Advertisement
If you have a new account but are having problems posting or verifying your account, please email us on hello@boards.ie for help. Thanks :)
Hello all! Please ensure that you are posting a new thread or question in the appropriate forum. The Feedback forum is overwhelmed with questions that are having to be moved elsewhere. If you need help to verify your account contact hello@boards.ie

chance of a lifetime "King's Ametyst"

Options
18911131421

Comments

  • Registered Users Posts: 20,039 ✭✭✭✭neris


  • Registered Users Posts: 680 ✭✭✭copper12


    Evening all
    Yep you guessed it I am still sanding
    I managed to salvage a lot of the original bronze screws
    I have already used them to reattach the laths in the stern cabin
    I see how far I get with rest in the forward section
    In order to clean the I put them all in a Coffey jar some of my special soap
    Basically glycerol that I have from when I used to make my own diesel
    Great stuff for really heavy cleaning oil’s grease, moss of the gutters.
    Anyway mix some sand in and give it a good shake several times over a day or two and they come out like new


  • Registered Users Posts: 680 ✭✭✭copper12


    Back again
    At last Damien arrived
    The lister petter LPWS4
    I will have to do a few small jobs to make her fit
    There’s enough spares’ to last a life, time hopefully I won’t need them
    There’s a long storey attached to this engine; hence the reason I call it Damien.
    So if she ever seems slow to start’ then Damien’s airs, will be ringing.
    I have never met a nicer and more honest man.:)


  • Moderators, Motoring & Transport Moderators, Sports Moderators Posts: 6,323 Mod ✭✭✭✭fergal.b


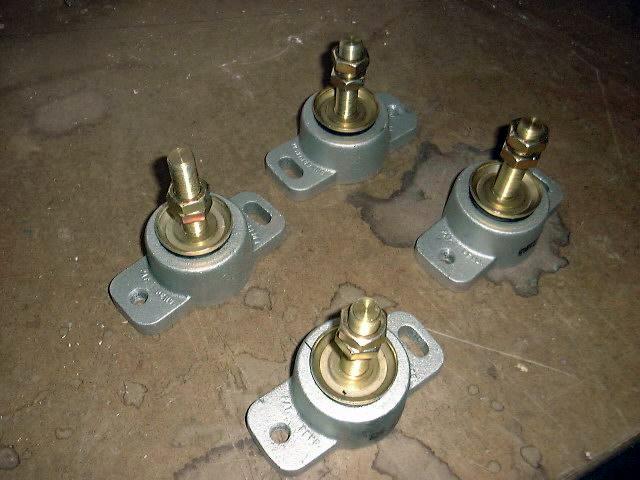
    If you have the room of adjustable engine mounts like these it will make the setup a lot easier. The engine looks great.

    mounts.jpg


  • Registered Users Posts: 680 ✭✭✭copper12


    Evening all
    I have been busy
    Just not a lot to show for it
    I have finally finished the sanding of the laths; all 65 of them.
    They have been sanded’ at least seven times’ and had four coats of varnish.
    The last couple of coats’ will be done once they are fitted.
    I have also been playing with Damien; I had to change two of the engine mountings.
    I used stronger 6mm galvanised angle iron’ stainless still bolts’ and locknuts.
    It took about ten drill bits four stainless cutting disk’s and lot’s of filing before I got it right.:mad:
    It’s a lot easier working with wood than steel.
    The engine mounts’ are fairly big’ they needed to be in order to align the prop shaft’ and allow the gearbox’ to clear one of the stringers.
    I made up a dummy engine bay’ in the garage, luckily’ I had the old oak engine mounts’ as a guide.
    Still it took a couple of days; to get it right’ there’s still a little adjustment needed to the front mounts. and it should be ok’ it should make installing, a lot easier’ when the time comes.


  • Advertisement
  • Registered Users Posts: 680 ✭✭✭copper12


    I just couldn’t resist it :P


  • Registered Users Posts: 680 ✭✭✭copper12


    Evening all
    It’s been too could the last couple of days to do anything on the e boat.
    I have been playing with Damien; it’s nearly ready to fit.
    I just have to run it a couple of times, and change the oil’ and water’ and filters,
    I also need to make an ignition panel so a visit to the car dismantlers is in order.
    I have finished the engine mounts’ bar the shouting
    And I have changed a few brackets’ for stronger ones and where there were pipes rubbing’ and touching’ things they shouldn’t have.
    You can see from the pictures
    The engine can be moved from left to right; on the stringers’ and backward and forwards’ on the oak mount’s to enable alignment, then the stainless brackets can be permanently fixed with coach screws.
    I will have to either make’ some brackets’ to tie the oak mounts to the stringers’ or maybe use joist hangers ?


  • Registered Users Posts: 680 ✭✭✭copper12


    Evening all
    I am still tipping away with Damien
    We had couple of warmish days’ so I tackled the forward section
    I have it finished’ bar the shouting, some electrical work, and another few coats of varnish .
    And another lick of paint.
    I had no luck with the scrap yards, for the engine control panel, so I will probably have to either make one, from new, or I might be lucky and find a second hand one on the net.
    If anyone known’s of one laying about give me a shout. :)


  • Registered Users Posts: 680 ✭✭✭copper12


    Evening all
    Me self and Damien are after having a falling out he wont start
    Before I loaded it into the van it started no problem
    I just thought it might be the warm air down south but no such luck
    I am now two days trying to sort him out
    I think I have it narrowed down to the fuel pumps there are four of them one for each injector
    I had to take nearly al of the parts that I had attached and some more in order to remove them
    I was advised to take the exhaust manifold off to enable easier access but jasus there had to be an easier way
    So rerouted the oil dipstick pipe and loosened the lines from the fuel filter and the return and this gave me enough leeway to get them out
    There’s a right knack in removing them and it’s even worse replacing them as you cannot remove them all together as it would shag up the timing
    I initially had fuel at no 2 and 3 so I removed 1 and 4 took them apart you can see from the photo they were supposed to have been serviced and cleaned me arse :mad:
    Although in fair ness to Damien he paid 180€ for this service
    But anyway what’s done is done
    Put them all back to together refitted them
    I had fuel at no 1 2 and 4 I tell ya it was doing me head in at this stage
    So I removed them for the tenth time and had a good look with a magnifying glass :eek:
    There are copper washers where the spring has to pass true this I was sure was the problem
    rant over:)
    As I was able to figure out how to test them with some wd40 I had back pressure but none true the top exit
    So I took one to an expert in bits I am awaiting the outcome he thinks the same copper washer should have been replaced first time I will let you know how I get on
    As soon as I get them back I will creep up on Damien and have them in before he knows what happening :)


  • Registered Users Posts: 680 ✭✭✭copper12


    Evening all
    Because of a ####### idiot who was paid 180€ from a man in his late sixties to service the pumps and who could be bothered to replace 4 copper washers that cost 2€ in total I had to do this.:mad::mad::mad::mad::mad:
    The only good that has come out of this is that I will know the engine back to front :rolleyes:


  • Advertisement
  • Registered Users Posts: 680 ✭✭✭copper12


    Evening all
    Well the saga goes on
    I’ve had the head on’’ and off 3 times now
    Every time it means stripping everything I had just put together.
    Inlet manifold.
    Engine manifold.
    Injectors’ and all associated pipe work.
    Pushrods.
    Rockers .
    Timing gear case cover.
    Drive pulley’ I had to make a tool to hold the fly wheel.
    Raw water heat exchanger.
    Both Water pumps.
    And about a couple hundred other bits and bobs.
    I’m getting good at striping an engine now. :p
    So today I striped everything down again.
    And this time’ went to town, on the block and the head.
    No4 cylinder seemed to be the problem, after ten minuets’ running there would be lots of white smoke.
    Which indicated to me that there was water entering the combustion chamber? It took me awhile to get to this conclusion.
    When I had taken the head off on the two previously occasions, I had noticed that the valve, and the piston head’ were spotless, I took no notice of this at the time, but now I realise that the water, entering the chamber, had cleaned these.
    Anyway, I cleaned the head, and the block, checked the head with a feeler gage, and a straight edge and everything seem ok, sanded it down with 600 grit sandpaper, and cleaned it with acetone cleaner, then inspected it with a magnify glass, I could not find anything wrong.
    So I checked the block, cleaned the block sanded it, and on inspection, found a tiny scratch mark,
    That led from one of the water passageways’ to the piston, this is the only thing I could find. :confused:
    This time, I put some Indian shellac, on the head, and the block, and put everything back together again.
    So tomorrow will tell a lot’ when I go to start Damien.
    On another note; every cloud has a silver lining, I have to change the two front engine mounts.
    At
    all the pulling and dragging, revelled a weakness’ the weight of the engine on the mount, that has the alternator attached, puts the alternator out of line, of the pulley’ so I will have to sort this out.
    On the other side the bracket is rubbing off the timing gear case, and would have worn a hole eventually.
    So I will have to sort this out as well.
    Better to do this in the garage than in the boat.
    Ah well god is good for tomorrow
    You have to be above ground to have these little troubles :p


  • Closed Accounts Posts: 5,108 ✭✭✭pedroeibar1


    That is some amount of work. As they say in your part of the world "Patience and persiverence will make a bishop of his riverence". If any water is getting in, the sump oil should have a grey-ish tinge. Hope it's cured.


  • Registered Users Posts: 680 ✭✭✭copper12


    Evening all
    I have been very busy the last week or so
    I have striped Damien again
    I had it checked out and the fitter maintained that the running problems was down to loss of compression
    So I started to remove the pistons only to find that on of the big end bearings had spun on the crankshaft
    So badly that it was beyond repair so I will have to fit a new one so Damien is sitting in the garage with nothing but paint left attached to the engine block
    I think I will paint it pink instead of the lister green :P
    So if some asks why the colour wont I have some story to tell ;)


  • Moderators, Motoring & Transport Moderators, Sports Moderators Posts: 6,323 Mod ✭✭✭✭fergal.b


    Ouch :( I wont click like on that one, Yep make the boy wear a pink dress :)


    .


  • Registered Users Posts: 3,963 ✭✭✭spaceHopper


    You must be sickened, any comeback on where you bought it or who serviced it. How many hours has it?


  • Registered Users Posts: 680 ✭✭✭copper12


    Evening all
    I don’t think there’s anymore I can take off damien
    I got the crankshaft out but had to make a few cuts in the crankshaft pinion
    I serviced the hydraulic pistons for the pushrods
    7 went well then the last the spring went flying so spent a couple of hours trying to find it :eek:
    Next thing is a power wash and a lick of pink paint:rolleyes:
    Fly wheel
    Crankshaft
    Striped


  • Registered Users Posts: 680 ✭✭✭copper12


    Evening all
    In between working on demean; I managed to get some paint on the hull.
    I was hoping to varnish above the water line, but alas it’s not to be.
    Although the finish to the planks I repaired, and replaced, didn’t look to bad.
    Some of the gaps were just too big’ and I would have ended up with a very uneven surface.
    So I have been given the hull a number of coats of aluminium primer’ sanding’ and fairing’ in between.
    It’s coming along and should look respectable when I have finished.


  • Closed Accounts Posts: 5,108 ✭✭✭pedroeibar1


    She’s looking great Copper, it’s a bit like watching one of the crew pregnant and progressing towards the big day. Nearly there!

    One word about Damien and what you wrote earlier; call me superstitious if you like but it’s best not to upset engines too much. They are strange temperamental creatures, oily, smelly and greasy, god help them, no notion at all of the beauty of the slight hum of the wind in the rigging and the lap of a ripple from the bow wave, but they do come in useful at times and it is best not to give them an excuse to misbehave. So have a strict word with him. Paint his rocker cover pink, place it alongside him in the bed (engine) and tell him that the rest of him will be painted the same way if he does not behave and learn his lesson. That should sort him out!:)


  • Registered Users Posts: 680 ✭✭✭copper12


    Morning all
    I gave damien; or dementia, as he is know known’ a lick of paint
    Depending on how he behaves during the rebuild will determine his final coiler


  • Registered Users Posts: 3,963 ✭✭✭spaceHopper


    copper12 wrote: »
    Morning all
    I gave damien; or dementia, as he is know known’ a lick of paint
    Depending on how he behaves during the rebuild will determine his final coiler

    Feeling better?


  • Advertisement
  • Registered Users Posts: 20,039 ✭✭✭✭neris


    copper12 wrote: »
    Morning all
    I gave damien; or dementia, as he is know known’ a lick of paint
    Depending on how he behaves during the rebuild will determine his final coiler

    I think its a Kick he needs not a lick of paint


  • Registered Users Posts: 680 ✭✭✭copper12


    Morning all
    I have managed to give Ceo Na Marra a couple of coats of paint
    I had two gallons of aluminium primer, so gave her about seven coats of this.
    And some rust inhibiting paint four or five coats of that.
    I will give her a couple of coats of jotum undercoat as well; and leave the antifouling alone until she is ready for the water.
    The reason I painted her now and not later?
    I am hoping that she will not dry out to much during the summer .
    I managed to router out the grove, just below the toerail and got it to match the original, well almost.
    Damien is still in the garage; awaiting parts from lister’ in England as soon as I get them’ I will put his cloths back on.
    Although I have the workshop manual’ and the master parts list’ the information from lister; leaves a lot to be desired.
    Having worked from other workshop manuals’ there’s has to be the worst ever:confused:


  • Registered Users Posts: 680 ✭✭✭copper12


    Making use of the fine weather


  • Registered Users Posts: 1,373 ✭✭✭ezra_


    Looking fantastic! When do you think she will be ready?

    Interesting D rings in the bow. I've never seen that before (but I don't know wooden boats!)


  • Registered Users Posts: 680 ✭✭✭copper12


    Morning all
    Not a lot to say really
    Just tipping away’ I have the cabin and the toe rail, a couple of coats of varnish.
    And the bilges the same, while I await a Crankshaft’ piston rings’ cylinder head bolts’ gaskets’ injector pump shims’ for dementia.
    Total cost €870 :mad:
    At least this time when it’s rebuilt’ I will know that it is done properly, and should see me true, thick and thin.
    I have to drill’ or enlarge’ the bolts holes’ in the fly wheel’ as the new crankshaft bolt holes are 12mm the older one was 10mm. that’s not going to be easy :o


  • Registered Users Posts: 680 ✭✭✭copper12


    Evening all
    While I am waiting on parts for dementia’ I said I would make a start on the mast.
    So I removed the mast head’ and cleaned the sheaves’ and greased them’ they look ok
    I replaced one of the spreaders aluminium bar’ that had broken’ I will have to cut to size later
    After I have riveted them. And tightened the bolts, they are lose for now’ until I fill the gap, with liquid metal.
    I also got a rope’ pulled from the mast head’ to the mast foot ‘so I will have to try and come across some builders twine’ and pull a few lines true.
    I just have to figure out how many wires I need for the electrics
    I could not remove the mast foot the stainless screw bolts are to tight and rather than drill them out I will leave well alone I can manage to do what it necessary with it attached
    There are four internal sheaves, the two forward, I will most likely use for the two forward sails, the rear two, the mainsail, and the topping lift.
    I will have to fit something for the inner forestay.


  • Closed Accounts Posts: 5,108 ✭✭✭pedroeibar1


    copper12 wrote: »
    ........
    I replaced one of the spreaders aluminium bar’ that had broken’ I will have to cut to size later
    After I have riveted them. And tightened the bolts, they are lose for now’ until I fill the gap, with liquid metal.
    ..........
    I just have to figure out how many wires I need for the electrics

    Hi Copper,
    I'm wondering about the spreaders .... as the mast is not original to the boat and you will be using the same chain plates, I wonder if it would be better to use spreaders that can move laterally?

    Wiring - make sure you use marine grade wire, ordinary stuff will not last.
    Rs
    P


  • Registered Users Posts: 4 Ametyst sailor


    Hi Copper.
    Magnificent work on the boat, that decking and coach roof look superb.

    Keep tipping away!

    A.S.


  • Registered Users Posts: 680 ✭✭✭copper12


    Evening all
    The parts for dementia finally arrived yesterday, so I made a start.
    Fitted the new crankshaft’ with new centre bearings’ conrod bearings’ trust washers’ oil seal’
    Shims’ and crankshaft pinion’ flywheel, piston rings’ injector pump shims’ fuel pump rack’ governor’ oil pump’ crankcase oil filter’ bypass valve’ refitted the head again; new gasket’ new head bolts’ rocker arms’ pushrods’ and a couple of other things I just cant think of now.
    No real problems, just had to redo a few things’ you know your self, you’d have a nut’ or a washer’ left over ,and you would have to take it apart again, I thought I would have a bit of trouble fitting the crankshaft pinion .
    I heated it on the hob, for half an hour, gas mark 8 :D and then with a blowtorch for ten minuets, it went on with just a little tap. :cool:


  • Advertisement
  • Registered Users Posts: 680 ✭✭✭copper12


    Evening all
    Well I and Damien are back on reasonable good terms

    Before I started reassembling the engine’ I gave it a lick of bottle green paint’ just to let him know I meant business.
    Jasus where do I start
    Two of the centre bearings housing assembly’s had been put on the wrong way round, also two of the connecting rods been put on facing the wrong way’ this I found out when reassembling the crankshaft.
    I was careful to take everything apart’ and place it in such a way’ that it would go back the same way’ while double checking the details with the manual
    The governor had shims placed in the wrong place
    Anyway to make a long story even longer
    I put everything back together, started it up, and promptly burned out the alternator.
    I was so concentrated looking for leaks’ water and oil; and making sure had oil pressure’ that I never spotted the smoke from the alternator.
    I am not too worried about this’ I will come across a second hand one easily enough.
    It started easily enough’ there were a few leaks, here and there; sorted them out
    He is only firing on three cylinders. So racked my brain’ to determine why this could be the case;
    Was it’ that I fitted the pistons rings wrong’ or the fuel injector’ fuel pump’ or maybe the valves’ or the head gasket’ after playing around with it for a day or two’ I decided to strip an old injector’ as make up a jig’ to do a blow down test’ while doing this’ I decided to do the easiest thing first’ before I started striping Damien down again; so I replaced the injector’ it made no difference’ so switched two of the fuel pumps’ and the this I feel may be the problem’ as the cylinder’ that was not firing now fires’ an the other one dose not’ so I will either replace or get the fuel pump serviced .
    Even though he’s only firing on three cylinders he starts from cold after only two or tree turns so there hope yet
    Photo1110.jpg

    Photo1117.jpg

    Photo1118.jpg

    Photo1119.jpg

    Photo1120.jpg


Advertisement