Advertisement
If you have a new account but are having problems posting or verifying your account, please email us on hello@boards.ie for help. Thanks :)
Hello all! Please ensure that you are posting a new thread or question in the appropriate forum. The Feedback forum is overwhelmed with questions that are having to be moved elsewhere. If you need help to verify your account contact hello@boards.ie
Hi all,
Vanilla are planning an update to the site on April 24th (next Wednesday). It is a major PHP8 update which is expected to boost performance across the site. The site will be down from 7pm and it is expected to take about an hour to complete. We appreciate your patience during the update.
Thanks all.

Project bike

Options
245678

Comments

  • Registered Users Posts: 975 ✭✭✭8valve


    Great to see more and more people getting into the restoration of these fine machines!

    Chapeau!


  • Moderators, Category Moderators, Arts Moderators, Sports Moderators Posts: 48,321 CMod ✭✭✭✭magicbastarder


    i still have two here for you, 8valve!

    i forgot to check that the stem wasn't seized in the one i bought yesterday, have to go out and check that soon.


  • Registered Users Posts: 975 ✭✭✭8valve


    i still have two here for you, 8valve!

    i forgot to check that the stem wasn't seized in the one i bought yesterday, have to go out and check that soon.


    Thanks a million!


    Hoping to get up soon.


  • Registered Users Posts: 2,730 ✭✭✭Type 17


    Peter T wrote: »
    ... think its a superb from the 50's or 60's...

    Look on the shell of the Sturmey-Archer gear hub and/or the Dynohub on the front - the month/year of manufacture (eg: "12 60" for December 1960) are stamped into them. The bike would have been assembled/sold usually sometime in the year afterwards.


  • Moderators, Category Moderators, Arts Moderators, Sports Moderators Posts: 48,321 CMod ✭✭✭✭magicbastarder


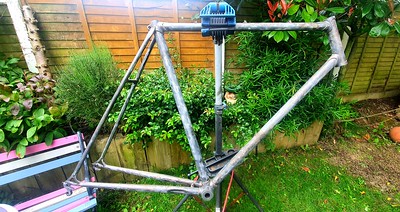
    dismantling the falcon has been easier than i expected; it seems it's lasted because someone was doing some general ongoing low level maintenance. despite the copiously rusty chainstays.
    i took a powerhose to it tonight, and the crud was so thick on the rear axle the powerhose was havng trouble shifting it. i was picking it off the jockey wheels with a wooden meat skewer, which revealed why the drivetrain was so stiff - there was literally a ring 4 or 5mm thick of crud either side of each jockey wheel.
    but the pedals came off without too much of a fight, which surprised me; the stem wasn't seized, the seatpost is stubborn but not seized.

    just need to work the seatpost out fully now and remove the chainwheel (my socket set only goes up to 13mm and i suspect the recessed nuts are 15mm) and the frame will be free for sanding/stripping, whatever approach i decide to take.


  • Advertisement
  • Registered Users Posts: 7,867 ✭✭✭cletus


    dismantling the falcon has been easier than i expected; it seems it's lasted because someone was doing some general ongoing low level maintenance. despite the copiously rusty chainstays.
    i took a powerhose to it tonight, and the crud was so thick on the rear axle the powerhose was havng trouble shifting it. i was picking it off the jockey wheels with a wooden meat skewer, which revealed why the drivetrain was so stiff - there was literally a ring 4 or 5mm thick of crud either side of each jockey wheel.
    but the pedals came off without too much of a fight, which surprised me; the stem wasn't seized, the seatpost is stubborn but not seized.

    just need to work the seatpost out fully now and remove the chainwheel (my socket set only goes up to 13mm and i suspect the recessed nuts are 15mm) and the frame will be free for sanding/stripping, whatever approach i decide to take.

    Let me know if your stuck for sockets etc


  • Moderators, Category Moderators, Arts Moderators, Sports Moderators Posts: 48,321 CMod ✭✭✭✭magicbastarder


    cletus wrote: »
    If you can't get it sandblasted (by far the easiest option), then start with 60/80 grit, up to 220 grit, and depending on the finish you want and the condition of the frame, you could go as far as 320

    Paint stripper for the small detail areas
    i found a wire brush attachment head i've tried with my battery drill, seems to do a fine job.

    there's pitting in the steel around the chainstays, but they certainly seem solid enough.


  • Registered Users Posts: 975 ✭✭✭8valve


    dismantling the falcon has been easier than i expected; it seems it's lasted because someone was doing some general ongoing low level maintenance. despite the copiously rusty chainstays.
    i took a powerhose to it tonight, and the crud was so thick on the rear axle the powerhose was havng trouble shifting it. i was picking it off the jockey wheels with a wooden meat skewer, which revealed why the drivetrain was so stiff - there was literally a ring 4 or 5mm thick of crud either side of each jockey wheel.
    but the pedals came off without too much of a fight, which surprised me; the stem wasn't seized, the seatpost is stubborn but not seized.

    just need to work the seatpost out fully now and remove the chainwheel (my socket set only goes up to 13mm and i suspect the recessed nuts are 15mm) and the frame will be free for sanding/stripping, whatever approach i decide to take.


    From memory, most crank nuts/bolts are 14mm.


    Finding that the pedals, seatpost and stem are not seized can be joyous.


    We need progress pics!


  • Moderators, Category Moderators, Arts Moderators, Sports Moderators Posts: 48,321 CMod ✭✭✭✭magicbastarder


    yep, confirmed this evening that they're 14mm. still no good to me though, and my neighbour with the endless bag of tools is in wexford for the weekend.
    one thing i noticed this evening is that the centreline of the fork (down through the steerer tube) does not match the centreline of the tines, i suspect the middle point is 5mm or more to the side. no sign of any crash damage or bending, i suspect it was that whoever made them was not paying attention.
    also, the dropouts on the fork are marked tange, but the frame is 531. might that mean the fork itself is tange, or possibly just the dropouts?


  • Registered Users Posts: 7,867 ✭✭✭cletus


    I second the progress pics suggestion. (I would, though)


  • Advertisement
  • Moderators, Category Moderators, Arts Moderators, Sports Moderators Posts: 48,321 CMod ✭✭✭✭magicbastarder


    will do tomorrow. also learned this evening - which i'd pretty much already known. modern paint stripper is bleeding useless. gimme the good stuff you could get 20 years ago where the smell would hurt your nose.


  • Registered Users Posts: 6,367 ✭✭✭iwillhtfu


    i found a wire brush attachment head i've tried with my battery drill, seems to do a fine job.

    there's pitting in the steel around the chainstays, but they certainly seem solid enough.

    Get yourself a 4" angle grinder and a knotted steel attachment it'll make short work of stripping the frame. Stripping with sand paper would be a winter project in itself. :D

    The drill attachments are handy for getting into the small areas.


  • Registered Users Posts: 975 ✭✭✭8valve


    yep, confirmed this evening that they're 14mm. still no good to me though, and my neighbour with the endless bag of tools is in wexford for the weekend.
    one thing i noticed this evening is that the centreline of the fork (down through the steerer tube) does not match the centreline of the tines, i suspect the middle point is 5mm or more to the side. no sign of any crash damage or bending, i suspect it was that whoever made them was not paying attention.
    also, the dropouts on the fork are marked tange, but the frame is 531. might that mean the fork itself is tange, or possibly just the dropouts?


    Tange indeed made dropouts for framebuilders; not sure if British framebuilders used them? Was the frame made in Taiwan/China under license, as many were (mostly by US manufacturers)?


    Lots of bike shops back in the day stocked replacement forks made by Tange, the majority of which were chromed. Still a few knocking around...I put a set on a Bianchi for a guy during the week who was carrying a child on the crossbar and the child's foot got caught in the front spokes! No one injured but forks ended up getting bent backwards when they both fell off!


    Might forks have been replaced at some point?


  • Moderators, Category Moderators, Arts Moderators, Sports Moderators Posts: 48,321 CMod ✭✭✭✭magicbastarder


    the fork seems to be original, the colour is the same as the frame, but the bottom half of the tines are chrome.


  • Registered Users Posts: 975 ✭✭✭8valve


    the fork seems to be original, the colour is the same as the frame, but the bottom half of the tines are chrome.


    If, at any point, you're dropping the forks out of the frame (e.g. to service headset bearings), check if the steerer tube on the fork has been stamped with the same serial number as the frame itself).


    This was common practice with steel framebuilders and will 100% confirm that the forks are original from the factory/workshop where the frame was built.


    Doing this helped me date a June 1956 Claud Butler that a friend pulled out of a shed, as some of his frame serial number stamping was damaged. It also confirmed both frame & forks were original as they had left the framebuilders workshop...a handy bonus was the steerer tube still had the original build paint colour...he wants it back to fully original.


  • Moderators, Category Moderators, Arts Moderators, Sports Moderators Posts: 48,321 CMod ✭✭✭✭magicbastarder


    yep, i took them out to assist with stripping, will check later.
    there's a nut welded to the fork seemingly to provide a mount point for a light, not something i've seen too often before.


  • Registered Users Posts: 1,490 ✭✭✭hesker


    531 decal with the number in a straight line indicate main tubes only are 531, ie the main triangle. Diagonal 531 means tubes, forks and stays


  • Moderators, Category Moderators, Arts Moderators, Sports Moderators Posts: 48,321 CMod ✭✭✭✭magicbastarder


    ah, i did not know this. i had assumed the stays *weren't* 531. no stickers on the fork either, so had assumed the same for that.


  • Registered Users Posts: 6,367 ✭✭✭iwillhtfu


    iwillhtfu wrote: »
    Get yourself a 4" angle grinder and a knotted steel attachment it'll make short work of stripping the frame. Stripping with sand paper would be a winter project in itself. :D

    The drill attachments are handy for getting into the small areas.

    Decided to spend an hour out of curiosity as I never really pay attention to the time when working on bikes but the frame is stripped for the most part, the small areas are usually what take the longest and are most tedious. A soft sanding pad now will remove the panzer look and make the finish a bit smoother for paint. If you've the spare cash I'd have someone media blast it though it's much handier.

    50311582838_1b9d86a8b1_w.jpg50312426677_32533dd7d7_w.jpg


  • Moderators, Category Moderators, Arts Moderators, Sports Moderators Posts: 48,321 CMod ✭✭✭✭magicbastarder


    where i am currently with mine; was around the folks, got sorted for the socket wrench there and now need a crank puller.
    may bring it around to the LBS; i want to pull the cranks, take out the BB and knock out the headset cups. they'd be able to do all that in five minutes where i'd be trying to bodge something together for a couple of hours.

    525497.jpg

    the worst the rust had been here:

    525498.jpg

    note the nut welded to the right tine. also i've not thought fasr enough ahead about what's involved with removing the chrome (or if it's necessary).

    525499.jpg


  • Advertisement
  • Moderators, Category Moderators, Arts Moderators, Sports Moderators Posts: 48,321 CMod ✭✭✭✭magicbastarder


    also, lest anyone is in aldi, this is €2.90 a bottle. bought it to soak some of the components (they're too grubby to assess as it is), don't know yet if it's any cop:

    525500.jpg


  • Registered Users Posts: 849 ✭✭✭Blanchy90


    Great to see more people restoring old bikes :D

    Here's a pic of the crack under the bottom bracket, do you think it would be ok to just leave it?

    I still haven't started back working on the bike but I've been out for a good few spins on my new Kelly's road bike and I'm loving it


  • Registered Users Posts: 1,490 ✭✭✭hesker


    Drill a hole where it ends near the middle of the bb. That will stop it moving further. I wouldn’t bother plugging the hole. Let it act as a drain point

    But it might be worth getting a frame builders opinion. Every time you stand on the crank you will be stressing that crack as it’s gone out to the edge.


  • Registered Users Posts: 7,867 ✭✭✭cletus


    @blanchy: the biggest problem you have with repairing that crack is the location. Even a good Tig welder will have difficulty not warping the BB sue to heat, so you could be looking at redrilling, facing and retapping. As it's a steel frame, perhaps a medium term solution would be to drill the hole as hesjer has suggested, and then use some steel putty or similar to fill the crack

    @magicbastarder: dunno where your based, but I'm working in Naas, so if you're anywhere near, I have any of the tools you need for pulling those cranks


  • Moderators, Category Moderators, Arts Moderators, Sports Moderators Posts: 48,321 CMod ✭✭✭✭magicbastarder


    cheers, i'm in dublin so might be a bit of a trek. there's at least one other boardsie near me who *might* have tools.

    that aldi degreaser did an absolutely fine job, btw.
    brakes look well serviceable too:

    525519.jpg


  • Registered Users Posts: 8,748 ✭✭✭CoBo55


    where i am currently with mine; was around the folks, got sorted for the socket wrench there and now need a crank puller.
    may bring it around to the LBS; i want to pull the cranks, take out the BB and knock out the headset cups. they'd be able to do all that in five minutes where i'd be trying to bodge something together for a couple of hours.

    525497.jpg

    the worst the rust had been here:

    525498.jpg

    note the nut welded to the right tine. also i've not thought fasr enough ahead about what's involved with removing the chrome (or if it's necessary).

    525499.jpg

    A long screwdriver should be able to tap out the headstock bearing cups. Don't touch the cranks without the proper extractor or it'll end in tears.


  • Moderators, Category Moderators, Arts Moderators, Sports Moderators Posts: 48,321 CMod ✭✭✭✭magicbastarder


    That crankset is shagged anyway. There's damage to two teeth on the middle chainring, looks like a chap stamped steel type. I can't imagine I'll be keeping it, it's definitely not original to the bike.


  • Registered Users Posts: 849 ✭✭✭Blanchy90


    Thanks I'll drill a small hole at the end of the crack to stop it going any further


  • Moderators, Category Moderators, Arts Moderators, Sports Moderators Posts: 48,321 CMod ✭✭✭✭magicbastarder


    i'd been hoping to keep the rear wheel intact - a weinmann rim on a pelissier (never heard of them) hub, but:

    525708.jpg

    i don't think drilling a hole at the end of the crack is the tactic that will work here.
    the front wheel is an unbranded (though i haven't taken off the tyre yet) rim with too much wear on the braking surface, on a maillard hub.

    and i borrowed a crank puller (thanks Weepsie!) and promptly stripped the threads on the drive side.


  • Advertisement
  • Registered Users Posts: 7,867 ✭✭✭cletus


    i'd been hoping to keep the rear wheel intact - a weinmann rim on a pelissier (never heard of them) hub, but:

    525708.jpg

    i don't think drilling a hole at the end of the crack is the tactic that will work here.
    the front wheel is an unbranded (though i haven't taken off the tyre yet) rim with too much wear on the braking surface, on a maillard hub.

    and i borrowed a crank puller (thanks Weepsie!) and promptly stripped the threads on the drive side.

    That rim looks fubar.

    Re pulling the crank, with the threads stripped, your best bet is heat and a bearing puller


Advertisement