Advertisement
If you have a new account but are having problems posting or verifying your account, please email us on hello@boards.ie for help. Thanks :)
Hello all! Please ensure that you are posting a new thread or question in the appropriate forum. The Feedback forum is overwhelmed with questions that are having to be moved elsewhere. If you need help to verify your account contact hello@boards.ie
Hi all! We have been experiencing an issue on site where threads have been missing the latest postings. The platform host Vanilla are working on this issue. A workaround that has been used by some is to navigate back from 1 to 10+ pages to re-sync the thread and this will then show the latest posts. Thanks, Mike.
Hi there,
There is an issue with role permissions that is being worked on at the moment.
If you are having trouble with access or permissions on regional forums please post here to get access: https://www.boards.ie/discussion/2058365403/you-do-not-have-permission-for-that#latest

My garden Room Build

1356789

Comments

  • Registered Users Posts: 45 naraicjul


    Just like to applaud the OP on the excellent work and commentary.

    Do you plan a publishing a breakdown of the costs - I'd imagine that quite a lot of people would like to attempt to emulate your great work?


  • Registered Users, Registered Users 2 Posts: 5,863 ✭✭✭RobAMerc


    yes - I think I have accounted for every screw, stone and stick gone into it so far, but I wont do anything till I have it complete as I dont want to have to re-edit it all the time.


  • Registered Users, Registered Users 2 Posts: 1,136 ✭✭✭maxamillius


    Ballpark what do you think it’ll end up costing?


  • Registered Users, Registered Users 2 Posts: 31,138 ✭✭✭✭Lumen


    Ballpark what do you think it’ll end up costing?
    My guess would be "more". :pac:


  • Registered Users, Registered Users 2 Posts: 5,863 ✭✭✭RobAMerc


    Ballpark what do you think it’ll end up costing?

    I'm at 4.8k now - I still need 1 or 2 electrical bits and pay sparky - c250

    plasterboard and jointing - 150

    skirting board - 100

    laminate flooring - 160

    So a ballpark would be 5.5k


  • Registered Users, Registered Users 2 Posts: 1,136 ✭✭✭maxamillius


    RobAMerc wrote: »
    I'm at 4.8k now - I still need 1 or 2 electrical bits and pay sparky - c250

    plasterboard and jointing - 150

    skirting board - 100

    laminate flooring - 160

    So a ballpark would be 5.5k

    Good work, looking forward to seeing the finished product


  • Registered Users, Registered Users 2 Posts: 2,645 ✭✭✭krissovo


    Good work, looking forward to seeing the finished product

    +1 You got me thinking I could build my own:D


  • Closed Accounts Posts: 395 ✭✭Class MayDresser


    RobAMerc wrote: »
    I'm at 4.8k now - I still need 1 or 2 electrical bits and pay sparky - c250

    plasterboard and jointing - 150

    skirting board - 100

    laminate flooring - 160

    So a ballpark would be 5.5k

    Look what you've got, and you did it yourself!


  • Registered Users, Registered Users 2 Posts: 27,253 ✭✭✭✭GreeBo


    RobAMerc wrote: »
    I'm at 4.8k now - I still need 1 or 2 electrical bits and pay sparky - c250

    plasterboard and jointing - 150

    skirting board - 100

    laminate flooring - 160

    So a ballpark would be 5.5k


    Would be interested to see a breakdown when you are done.


  • Registered Users, Registered Users 2 Posts: 3,088 ✭✭✭Static M.e.


    Just found this great post. Keep the pictures coming please! :)


  • Advertisement
  • Registered Users, Registered Users 2 Posts: 2,530 ✭✭✭Car99


    RobAMerc wrote: »
    I'm at 4.8k now - I still need 1 or 2 electrical bits and pay sparky - c250

    plasterboard and jointing - 150

    skirting board - 100

    laminate flooring - 160

    So a ballpark would be 5.5k

    Does 5.5K include tools you had to buy for the project?


  • Registered Users, Registered Users 2 Posts: 1,577 ✭✭✭Bonzo Delaney


    If you put up roughfully how many hours you spent on it also.
    It be great as you'd be amazed at how many would think a trades man would knock up something similar for a couple grand all in "sure it's only a few lengths of 4x2 and some plywood" is what I generally hear.

    Good work by the way looks like your enjoying it.


  • Registered Users Posts: 4,994 ✭✭✭c.p.w.g.w


    Really interested to see how much all the timber cost


  • Registered Users, Registered Users 2 Posts: 5,863 ✭✭✭RobAMerc


    Car99 wrote: »
    Does 5.5K include tools you had to buy for the project?

    No, I had everything myself already bar a Lidl battery circular saw ( thats caused me more issues than fixed ) - I consider those costs as irrelevant however as they will be used on other projects


  • Registered Users Posts: 185 ✭✭Highcontrast1


    are you doing epdm? where did you get the rubber from locally? i'm attempting a flat roof on a shed but can't decide between rubber for roofs and firestone. hoping to get something locally though.


  • Registered Users, Registered Users 2 Posts: 5,863 ✭✭✭RobAMerc


    are you doing epdm? where did you get the rubber from locally? i'm attempting a flat roof on a shed but can't decide between rubber for roofs and firestone. hoping to get something locally though.

    See here : https://www.boards.ie/vbulletin/showthread.php?p=113322076


  • Registered Users, Registered Users 2 Posts: 5,863 ✭✭✭RobAMerc


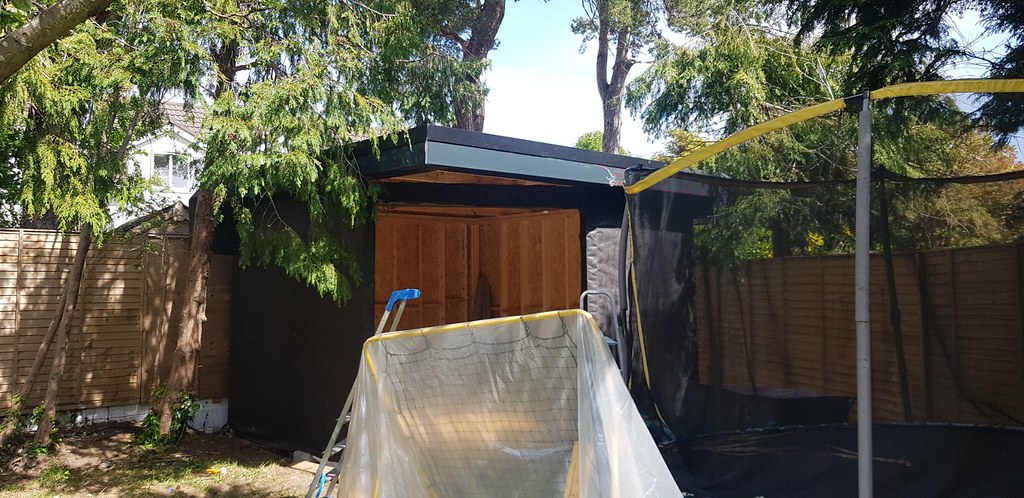
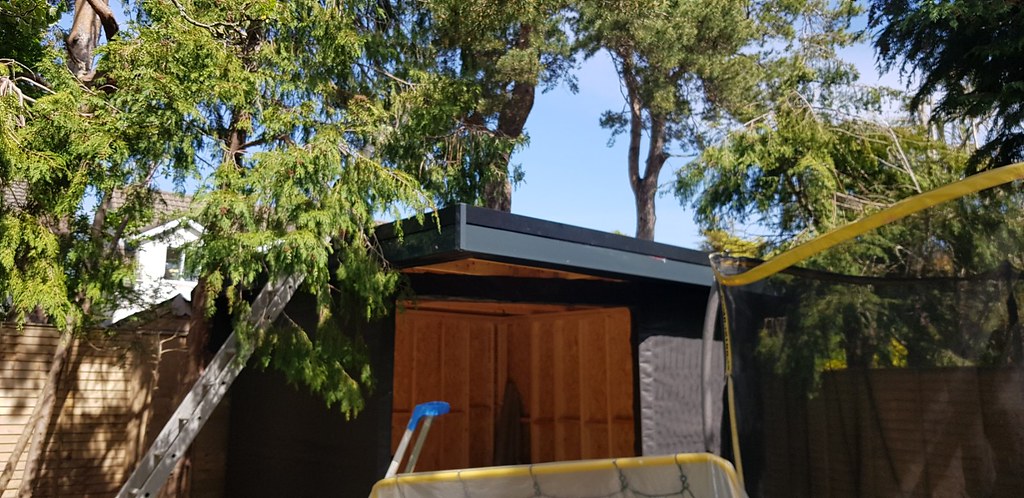
    So, I spent a good bit of Sunday and a couple of hours each day this week finishing off the roof.

    Some things to note : Yes EPDM is simple to install but weights a freakin ton - I had to pay a man a pint to help me lift it onto the roof.

    No the metal trims supplied by the company in Baldoyle are not nice not easy to install, and they dont look great imo either. I think they make the decision to use grey fascia ( a fair bit more expensive ) a poor one as the contrast alot.

    I think the answer might be to buy the rubber here and have the "kit" shipped from the UK - they trims can be got the right colour etc.

    The freefoam fascia and soffit are easy enough to install and fit, but a word of warning : the plastic capped nails are a fooking pig as the hammer seems to slip off the head when the nail is about 75% home, and getting them out is painful as there is nothing to use the claw against without damaging the fascia itself as they are soft.

    Anyway - I think we are watertight - and here is the result.
    I have not yet finished the back/gutter end.

    Apologies : I keep meaning to take more photos but I forget !

    49942887641_13ae9ebcf5_b.jpg
    49943178132_7a2997e638_b.jpg


  • Registered Users, Registered Users 2 Posts: 15,483 ✭✭✭✭Supercell


    Looking fantastic, I think the grey fascia looks pretty good to be honest.
    With the black roof and timber construction this looks like it could get very warm during the summer, have you plans for ventilation?

    Have a weather station?, why not join the Ireland Weather Network - http://irelandweather.eu/


  • Registered Users, Registered Users 2 Posts: 34,105 ✭✭✭✭listermint


    Heavier hammer or firmer hand on the pins for the fasica .


    Looks well. The black will fade away your just noticing it now cos it's new.


  • Advertisement
  • Registered Users, Registered Users 2 Posts: 5,863 ✭✭✭RobAMerc


    Supercell wrote: »
    Looking fantastic, I think the grey fascia looks pretty good to be honest.
    With the black roof and timber construction this looks like it could get very warm during the summer, have you plans for ventilation?

    I had not thought of it to be honest - I may wait to see how air tight I get it first, there may be lots of natural ventilation !

    Its fairly hot out there today and it seems nice and cool though - but there isnt a big door on it yet ! :)


  • Registered Users, Registered Users 2 Posts: 5,863 ✭✭✭RobAMerc


    listermint wrote: »
    Heavier hammer or firmer hand on the pins for the fasica .

    Yea, but they seem to bend when in too far for my fat fingers to be holding it any longer !


  • Registered Users, Registered Users 2 Posts: 5,863 ✭✭✭RobAMerc


    So, I got up at 6 am this morning and got cracking for a few hrs before I started work. I started to pull the cables awating the arrival of the sparky ( more I got done the cheaper he'd be right ? ) well, no.
    Turns out I read a UK website where they use ring circuits for the sockets - we dont in Ireland

    first image is my work..

    49950106192_1ca72e835b_b.jpg

    So, after he had fixed it it looked like this ......

    49950105927_7301921683_b.jpg

    I have no idea how I did this but I managed to hit a roof joist on 3 out of 4 of the holes cut in the soffit - despit me drilling a pilot hole each time. Anyway - the downlights I got ( screwfix ) are compact enough I could make them fit with a little bit cut out of the joist.

    49949311188_05862b5ee7_b.jpg

    tomorrow - finish the roof ( back edge ) and start insulation and maybe plaster board -


  • Registered Users, Registered Users 2 Posts: 6,373 ✭✭✭iwillhtfu


    We do use ring circuits here although it wouldn't be necessary in your case and easily fixed if you wired it already you're only removing a leg in the middle or end.

    Are those lights wired in 2.5sqmm?

    3 cables at a socket is pretty poor in a small installation like that.

    As for the joists measure 20 times cut once :D

    Wire a cat 6 to your tv area also nice to pull in a long HDMI cable so you can wire dvd/playstation etc away from the tv giving a clean look.


  • Registered Users, Registered Users 2 Posts: 5,863 ✭✭✭RobAMerc


    I drilled about 5 pilot holes in the 2nd an 3rd ones and couldnt believe I hit a joist

    Where are you seeing 3 cables at a socket ?


  • Registered Users, Registered Users 2 Posts: 6,373 ✭✭✭iwillhtfu


    RobAMerc wrote: »
    Where are you seeing 3 cables at a socket ?

    Perhaps it's a light/switch? left of pic


  • Advertisement
  • Registered Users, Registered Users 2 Posts: 5,863 ✭✭✭RobAMerc


    iwillhtfu wrote: »
    Perhaps it's a light/switch? left of pic

    yup, left is lights ( internal and external ) right is wiring into the consumer board.


  • Registered Users, Registered Users 2 Posts: 208 ✭✭keithdub


    Before you slab the inside push the out side light wires back in and drill out the hole make sure to go deeper than you need


  • Registered Users, Registered Users 2 Posts: 5,863 ✭✭✭RobAMerc


    keithdub wrote: »
    Before you slab the inside push the out side light wires back in and drill out the hole make sure to go deeper than you need

    Thanks for the help, but I am not sure I understand why I need to do this ?


  • Registered Users, Registered Users 2 Posts: 5,863 ✭✭✭RobAMerc


    I haven't been posting coz I have been forgetting to take photos, not because there hasnt been progress.

    once the sparky finished first fix I took to installing the insulation -
    I went with Earthwool as I bought a crap ton for this and the house and it was cheap.

    I installed it and then put in the vapour barrier - Tips here, start at the top well onto the ceiling so that you can get a good sealed barrier - also, make sure you get it tight into the corner or it will hamper the putting up of plasterboard.


    49997167123_eb02176740_b.jpg

    49997167258_703575dcf9_b.jpg

    I took to plasterboarding before we finished the electrics -

    Some tips 1: I would suggest you do the ceiling first - which leads me to tip 2
    When planning you roof joists, make sure to leave a joist or something along the walls to attach your ceiling boards to. Possibly a few extra noggins might do it, but I found at the wall side of boards with the end running parrallel to the joists I had nothing to attach them to.
    I ended up more or less resting the boards onto the top of the wall plasterboard : NOT IDEAL
    The boards wont fall down or anything, they just do not have the support across the full width I would have liked at one end. ( I hope this makes sense )

    I didnt get a lot of photos at this stage - suffice to say I made a truely awful mess of some of the joints etc and was hoping the plasterer would sort it out ( thats me by the way )

    49997940852_cd1a98e6b6_b.jpg


    Next tape and jointing : I used pro-form jointing compound which is nice and easy enough to use. Be prepared to apply many many coats !

    49997168433_3c30c0f447_b.jpg

    So here I started to pay the penalty for my poor workmanship putting up the plasterboard. I think I did an OK job, however I admittedly am hoping the paint will make good a lot of the rough bits. : those of you who read my comment earlier will see how poor workmanship tends to compound itself.

    I am now hoping the painter will fix stuff ( its me )

    49997168823_110bf1e8f5_b.jpg

    Big day yesterday - the door arrived !

    I had it delivered without the glazing installed - as I was worried it wouldnt fit through the garage exit, but it did.

    Fitting it made me realize I should have trusted myself on the size a bit better, the 12mm all round was a bit much I think and means lots of spray foam.

    49997690841_4fe6fe7660_b.jpg

    In order to spray foam it, I blocked the gap all round the outside and foamed from the inside. This hopefully means I wont have to cut foam off both sides and will end up with a nice smooth finish on the outside ( although cladding will hide it )

    And this is how it looked last night !

    49997942317_b7715b6e71_b.jpg

    Thats where its at as of today. I am considering painting the inside next as I am mad keen to see how the plastering fairs out once painted, however I really need to spend time making good around the inside of the door. Something I am noodling on at the moment. ( I am seeing lots of skirting board rather than plasterboard I think )

    I dont have a lot more pics, but if there is anything you'd like to see speciffically pls let me know and I will put it up if I have it, or take it if I dont!


  • Registered Users, Registered Users 2 Posts: 3,412 ✭✭✭randombar


    Might have been asked already but what are you doing for heating?


  • Advertisement
  • Registered Users, Registered Users 2 Posts: 6,373 ✭✭✭iwillhtfu


    RobAMerc wrote: »
    Thats where its at as of today. I am considering painting the inside next as I am mad keen to see how the plastering fairs out once painted,

    Sanding! lots and lots of sanding and when you think you're done sanding add some more filler and sand again. Paint will show up that type taped seam finish really badly if not super smooth.


  • Closed Accounts Posts: 3,292 ✭✭✭TheBoyConor


    Looks nice but I donno why you didn't just pour a concrete slab.
    The arse is going to rot out from under that in a few years. Guaranteed. and the space beneath will harbour vermin.


  • Registered Users, Registered Users 2 Posts: 5,863 ✭✭✭RobAMerc


    GaryCocs wrote: »
    Might have been asked already but what are you doing for heating?

    It was ! :)
    I am looking at this as the thing is well insulated and I was advised against the original underfloor heating idea.


  • Registered Users, Registered Users 2 Posts: 5,863 ✭✭✭RobAMerc


    iwillhtfu wrote: »
    Sanding! lots and lots of sanding and when you think you're done sanding add some more filler and sand again. Paint will show up that type taped seam finish really badly if not super smooth.

    Totally makes sense !
    So being an awkward twat, I decided to go the other route. I am painting it and will the fix the bits that do show up.
    first coat has told me nothing really as the plasterboard ate the paint.

    As I said I am compounding poor workmanship on top of poor workmanship !
    But one of the joys of DIY is learning the hard way !


  • Registered Users, Registered Users 2 Posts: 5,863 ✭✭✭RobAMerc


    Looks nice but I donno why you didn't just pour a concrete slab.
    The arse is going to rot out from under that in a few years. Guaranteed. and the space beneath will harbour vermin.

    I actually expected to see a lot more of these - "What I'd have done" or "what you should have done" posts. But I have what I think are valid reasons for not using a slab - again, one of the joys of DIY: I did what I wanted to do for my own reasons.

    I dont see why it will rot as its treated wood, kept dry and off the ground. There isnt a food source for vermin and the cat and foxes will make sure there isnt an issue.


  • Registered Users, Registered Users 2 Posts: 7,368 ✭✭✭bladespin


    That's awesome, just found this thread, fair play!

    MasteryDarts Ireland - Master your game!


  • Closed Accounts Posts: 3,292 ✭✭✭TheBoyConor


    Conrete slab would have been quicker, cheaper, much more easy to insulate and provides a much more solid base from which to build everything else off of.

    Might be treated timber but in this wet climate, it is still going to rot at the places where it bears on the piers. And since that is where all the pressure is, once the rot sets in at the bearing, it will rapidly start to crumble away.


  • Registered Users, Registered Users 2 Posts: 31,138 ✭✭✭✭Lumen


    Might be treated timber but in this wet climate, it is still going to rot at the places where it bears on the piers. And since that is where all the pressure is, once the rot sets in at the bearing, it will rapidly start to crumble away.

    I'd have thought location would be important. Is this Dublin? I had a cheap treated shed on blocks for 12 years in Dublin without any sign of rot.


  • Registered Users, Registered Users 2 Posts: 6,373 ✭✭✭iwillhtfu


    Conrete slab would have been quicker, cheaper, much more easy to insulate and provides a much more solid base from which to build everything else off of.

    I'd have thought only one of those 4 would be correct maybe I'm wrong. How would it be cheaper to insulate? I'd build that base faster than it would take for the concrete to be delivered. No idea what concrete costs per sq meter or re bar, hardcore, whacker plate rental etc. It would be a solid base but the timber is equally adequate. Also I'd have thought concrete if done incorrectly has potential to introduce damp problems.


  • Registered Users, Registered Users 2 Posts: 6,373 ✭✭✭iwillhtfu


    Lumen wrote: »
    I'd have thought location would be important. Is this Dublin? I had a cheap treated shed on blocks for 12 years in Dublin without any sign of rot.

    I have a two decks much larger than the floor here and also a shed based on blocks in the back garden for the same 12 years. One deck has rotted away but sub floor is perfect to the point I just replaced the rotten deck with composite. Keep in mind a deck wouldn't have a roof over it I'm sure this floor will be perfectly fine. Shed is just as pissed as the day it went up but no vermin or anything of consequence the odd hedgehog :D One thing I would watch out for is wasp but it looks well sealed.


  • Advertisement
  • Closed Accounts Posts: 395 ✭✭Class MayDresser


    Conrete slab would have been quicker, cheaper, much more easy to insulate and provides a much more solid base from which to build everything else off of.

    Might be treated timber but in this wet climate, it is still going to rot at the places where it bears on the piers. And since that is where all the pressure is, once the rot sets in at the bearing, it will rapidly start to crumble away.

    Yeah, we get it, you'd have put in a concrete floor. OP didn't, move on.

    Any more up to date pics OP?


  • Registered Users, Registered Users 2 Posts: 1,314 ✭✭✭The Mulk


    RobAMerc wrote: »
    Totally makes sense !
    So being an awkward twat, I decided to go the other route. I am painting it and will the fix the bits that do show up.
    first coat has told me nothing really as the plasterboard ate the paint.

    As I said I am compounding poor workmanship on top of poor workmanship !
    But one of the joys of DIY is learning the hard way !

    You should use primer , it's dear but gives great finish before painting,

    I did my whole house in taping and jointing and used this over it, before painting.
    I used Prime 4- PSU
    http://www.constructionbusiness.ie/behind-every-great-paint-is-an-even-better-primer/

    The other alternative is a couple of mist coats of cheap emulsion


  • Registered Users, Registered Users 2 Posts: 27,253 ✭✭✭✭GreeBo


    would you consider getting the walls skimmed?
    all your finish problems go away then, and shouldnt cost the earth for such a small space.


  • Registered Users, Registered Users 2 Posts: 609 ✭✭✭jumbone


    Never had to paint bare plaster board but I follow a bunch of DIY threads and often see the tip to prime with PVA glue to prevent it absorbing too much of your paint


  • Closed Accounts Posts: 3,292 ✭✭✭TheBoyConor


    GreeBo wrote: »
    would you consider getting the walls skimmed?
    all your finish problems go away then, and shouldnt cost the earth for such a small space.

    The thing with that is you won't get anyone to take it on. When you tell them the size of the job they'll be going "sure I wouldn't start the van for that / I don't get out of bed for less than xxxm2"


  • Registered Users, Registered Users 2 Posts: 5,863 ✭✭✭RobAMerc


    The Mulk wrote: »
    You should use primer , it's dear but gives great finish before painting,

    I did my whole house in taping and jointing and used this over it, before painting.
    I used Prime 4- PSU
    http://www.constructionbusiness.ie/behind-every-great-paint-is-an-even-better-primer/

    The other alternative is a couple of mist coats of cheap emulsion

    I've gone with option B - at €16 for 10l bucket, I think its actually going to work out ok.
    GreeBo wrote: »
    would you consider getting the walls skimmed?
    all your finish problems go away then, and shouldnt cost the earth for such a small space.

    I'd never be able to look at it and say "I did, or at least tried to do every bit of that" - although people would cut me some slack for sparks and plaster I think, but I will see where I am after I have tried.
    jumbone wrote: »
    Never had to paint bare plaster board but I follow a bunch of DIY threads and often see the tip to prime with PVA glue to prevent it absorbing too much of your paint

    Yes, but equally read a few that disagreed - intorducing too much moisture to boards is the argument.
    The thing with that is you won't get anyone to take it on. When you tell them the size of the job they'll be going "sure I wouldn't start the van for that / I don't get out of bed for less than xxxm2"

    Yup - thats a distinct possibility !


  • Registered Users, Registered Users 2 Posts: 27,253 ✭✭✭✭GreeBo


    RobAMerc wrote: »
    I'd never be able to look at it and say "I did, or at least tried to do every bit of that" - although people would cut me some slack for sparks and plaster I think, but I will see where I am after I have tried.
    Yeah thats a fair point.
    To be honest, in a room such as that, you are not going to have much downlight so imperfections might not show up at all.


  • Posts: 0 [Deleted User]


    Been following this since day 1ish because I love this kind of stuff. Everything you're doing is fantastic. My background is in the electrical game so was keen to see what your plan was there. Great ideas and advice from the posters here. Looking forward to the finished product. Fair play to you for tackling it yourself.


  • Registered Users, Registered Users 2 Posts: 3,088 ✭✭✭Static M.e.


    Agree. I love reading this thread and I'm impressed you are doing it all yourself. It's inspirational to DIYers.


  • Advertisement
  • Registered Users, Registered Users 2 Posts: 34,105 ✭✭✭✭listermint


    RobAMerc wrote: »
    I actually expected to see a lot more of these - "What I'd have done" or "what you should have done" posts. But I have what I think are valid reasons for not using a slab - again, one of the joys of DIY: I did what I wanted to do for my own reasons.

    I dont see why it will rot as its treated wood, kept dry and off the ground. There isnt a food source for vermin and the cat and foxes will make sure there isnt an issue.

    Wouldn't bother too much with replies certain poster has form for dropping into random threads giving anti advice and legging it quick smart


Advertisement