Advertisement
If you have a new account but are having problems posting or verifying your account, please email us on hello@boards.ie for help. Thanks :)
Hello all! Please ensure that you are posting a new thread or question in the appropriate forum. The Feedback forum is overwhelmed with questions that are having to be moved elsewhere. If you need help to verify your account contact hello@boards.ie
Hi all,
Vanilla are planning an update to the site on April 24th (next Wednesday). It is a major PHP8 update which is expected to boost performance across the site. The site will be down from 7pm and it is expected to take about an hour to complete. We appreciate your patience during the update.
Thanks all.

Spitfire Total Rebuild!

Options
145791016

Comments

  • Registered Users Posts: 4,504 ✭✭✭SpitfireIV


    Not all that much to report these days guys. Still at the monotonous task of cleaning parts and sorting out whats what for the chassis rebuild. It's all fine and good getting the big parts sorted, cleaned and painted but at this stage its the small things that can stall progress; wrong sized bolt, shims, gaiters, seals etc.

    Waiting on an order of parts which *hopefully* should see me get the chassis rebuild started. The diff is gonna need to be rebuilt; havent even looked into what bearings or shims I need for that yet.....nightmare :cool:


    Anyway, just been doing this kinda stuff......


    11737881_10155791105325591_1059217408590488319_n.jpg?oh=263f9724c9448125424a844d79fdc163&oe=561AD034
    ^ Shims were put in the electrolysis tank, cleaned and then given a few blasts of rust primer.


    11029905_10155791105755591_4771960142389851730_n.jpg?oh=b7207ab2bf2d2c6db69c45b539c0ed63&oe=561C592A
    ^ Just a selection of some of the many bolts, all given the electrolysis treatment, soaked in vinegar and then cleaned and oiled. All inspected and any found to be remotely questionable were tossed. The rest will have the threads cleaned up with a die and then they'll have to be sorted according to size and lenght.....each one has a job to do!


    When I tell people I know every single nut and bolt in this car......it wont be a lie! :o:pac:


  • Closed Accounts Posts: 891 ✭✭✭Falcon L


    Great work.. It's a labour of love, isn't it? :o


  • Registered Users Posts: 4,504 ✭✭✭SpitfireIV


    Falcon L wrote: »
    Great work.. It's a labour of love, isn't it? :o

    Yes! :P

    Just have to keep the end goal in mind.


  • Registered Users Posts: 24,146 ✭✭✭✭Sleepy


    You're doing a great job of this. Fantastic thread to read and looking forward to seeing the finished car! Do you plan to show the end result at Classic Car events?


  • Registered Users Posts: 531 ✭✭✭biketard


    I admire your attention to detail. A lot of people would be tempted to just stick parts back on that seem "good enough" and then pay for it a couple of years later when the rust spreads.


  • Advertisement
  • Registered Users Posts: 4,504 ✭✭✭SpitfireIV


    Sleepy wrote: »
    You're doing a great job of this. Fantastic thread to read and looking forward to seeing the finished car! Do you plan to show the end result at Classic Car events?

    Cheers. I'll probably join the Carlow Vintage Club alright and bring it to shows alright, but I hope to drive it a lot in between too :D
    biketard wrote: »
    I admire your attention to detail. A lot of people would be tempted to just stick parts back on that seem "good enough" and then pay for it a couple of years later when the rust spreads.

    Thanks, sometimes I wonder why I'm going to all this bother but then I figure that I might as well while its in pieces; bit of extra effort now might save a lot in years to come.


    Updates........


    Well, got another lot of bits cleaned, sorted and ready for painting or to go back onto the chassis. Spent a couple of hours alone just sorting about 500 nuts, bolts and washers into various labeled bags; very handy when it comes to the rebuild, follow the diagrams and go to the bag with the appropriate nut or bolt, no rooting about or measuring.


    11701183_10155815707395591_8840903829116713297_n.jpg?oh=c785f166864d9c18af97d9f448352be3&oe=565BAE22
    ^ Some previously painted bits that are good to go! (Plus an annoying dog that kept prompting me to throw a pine cone for him!)


    11060313_10155815707705591_7333136778968720300_n.jpg?oh=6b4671dd7b4cd6aa60727d975ad15e14&oe=5652EE2A
    ^ Some bits cleaned up, lined up and ready to be shot.........with a spraygun. (Dog still waiting)


    11750737_10155815707995591_6858202952458322455_n.jpg?oh=89b419a3d66745e53afde72f7ccffeb3&oe=565022AD
    ^ Hung out to dry!


    11781675_10155815708455591_5040399215031527756_n.jpg?oh=49bceaa41398beb4586affb23b2988cb&oe=564BE830
    ^ An imperial tap and die set is a MUST for cleaning up old threads prior to reassembly (I like that word REASSEMBLY :D )


    11695970_10155815708670591_8970467911468819140_n.jpg?oh=a9d4e5aff1edb571d26cb3acf24a700f&oe=563BF426
    ^ Front turrets back on as well as the upper and lower wishbones, its starting to come back together.


    11705313_10155815708825591_3635986746377097339_n.jpg?oh=a00a50384a60358333eb4fc0c799ec73&oe=564AD5AD
    ^ Hopefully within the next few days I'll be able to stick on the parts I've recently painted, that'll get the front end built up anyway. The rear leaf spring, thats currently in the electrolysis pot derusting and the differental, well, thats still a work in progress.....


    Sometimes, when its getting a bit monotonous its nice to remind myself at how far I've come....

    11794109_10155815206660591_6209841391054281625_o.jpg
    10410883_10155815206750591_4316436669283864519_n.jpg?oh=aad1f0541d399df8fa7507f3f865b8e4&oe=563D8112

    :)


  • Registered Users Posts: 531 ✭✭✭biketard


    Looking great!


  • Closed Accounts Posts: 891 ✭✭✭Falcon L


    That before and after shot is what it's all about. In the end, you'll have a car that's better than it was when new. :)


  • Registered Users Posts: 4,504 ✭✭✭SpitfireIV


    Bits and pieces be going back together.......


    11826020_10155849433445591_1025519098523431292_n.jpg?oh=e6ed04ea3f3d2a4c9f201d475024e4ac&oe=5639B443
    ^ Newly painted springs and shocks being compressor in a home made spring compressor, made from two pipe flanges and threaded bar. Worked a treat and didnt feel as if I was taking my life in my hands using it as there's considerable pressure in the springs!


    11222054_10155849434630591_8472562264103196852_n.jpg?oh=a1612912bcb3ece29c0e8f1bcd214ae8&oe=564FE234
    ^ New poly bushes in and securing nuts in place.


    11813281_10155849435890591_6314499999130036448_n.jpg?oh=4cf7fb30b2a8b930fb5460b1749e480a&oe=563D99A5
    ^ Two nice an' shiney struts. Gets a thumbs up from me! :)


    Then, with those done it was time to build up the front and rear vertical links.....


    11800232_10155849453215591_7901658250837201182_n.jpg?oh=c9b65235b4ec54ba1e57088e6b552a7f&oe=564FD08D
    ^ New trunnion bushes ready to go into rear half shaft.


    11141160_10155849453685591_5700320510632021852_n.jpg?oh=2c33bad35b99d00a01b9d3210bdca22e&oe=563CA8E3
    ^ Spreading the top end of the vertical link to fit the half shaft in place.


    11796350_10155849454085591_4775163962007259228_n.jpg?oh=8200c8a80916939b0f261253c4d812f9&oe=563F3E9C
    ^ Base of the front vertical link; a rather crude turning system called a trunnion which is basically a threaded bar that screws into a brass housing, when you turn the wheel left or right the vertical link rotates on the threads. A ball joint would have been an easier method, but, some of the logic behind British Leyland design is not to be questioned! :rolleyes:

    11817076_10155849454900591_6101224189799427376_n.jpg?oh=cdddd7461d29e74cecb97dbf3ddb5189&oe=5655EACD
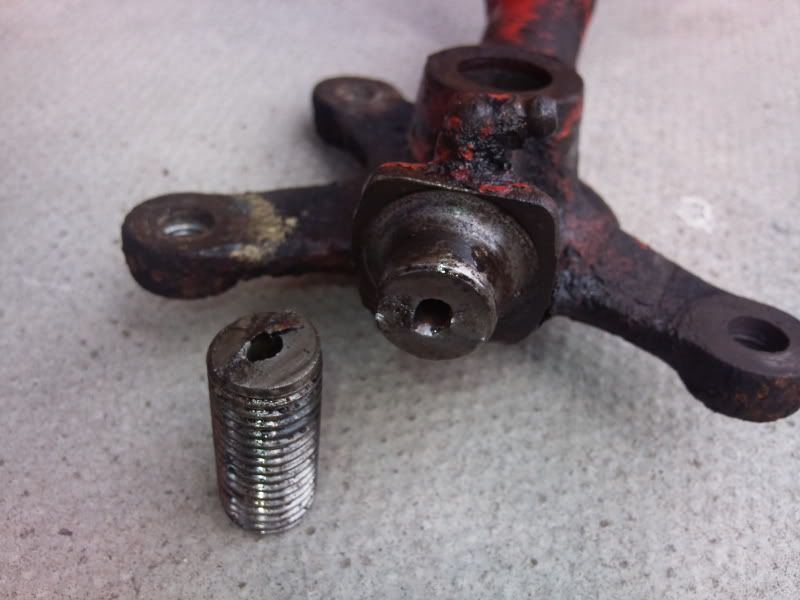
    ^ Here you can see the brass trunnion screwed into place. The trunnions have to be oiled regularly; they're a known weak spot which can, and do, fail due to poor maintenance. Its reckoned using grease instead of the recommended oil can lead to failure of the threaded section and leave your Spitty looking something like this......


    Photo493.jpg
    Photo496.jpg
    (Images taken from: http://club.triumph.org.uk/cgi-bin/forum10/Blah.pl?m-1341850452/)


  • Registered Users Posts: 4,504 ✭✭✭SpitfireIV


    Another few pics to keep you going......

    Been away for a few days last week so had to put Spitty aside :o But before I went a few bits got reassembled.

    11202102_10155866870995591_1697836881692406300_n.jpg?oh=2ab0a902c69ab3cb647b9e02ec2a4408&oe=5644779B

    11824923_10155866870710591_6222392953987598762_n.jpg?oh=e675ef57e27c150bb6856807553a8dfa&oe=563DDF64

    11831737_10155866871765591_8952395728954281349_n.jpg?oh=a3146cf2ba55ccfc7120b64728b4e430&oe=56723064

    11058224_10155866871305591_4853284953314240006_n.jpg?oh=fbf24198c37eed089ecdd70c73b3c8e8&oe=564533F3

    So, apart from a set of drop links and the front hubs & discs (painted and ready to be fitted) the front end is built up and torqued up. Theres an argument that its best to torque up all the bolts when the car is on the ground under its own weight, but, I cant see what difference it'll make, they'll all be checked again near completion, but for now they've been given a red mark to show they've been torqued as per the specs. Copper ease was also used on any bolts that would be going through the metal sleeves in bushings to hopefully prevent rust and stop the two components sticking to each other. Before I can get the back end built up I'll have to get the differential sorted! Leaf spring has been repainted and ready for reassembly with new bushes.


    Also, went to visit the Carlow Vintage & Classic Show on Sunday last, was really surprised to see so many Spitfires at it! (Ok, they werent plentiful, but still, a few new ones that I hadnt seen at shows in the past couple of years). Gave me a great boost and a new deadline, August 2015, I want my finished car at this show!!

    11825793_10155870109415591_2234004128147842757_n.jpg?oh=c07b14424dfe518d486d2315cf91ec81&oe=56760B2C

    11825840_10155870105650591_5666085234678733899_n.jpg?oh=92edc857754664f69e1706cb075fca89&oe=56741C49

    11013582_10155870105260591_7754185857680548931_n.jpg?oh=65b39b5f540d7d299f79a9114496c1ea&oe=5635FDC6

    11828572_10155870103900591_4169909447603715542_n.jpg?oh=c7b3333a4a367e990d7df1b8c283337f&oe=5643C1ED

    11811375_10155870104275591_2158915053082695858_n.jpg?oh=05c9053ebdfcf278df096ee88ca7bb0a&oe=567945E4

    11873434_10155870101495591_4213916862226058886_n.jpg?oh=e8ba611c42aa0a8521ce062e98e9d157&oe=567B778B


    :)


  • Advertisement
  • Closed Accounts Posts: 891 ✭✭✭Falcon L


    I think you'd better allow another year. August 2015 doesn't give you much time. :P

    Looking great! I see a car coming together, not just a pile of parts. Great job and I'm totally jealous. :(


  • Registered Users Posts: 4,504 ✭✭✭SpitfireIV


    Falcon L wrote: »
    I think you'd better allow another year. August 2015 doesn't give you much time. :P

    Looking great! I see a car coming together, not just a pile of parts. Great job and I'm totally jealous. :(

    Ah yes, lets aim for August 2016 far more realistic deadline :P

    Thankfully, as you probably know all the major work is done on the tub, underside and inside finished and painted, just have to finish the outside, so, once the chassis is finished and the tub is dropped on then it'll really get exciting! :D

    Bonnet needs a lot of work still though :p


  • Registered Users Posts: 1,003 ✭✭✭Zoo4m8


    I really enjoy this thread, you are showing in great detail what can be done with a bit of application and common sense. I wonder would you think seriously when you are finished of compiling what you have posted on this forum and maybe having it published in some way as a handy reference for others at the same game and not necessarily restoring a Spitfire as your info could be applied to almost any resto, just my two cents!
    My TR7 ( eventually to be a Tr8) shell is at the body shop since Jan. I did the owner a large favour a while ago and as there was no return happening we agreed this was the best way to resolve it.. There have been a couple of 'frank exchanges of views' but at last progress is being made :D
    Anyway while all this has been going on I've been working on other bits and your electrolysis bucket has been useful!
    I'm looking forward to you tackling the diff, I'm changing the ratio in mine and want to let you make the mistakes first!
    Anyway I'm rattling on ..keep up the good work.


  • Registered Users Posts: 4,504 ✭✭✭SpitfireIV


    Zoo4m8 wrote: »
    I really enjoy this thread, you are showing in great detail what can be done with a bit of application and common sense. I wonder would you think seriously when you are finished of compiling what you have posted on this forum and maybe having it published in some way as a handy reference for others at the same game and not necessarily restoring a Spitfire as your info could be applied to almost any resto, just my two cents!
    My TR7 ( eventually to be a Tr8) shell is at the body shop since Jan. I did the owner a large favour a while ago and as there was no return happening we agreed this was the best way to resolve it.. There have been a couple of 'frank exchanges of views' but at last progress is being made :D
    Anyway while all this has been going on I've been working on other bits and your electrolysis bucket has been useful!
    I'm looking forward to you tackling the diff, I'm changing the ratio in mine and want to let you make the mistakes first!
    Anyway I'm rattling on ..keep up the good work.

    Glad your enjoying the thread and getting some benefit from it! :) I do plan on compiling pics at the end of the project into a couple of photo booklets to stick in the back of the car and show interested people or bring along to shows, as for compiling a publication, well.....that sounds like a lot of hard work, but, we'll see ;)

    Hah, cheers with regard your confidence with me tackling the diff :P It's a pain to have to pull it asunder, but, it's gotta be done. Needless to say there will be updates and pics!


    In other news I made a few new purchases over the past few days. Firstly had a package arrive from Paddocks in the UK with lots of shiney and new rubbery rebuild kits for the master cylinders, calipers, rear brake cylinders etc.


    11870795_10155914446775591_5353637099404038642_n.jpg?oh=5591c13e0f46f2f11e6b59e44f5cb3e6&oe=56770682
    ^ Still cleaning rust and dirt from the diff, have yet to push the pinnion out.


    11888046_10155919230760591_6661086675037944402_n.jpg?oh=94e1e0cbce144fa39a0d6cced82b2619&oe=563C429E
    ^ Split the brake calipers as two of the pistons were proving difficult to remove. Have full rebuild kits so after a good clean they'll be good as new.


    Then we have this....

    11902281_10155919217995591_6551087170273684729_n.jpg?oh=4e0a1b4afba23f4613583179db6bfbda&oe=567B2E06
    11891125_10155919218125591_2773374086791201454_n.jpg?oh=ba05bc2ac0115628bb7da22203ab34b2&oe=5638DF1E
    11902442_10155919218235591_8380178031795461984_n.jpg?oh=1974a1744d089ff636d1b1847aaf148f&oe=567A75AE
    ^ Interesting! :confused: The threads in the brake caliper for the bleed nipple must have stripped so someone has drilled out the hole larger, re-tapped, dropped in a ball bearing and a larget bolt. Suppose it'll do the job, but, an interesting fix!

    Apart from that the other other thing was popping the pistons out of the clutch master cylinders, have two of 'em, came out easy enough with a bit of pressure on an hydraulic hand pump, the brake master cylinders though, even with upward of 70psi they werent budging, stuck solid!!

    So, I picked up a good second hand one! :D


    Onto more exciting news now. I reckon I've shaved weeks, if not months off the build with these two recent acquisitions!! Scored a grp GT6 bonnet and a really clean and straight bootlid! Missed out on a really clean, almost new mohair hood (still kicking myself over that one) but, none the less, very happy with the purchase, like I say, it's gonna knock a LOT of time off the build as both the bonnet and bootlid I had needed a lot of attention.

    11866314_10155927465940591_8830148525858204503_n.jpg?oh=70176466bae2c75a6d30fd91ca7f434c&oe=5676C93A
    ^ Nice shade of magenta!

    11949366_10155937532455591_8324739431028805502_n.jpg?oh=907560ca297e017fa5ac01bb73bd15e9&oe=56822A73
    ^ Even came fitted with a nice shiney lock! Score.


  • Registered Users Posts: 2 yorkebar


    Finally registered on the forum so i could comment on your amazing build, and i dare say that you're chassis completely puts mine to shame, it's come up lovely! and the shocks are basically brand new. considering what you started with this is a massive achievement that you should be truly proud of.


  • Registered Users Posts: 4,504 ✭✭✭SpitfireIV


    yorkebar wrote: »
    Finally registered on the forum so i could comment on your amazing build, and i dare say that you're chassis completely puts mine to shame, it's come up lovely! and the shocks are basically brand new. considering what you started with this is a massive achievement that you should be truly proud of.

    Cheers mate and thanks too for going to the hassle of setting up an account on here! :) Stay tuned! :D


  • Registered Users Posts: 4,504 ✭✭✭SpitfireIV


    Was looking back over some old pics (March/April 2014 perhaps) to compare with how things look now....


    11951700_10155962320605591_4256150157463323248_o.jpg
    ^ Car was still split in two. Sills needed to come off on both sides and be reposistioned. New mid sills fabricated for both sides, new inner side made for passenger side. New boot floor and rear valance to go in as well as dozens of other major and minor repairs. Ah yeah, I had it all ahead of me!


    11990611_10155962315785591_5173201551827690729_n.jpg?oh=72abb7c725730443248ceff7d23e929a&oe=566A2581
    ^ Looking a bit fresher! Bulk head came up really well after a few applications of Bilth Hamber deox gel and many hours wire brushing. Underside epoxy primer, stone chipped and colored. Inside primed and colored. Bulkhead epoxy primed so far. The rest of the exterior will be epoxy primed before filling.


    11062344_10155963048765591_6026517165389026458_n.jpg?oh=9bc882afaa0039f81f825f8a2573a3f4&oe=5667E6FD
    ^ Rebuilt the original leaf spring and have it reassembled with new bolts, poly bushes and rubber buttons between the leafs.

    11951783_10155963049205591_1339732585744033654_n.jpg?oh=0872261d014333bae236595ff854632a&oe=5670E3AA
    ^ The buttons seperate the leafs and reduce the surface area thereby preventing metal cutting into metal, thus, making the movement smoother.

    11947521_10155963667810591_9159254054712948210_n.jpg?oh=fc0c0614fafb4e415284f6e13dacd004&oe=5679AEFF
    ^ Prior to reassembly they had done a stint in the electrolysis tank. Cleaned up really well!

    I'll give the whole lot another blast or two of black before refitting.


  • Registered Users Posts: 4,504 ✭✭✭SpitfireIV


    Nothing much to report I'm afraid. Picked up all the hardware for the diff rebuild, including:

    - Output shaft bearings x2
    - Diff carrier bearings x2
    - Pinion bearings x2
    - Pinion oil seal x1
    - Output shaft oil seals x2
    - Case gasket x1

    12002272_10155999003625591_2040624033288113345_n.jpg?oh=57bdaa4efc3141cf8ca91d23df1c571f&oe=5666C1DD


    Getting the diff back together is gonna be a tedious job, lots of measurements to be taking, so its out with the dial guage, calipers, feeler guages etc........this could be interesting.


  • Registered Users Posts: 4,504 ✭✭✭SpitfireIV


    Diff rebuild has got underway and actually was not as bad as I thought it would be. With a little help from someone more knowledgeable than I, a good service manual, some youtube vids, time and patience the outcome has been good.

    Now, as they say, time for the science bit........


    12009567_10156010019945591_2977065201759502858_n.jpg?oh=2c7cc65377c2769f9881a57de84071f2&oe=566FDB3A
    There was a lot of play in the sun gear in the carrier, this play was due to the cupped trust washers behind the planet gears being worn. The original was .035", but, when measured they were approx .032". As replacements are not easily availible we rooted out some brass with an approx thickness of .035 and set about forming some new shims.


    12011140_10156012988750591_2264878458694841562_n.jpg?oh=7d7f9622739e7c0f0ede9017aadde5a8&oe=56627CE9
    Planet and sun gears with their shims. The cupped trust washers are the diy shims along with the original I'm holding. They polished up well!


    11993291_10156012989330591_6487204125913866229_n.jpg?oh=18baefcd8226fa90eb90a2ad4baec561&oe=56706423
    New head bearing pressed onto pinion along with new bearings on carrier.


    11990670_10156012989060591_5459629295603959221_n.jpg?oh=115264daa4c856129bcd54ba9bb8b866&oe=566D8068
    Planet and sun gears back in the carrier with shims fitted. Very little play now and engineers blue applied to some of the teeth show a good mesh. Happy!


    12006228_10156012989175591_5137049370844962918_n.jpg?oh=5e73ea0904681c965f1105fab5cfbc18&oe=56A97FC4
    Pinion head bearing outer race pressed into the front casing.


    12019952_10156012989440591_3606035191880322436_n.jpg?oh=764cceffe300ce939c28263ca46c611d&oe=569BA509
    New pinion tail bearing race pressed in.


    12032074_10156012989600591_1415862677936886981_n.jpg?oh=4aec09ee4e666dd60f0d18c548898d75&oe=56A00F6C
    Pinion inserted, without oil seal in place and being torqued up to spec. Mounting plate also fitted.


    12003900_10156012989810591_4658607246615368234_n.jpg?oh=e17a889816016ac6d0f74da9cbebcb88&oe=56A755F6
    Carrier assembly in place, yet to calculate the float, although I have the original shim packs from each side.


  • Registered Users Posts: 4,504 ✭✭✭SpitfireIV


    Diff rebuild continued.....

    Lot of measuring, shimming, assembling, checking, disassembling, measuring, shimming, assembling, rechecking.....etc etc, you get the idea


    12004782_10156017699710591_4260825669385876281_n.jpg?oh=a966b79df3bdaada5857d159adb91b0c&oe=569BBFCC
    Pinion was removed from yesterday and reshimmed to add preload as it was spinning free. Preload should be in the region of 12 to 14lbs. Check out the crude measuring system in the absence of anything more scientifical tongue emoticon. A graduated bar with a 2lb weight suspended from it.

    Holding 8lb well here.


    11996901_10156017699860591_4037896589721111198_n.jpg?oh=6e92329c4bf1017c0953d7ef2e30a153&oe=56AA3CDE
    Holding onto approx 11lbs here. Specified preload is 12 to 14lbs, but given the makeshift nature of the setup and the fact the preload feels good, I'm happy enough.


    12004932_10156017700055591_3766201514398411216_n.jpg?oh=1dfbd8c94f86407179888daf010eff60&oe=566FEE59
    Had to make up a jig to hold the dial guage in place to check the back lash on the crown wheel.


    11025962_10156017700315591_2880046317861937181_n.jpg?oh=b085f43e91e436d56ffd5c20b0d98fa4&oe=569F4798
    Backlash being checked again, it requires a lot of patience moving various thickness shims from side to side to hit that magic number....


    10421464_10156017700490591_2534014531764840140_n.jpg?oh=0f958785fb7f9e9ba4e33983822886b3&oe=56A6E80C
    ....Bingo! Dial reads .12mm backlash which is equal to .0045" ish, required backlash is specified as being between .004 and .006".......I'm happy with this!


    12036631_10156017700675591_8113660632312040624_n.jpg?oh=c4c2611a1e22c49281f49023bc734f2e&oe=56672C35
    12006246_10156017701000591_957356707287555101_n.jpg?oh=b9eb037f43512bfdcc6d723b6d7ad4ae&oe=565D92C2
    Engineers blue on the crownwheel teeth shows a good pattern.


    11836788_10156017701185591_9166493661400913931_n.jpg?oh=3b63e3d299e9aa02fa881296b99593a7&oe=56664FC3
    As to are the markings on the pinion gear.


    12002220_10156017701480591_4617368763876439974_n.jpg?oh=15ee5a2062cf25eada14cee8b1390e68&oe=569ED870
    Pulling the bearing from the output shaft, puller might be overkill, but it does the job.


    12032271_10156017701760591_7259510320484730816_n.jpg?oh=53306b1a9ed38db46d257cd5a4849764&oe=5669DE7D
    Checking the trueness of the crownwheel.


    11988724_10156017702130591_6555557701430557450_n.jpg?oh=a906393825736d38d2118cb628304958&oe=5667471A
    United colors! :D The whole lot will be painted black eventually.


    All that remains now is to fit the pinion oil seal, press on the bearings to the output shaft and fit new oil seals, then on with the gasket and close her up! ;)


  • Advertisement
  • Registered Users Posts: 531 ✭✭✭biketard


    Outstanding!


  • Registered Users Posts: 416 ✭✭scudster


    Admit it, you're really Edd China!
    Fantastic thorough restoration.


  • Registered Users Posts: 185 ✭✭pryantcc


    Excellent work! I went through the same tedious in, measure, out, shim, in, measure procedure a few years ago. Hard to believe at the start that it'll ever end up right, but perseverance pays off!


  • Registered Users Posts: 2,361 ✭✭✭jack of all


    I've really enjoyed this whole thread so far, thanks for documenting your work, it's a fantastic job!


  • Registered Users Posts: 4,504 ✭✭✭SpitfireIV


    When I'd done I'll give it all a coat of stonechip and the job's a good'un! :P No I'm not Ed China ;)

    Cheers guys, glad youre enjoying it. Cant wait to get that diff sorted and back on the chassis! I'll soon have something that'll move.....even if it is only by pushing! :P


  • Registered Users Posts: 1,003 ✭✭✭Zoo4m8


    Well done on the diff rebuild, never doubted you for a minute! Discussing this today withe the 'someone more knowledgable than me' who will be helping me with the TR7 diff he made the interesting comment that he sets the preload by feel.. He explained he rebuilt an Atlas diff for a rally Escort to the book and after a trial the diff was red hot and he has done it by feel ever since without any issues...


  • Registered Users Posts: 4,504 ✭✭✭SpitfireIV


    Zoo4m8 wrote: »
    Well done on the diff rebuild, never doubted you for a minute! Discussing this today withe the 'someone more knowledgable than me' who will be helping me with the TR7 diff he made the interesting comment that he sets the preload by feel.. He explained he rebuilt an Atlas diff for a rally Escort to the book and after a trial the diff was red hot and he has done it by feel ever since without any issues...

    I can understand that, you do kinda know A. when its too loose or B. when its too tight, youre kinda looking for that washboard'ie kinda feel....hard to explain. Best of luck with your diff build, its a lot of fun! :D


    Well, I got the diff finished up; new seals in, gasket fitted and then I closed her up and it was ready to be fitted to the chassis........


    12009687_10156043872775591_8310022374184491329_n.jpg?oh=af469553051df3855d95941ce9f124c9&oe=56AAAD1E
    It was an ape to get in on my own, getting the long cross bolt across the back was fun! :rolleyes:


    10322846_10156043874200591_8379614657770811211_n.jpg?oh=fa90347a794b5867797c044bb3697cba&oe=569C5E34
    Leaf spring mounted on top and half shafts fitted! :D


    12039680_10156043874620591_2406030338748139021_n.jpg?oh=36636eec803fd65a922358830900a382&oe=5691E1AE
    I have to give the spring housing a lick of paint.


    12006109_10156043874865591_5113708050621543494_n.jpg?oh=f8793ec01b50fd38bc342ebd35fefbca&oe=56A0026B
    Rebuilt rear brakes; new shoes and cylinders.


    12003188_10156046096455591_3328950076212265931_n.jpg?oh=268e2e9cba3f9d63d06fbc136a027832&oe=569F22A2
    Kinda looking like a car :o


    Next up, gotta get my wheels sorted so I can get this bad boy moving!


  • Registered Users Posts: 4,358 ✭✭✭kev1.3s


    Excellent work, will probably end up the best spitty in the country.


  • Registered Users Posts: 12,917 ✭✭✭✭Toyotafanboi


    first post here, just got to say i'm loving it. keep the updates coming :)


  • Advertisement
  • Registered Users Posts: 4,504 ✭✭✭SpitfireIV


    Cheers guys! :)


    Had a bit of a kick in the teeth last Thursday evening when the gearbox was stripped down and inspected. Main shaft has some very bad wear on it, a roller bearing essentially cut a nice deep recess into it! It'll need to be sent to a machine shop or a new one purchased. New shafts are almost €300!! :eek::eek: The gearbox must have been hanging out of it when it was last driven, that, coupled with the fcuked piston in the engine must have made it a real dog!! :rolleyes:

    Lets make her beautiful again!! :o


Advertisement