Advertisement
If you have a new account but are having problems posting or verifying your account, please email us on hello@boards.ie for help. Thanks :)
Hello all! Please ensure that you are posting a new thread or question in the appropriate forum. The Feedback forum is overwhelmed with questions that are having to be moved elsewhere. If you need help to verify your account contact hello@boards.ie
Hi all! We have been experiencing an issue on site where threads have been missing the latest postings. The platform host Vanilla are working on this issue. A workaround that has been used by some is to navigate back from 1 to 10+ pages to re-sync the thread and this will then show the latest posts. Thanks, Mike.
Hi there,
There is an issue with role permissions that is being worked on at the moment.
If you are having trouble with access or permissions on regional forums please post here to get access: https://www.boards.ie/discussion/2058365403/you-do-not-have-permission-for-that#latest

Spitfire Total Rebuild!

1235710

Comments

  • Registered Users, Registered Users 2 Posts: 540 ✭✭✭biketard


    Outstanding!


  • Registered Users, Registered Users 2 Posts: 416 ✭✭scudster


    Admit it, you're really Edd China!
    Fantastic thorough restoration.


  • Registered Users Posts: 185 ✭✭pryantcc


    Excellent work! I went through the same tedious in, measure, out, shim, in, measure procedure a few years ago. Hard to believe at the start that it'll ever end up right, but perseverance pays off!


  • Registered Users, Registered Users 2 Posts: 2,376 ✭✭✭jack of all


    I've really enjoyed this whole thread so far, thanks for documenting your work, it's a fantastic job!


  • Registered Users, Registered Users 2 Posts: 4,506 ✭✭✭SpitfireIV


    When I'd done I'll give it all a coat of stonechip and the job's a good'un! :P No I'm not Ed China ;)

    Cheers guys, glad youre enjoying it. Cant wait to get that diff sorted and back on the chassis! I'll soon have something that'll move.....even if it is only by pushing! :P


  • Registered Users, Registered Users 2 Posts: 1,003 ✭✭✭Zoo4m8


    Well done on the diff rebuild, never doubted you for a minute! Discussing this today withe the 'someone more knowledgable than me' who will be helping me with the TR7 diff he made the interesting comment that he sets the preload by feel.. He explained he rebuilt an Atlas diff for a rally Escort to the book and after a trial the diff was red hot and he has done it by feel ever since without any issues...


  • Registered Users, Registered Users 2 Posts: 4,506 ✭✭✭SpitfireIV


    Zoo4m8 wrote: »
    Well done on the diff rebuild, never doubted you for a minute! Discussing this today withe the 'someone more knowledgable than me' who will be helping me with the TR7 diff he made the interesting comment that he sets the preload by feel.. He explained he rebuilt an Atlas diff for a rally Escort to the book and after a trial the diff was red hot and he has done it by feel ever since without any issues...

    I can understand that, you do kinda know A. when its too loose or B. when its too tight, youre kinda looking for that washboard'ie kinda feel....hard to explain. Best of luck with your diff build, its a lot of fun! :D


    Well, I got the diff finished up; new seals in, gasket fitted and then I closed her up and it was ready to be fitted to the chassis........


    12009687_10156043872775591_8310022374184491329_n.jpg?oh=af469553051df3855d95941ce9f124c9&oe=56AAAD1E
    It was an ape to get in on my own, getting the long cross bolt across the back was fun! :rolleyes:


    10322846_10156043874200591_8379614657770811211_n.jpg?oh=fa90347a794b5867797c044bb3697cba&oe=569C5E34
    Leaf spring mounted on top and half shafts fitted! :D


    12039680_10156043874620591_2406030338748139021_n.jpg?oh=36636eec803fd65a922358830900a382&oe=5691E1AE
    I have to give the spring housing a lick of paint.


    12006109_10156043874865591_5113708050621543494_n.jpg?oh=f8793ec01b50fd38bc342ebd35fefbca&oe=56A0026B
    Rebuilt rear brakes; new shoes and cylinders.


    12003188_10156046096455591_3328950076212265931_n.jpg?oh=268e2e9cba3f9d63d06fbc136a027832&oe=569F22A2
    Kinda looking like a car :o


    Next up, gotta get my wheels sorted so I can get this bad boy moving!


  • Registered Users, Registered Users 2 Posts: 4,358 ✭✭✭kev1.3s


    Excellent work, will probably end up the best spitty in the country.


  • Registered Users, Registered Users 2 Posts: 12,917 ✭✭✭✭Toyotafanboi


    first post here, just got to say i'm loving it. keep the updates coming :)


  • Advertisement
  • Registered Users, Registered Users 2 Posts: 4,506 ✭✭✭SpitfireIV


    Cheers guys! :)


    Had a bit of a kick in the teeth last Thursday evening when the gearbox was stripped down and inspected. Main shaft has some very bad wear on it, a roller bearing essentially cut a nice deep recess into it! It'll need to be sent to a machine shop or a new one purchased. New shafts are almost €300!! :eek::eek: The gearbox must have been hanging out of it when it was last driven, that, coupled with the fcuked piston in the engine must have made it a real dog!! :rolleyes:

    Lets make her beautiful again!! :o


  • Closed Accounts Posts: 8,585 ✭✭✭jca


    Cheers guys! :)


    Had a bit of a kick in the teeth last Thursday evening when the gearbox was stripped down and inspected. Main shaft has some very bad wear on it, a roller bearing essentially cut a nice deep recess into it! It'll need to be sent to a machine shop or a new one purchased. New shafts are almost €300!! :eek::eek: The gearbox must have been hanging out of it when it was last driven, that, coupled with the fcuked piston in the engine must have made it a real dog!! :rolleyes:

    Lets make her beautiful again!! :o

    Don't forget the howling diff, she was a sweet baby alright:D:D. It was a bit like the hunter engine we bought years ago that was "going grand" with the head gasket blown between 2&3 and number 4's exhaust valve burned to a crisp.... Ahhh the 70's the good old days:cool::cool:


  • Registered Users, Registered Users 2 Posts: 4,506 ✭✭✭SpitfireIV


    jca wrote: »
    Don't forget the howling diff, she was a sweet baby alright:D:D. It was a bit like the hunter engine we bought years ago that was "going grand" with the head gasket blown between 2&3 and number 4's exhaust valve burned to a crisp.... Ahhh the 70's the good old days:cool::cool:

    Sweet! :D


    Been a busy and interesting few days indeed! Let's get started.......


    12088380_10156068808190591_3217909451159444014_n.jpg?oh=8b346210c6e0a54ffca8b89b6196006d&oe=5695859F
    Sprayed the steel rims black, even though they do look a little greeny/grey in the pictures, weird.


    12036954_10156068951850591_6418753083447675312_n.jpg?oh=e8399570d7e2e5a0af489e5bbf0b831e&oe=569DAFEE
    Definately black though!


    12095997_10156071546425591_4142577262264946333_n.jpg?oh=bd56f4470b50090d866f51f14a3d36d7&oe=56929DA2&__gda__=1452990291_229ffe42798db773ef8ac24aaff87577
    Little teaser of the finished rim. Chrome ring in place, not sure about the centre cap, I'll probably go black with the Spitfire centre decal in stainless.


    12144681_10156071546290591_8580481528479491263_n.jpg?oh=265a6ce35cc39532cffd74ea5a321428&oe=569A70C8&__gda__=1452347585_c6ad9de4a8833d937d414030efaabf2f
    Got the chassis down off its high horse(s) and two temp wheels put on up front. Couldnt resist plonking one of the seats in a rough posistion and doing this.....


    12108864_10156071546205591_7341134003103268467_n.jpg?oh=41491bd665d03db3ecbe56f6fc7c8e70&oe=5693C084
    *Vroooommmm vrooommmmm GEAR CHANGE vroooozzmmmmmmm* Ah yeah, someday soon :o


    12072721_10156071545665591_6031731782194593922_n.jpg?oh=da49efde41a4f97dd0a30bbddee454bb&oe=56853E1F
    Brake lines ready to go on, only to discover later that the lines, although sold to me as for a Spitfire, definately aint for one! But, I might be able to salvage some of them and reuse.


    Then......


    12074562_10156069469080591_7965507724633525331_n.jpg?oh=02f09e25cd5bd20f23490c3e23330ce7&oe=56970CF2
    12036592_10156069469220591_8748541180317784662_n.jpg?oh=6828a929e14415120d41ce91863c448e&oe=568B7EB2
    Whats all this?!! A TOYOTA engine?!!!! :eek:


  • Closed Accounts Posts: 891 ✭✭✭Falcon L


    WTF? Seriously... Toyota? :eek:


    I like the centre cap on the wheels. :o


  • Registered Users, Registered Users 2 Posts: 4,506 ✭✭✭SpitfireIV


    Yes, its a Toyota engine! :D A 4E, 1.4 from a Corolla, this particular one was picked up free as a test dummy or mock up block if you wish.

    The plan?

    To mate a highly reliable, lightweight (compared to the Triumph lump) and fuel efficient engine with an overdrive Triumph gearbox.

    Why would you do such a thing?!

    Well, I have two 1300cc Triumph engines, one of them original to the car. Both however would require a full rebuild, re-bore etc which could cost big bucks, at the end of it you still have an engine thats 40+ years old and not renowned for their reliability. Ok, so there is a certain charm to having a big old lump up front; the sound, smell etc. But I dont think there is much charm is always having a feeling in the back of your mind that it wont start in the mornings or is going to konk out on you anywhere at any time.

    The gearbox will be rebuilt, have a full kit of bearings, seals, gaskets, synchro rings etc, so, that'll be good as new.


    Why not get a bigger and potentially better engine or gearbox if going to all this trouble?!

    The Toyota 4EFE (as fitted in late 90's Starlets, Corollas etc) is a relatively lightweight engine, renowned for their reliability and longevity, it has an electronic distributor which makes things easier. They put out about 75hp which is more or less the same as the early 1300 engine I have. So, by using this particular type of engine it allows me to use the Triumph gearbox, the original prop shaft and differential without any worries that a bigger, more powerful engine would rip 'em apart. Plus, by using an original gearbox it gives me a known fixing point to work from; ie, fix the gerbox to its mounting and see where the engine lines up, from there make new mounts for the engine. Means very minimal alterations to the chassis, which, as you may have seen is painted and finished.


    Hope that answers all questions and clears my consciene! :D


    Ok, so, neighbour sourced a scrap block that could be used for mocking up purposes. Its a bit ropey, but probably could be made to work and certainly has some useable parts that could be salvaged. But a running 4E can be got for about €150.


    Let project TRIOTA begin.....

    12049632_10156083093295591_1265582879615044934_n.jpg?oh=2d74747cbb9766a736557ab42107b165&oe=56A2F4E2
    Triumph bell house mounting plate offered up to the 4E. Plan was to use the original plate (behind the triumph one, to mask out the mounting holes).


    12115721_10156083093775591_8326041309276349453_n.jpg?oh=1e22384ad61745104bfaa9c74882bf23&oe=569B6ED9
    Up on the bench! The Toyota plate, mounted behind the Triumph one would be temporarily mounted together.


    12088438_10156083094675591_5908852630715185527_n.jpg?oh=597f1feabc69603f756fb44e6e7b01c4&oe=568A9F5E
    Drilling out the mounting holes in the triumph plate using the toyota plate as a template.


    12105838_10156083094880591_5839593319588365816_n.jpg?oh=a2b037d9c60f92924a1deb06e3b51636&oe=5688D1CD
    Plate drilled, centre section marked up and ready to be cut out to allow the plate sit flush.


    12105764_10156083095105591_1668039680867924504_n.jpg?oh=406186fb836645dfe12cbacdfddfb322&oe=5690BDE7
    Cut! Plate mounted and sitting well on block.


    12075052_10156083095230591_7134393116394651414_n.jpg?oh=07a84b427f88e0efdb736e392d51cd14&oe=56D28323
    Flywheel mounted and spinning freely.


    12112018_10156083095365591_5770618151952522528_n.jpg?oh=905b96cfecff2e4ef417ec05c4d582d6&oe=568CDB97
    Starter motor on the 4E is on the opposite side, so, modifications will have to be made, thus this hole will be plated in and rounded off in time.


    12109217_10156083095670591_3405966595868616937_n.jpg?oh=ed0e2b967d32201d872a7df04d6b3e11&oe=56A0B9D5
    Bell housing offered up.


    12079445_10156083095995591_7941015106886627946_n.jpg?oh=2592e3ee500581ea9c8fb771748c0019&oe=569735F7
    12140820_10156083096145591_642092932243026905_n.jpg?oh=d6057c11a95345858ea9de713e1a8f7e&oe=56D112C8
    Gearbox mounted to bell housing and the lot offered up.


    12112449_10156083096325591_1000449178384018168_n.jpg?oh=c1c9c0d3c1ba857f502a214a739699a0&oe=56A2F67E
    Nice tight fit!


    Critical measurements! Distance was measured from the face of the plate to the face of the flywheel on a Triumph block and then on the Triota....

    12087999_10156083096445591_1296380995778600409_n.jpg?oh=d2f0e7a8de1259ed734df2d5ac707216&oe=56D37DD5
    Triumph: 27mm


    12079432_10156083096635591_3114507078939585469_n.jpg?oh=a77f2d58ff0e7d081e988972d0e2e06b&oe=56856B3C
    Triota: 27mm!! Happy days!!


    After this I losely assembled the clutch and pressure plate on the input shaft and bolted the bell housing back on and the input shaft spun when the engine was turned over......excellent.

    Plan is to fit a larger 7 1/4" clutch plate with a larger pressure plate from a 1500. The sump will also need to be modified, as its to the front on this engine but needs to be more toward the rear. The front of this engine lines up very closely with the original engine mounting points so with a bit of clever steel work a nice engine mounting system will come together. Simple jobs I hope. Exciting times though.


    I'm not after speed or performance with this, its a simple small engine but still, lighter than the original and with the reduced weight of the GRP bonnet she'll be nippy enough.


  • Registered Users, Registered Users 2 Posts: 12,917 ✭✭✭✭Toyotafanboi


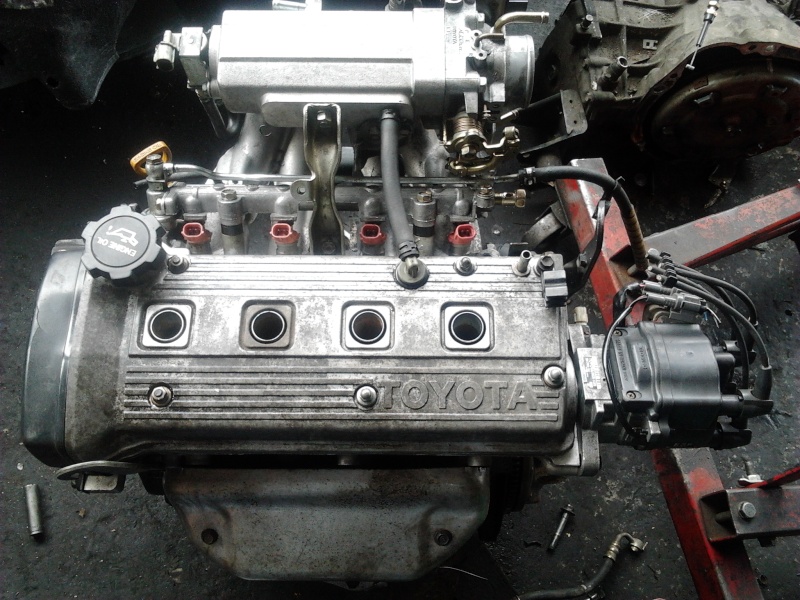
    That's very exciting :pac: the 4e in your picture looks like an 85bhp model with the later (97-) tubular intake manifold. The earlier (Irish 96-97) ones were 75bhp, they had this intake mani

    2012-022.jpg

    You should keep an eye out, (if power is any way your thing) for any japanese import non turbo starlets as the 4e in these made 99bhp with bigger injectors and throttle body. It's a good gain at virtually no expense and at no cost to reliability.

    Are you going to use the toyota loom and managment or build yourown system?


  • Advertisement
  • Closed Accounts Posts: 891 ✭✭✭Falcon L


    Yup, I see where you're coming from with the reliability and economy. If originality isn't your thing then it makes perfect sense.

    Now, where's that 'unfollow' button. :D:D (kidding)


  • Registered Users, Registered Users 2 Posts: 4,506 ✭✭✭SpitfireIV


    That's very exciting :pac: the 4e in your picture looks like an 85bhp model with the later (97-) tubular intake manifold. The earlier (Irish 96-97) ones were 75bhp, they had this intake mani

    2012-022.jpg

    You should keep an eye out, (if power is any way your thing) for any japanese import non turbo starlets as the 4e in these made 99bhp with bigger injectors and throttle body. It's a good gain at virtually no expense and at no cost to reliability.

    Are you going to use the toyota loom and managment or build yourown system?

    The mock-up-block is a 1.4 from a Corolla, I'll probably be using a 1.3 from a Starlet, which, as your pic shows usually have the more basic inlet manifold. But, I have a tubular one now that can be reused ;) That said, I cut cut the pipes down and add bike carbs or stick a 2" Jag carb onto the end of the manifold setup, its all to play for. Gonna try keep it as simple as possible and probably use the ECU if only for the spark timing etc, but that jobs one for my neighbour/mechanic; far more knowledgeable on these kind of things :P I would prefer to keep the power to the 75bhp mark or there about, it's enough I recon for a small light car, plus I dont want to put any unnecessary stress on the gearbox or diff.


  • Registered Users, Registered Users 2 Posts: 4,506 ✭✭✭SpitfireIV


    Falcon L wrote: »
    Yup, I see where you're coming from with the reliability and economy. If originality isn't your thing then it makes perfect sense.

    Now, where's that 'unfollow' button. :D:D (kidding)

    You must have missed the bit where I chopped up the rear light panel to add my own light design; at that point originality went out the window :p

    I've given it a lot of thought and deep contemplation, locked myself away for days on end, built a small hut from branches and twig on the side of a remote mountain and considered all the pros and cons of such an action. At the end I just thought, 'Yeah, sur why not! :D '

    I've been driving a Starlet for the past 3 years or so, never once has she even hiccuped on me, only time I have to lift the bonnet if for fluid top ups and services. Thats the kinda' reliability I want from Spitty, something that I can enjoy and drive, heck, it'd nearly be a daily driver! :D


  • Registered Users, Registered Users 2 Posts: 12,917 ✭✭✭✭Toyotafanboi


    The mock-up-block is a 1.4 from a Corolla, I'll probably be using a 1.3 from a Starlet, which, as your pic shows usually have the more basic inlet manifold. But, I have a tubular one now that can be reused ;) That said, I cut cut the pipes down and add bike carbs or stick a 2" Jag carb onto the end of the manifold setup, its all to play for. Gonna try keep it as simple as possible and probably use the ECU if only for the spark timing etc, but that jobs one for my neighbour/mechanic; far more knowledgeable on these kind of things :P I would prefer to keep the power to the 75bhp mark or there about, it's enough I recon for a small light car, plus I dont want to put any unnecessary stress on the gearbox or diff.

    I think it's a great plan anyway :) nice to see a 4e getting some love.

    do bare in mind that all 4e engines whether corolla or starlet based are all 1332cc, there's no 1.3/ 1.4 alternates. The older 2e is 1298 and 5e (whose bottom end is interchangable with the 4e) is 1497.

    There are a few lads on TOC-IRL running 4e's on ITB set-ups, it may be worth signing up there for sone info.

    There is one setup still for sale afaik @€;450 for a full 4e on ITB's, with everything needed to get it going in terms of ecu/ loom etc, might be worth looking at the thread even if only for the photos :P http://www.toyotaownersclub-irl.com/t60921-gauging-interest-4efe-on-throttle-bodies


  • Registered Users, Registered Users 2 Posts: 4,944 ✭✭✭Bigus


    Good plan to use that type of engine.


  • Advertisement
  • Closed Accounts Posts: 8,585 ✭✭✭jca


    Go the whole hog and give her the 3500 V8 treatment never mind feckin around with those puny jap engines..... Only joking before the boardsie dry ****es turn turk on me!!!


  • Registered Users, Registered Users 2 Posts: 4,358 ✭✭✭kev1.3s


    jca wrote: »
    Go the whole hog and give her the 3500 V8 treatment never mind feckin around with those puny jap engines..... Only joking before the boardsie dry ****es turn turk on me!!!

    Wonder what kind of reg it'll have?


  • Closed Accounts Posts: 8,585 ✭✭✭jca


    kev1.3s wrote: »
    Wonder what kind of reg it'll have?

    It's Ireland, pick a number and throw it onto her shur it'll be grand:cool:


  • Registered Users, Registered Users 2 Posts: 4,506 ✭✭✭SpitfireIV


    kev1.3s wrote: »
    Wonder what kind of reg it'll have?

    The one listed on the logbook most likely :P


    Next phase of project Triota under way. Mounting the block and gearbox on the spare chassis to establish fit etc.
    Sump was removed to allow the 4E to be trial fitted. The sump will need to be modified to fit.

    Problems encountered were the placement of the alternator, might be a bit tight and the intake manifold sits far too high for the bonnet.......replace with bike carbs perhaps!

    NOTE: The 4E pictured is for trial fitting purposes only! I'll be purchasing another running example eventually.


    1536521_10156093733570591_8127753091852152412_n.jpg?oh=076f26a1203f65410f5bf491ebd846a2&oe=568F6921
    1300 block and non OD gearbox mounted to chassis to establish the position the gearbox would sit. Gearbox would then have to be fixed in that position so the block could be lifted away.


    12105738_10156093733695591_673979573100440958_n.jpg?oh=d295a5e2bc07cf32bf971bc602261d46&oe=568A6178
    Bit of angle made up with a locating stud on the end to hold the gearbox in place.


    12118988_10156093733815591_4578509129319878731_n.jpg?oh=f33108107034af3fd789f61cec65c726&oe=56D08AFF
    Same on the other side and a supporting prop underneath.


    12118927_10156093733905591_4986935870715124148_n.jpg?oh=b14c21e8bd1341a9d7ca6e8c5229b08c&oe=56CCEECA
    Bye bye block!


    12106726_10156093733970591_4343158861081186863_n.jpg?oh=91dde5ca2764f1273774b2852e7e48c2&oe=56891A75
    Gearbox held its position when block was taken away.


    12079229_10156093734045591_2450732636688297469_n.jpg?oh=bbacc07cf376451f8e8d9e8af5f82d46&oe=569730DB
    Toyota engine offered up (light enough to lift myself!!) and bolted up to the bell housing. Sump was removed as this will need work to clear the cross member on the chassis.


    10354161_10156093734115591_6605019148253047389_n.jpg?oh=3fc64a546ce15dd38f8ce091c360640d&oe=5695D949
    Exhaust will clear the turret, good!


    12079228_10156093734285591_2070726989484126380_n.jpg?oh=e4095dcf1b419212f7a9597ec5134468&oe=56938DDC
    Lines up pretty damn well


    12074827_10156093734490591_8378654112020665266_n.jpg?oh=0bdade47310289f90d7c349a5d816cbd&oe=56982ACF
    Should be easy enough to make some mounting brackets.


    11148220_10156093734565591_2640827515436980887_n.jpg?oh=c12bd490ed76b908f0029e9695980247&oe=569306E1
    12096572_10156093734675591_7859361040916803062_n.jpg?oh=c21191dcb1703ce24bb86d118d35c611&oe=56996DF4
    Front of the block lines up almost with turret mounts.


  • Registered Users, Registered Users 2 Posts: 4,944 ✭✭✭Bigus


    If I was at this stage I'd be trying an MX5 engine and box instead , because of the sump issues, With the Toyota. Loads on google in spitfires


  • Registered Users, Registered Users 2 Posts: 4,506 ✭✭✭SpitfireIV


    Bigus wrote: »
    If I was at this stage I'd be trying an MX5 engine and box instead , because of the sump issues, With the Toyota. Loads on google in spitfires

    MX5 engines and boxes arent that easy to come by really, that and the fact that I'd need have the drive shaft shortened and the bigger engine would probably make short work of my newly overhauled differential (which was designed for an engine in or around the 70bhp region). Probably mean more cutting and chopping, more than I'd be prepared to do. The 4E seems to be going well thus far, plus, I drive one daily in my little Starlet :p Not the most powerful engine ever, but its a light engine and its going into a light car; should be nippy enough.

    Regarding the sump, well, thats easy, chop the lower section off and spin it around so the hump is to the rear instead of the front, modify the oil pick up too so it reaches back to it.......thats the plan anyway.


  • Registered Users, Registered Users 2 Posts: 4,944 ✭✭✭Bigus


    Yeah I've chopped sumps before and modified pick up , hence my comment, anyway well done so far .


  • Registered Users, Registered Users 2 Posts: 4,506 ✭✭✭SpitfireIV


    Bigus wrote: »
    Yeah I've chopped sumps before and modified pick up , hence my comment, anyway well done so far .

    Watch this space, thats the next job on the list :D


    Hopefully will be picking up a 96 Starlet over the next couple of days that will have many useable parts such as:

    -Engine (100k on the clock)
    -Loom and ECU
    -Radiator
    -Has good 13" tires that I can use on my rims

    Plus other parts I can salvage for my own starlet! :P


    Also purchased a set of Honda cbr throttle bodies to stick on the side ;)


    I'll be back......


  • Registered Users, Registered Users 2 Posts: 1,783 ✭✭✭rugbyman


    Have just looked in here after a long while, you are a brave man Croppy Boy

    Regards, and good luck


  • Registered Users, Registered Users 2 Posts: 4,506 ✭✭✭SpitfireIV


    rugbyman wrote: »
    Have just looked in here after a long while, you are a brave man Croppy Boy

    Regards, and good luck

    Cheers. Stay tuned, lots more updates coming tomorrow! :-D


  • Advertisement
  • Registered Users, Registered Users 2 Posts: 4,506 ✭✭✭SpitfireIV


    Been a very busy few days, progress has been good and things are moving along nicely. Like they say, picture paints a thousand words.......


    12118736_10156109495055591_7868911422594619374_n.jpg?oh=f678b614b18c4cab0989167b030c5129&oe=56D0C18D
    Engine propped in posistion and the engine mounts fixed to the turrets, sections of plate were ten fixed to both of these and one to the bracket on the engine block.


    12065474_10156109495720591_4628969634006882918_n.jpg?oh=378af2757151cdeddbf2c321b64831cb&oe=568BB8E6
    Mounts are slightly bigger than the regualr Spitfie engine mounts, they're from a larger 6 pot engine, GT6, Stag etc.


    12115917_10156109496245591_1434656708601009001_n.jpg?oh=8b84e323775455be720985408c4243d6&oe=56C3EE4A
    View from above, next step was to bend up some pipe to connect the three mounts....


    12107782_10156109496655591_582703955594142963_n.jpg?oh=be92bc898e54e7ed90853ea1caa1dc52&oe=56CF043E
    Like so.


    12144894_10156109497775591_8466609204761123657_n.jpg?oh=44410b7d35d469f751971ca9fbc1c229&oe=56CC228D
    Welding the bracket up.


    12088036_10156109498505591_7084086965185734422_n.jpg?oh=efae81fc5db727b0ef0ed569c639267b&oe=568A1705
    All welded up and a brace put across the bottom to support the turrets.


    12141743_10156109499170591_8698152681180503543_n.jpg?oh=5393bff4cb13e30e8fe2d8dec751d117&oe=56BCD114
    12112412_10156109499760591_3790807608410291170_n.jpg?oh=bf77b1073a251de100e3456f19c1ec44&oe=568DF73F
    12088194_10156109500260591_6797646912737720846_n.jpg?oh=f66fe43d092ccb50e2b1686c044ca418&oe=56894698
    Loks good and fits well! Needs a bit of a grinding and clean up and it'll be good for paint.


    Next question........would it fit under the bonnet?


  • Registered Users, Registered Users 2 Posts: 4,506 ✭✭✭SpitfireIV


    Yes, yes it would :)


    12109102_10156114308825591_6987540921581010729_n.jpg?oh=6ce13461223bdacd970c1ec0d3dcd6fc&oe=56862690
    Lifted on the fibre glass GT6 bonnet for a look see. Hinge boxes set at their lowest setting and scrap bulhead section put in place to support the bonnet.


    12079503_10156114309245591_5531766436426533104_n.jpg?oh=4a0078019829a43c1aa94839de739af6&oe=56CEF58F
    Plenty of room underneath. In fact, there was enough room for a boot!


    12108247_10156114309740591_7961919645860829886_n.jpg?oh=73fdc18e931c824f5e9006b4a2029463&oe=568B335B
    Pulley clears the steering rack too.


    The sump was next on the list. As the 'hump' is to the front on the Toyota engine this would have clashed with a crossmember on the chassis, so the only thing to do (bar chopping the chassis) was to mod the sump.....


    12074600_10156109493800591_498339116051631456_n.jpg?oh=fe788c134e6275bc17e634296d7a468e&oe=568E89BB
    Marked up for the chop.


    11245501_10156109494310591_6316422851772918529_n.jpg?oh=e3d743ed11aea806f4bd79941bb2b1e2&oe=568F131B
    Chopped!


    Because we'd be swapping the hump around to the far end of the sump the pickup would also have to be modified to reach to the far end, so, that got the chop too.....

    12107765_10156120585835591_600577658962193743_n.jpg?oh=35fd0b1f462a5065c633d174f5bb9287&oe=568C63B5
    Connection chopped from original pickup; I'll be needing that.


    12119144_10156120585705591_4934450444442890924_n.jpg?oh=2884ca9c8cd9e9727fdd04dd8ad8bcf3&oe=56BB949D
    Trial pickup bent up and held in place.


    12108993_10156123337055591_3192763751722725146_n.jpg?oh=ef2e8df57932381cff6d8805f261d377&oe=56CC143C
    As it turns out it needed a bit of lenghtening to reach into the sump with the filter in place. So now that the proper lenght an angles have been determined a new one can be bent up and welded up.


    12115943_10156123341565591_1451064950240690186_n.jpg?oh=6b251fdc611000fbe20e1ea55651f261&oe=56879370
    Couple of tacks put on the sump for a trial fit and it goes on just fine!


  • Registered Users, Registered Users 2 Posts: 4,506 ✭✭✭SpitfireIV


    This thing came along then........


    10994178_10156114310060591_4180489176630211989_n.jpg?oh=cbd9fcc1abcabac1a2dc1415d49ac6f6&oe=56D087FC
    96 Starlet, 100k on the clock and engine dry as a bone! That'll do nicely.

    12140851_10156111161405591_8025554792781438218_n.jpg?oh=4611d7205fee044b82f018167751b270&oe=56C686F6
    Then these appeared!!! :eek: Honda CBR throttle bodies, but, thats for a later stage ;)


    Now, the 4EFE engine has an electronic dizzy that would clash with the bulkhead of the Spitty tub, so, a little bit of relieving was required....


    12106958_10156120584545591_2703479295143165114_n.jpg?oh=1dbec5c62ee96994a7ffcde6117c015c&oe=56905270
    Dizzy sticking out of the rear, as highlighted.


    12122856_10156120584710591_779465308995099102_n.jpg?oh=5af69e5e93588c236c93f11504fabaa3&oe=5689FF1B
    Where it would clash with the Spitty bulkhead.


    11249094_10156120584875591_4500821670629992774_n.jpg?oh=b2236d2896bf6c461d6e4516f55a7d0b&oe=56BC4739
    Thus this area on the bulkhead would have to go....


    10885561_10156120584995591_8393247794036411278_n.jpg?oh=f459a874122ffbe1c7afd857d589d6df&oe=56D3789F
    And then it was gone.


    12108958_10156120585170591_1299063802354016074_n.jpg?oh=2939d2723bb5106ed17db12dd7ce8b6c&oe=56869CF8
    Bit of angle made up to support the cut out section.


    12115752_10156120585295591_1512443261110595260_n.jpg?oh=ba85ecaf304394556a86d05abc0e8b6a&oe=56850AC6
    Fits in something like so.


    12105902_10156120585475591_9052385096023815011_n.jpg?oh=42ff5b6ac6f5b12c2e31e57777b0cbdf&oe=56893D0D
    View from the inside, the card gearbox tunnel cover will need to be modified to fit around this eventually, but thats a minor issue.


    So yeah, thats basically been it, been very busy!! :D


    Oh, knicked the tyres off the Starlet too, almost new rubbers fit the 13" rims nicely! Back two to fit yet, but, she rolls :cool:

    12074846_10156114310195591_2760149276270231375_n.jpg?oh=d33de19005e18747e701879d6982dc2c&oe=56C445A1


  • Registered Users, Registered Users 2 Posts: 12,917 ✭✭✭✭Toyotafanboi


    That's an internal coil dizzy but some 4e's ran a stubbier external coil dizzy with the coil on the bulkhead making dizzy maybe 40mm shorter, might have saved you that chassis chopping? Bit late now and fascinating progress either way!


  • Registered Users, Registered Users 2 Posts: 4,506 ✭✭✭SpitfireIV


    That's an internal coil dizzy but some 4e's ran a stubbier external coil dizzy with the coil on the bulkhead making dizzy maybe 40mm shorter, might have saved you that chassis chopping? Bit late now and fascinating progress either way!

    Are those the later coil pack ones? It was a choice between the two and the latter would have meant no mods to the tub but the internal coil would be easier to work with and allow for a bit more play and tuning when it comes to the throttle bodies etc, we'll see :-)


  • Registered Users, Registered Users 2 Posts: 12,917 ✭✭✭✭Toyotafanboi


    No actually, the coil pack one is shorter again, but the one I was referring to is kind of in between the two, a mechanical dizzy but with the coil unit in the bulk head connected via king lead which meant the dizzy cap was maybe 40mm shorter overall. Had a feeling you'd rather keep the mechanical style one for simplicity later on anyway, so it may have been an apt choice. Looks like a tidy job either way!


  • Registered Users, Registered Users 2 Posts: 12,917 ✭✭✭✭Toyotafanboi


    attachment.php?attachmentid=48206&d=1331735982


  • Registered Users, Registered Users 2 Posts: 4,506 ✭✭✭SpitfireIV


    No actually, the coil pack one is shorter again, but the one I was referring to is kind of in between the two, a mechanical dizzy but with the coil unit in the bulk head connected via king lead which meant the dizzy cap was maybe 40mm shorter overall. Had a feeling you'd rather keep the mechanical style one for simplicity later on anyway, so it may have been an apt choice. Looks like a tidy job either way!


    Interesting! I wasnt aware of that variety. Are they common here or unique to a particular year?


  • Registered Users, Registered Users 2 Posts: 12,917 ✭✭✭✭Toyotafanboi


    It was in the 96-99 starlet turbo and iirc the 90-95 starlet turbo aswell (probably others too) which i'm sure you know are easily found. For the purposes of what you're doing it's perfectly interchangable.

    toyodiy.com is handy if you want to look up a part number or check what parts are shared across various models.


  • Advertisement
  • Registered Users, Registered Users 2 Posts: 4,506 ✭✭✭SpitfireIV


    It was in the 96-99 starlet turbo and iirc the 90-95 starlet turbo aswell (probably others too) which i'm sure you know are easily found. For the purposes of what you're doing it's perfectly interchangable.

    toyodiy.com is handy if you want to look up a part number or check what parts are shared across various models.

    I'll be saving that link, thanks! :D


    Gave the tub a good sanding and de-greasing over the weekend, masked her up and brushed/rolled on a coat of 2k epoxy primer. She'll need a second coat, but it'll prevent rust from forming and tide her over the winter as well as making an excellent base for filler and highbuild. What's more, its almost ready to be reunited with the chassis! :D:D


    12189983_10156141979835591_9192583420079105408_n.jpg?oh=7d76243dd082a95fa9398a00b4d88c3d&oe=56BCBEDE

    12190042_10156141980135591_8639337032850453002_n.jpg?oh=289a6b19e0f54786ed5ef88c640ab364&oe=56C06F9A

    12109230_10156141980205591_1142890535625759835_n.jpg?oh=1e776576e6bc37995637e43bf0c66138&oe=56B4BD35&__gda__=1455535907_b341e173425f0abf8b393fdda2e704d5

    12190940_10156141980290591_6594825182781368280_n.jpg?oh=6ce812882badf02699a591cfd936356d&oe=568477FE

    11225156_10156141980380591_1989422236105314817_n.jpg?oh=04b24a1da97807ad3066fce11bd4e5f2&oe=56C222B6
    Stuck a few bits on her rear end for a look'see :P Plan is to put stainless steel inserts behind the lights and have the panel finished in black, should give the chrome a bit of a bang!


  • Registered Users, Registered Users 2 Posts: 4,506 ✭✭✭SpitfireIV


    Little update, emphasis on little, had a week off work and it just seemed to fly by! :(


    Got the main and input shaft sorted, had to leave it at an engineers shop for work but hopefully that'll be that issue sorted....

    11219586_10156160124875591_8005466180253546792_n.jpg?oh=3980d48d96a14661c3886bbb61821380&oe=56B02734
    Roller bearing had wore a recess into the end of the shaft!! :rolleyes:


    After a few weeks of being put on the long finger and many phonecalls later I got the reworked shafts back.....

    12065994_10156160125015591_7365125049884431005_n.jpg?oh=9f92216cc3de31d57bbfb999ee047f66&oe=56F31627
    Hardened steel sleeve on the end of the shaft.


    12189165_10156160125210591_6681261847992088910_n.jpg?oh=b82f758514377fbc370dea83fa153e84&oe=56AE058D
    New insert and roller bearing inside the end of the input shaft. Both of them fit together tight as a glove now!


    After that it was a case of cleaning up and prepping the calipers for painting, which they have recieved.

    12191502_10156160125500591_5158973782834915232_n.jpg?oh=f775ad627b5fc513d1fffc32e83d9293&oe=56BEEEE8


    And then attaching this thing to the inside of the tub! ;)

    12088290_10156160125560591_6619325354132642533_n.jpg?oh=6925cbd65d1470e28b031b43b448b3a4&oe=56AF7DBE


    Oh, and I cut a piece of stainless to fit in behind the lights. I like it......
    12191911_10156150470000591_6493851308357918416_n.jpg?oh=01173a5720df60d51c3a56d128ba792e&oe=56FAB391&__gda__=1459179655_ab2e3688d9e97390f9931cbdaeb72e56


  • Registered Users, Registered Users 2 Posts: 4,506 ✭✭✭SpitfireIV


    Looked at the wiring harness then, freshly removed from the Starlet. Thinned it out a little before offering it up as there isnt as much room to play with in the Spitty tub and besides, a lot of the wiring was either not in use or of no use to me in the Spitfire.

    12195844_10156165446355591_6148730211628735407_n.jpg?oh=bbdac67602c6798a9f63156b47fcb9d6&oe=56B92D08
    Lotta wires!

    12190045_10156165381330591_2961577974975453275_n.jpg?oh=4a06fc367846334dc5a94c151d4462c4&oe=56F70974
    Scrap pile.


    12226975_10156176508160591_5363713996320910073_n.jpg?oh=9fa6755a104540394cb338501dfe3cff&oe=56C537AA
    Started tracking it through the tub then, just to get an idea of how things would pan out, what needed to go where and what directions I needed to go. For the most part it seems to be working out pretty good. Watch this space...


    Onto the gearbox then.......


    12208617_10156172782560591_5229656000300397060_n.jpg?oh=c05845e2088162dd3b45c6eb962e77bc&oe=56C1A94A
    Freshly painted casing have the threads cleaned up.


    10612920_10156172782655591_2796532974248854436_n.jpg?oh=70d80e25a34578dd97c5eb2bc0179c9d&oe=56B36BBF&__gda__=1454802368_83fd5030681a7a58e7ceeff554e9abc4
    All the bits and bobs lined up after being cleaned. Picked up a rebuild kit from Paddocks that had all the necessary bearings, needle rollers, gaskets, circlips etc...


    12191718_10156172782870591_8788051292653975857_n.jpg?oh=c5d1045f723dbb77445fad23907721fc&oe=56BEFB4B
    Had two gearbox too pick and mix from so got a good selection of clean gears.


    11027474_10156172782960591_2383230155621561795_n.jpg?oh=cd979282c2700c5eda268f75b1c5f0fc&oe=56C1A403
    Had to make up a stand to hold the casing, vital if you're doing a rebuild! Bloody thing has no flat surfaces apart from the ends and thats not much good. So, for the sake of a few mins cutting and drilling it made life so much easier!


    10151266_10156172783225591_2487927318944396518_n.jpg?oh=2a94f18d91584dcff6e24c5944c00193&oe=56F59743


  • Registered Users, Registered Users 2 Posts: 304 ✭✭aidanic


    Wow is all I can say. That is a real labour of love. And I'm a bit envious too. Time, space, help and above all patience.


  • Registered Users, Registered Users 2 Posts: 12,917 ✭✭✭✭Toyotafanboi


    That's a "little" update :pac:


  • Registered Users, Registered Users 2 Posts: 4,506 ✭✭✭SpitfireIV


    aidanic wrote: »
    Wow is all I can say. That is a real labour of love. And I'm a bit envious too. Time, space, help and above all patience.

    Cheers! :) The pics and updates here might look great but let me tell you it's demanding, almost every free hour I can muster goes into the project; it can be frustrating, annoying, draining, expensive and consuming! Still envious? :D

    I'll be at this car 2 years come next March, the only thing that gets me through at times and keeps a little momentum behind me is the fact that I've come so far and keep in mind the end goal......it'll be worth it! :o


    That's a "little" update

    :p Out of interest are you familiar with the wiring harness setup? Particularly the ones for the lights and indicators on the stalk? I'll need to figure out which is which so I can remove the plugs and swap over to the Triumph stalks and light switchs.


  • Advertisement
  • Registered Users, Registered Users 2 Posts: 9,605 ✭✭✭gctest50


    might help or might lead you astray altogether :

    http://www.mearcat.com.au/docs/EP82%20Starlet%20Wiring%20and%20Connectors.pdf
    This document details a large amount of wiring information which I could ascertain from the two main wiring looms (Cabin & Engine Bay) that was provided with a 1991 (Gen 1) EP82 Toyota Starlet GT (4E-FTE) front cut, however much of the wiring layout and information will be appropriate to later
    Toyota Starlet models (with eg slightly different connectors or wiring colours).

    .


  • Registered Users, Registered Users 2 Posts: 4,506 ✭✭✭SpitfireIV


    gctest50 wrote: »

    Linkey no workey :( Sounds very interesting though!


  • Registered Users, Registered Users 2 Posts: 9,605 ✭✭✭gctest50


  • Closed Accounts Posts: 1,299 ✭✭✭paulmclaughlin


    Linkey no workey :( Sounds very interesting though!

    Here's the same pdf, different link!

    http://www.toyotagtturbo.com/wiki/EP82wiring/EP82%20Starlet%20Wiring%20and%20Connectors.pdf


  • Registered Users, Registered Users 2 Posts: 4,506 ✭✭✭SpitfireIV


    That'll come in very handy, thanks guys! :)


  • Advertisement
Advertisement