Advertisement
If you have a new account but are having problems posting or verifying your account, please email us on hello@boards.ie for help. Thanks :)
Hello all! Please ensure that you are posting a new thread or question in the appropriate forum. The Feedback forum is overwhelmed with questions that are having to be moved elsewhere. If you need help to verify your account contact hello@boards.ie
Hi all! We have been experiencing an issue on site where threads have been missing the latest postings. The platform host Vanilla are working on this issue. A workaround that has been used by some is to navigate back from 1 to 10+ pages to re-sync the thread and this will then show the latest posts. Thanks, Mike.
Hi there,
There is an issue with role permissions that is being worked on at the moment.
If you are having trouble with access or permissions on regional forums please post here to get access: https://www.boards.ie/discussion/2058365403/you-do-not-have-permission-for-that#latest

Spitfire Total Rebuild!

1356710

Comments

  • Registered Users, Registered Users 2 Posts: 4,506 ✭✭✭SpitfireIV


    Cheers guys! :) I'll see how the new light sections look once welded in and cleaned up, I dont necessarily want to draw attention to them with a different color, but, just create a little bit of interest on the back panel rather than just simply fixing the lights on to the existing panel.


    Few more pics from very recent times, ie last weekend!


    The major body work has been done so now its down to the trivial little jobs that need doing, like, patches of rust on the doors. I had been kind of dreading this, but, it was a pretty easy fix in both cases and I enjoy doing them, so, here we go.........


    10556898_10154467827790591_7979772407059060995_o.jpg
    ^ Rust had eaten through the skin of the passenger door. Wasnt sure what the lip/flange below it was like. Only one way to find out!


    1495377_10154467825865591_1443252809095270158_o.jpg
    ^ Rusty section removed and the lip below revealed and found to be very sound; apart from some surface rust that cleaned up.


    10495566_10154467828075591_1098041691974715753_o.jpg
    10495384_10154467826150591_3636210119366591681_o.jpg
    ^ New piece of steel in for a trial fit.


    10511523_10154467826720591_5471106112724984135_o.jpg
    ^ Excess trimmed away with enough left to fold over. The rusty section was cleaned up and treated before the metal was folded over.


    10557777_10154467828580591_8403994293919839226_o.jpg
    ^ Tacked in place and folded over; my first half decent attempt at MIG welding!! :P

    I'll get back to that one later.


    Now, driver side door needed work too!


    10454432_10154467825445591_2507813344170529070_o.jpg
    ^ Rust had eaten through door skin and unfortunately the lip/flange underneath; damn!


    1553552_10154467849255591_4572209097443882570_o.jpg
    ^ Outer skin cut away.


    10624048_10154467848460591_6386465695579495416_o.jpg
    ^ Flange cut away and template made up.


    10473054_10154467848145591_7679635649825754576_o.jpg
    ^ New section added.


    10550060_10154467850930591_1610591763827187995_o.jpg
    ^ New outer skin section in place and welded. Just to be cleaned down now and folded over.


    And that folks is you up to date! I've been playing catch up up to this point and throwing up pics when I had the time/felt like it, now however you will have to wait until I get time to work on the car! :P


  • Registered Users, Registered Users 2 Posts: 2,574 ✭✭✭dharn


    Great stuff super welding, interesting to see how you manage the fold over on that curve


  • Registered Users, Registered Users 2 Posts: 4,506 ✭✭✭SpitfireIV


    dharn wrote: »
    Great stuff super welding, interesting to see how you manage the fold over on that curve

    Curve has been sorted ;) Simples really, just cut the curve with about 20mm extra, then cut a number of slots and folded it over. There will be images soon that will show it infinitely better than I can explain! :p


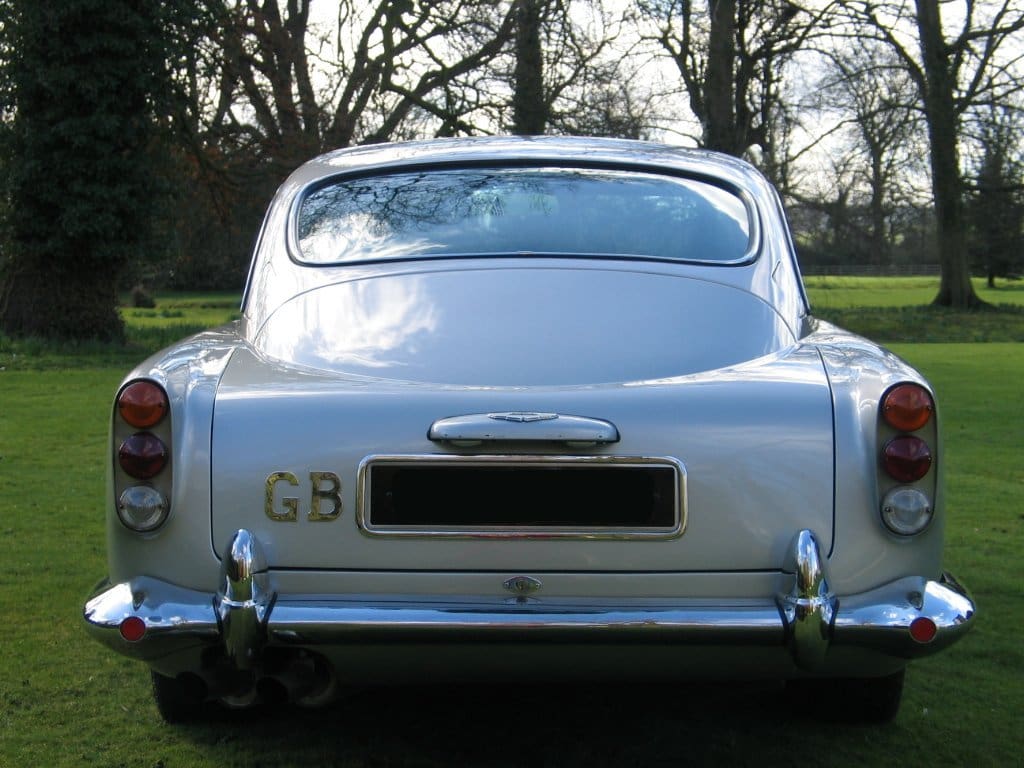
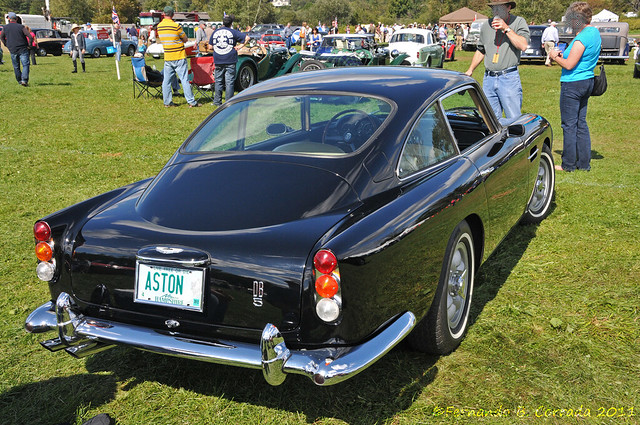
    But, in the meantime, I just realised my modifications to the lights look remarkably like the set up on the rear of the Aston Martin DB5!! :eek: I swear I didnt use this as a style que! They even use the same Lucas light fittings.....

    jamiroquai-Aston-Martin-DB5-rear-view1.jpg


    6190652865_12ea6f36c0_z.jpg

    The plate onto which the lights are fixed seems to be chromed, or stainless?? Hmmm........


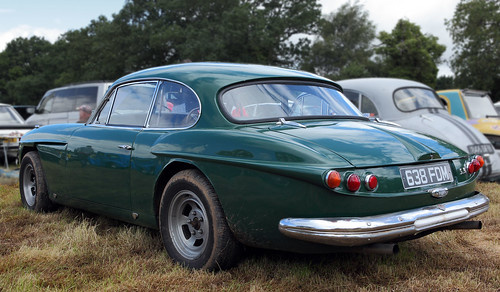
    Also, the Jensen C-V8 has a similar set up also using the same Lucas fittings.

    7434809394_5ec3ec854d.jpg

    48367a.jpg


    So, whilst I can no longer claim my car is original, it is at least in good company! :D


  • Registered Users, Registered Users 2 Posts: 4,506 ✭✭✭SpitfireIV


    Update time!

    Sorry guys, been a while, but, like I said, the frequency of updates now depends upon how much time I get to work on the car :P Up to recency I was trying to catch up with myself with the posts/stages of the build.


    Anyway, I left off with the door repair looking like this....
    10628887_10154558443490591_6939741123846919936_o.jpg


    The welds were then ground down (to reveal a few little holes that needed to be touched with the welder again.
    1606296_10154558443370591_4438671298584934899_o.jpg


    The profile of the curve was then drawn onto the repair section and the rest cut away.
    10333442_10154558443410591_8716795980874375816_o.jpg

    Must have got carried away at this point because the images are lacking! :o But, essentially I made a number of V shaped cuts into the inner curve marking and then one by one bent these tabs following the shape of the curve, like so...
    10630615_10154558443435591_8008881778870003742_o.jpg

    Just needs a final cleaning, a touch of weld and a skim of filler and the jobs a good'un.


    Now, the rear light panels were good to go having had the three holes made larger to allow for light fittings and the mounting points for the light units drilled.
    10687361_10154558443505591_6390334946338378565_o.jpg


    My own (messy) attempt at welding! Note the rusty area in the upper corner to the rear, this'll be cut away and replaced eventually.
    10700499_10154558443515591_4369277723608428261_o.jpg


    Driver side light panel welded in and partially cleaned up. Needs another bit of grinding and cleaning up, but at this point it was getting late so a quick sch'lap of rust primer will keep it safe until I get back to it.
    10687910_10154558443345591_1846531170028003440_o.jpg


    Driver side sill was good to close up! All rust proofed and will eventually be given a good dose of Waxoil when all the body work is done. The box section is the strenghtening bar as discussed earlier in the thread.
    10669243_10154558443030591_3848347705066659145_o.jpg


    Again, my attempt at welding! :o Not so bad along the sill but I ended up burning away the lip where it meets the bulkhead/firewall! D'oh, ah well, I'll clean it up and get it welded proper! Hole to fill in the bottom too.
    10604076_10154558443325591_5029092888713257021_o.jpg


    Other little jobs have been carried out too, minor bits of welding, filling gaps etc; all of them little steps towards getting the tub off the chassis, flipping her over and treating/sealing the underside!! :D


  • Registered Users, Registered Users 2 Posts: 22,353 ✭✭✭✭endacl


    Nothing to add. Just to let you know the thread's being followed and enjoyed!


  • Registered Users, Registered Users 2 Posts: 4,506 ✭✭✭SpitfireIV


    Bit more work has been done, but, not that much to show for it really :confused:

    I'm still at that rather annoying stage of trying to get (what seems like) the millions of little jobs done on the tub; the little holes that need cleaning and filling, the little cracks that need dressing, te rusty spots that need little patches or filling. When putting on large panels; wings, sills etc you seem an immediate difference, but with these little jobs, not so much so. Spend almost 12 hours straight on it Saturday and it still kinda looks the same, but, at least I know I'm a bit closer to getting the tub sorted! :)


    10258744_10154610643295591_4880398185585975534_o.jpg
    ^ About to get stuck in with another days work, but, as you can see, its still up in the air!


    10658714_10154610642200591_3605361637736204662_o.jpg
    ^ View from the rear.


    10623842_10154610643020591_8235132246647298204_o.jpg
    ^ Touching up a few little spots and cracks in the floorpan. Strenghtning ribs have also been knocked into the replacement section of floorpan nearest the sill.


    10633454_10154610643210591_7917230753169185337_o.jpg
    ^ Seat rails going in :D temporarily :( As a new section of floorpan was added the lenght of the floor on this side new holes had to be drilled and nuts welded to the underside to take the seat runner.


    10669188_10154610642485591_5183582763515720185_o.jpg
    ^ Had some spare brackets left on the donor tub so I figured it'd be no harm to have them added to the bulkhead.


    10700344_10154610642855591_5718001805270064765_o.jpg
    ^ The last of the rusty sections cut from the rear light panel! I had been putting this one off as there are a number of layers here and difficult profiles, but, I bit the bullet and got stuck in.........with a grinder!! Here the rusty section has been cut away.


    10662108_10154610642680591_8861684891576115187_o.jpg
    ^ First piece goes in.


    10001032_10154610642545591_6766337259676537902_o.jpg
    ^ Next bit in on top and tacked in place. Didnt get any more pics of this repair after, got carried away and stuck at it while I had the daylight, but, another two pieces were added and I'm happy to say that job is now done!! :cool:


    883414_10154610641170591_5748658545489099965_o.jpg
    ^ Filling up a few little spotweld holes on the rear deck, remnants of earlier days when the car was split in two!


    Until next time.......


  • Registered Users, Registered Users 2 Posts: 4,506 ✭✭✭SpitfireIV


    Got another bit done yesterday evening; few little holes welded, little bits an' bobs cleaned up and I reckon come the weekend *hopefully* I'll be able to lift the tub off the chassis!! :D

    The plan then is:

    1. The crappy bonnet can come off now and the chassis that I have been using can be put aside for the time being. Flip the tub over onto stands, give it a throughout cleaning back to bare metal and then it'll be chemically rust treated, sealed and painted.

    2. The second, spare chassis that I havent used yet will be brought in and inspected. This chassis looked to have been cleaned back and coated, possibly power coated, unfortunately it's in a Triumph deep orange :cool: So, I'll scrape that back a bit, see what its like underneath, if its good then it'll be sanded back a bit and given a coating of black.

    There are a number of new parts on this rolling chassis, so, I'll have a good look to see whats what, order new bushes, seals, brake parts etc then, once the chassis is rebuilt and rolling the tub, with its underside seaded can be dropped on ready for the inner prep! :)


    At least thats the plan.....


  • Registered Users, Registered Users 2 Posts: 4,358 ✭✭✭kev1.3s


    Ah that sounds very straight forward, good luck!


  • Registered Users, Registered Users 2 Posts: 4,506 ✭✭✭SpitfireIV


    So, not going exactly to plan, but, the weather has turned, there has been more little jobs needing to be done and even managed to squeeze in a weeks holidays!

    This is how she stood last week....

    I picked up a cheap tin of red spray just to cover up any raw areas of metal to tide me over until I could get back to it. The red will eventually be cleaned off! There was also a reason for picking the red; I wanted to see what the light mod to the rear would look like with some color on it! :D

    1016546_10154663462510591_3381829939829591432_n.jpg?oh=ce5f9d2e2e874f7fed73c0d574ff7d5d&oe=54F850ED
    ^ A patchwork of color! Bonnet off, Bare/raw areas sprayed red and the seam covers on the rear wing seams to keep any water out!


    10658529_10154663460955591_1137358241208938633_o.jpg
    ^ Mid way through the repair on the rear light panel.


    10700491_10154663460440591_675014953325756627_o.jpg
    ^ Repair just about finished and still in need of a little cleaning up.


    Below are some images of the rear panel with the lights temp in place (with wood screws! :P) and the chrome trim in place. I'm pretty damn happy with it!! :o

    10358961_10154663462895591_7919162307387738968_o.jpg

    10373060_10154663462820591_7728848648335161636_o.jpg

    10659083_10154663462815591_8446909018480662851_o.jpg

    10257229_10154663462570591_7264390711344095323_o.jpg

    10714384_10154663462245591_7267206493923620104_o.jpg


  • Closed Accounts Posts: 9,607 ✭✭✭toastedpickles


    She looks well! :D


  • Advertisement
  • Registered Users, Registered Users 2 Posts: 2,574 ✭✭✭dharn


    Looks very well indeed croppy, man standing with arms folded surveying his great achievement;)


  • Closed Accounts Posts: 433 ✭✭MaggotBrain


    Great thread, and a beautiful canvas, reading with interest here :)


  • Registered Users, Registered Users 2 Posts: 4,358 ✭✭✭kev1.3s


    There's nothing quite like seeing all you're hard work covered in paint, even if it is only tempory rattle can. Good job, looks well.


  • Registered Users, Registered Users 2 Posts: 4,506 ✭✭✭SpitfireIV


    Cheers guys! :o


    Nothing worth taking pics of lately, just cleaning up some of the panel joins/welds in and around the boot area/rear wings, treating them with Jenolite and LOWE rust primer, just trying to get a bit of protection down into the seams/joints itself.

    Other than that I purchased one of these finger/power files in Aldi yesterday, have yet to put it to action, but if it does work adequately there are lots of little welds and areas that need grinding/cleaning up that a disc grinder cant get in at! So, lets see........

    W43_PD_Thursday_New_UL7_2a524cd536.jpg


  • Registered Users, Registered Users 2 Posts: 4,506 ✭✭✭SpitfireIV


    Took the opportunity over the weekend to go take a look at the chassis! It's exactly as I got it back in February and stored at a family member house with other odds and ends (mostly junk) from the build.

    The chassis is in very good, clean condition with no evident rust or previous repairs and had been finished in a Triumph orange and assembled by the previous owner whom obviously never got round to finishing the project. It looks to have a number of new, or very seldom used parts fitted already (thankfully!).

    Those parts being:
    - Aftermarket/custom? 8 leaf spring with lowering block.
    - Shocks on the rear
    - Discs and dirt guards up front.
    - Bushes and gators

    Thankfully someone has already spent a few bob. The plan however for this chassis will be to strip it down, clean it back to bare metal in a few areas and assess the condition of the metal underneath; if good it'll be generally roughed up and painted black (should be the body color by right, so, we'll see). All the suspension components will be cleaned up also and repainted.


    10658679_10154727175990591_2453176055792871659_o.jpg

    10387616_10154727182470591_390279728305247841_n.jpg?oh=2e7fcf7515f6b40d9658837de4dd0e66&oe=54EA4E4A&__gda__=1424069885_d88a912441068eae1c5278f95907fdc1

    10687895_10154727175940591_3217397973422689536_o.jpg

    10648475_10154727177400591_2956714907746566746_o.jpg

    10655328_10154727179005591_543431169030121580_o.jpg

    10560442_10154727179955591_8614362940214522951_o.jpg

    1836914_10154727180805591_5773115584619251282_o.jpg

    10688018_10154727181720591_1504416412806891725_o.jpg


  • Registered Users, Registered Users 2 Posts: 2,574 ✭✭✭dharn


    I cant believe my eyes I saw thes pics already today on spitfire facebook page, thats a well kept secret croppy, the level of knowledge there is amazing:)


  • Registered Users, Registered Users 2 Posts: 4,506 ✭✭✭SpitfireIV


    dharn wrote: »
    I cant believe my eyes I saw thes pics already today on spitfire facebook page, thats a well kept secret croppy, the level of knowledge there is amazing:)

    Hah, glad you joined the group! :D Its a great page alright with plenty of knowledgable guys and gals that'll answer any and all questions (no matter how trivial), still though, they cant tell me what kind of leaf spring I have! :pac:


  • Registered Users, Registered Users 2 Posts: 2,574 ✭✭✭dharn


    Id say its off an ould trailer :p


  • Registered Users, Registered Users 2 Posts: 4,506 ✭✭✭SpitfireIV


    dharn wrote: »
    Id say its off an ould trailer :p

    Y'know what? It could be! :pac: I like to think however that it was a special, custom made one off spring for the car :P


  • Advertisement
  • Registered Users, Registered Users 2 Posts: 4,506 ✭✭✭SpitfireIV


    Ah hah!

    At last, a little bit of progress and a somewhat exciting stage of the build, it has, for now moved from the reconstruction phase to 'finishing', well, the first step in a veryyyyy long finishing process, but still, its a new area! :D


    The body tub was lifted off the chassis where it was rebuild, hammered, welded, patched, strengthened and spun round and round 360 and was moved, or, squeezed would be a more appropriate term into my former woodworking workshop (had to pull out some workbenches and put away all the old chippy tools :o ). But at least she's in out of the weather, dry and relatively warm (when I light the stove!) so, I'm happy about that.

    10633748_10154784727180591_6408007285185331789_o.jpg
    ^ Looks tight but there is room to move and work around the car.

    10658932_10154784727210591_6861459243677332242_o.jpg
    ^ With the car in, and turned upside down the plan is to completely strip the underneath of the many layers of underseal and gunk that was applied by the previous owner. Top marks for effort, there was 3 layers; grey Schultz, white epoxy and black stonechip! Unfortunately the prep work was lacking so there was many patches of rust under all these 'protective' layers, so, one has to wonder if the underseal was protecting the rust! :rolleyes:

    Anyway, a bit of heat, some old chisels and plenty of elbow grease will have that stuff off in no time.


    10382283_10154784727215591_6566446776734940777_o.jpg
    ^ Not a great pic, but, you get the idea of what I'm working with.....a mess.


    I hope, if I have the space and it works to mount the tub on a spinny jib so I can work at it more comfortably as well as similtainiously working on the inside floorpans, but, we'll see how that works out.


    The plan for the underside is...

    1. Clean off all the underseal, old paint and any other junk.
    2. Do any final bits of welding that need to be done and clean up all existing welds.
    3. Clean all the underside down to bare, clean metal.
    4. Thouroughly clean and degrease.
    5. Apply Deox gel as per instruction; that'll both highlight and kill any active rust.
    6. Clean again and and apply Hydrate 80 which will put down a rust proof barrier.
    7. Over this will be applied an epoxy resin.

    10303174_10154784727285591_4601128690172965043_n.jpg?oh=87961d64e91031373036b0a565f83e5c&oe=54E4DAB0
    ^ Deox Gel and Hydrate 80.


    We'll see how it goes.......


  • Registered Users, Registered Users 2 Posts: 4,506 ✭✭✭SpitfireIV


    Bye bye underseal, HELLO relatively clean metal! :D


    Well, the body tub has been mounted on the spinny jig and she does indeed spin 360, albeit a bit tight, but, its workable.

    Next job with the underseal gone is to tidy up the welds, straighten out a few dings and knocks and sort a few very minor little repairs that the removal of the the underseal highlighted. We're going good!


    10696350_10154807554020591_4927269889822105470_n.jpg?oh=ccb383a2bbac183ec7566ff153783635&oe=55206308&__gda__=1423467629_bd5d757f59ad199f30ab0ded5aad9a5d
    ^ She spins! (stupid fog getting into the workshop lastnight!)


    1899708_10154807553835591_2769234024232386908_o.jpg
    ^ Shiney metal is good metal! :o


    13259_10154807553790591_6552422963278641308_n.jpg?oh=ccc8f709d154976f0cee7cb767a31dc9&oe=54DE4150
    ^ Underside of the boot panel, needs a bit of cleaning up still.


    With the underside pretty clean now I can spin her round and remove the heavy end of the paint/rust primer that I previously applied to the inside surface of the floorpan. I'd sooner tackle that now and get it off instead of treating the underside, then generating heat on the inside which may affect the protective coating underneath.


    I'll be back......


  • Registered Users, Registered Users 2 Posts: 1,003 ✭✭✭Zoo4m8


    This is a terrific thread and real encouragement to the likes of me, just finished the spit for my TR7, a collection of holes held together with the odd piece of sound steel, lifted the shell up with the help of a tractor and loader, slotted the spit on and it works a treat!
    Unfortunately don't know how to post pics but will sort that out at some stage probably with the help of a 10 year old!


  • Registered Users, Registered Users 2 Posts: 314 ✭✭Darraghmh91.


    Really goin balls out on this project full restoration .. Wish I had a garage to do this kinda stuff


  • Registered Users, Registered Users 2 Posts: 4,506 ✭✭✭SpitfireIV


    Got another update for you lot! :D

    The chipping, grinding and sanding goes on. There's a lot to be done and a heck of a lot already done, hence the lack of images as of late, there's only so many images of rust and old paint one can show!

    Been trying out my Bilt Hamber 'Deox Gel' on some of the rust and, yeah, it seems to work. Its a water based (how ironic) rust killer and remover. See the pics for more info....

    Also been squeezing the upper half of me in and out of the gearbox tunnel opening and trying to work at scraping off a rough textured (almost like stonechip) black paint off the inside face of the firewall/bulkhead and the underside of the dash, battery box etc.


    10410471_10154870830015591_8534893658573595760_n.jpg?oh=4ead2c2cb9ae1a57668a02e9071b5ef2&oe=54FBD5BF&__gda__=1427611817_b438e15050d496b8761291a9403c43de
    ^ A little test with the rust killer/remover 'Deox Gel'. Both sides of the tunnel were equally rusted (approx half way across the diff window is where I worked to. The prep process takes a bit of time but after 45 mins or so it does lift a fair bit of rust as can be seen by the shiney metal!


    10419005_10154870830260591_1185789421282841386_n.jpg?oh=027a567665bc1f96dfa5c4e1b89b45e5&oe=5514149F
    ^ A rusty floorpan, ready for some treatment! Had to be degreased first, then washed with hot soapy water, then rinsed with clean water before being dried, and then...


    10834864_10154870829260591_1812997596263839281_o.jpg
    ^ The deox gel gets slopped on good and thick and left for 30-60 mins or so to do its work.


    10849944_10154870830210591_6890005397093848547_n.jpg?oh=91dd3f69056bed601a5c659dc7b9f2c8&oe=55047406
    ^ After about an hour and before the stuff starts drying out you work it with a wire brush and then wash it away and dry up! The rust turns black and the cleaner metal turns shiney.


    10383487_10154870830005591_4157350092167161388_n.jpg?oh=5cf5e0d35d229ab7244acf872d63305d&oe=550405C5&__gda__=1427558513_f3a1d1d642e95a80da15fdcd7325db23
    ^ Then the floorpan got a liberal coating of rust primer! The first of two. Feels good to be seeing nice fresh paint go down on a properly prepped surface. This wont be coming off again for many a year I hope!!


    10339373_10154870829940591_1504456142719526234_o.jpg
    ^ Cleaned off the back panel and guess what I found? Yeah! More filler, big splodge of it in fact! Damn. It'll probably knock back into shape.


    I also got the frame erected for the 6x3 metre poly tunnel, so, hope to get that finished soon too and at least I'll have a place to store the car and hopefully put on the primer. :o


  • Registered Users, Registered Users 2 Posts: 1,258 ✭✭✭sogood


    I'm getting towards the end of a boat resto before I move onto the MG and even with the luxury of a big dry garage, it can be hard, but every time I read your posts, I stop complaining and take encouragement. Major kudos to you, especially at this time of year, dodging the cold and rain.

    Maybe I'm just getting soft in my old age!

    keep up the great work!


  • Advertisement
  • Registered Users, Registered Users 2 Posts: 4,506 ✭✭✭SpitfireIV


    Zoo4m8 wrote: »
    This is a terrific thread and real encouragement to the likes of me, just finished the spit for my TR7, a collection of holes held together with the odd piece of sound steel, lifted the shell up with the help of a tractor and loader, slotted the spit on and it works a treat!
    Unfortunately don't know how to post pics but will sort that out at some stage probably with the help of a 10 year old!

    Sounds like an interesting project! Make sure and start a thread when you get the pics figured out! :D I'm copying mine from Facebook, I keep updates on the Spitfire page so its easy to copy the URL and drop it on here.


    Really goin balls out on this project full restoration .. Wish I had a garage to do this kinda stuff

    Cheers! :) Wish I had a garage too, hah, well, a half decent sized one. Working room is quite limited, but, I've set up a poly tunnel off site where I can store and assemble the car when the time comes.
    sogood wrote: »
    I'm getting towards the end of a boat resto before I move onto the MG and even with the luxury of a big dry garage, it can be hard, but every time I read your posts, I stop complaining and take encouragement. Major kudos to you, especially at this time of year, dodging the cold and rain.

    Maybe I'm just getting soft in my old age!

    keep up the great work!


    The only thing keeping me going at times is the thought of the end product and the (hopefully) fun I'll get from it and the head turns!! :D It'll be all worth it, plus, I'll have a car that I know every square inch of!! :o

    'Till all be worth it.


  • Registered Users, Registered Users 2 Posts: 4,358 ✭✭✭kev1.3s


    I would be a little apprehensive of the poly tunnel, I'm open to correction but my lancia was stored for decades in a Polly tunnel and it didn't exactly stop her from rusting. I assumed that the humidity and condensation were not ideal for storing an Italian classic, or a BL classic for that matter.


  • Registered Users, Registered Users 2 Posts: 4,506 ✭✭✭SpitfireIV


    kev1.3s wrote: »
    I would be a little apprehensive of the poly tunnel, I'm open to correction but my lancia was stored for decades in a Polly tunnel and it didn't exactly stop her from rusting. I assumed that the humidity and condensation were not ideal for storing an Italian classic, or a BL classic for that matter.

    The poly tunnel I hope will just be a temporary measure to store the body on chassis while I work on the bonnet and also to prep the car and prime, perhaps, when the weather picks up closer to summer, to spray it in. There are 12 mesh windows in it so I hope the air flow might cut down on the damp/condensation, but, we'll see.


    Happy new year all! Been a busy enough Christmas/New Year so have many updates to share! :)


    Now, I left off with getting the underside cleaned up ready to be treated. It was a long, hard, messy job to remove every mm of underseal, paint, gunk and junk and then tidy up any last little weld/tidy up jobs before the treatments could begin.


    10848605_10154942304495591_9001274311453398182_o.jpg
    ^ Almost forgot to make and fit this little guy! Wouldnt have done to have treated the underside then realised I had to weld this in!


    10446209_10154942307085591_410435798267360976_o.jpg
    ^ Lot of rust, but, thankfully just light surface rust/staining.


    10888575_10154942307025591_2979955991894546975_n.jpg?oh=fd1f028b41a710048503b3785a0aa215&oe=55365C2B&__gda__=1433327165_16d5f551e2c88ef3c896321be7acc00e
    ^ Original floorpan with replacement 1.6mm section down the left had side. Rear section of the floorpan aint so bad, there was a number of pin hole in the footwell that were welded.


    After taking the heavy end of any rust off with the wire brush and tidying up any little jobs the whole underside was washed cleaned and then was treated with Deox Gel which removes any active rust and restores metal back to nice shiney stuff! Its messy, gloopy stuff. Instructions say to apply the gel and leave to sit for 30-60mins before scrubbing with a wire brush and washing clean, however, an internet search recommends that its left on for 12 hours plus, possibly 24.


    10873025_10154942307360591_5774790177863791191_o.jpg
    10418517_10154942306495591_3130888476926312305_n.jpg?oh=bd0ac5cfbd8e03c323d03f3840023276&oe=552BB309&__gda__=1429208156_a2d5f43518c34f3b2af80c76e3d209ca
    ^ Gel was applied and wrapped with cling film to prevent it drying out. Now we wait.....


    10847510_10154945624470591_2190985967918143695_o.jpg
    ^ The next day revealed a lot of removed rust in the form of a orange sludge, green gunk and like a white fungus.....nice!


    10680099_10154945624505591_796100359986657253_o.jpg
    ^ Cling film will have to be removed, the metal scrubbed with a brush to remove any loose stuff and then the underside washed clean. Here we go!


    10452371_10154945622555591_2988146963131879903_n.jpg?oh=836610496ccc8d5f2c7669e43fe657b7&oe=552A1F73&__gda__=1429756694_44273f2cd7767a1c2e626274712193b9
    10838287_10154945624215591_7872387118068408052_o.jpg
    ^ All washed and clean, and not looking too bad. A bit shiner than when I began for sure. I could do this process again to clean it further but I made the decision that it was clean enough and ready to move onto the next stage.....


    10689497_10154948071835591_7764271900345141426_n.jpg?oh=f27532679ce6bd790cbb2906f7956163&oe=55435291&__gda__=1429393604_a42ccd1ea3f52591d18fa4a6b63ac6c8

    ;)


  • Registered Users, Registered Users 2 Posts: 4,506 ✭✭✭SpitfireIV


    So now, lots of shiney clean metal on show and time for it to be treated!

    As above, the next product to be applied was the Hydrate 80. This is a water based, chemical rust killer and metal protector that apparently turns the metal black!! We'll see......

    10452359_10154948071915591_6950709520029872569_n.jpg?oh=17bdbbcd692281cebf8f200e346cc5ca&oe=552BDA49


    Before I began I made sure to give the car a final FINAL grinding and clean up both inside and out because once this stuff goes on I dont want to damage it but grinding or welding on the inside and burning it off underneath! So, satisfied all the tidying up was done the underside was degreased twice, washed, wiped down and dry, ready for the Hydrate 80 to be applied.


    10863975_10154945624375591_3467815864269041285_o.jpg
    ^ Strange color stuff, has the consistency of milk almost and has a kind of PVA smell from it.


    10888556_10154945624045591_8418828379503305125_n.jpg?oh=449a761610563542138391b2c4b97412&oe=553A9BA9&__gda__=1429667858_6089978d1b64de17f6a94c147b699eec
    ^ Boot floor done. Goes on an odd color but gradually turns darker, until........


    14330_10154945624240591_1507589187584457053_n.jpg?oh=71081eb26de5e755a4a6f454b747498a&oe=552F7505&__gda__=1430458066_0c1d11f9192624a178633e2d151cecee
    ^ .....it goes almost black! Looks a bit patchy too, I guess this is because of the different levels of pitting, staining on the bodywork. But, hopefully a second coat will sort all of that out.


    10863788_10154948070585591_6634871226876535325_o.jpg
    ^ Second coat applied and it looks something like this :)


    1974264_10154948072000591_4174775811729465462_o.jpg
    10881612_10154948071810591_509332577012940426_n.jpg?oh=b954b107d24acdf0d0aaafa4617d903e&oe=552E73BF&__gda__=1429776367_6a3182c930dd267385a873d295d49f9a
    10888942_10154948071825591_8092694328625649107_n.jpg?oh=c19c6d2ca42acfb7821d3f70ce0885e5&oe=553DFDD6&__gda__=1430025408_b1d8a6076934a0d517e566889793594b
    ^ Really pleased with how it turned out! Great to see the whole underside looking fresh an' clean and all the one color; great moral boost!

    After this it was onto the next stage which would involve laying down two coats of rust primer on the underside; coming along nicely!! ;)


  • Closed Accounts Posts: 891 ✭✭✭Falcon L


    That's a fantastic job on the underside. It must be very rewarding getting the metal back to (better than?) original.

    I would love to do a Stag to this level, but unfortunately, I'm well past being able to.

    Good luck with the rest of the restoration. I'll be watching with great interest.


  • Advertisement
  • Closed Accounts Posts: 9,607 ✭✭✭toastedpickles


    I was actually gona use that combo on my 900 raging i didnt now!


  • Registered Users, Registered Users 2 Posts: 4,506 ✭✭✭SpitfireIV


    Falcon L wrote: »
    That's a fantastic job on the underside. It must be very rewarding getting the metal back to (better than?) original.

    I would love to do a Stag to this level, but unfortunately, I'm well past being able to.

    Good luck with the rest of the restoration. I'll be watching with great interest.

    Its very rewarding indeed, does take a lot of work and hardship though, but, while I have it at this stage I might as well do it right and be done with it.
    I was actually gona use that combo on my 900 raging i didnt now!

    What did you use instead?


    The hydrate 80 was given a few days to cure and then it was time to crack open the Lowe Rust Primer, of which it would recieve two coats which turned it from black to grey! :)

    10906359_10154964292045591_4587167034408422431_n.jpg?oh=db6fd04e7dcc6dc80f529e483fe3438e&oe=552D9B82

    10885494_10154964292265591_1642520112059380979_n.jpg?oh=731ffaf7b1ae0500c6ba751a8e93e115&oe=553A097F

    541607_10154964291780591_1843754400177171553_n.jpg?oh=16e910a8c2219a8efe8f75e889d956ed&oe=553980D3

    That stuff is like very sticky gloss paint! Not the easiest to apply, but its supposedly good stuff (and if the price is any indication then it is!). These two coats will be allowed a few days to fully cure (it does tend to stay a bit rubbery for a while) and then the seams will be sealed with Tec7 before it gets another coating, this time of epoxy resin.

    Now, to the inside......


  • Closed Accounts Posts: 9,607 ✭✭✭toastedpickles


    I used a 2 in 1 sorta thing, por 15 i think it was, its out in the shed, It turned the rust white and then you just painted over it! The shell looks amazing though i gotta say! Looking forward to getting stuck into mine again soon


  • Registered Users, Registered Users 2 Posts: 1,863 ✭✭✭dball


    The only thing i know about cars is driving them, Ive been watching this thread with interest for a few months now - Amazing work, well done to date. I hope the next few months are good to you with the weather and all that and shes up and running for the summer months.

    best of luck


  • Registered Users, Registered Users 2 Posts: 4,506 ✭✭✭SpitfireIV


    I used a 2 in 1 sorta thing, por 15 i think it was, its out in the shed, It turned the rust white and then you just painted over it! The shell looks amazing though i gotta say! Looking forward to getting stuck into mine again soon

    I've heard good reports on the POR15, so, I wouldnt worry, once you prepped it correctly then it should be grand :)
    dball wrote: »
    The only thing i know about cars is driving them, Ive been watching this thread with interest for a few months now - Amazing work, well done to date. I hope the next few months are good to you with the weather and all that and shes up and running for the summer months.

    best of luck

    Cheers mate, glad youre enjoying. Its not enticing you to pick up a little project of your wn no?? ;):D


  • Registered Users, Registered Users 2 Posts: 4,506 ✭✭✭SpitfireIV


    I figured I'd leave the underside for a number of days and let it harden fully and so started work on the inside of the car. The plan now is to take it in steps, the first area to tackle was the floorpans and inner sills. These were cleaned back to fresh metal with a wire brush, washed and treated with Hydrate 80. After a couple of days and another bit of a cleaning the rust primer came out once more.


    10730229_10155001264930591_2715282795709996021_n.jpg?oh=1be8e423c21d313cedcd603565904a83&oe=55242E19

    10730229_10155001269870591_3684609828846759828_n.jpg?oh=ba55f6a9122b6d81c56fa70c1276f6e3&oe=5523EC28&__gda__=1429154622_5937ac1ba0c2434f898c81fe7d36c9ef

    10915220_10155001269215591_5724030701896717589_n.jpg?oh=a462f606d279f15b3dcfc9aee6c4f845&oe=556D7082

    10897107_10155001267290591_96534091021504494_n.jpg?oh=8d0dd83eb990c24479b80d433159d522&oe=553BDCA5

    And that my friends is me up to date. The above is just the first coat of two, but, I reckon the underside has been left long enough so I'll seam seal that in the coming days and seal up the internal joints before giving it a second coat.

    I'll be back....


  • Registered Users, Registered Users 2 Posts: 4,506 ✭✭✭SpitfireIV


    Another bit of progress from yesterday evening.....

    10906211_10155029099115591_7708432178980096286_n.jpg?oh=33e4de75de9d46ef364f4eaf3dcb7883&oe=55280139
    10917862_10155029098335591_6634475391376594007_n.jpg?oh=ff0605aa241310f6e2b7b7cc55c0ef15&oe=552920A5&__gda__=1428875760_ca721c4e8d646a19da6d8041db28e565
    ^ Bit of seam sealing using Tec7, should keep the moisture, dust and dirt out. Happy enough with the job, looks clean enough, especially when compared to how it looked when I got the car......


    10916384_10155029098595591_3721363091136642875_o.jpg

    :confused:


    Started on the boot area then. Took off the rear stand for the rotisserie and propped it up so I could remove the rotisserie bracket and also the bumper mounting brackets; with no obsticles its easier to access, clean and do a proper job!

    10891723_10155029099540591_4565476829274646025_n.jpg?oh=2ed47f8637ed06c3e4b0182db1770f15&oe=55370E9D&__gda__=1429729163_087b8342bbb3e1fa4e0a5fff315446c5

    10898046_10155029099825591_3188210219868827061_n.jpg?oh=23686dbe21f5d14387070613bc068fbb&oe=55257465&__gda__=1428989232_d3ac15d03380c825edf0b5503ecd8c03
    ^ The plan is to clean this are up and treat the boot floor with Hydrate 80 before it gets a coat of rust primer.


  • Registered Users, Registered Users 2 Posts: 4,506 ✭✭✭SpitfireIV


    Been tipping away at it on and off.

    Got the boot floor cleaned up, washed and treated the bottom section of it with the Hydrate 80 and then watched it go blackkkk.......

    10928981_10155032179185591_3536941547498855242_n.jpg?oh=e7e8b88679386bfd53ab58ffe283f8d1&oe=552C3349

    10488096_10155032179410591_6631683253752198408_n.jpg?oh=b5d8f411fa8f5011332d9cfbe50bc2ec&oe=5522A9A0


    10923530_10155034310535591_576729307115376019_n.jpg?oh=12da1d6a16ae512a83c39bd402e6ddc9&oe=556BABD8
    ^Set about cleaning up the rear end then, particularly around the little nooks and crannies of the light panel; taking care of most of the dust and dirt before I painted the boot floor, which has been done since but I dont have a pic to hand. At this stage the frame and jig at the rear of the car to allow it to spin was removed to allow access and the car propped up on kegs :D


    10933925_10155054474735591_8434353552977474431_n.jpg?oh=39c7b5233c72778a0e741690aa5757e8&oe=552BAF47
    ^ After that, the disorientation set in again so I had to grab a few parts and put them in place to remind (and reassure?!) myself of what she may look like someday, soon :(

    Stuck the doors on after this for a test fit and got a little issue with the passenger door sorted, so, happy with that.


    10923572_10155054111585591_5832774735551265162_n.jpg?oh=ded70dafe982c987dd166bf088a4ff85&oe=556DEC41&__gda__=1432854078_6e59f298e16aa06efe9cc1bc0faaa230
    ^ My job for the weekend? To sort this tunnel out! Get the cover on her and secure it. Theres a pile of parts here but the only parts that will be used are the chassis and bonnet, the latter needing a good bit of work. Hardtop is rotten to the core and bootlid under it is not much better! I hope, once I have the cover on the tunnel to strip down the chassis, clean and repaint it, at least it'll be dry.


  • Registered Users, Registered Users 2 Posts: 314 ✭✭Darraghmh91.


    Done more great work goin into this car .. It's a long hard stressful project but it's well worth it when you start to see results like you gave been gettin

    That rust killer gel done some job didn't it .. Will you bring the car to the previous owner and show him what you have done since you bought it off him


  • Registered Users, Registered Users 2 Posts: 502 ✭✭✭adrianshanahan


    I've just read this thread start to finish, amazing work done so far. Look forward to the further updates.


  • Advertisement
  • Registered Users, Registered Users 2 Posts: 61 ✭✭ben9195


    One of the most enjoyable and interesting projects I have followed. Great pictures etc. and I look forward to seeing how things are progressing. Thanks for sharing.


  • Registered Users Posts: 47 dante2015


    looking fantasitc so far cant wait to see more


  • Registered Users, Registered Users 2 Posts: 4,506 ✭✭✭SpitfireIV


    Cheers for the interest guys! :) Daragh, I might take it for a spin, they might not recognise it though! :p


    Well, some more work has been done as you can see below.....


    1384199_10155064418930591_6422188891246366380_n.jpg?oh=af68d5d4b492bf1ebb025c4e8f51e0cf&oe=55589701&__gda__=1431897937_d5b83147a7f5b73c67c901a93413cd31
    ^ Got the cover on the poly tunnel; finally somewhere to keep the odds and ends dry and a place to work on the chassis.....


    1743501_10155064419090591_2227953902815478472_n.jpg?oh=91a113a2b10670b2c3232ddbf5b1d2fc&oe=55645208&__gda__=1431885623_ec555066c8c59c9ccd335d949002210f
    ....which I began to strip down. More on this to follow :(


    10410565_10155063284115591_4302609330817885686_n.jpg?oh=f71f9a12c0cbb53b20091808d8bea621&oe=556E8B05
    ^ Weird ass leaf spring, non one seems to know what it came off. Although it fits its certainly not a standard spring!


    Purists turn away NOW!! It gets controversial!! :eek:

    After seeing a digital image created by a member of the Triumph Spitfire Facebook page that I really liked I decided to take the modifications to the rear a little further than the round lights.


    10933826_10153098077410929_7895127498243388165_n.jpg?oh=4f1a932b715800f97836d27230b1978b&oe=556C91E1
    ^ The digital image with dropped rear plate, modified bumper and TRIUMPH lettering. I loved it!


    10941013_10155091220450591_1163844377406024586_n.jpg?oh=bdd97ca967c395f386be11864cb3a9f6&oe=55218852&__gda__=1432119364_3f9bf52a102e999d4abcec638ad0fbf9
    ^ So, I got sketching and came up with my own ideas which the facebook member converted for me to this.....


    10360829_935609523130373_4505539622383914765_n.jpg?oh=6a5ff7fd5d949563d0e9aee6283c3c9d&oe=5559837B&__gda__=1432440778_7514274d842a9b7c8f4dfdc524fbc008
    .... me likey!! But, this would mean having to chop the rear bumper!! Now, as you might imagine, sourcing another rear bumper, or a Spit that was being broken is gonna be very very tough in this country, so, after some soul searching, contemplation and a Mars Bar I thought, LETS DO THIS!!! :D


  • Registered Users, Registered Users 2 Posts: 4,506 ✭✭✭SpitfireIV


    10406347_10155096349380591_252984597553350643_n.jpg?oh=9e9b955c53eb39cca3d5e7f13873f9db&oe=556F7F9A
    ^ Thinking out loud! I decided I'd drop the Triumph logo off the rear panel and just go with the lettering which, will be raised chrome.


    10931519_10155098717565591_2246139642378394586_n.jpg?oh=f3250dba4ec8d84e31856ab838a8c265&oe=555F5879&__gda__=1433078639_23808b2eb2be60dfa7108b47e212e0d4

    10929895_10155098718655591_2342354964689826093_n.jpg?oh=4af3d8b0f8846506fc6e175b14a46c5f&oe=55248851&__gda__=1428707588_6129758f06dcb35cb9f73254f5ec0ee0

    10922600_10155098718415591_3952822810456806476_n.jpg?oh=acb7bb37751599f824b8cc0105135fe7&oe=556BDBB2&__gda__=1433038311_1586b9a1feb3149f273a4f9afa5f4010

    Cut and shut! Almost. The cut ends of the bumper were rounded over but are still round and need a bit more peening over and welding, but, it turned out really well and I'm happy with the look! Cant wait to get the chrome lettering, which, is the same size as I have it marked out with pernament marker.


    So yeah, all was going super until I got a message to say this had happened....

    10941438_10155101740565591_5522308766533269629_n.jpg?oh=306c573a37f33f28440d5ffffc7ec914&oe=556101DE

    Bullocks! :mad:


  • Closed Accounts Posts: 891 ✭✭✭Falcon L


    Oh bollox! Bad news about the poly tunnel. Still, at least it didn't decide to do it when it could have ruined some of your work.

    Loving the bumpers and the Triumph lettering! Looks fantastic. Not so sure about the round lights though. :o The ones on the white car in the digital image look the part. A bit like a mini Stag.


  • Registered Users, Registered Users 2 Posts: 4,358 ✭✭✭kev1.3s


    Yeah I agree, love the lower number plate and split bumpers, I'll sit on the fence regarding the lights until I see it painted.


  • Registered Users, Registered Users 2 Posts: 314 ✭✭Darraghmh91.


    Looks good man I do like that sketch tho pretty Cool if Love to be able to draw like that and do one of my starlet ha

    Yeah take it up ha make him see that if he had of done the work he would of had a lovly mint car ha hel Probly make you an offer to buy back haha


  • Registered Users, Registered Users 2 Posts: 4,506 ✭✭✭SpitfireIV


    Cheers guys! :D

    I should mention that the lights will be altered, so the inside red lights will be replaced for two clear reverse lenses.


    Apart from that just be cleaning up the bulkhead. I had lashed on some rust primer to keep it from deteriorating whilst it was being worked out outdoors, so, it was a nightmare to get back off; combination of nitromors and wire brush in the drill seemed to take care of it.


    10445511_10155112551690591_3005827148959408927_n.jpg?oh=c42d201dab62801f35277f3ee16f6961&oe=5555F40F


    Next job is to tackle the poly tunnel and get that up again! Scaffold tubing, plastic piping and galvanise sheeting on the way......


  • Registered Users, Registered Users 2 Posts: 4,506 ✭✭✭SpitfireIV


    I'm still working on it, honest! :o


    Well, as you seen above the bulkhead was rather rusty, but, thankfully nothing major that couldnt be sorted. So, it was onto the next stage.


    10923228_10155135895255591_5281290251142556154_n.jpg?oh=766c94be7bc02dd459d80f550e46d6c6&oe=554F54B9
    ^ The bulkhead was washed and dried then the Deox Gel was applied, wrapped up in cling film and left for 24 hours + to do its work. The results, well.....


    10986922_10155150773510591_6691575172302294272_n.jpg?oh=2c189ad0b1d68a00fd2afa7166edb59b&oe=555FBF8A
    ^ This is how it appeared after all the orange, black and green gunk and gunge was washed away. Bit cleaned, but still needing more rust removed. So, out with the wire brushes for the drill.....


    10968425_10155150773865591_7815534308194594516_n.jpg?oh=077dbab8ae18deda22e727ba4cbd50fe&oe=5549945F
    ^ Not looking too bad now. Dug out most of the rust. So, after a final sanding and wipe down it was time to get out the rust primer once more!


    10959398_10155150774050591_6932976679721853937_n.jpg?oh=4a28e985a0b76f5ba8489bfa4abfb596&oe=555BF2B5
    ^ Looking nice and clean :)


  • Advertisement
  • Registered Users, Registered Users 2 Posts: 4,506 ✭✭✭SpitfireIV


    Cleaned up, wiped down, out with the spray gun and rust primer and this is the result.....


    1016542_10155173089040591_6752259776614629340_n.jpg?oh=5e6649a7e46d2b32440aacf20acd60be&oe=558E7040&__gda__=1432049273_3ffe6570f0b049d95c65d64639a139d6

    11006461_10155173089165591_847865145819350868_n.jpg?oh=335844a2d904d2eb7427d2b9af4eef34&oe=555A1E10&__gda__=1432106031_990e73dbd1db1bc923b850721569fe80

    10984279_10155173089250591_5235523932715139731_n.jpg?oh=44c7d41d9889894de438f764950a93e8&oe=554CD391&__gda__=1435132142_bda21ff1a830d2d51692c583911b1c3f

    10389187_10155173089345591_5107637895158335156_n.jpg?oh=7a7d384d6294ce81e14f703208f9b0c6&oe=554882F8


    ....simples :)


Advertisement