Advertisement
If you have a new account but are having problems posting or verifying your account, please email us on hello@boards.ie for help. Thanks :)
Hello all! Please ensure that you are posting a new thread or question in the appropriate forum. The Feedback forum is overwhelmed with questions that are having to be moved elsewhere. If you need help to verify your account contact hello@boards.ie
Hi all! We have been experiencing an issue on site where threads have been missing the latest postings. The platform host Vanilla are working on this issue. A workaround that has been used by some is to navigate back from 1 to 10+ pages to re-sync the thread and this will then show the latest posts. Thanks, Mike.
Hi there,
There is an issue with role permissions that is being worked on at the moment.
If you are having trouble with access or permissions on regional forums please post here to get access: https://www.boards.ie/discussion/2058365403/you-do-not-have-permission-for-that#latest

Shed build - help

12357

Comments

  • Registered Users, Registered Users 2 Posts: 5,890 ✭✭✭Bullocks


    Do you have to counter batten to nail the shingles to ? 
    When the gutters are on I'd say there will be frig all splash back and even any splashback won't be too noticeable if it's onto something clean as opposed to clay / dirt .
    I think barkmuch will be a bit woody alongside the full thing clad in shingles aswell but thats just a personal preference and might be exactly what you like


  • Registered Users, Registered Users 2 Posts: 31,138 ✭✭✭✭Lumen


    Bullocks wrote: »
    Do you have to counter batten to nail the shingles to ?
     
    Yeah, the same 50 x 35mm I've used to hold on the insulation. The nails are 31mm stainless ringshank from inox.ie (finally I've found a supplier of stainless fixings in Ireland!). I think I need 18 battens on each 5.something metre slope, so that's 45 x 4.8 cut in about three different ways according to my spreadsheet. :D
    Bullocks wrote: »
    When the gutters are on I'd say there will be frig all splash back and even any splashback won't be too noticeable if it's onto something clean as opposed to clay / dirt .
    I think barkmuch will be a bit woody alongside the full thing clad in shingles aswell but thats just a personal preference and might be exactly what you like

    I'll probably leave the cladding for a while anyway, as I've windows to think about. Once the gutters are on I can monitor the splash for a couple of months and make a decision. It's quite dark under the tree anyway, I might just plant some shade-loving ground cover plants or mossy rocks or something. But some clean dark-ish pebble might be a nice contrast....


  • Registered Users, Registered Users 2 Posts: 31,138 ✭✭✭✭Lumen


    Shingling in the rain today.

    PrxOj4n.jpg


  • Registered Users, Registered Users 2 Posts: 31,138 ✭✭✭✭Lumen


    So, shingles took pretty much the whole bank holiday weekend, and I've still about 20% of one side remaining (I ran out of stainless steel ringshank nails).

    Then we had a couple of days of heavy-ish rainfall with little wind, so I have a chance to examine the rain shedding performance.

    It's....not perfect. Despite correctly overlapping the shingles and using a double layer at the drip edge, it seems that the water is crawling back under the drip edge and in places wetting the bottom two sets of counterbattens. The counterbattens further up are dry as a bone.

    I could have prevented this by using a strip of membrane over the bottom two counterbattens, but since the main roof structure itself is well protected under a layer of continuous lapped membrane (and the insulation under the membrane is water resistant), I wasn't really fussed about the counterbattens. So I guess the question is whether a treated counterbatten subjected to period indirect wetting is going to rot. I guess I'll find out...

    Although I guess I can poke a thin strip under the bottom batten to give that some protection, since they're nailed further up.

    HjG6oJ2.jpg LDAr6oV.jpg7N9YdVD.jpg 0MogYyf.jpg FT0ErrR.jpg icpRDm0.jpg


  • Registered Users, Registered Users 2 Posts: 27,253 ✭✭✭✭GreeBo


    Lumen wrote: »
    So, shingles took pretty much the whole bank holiday weekend, and I've still about 20% of one side remaining (I ran out of stainless steel ringshank nails).

    Then we had a couple of days of heavy-ish rainfall with little wind, so I have a chance to examine the rain shedding performance.

    It's....not perfect. Despite correctly overlapping the shingles and using a double layer at the drip edge, it seems that the water is crawling back under the drip edge and in places wetting the bottom two sets of counterbattens. The counterbattens further up are dry as a bone.

    I could have prevented this by using a strip of membrane over the bottom two counterbattens, but since the main roof structure itself is well protected under a layer of continuous lapped membrane (and the insulation under the membrane is water resistant), I wasn't really fussed about the counterbattens. So I guess the question is whether a treated counterbatten subjected to period indirect wetting is going to rot. I guess I'll find out...

    Although I guess I can poke a thin strip under the bottom batten to give that some protection, since they're nailed further up.

    Looks well, like an old tiled roof.

    How deep is the overhang?
    Looks like 2" or so?

    The first set of battens is probably ok...the second set would concern me...how much drying is it actually going to get?


  • Registered Users, Registered Users 2 Posts: 34,105 ✭✭✭✭listermint


    Personally id probable just go get some dry drip edge. It comes in about 2.1 Mtr lengths various colours. and just slot it under the first run of tiles. Youve gone to the trouble elsewhere. Best not lead the leading edge as exposed as it is.


  • Registered Users, Registered Users 2 Posts: 31,138 ✭✭✭✭Lumen


    listermint wrote: »
    Personally id probable just go get some dry drip edge
    Thanks. Got a link?


  • Registered Users, Registered Users 2 Posts: 31,138 ✭✭✭✭Lumen


    Actually, maybe I just need a thin flat metal profile in between the two bottom shingles.

    Where would I get that?

    Edit: or this?

    https://www.lenehans.ie/raw-aluminium-unequal-corner-profile-10mm-x-40mm-x-1m.html


  • Registered Users, Registered Users 2 Posts: 31,138 ✭✭✭✭Lumen


    I picked up some cheap expanded metal mini-mesh and will do some experiments...


  • Advertisement
  • Registered Users, Registered Users 2 Posts: 27,253 ✭✭✭✭GreeBo


    listermint wrote: »
    Personally id probable just go get some dry drip edge. It comes in about 2.1 Mtr lengths various colours. and just slot it under the first run of tiles. Youve gone to the trouble elsewhere. Best not lead the leading edge as exposed as it is.

    Is it a drip though?
    It looks more like a bleed through to me?

    Though maybe heavy rain & wind would explain it.

    No harm to try the drip strip though!


  • Registered Users, Registered Users 2 Posts: 31,138 ✭✭✭✭Lumen


    GreeBo wrote: »
    Is it a drip though?
    It looks more like a bleed through to me?

    Though maybe heavy rain & wind would explain it.

    No harm to try the drip strip though!

    The shingles are soaked through so you may be right. Although that wouldn't explain why the first row is the only one affected, but it could just be less overlap.

    I'm probably fussing over nothing. I've had treated fencing and a conventional shed last 12 years with no visible sign of rot, and it would only be a few hours work to rebatten if they go a bit soft.


  • Registered Users, Registered Users 2 Posts: 450 ✭✭Zebbedee


    Lumen wrote: »

    It's....not perfect. Despite correctly overlapping the shingles and using a double layer at the drip edge, it seems that the water is crawling back under the drip edge and in places wetting the bottom two sets of counterbattens. The counterbattens further up are dry as a bone.
    Don't worry about that first line of battens getting wet and becoming stained. I believe it's simple osmosis in action drawing the natural tannin from the cedar.

    I put a cedar shingle roof on a shed with a similar pitch to yours five years back.
    The exact same thing happened to mine but it never stained or became damp further up than the first line.
    It's never leaked either.


  • Closed Accounts Posts: 9,764 ✭✭✭my3cents


    Lumen wrote: »
     
    ... as I've windows to think about.

    I'm just putting on a shed extension 8ft x 12ft to a 24ft x 12ft. Really simple standard garden shed unlike the OP's. My wife says she doesn't need windows in the extension but I'm going to prebuild the cutout required into the frame just in case because I have a couple of old hardwood double glazed windows I acquired for the job.

    My point is that its a lot easier to have a frame within the shed wall to put a window into than it is to cut into the frame and put a window in. I know because I put 4 windows in the shed last year. So I'm really interested to know how Lumen does the job?


  • Registered Users, Registered Users 2 Posts: 31,138 ✭✭✭✭Lumen


    my3cents wrote: »
    I'm just putting on a shed extension 8ft x 12ft to a 24ft x 12ft. Really simple standard garden shed unlike the OP's. My wife says she doesn't need windows in the extension but I'm going to prebuild the cutout required into the frame just in case because I have a couple of old hardwood double glazed windows I acquired for the job.

    My point is that its a lot easier to have a frame within the shed wall to put a window into than it is to cut into the frame and put a window in. I know because I put 4 windows in the shed last year. So I'm really interested to know how Lumen does the job?

    My rough plan is direct mount glazing on to the studs, with one sealed unit per stud partition. I've no need for the windows to open as I designed the door opening width so that the door should be able to fold back flush with the wall, if I get the hinge position right.


  • Registered Users, Registered Users 2 Posts: 31,138 ✭✭✭✭Lumen


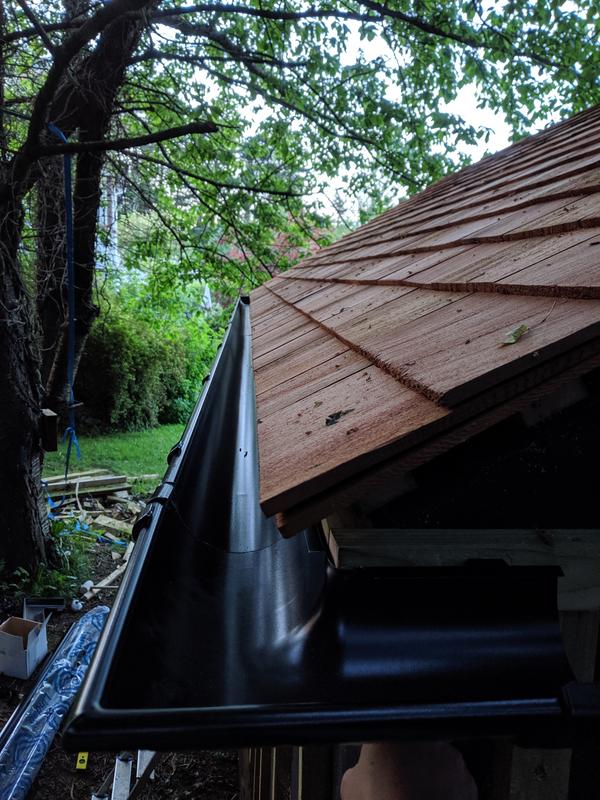
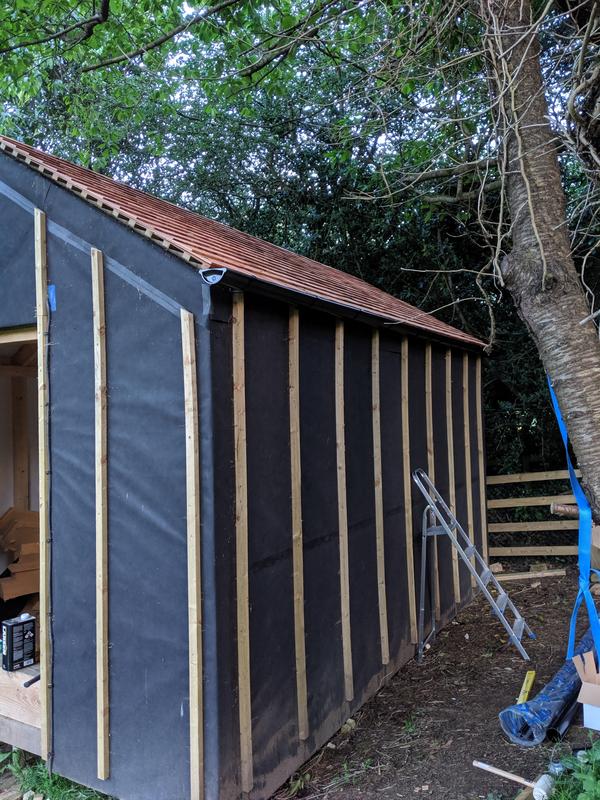
    Finished roof (apart from ridge tile) yesterday and added the first set of gutters.

    The Lindab stuff is really easy except for the hacksawing (machine tools not allowed). 20mm fall over approx 5m.

    It rained heavily today and it worked! Still a small amount of ground splash so I'll need to figure something out for that...

    IMG-20190608-213318.jpg

    IMG-20190608-213516.jpg


  • Advertisement
  • Registered Users, Registered Users 2 Posts: 34,105 ✭✭✭✭listermint


    Not use an angle grinder for cutting ? Much quicker and cleaner for PVC cuts.


  • Registered Users, Registered Users 2 Posts: 31,138 ✭✭✭✭Lumen


    listermint wrote: »
    Not use an angle grinder for cutting ? Much quicker and cleaner for PVC cuts.

    It's galvanised steel. Hand tools are required to stop rust.


  • Registered Users, Registered Users 2 Posts: 34,105 ✭✭✭✭listermint


    Lumen wrote: »
    It's galvanised steel. Hand tools are required to stop rust.

    Ah ok, Fancy :D


  • Registered Users, Registered Users 2 Posts: 31,138 ✭✭✭✭Lumen


    listermint wrote: »
    Ah ok, Fancy :D
    Thanks for not saying "yeah, but it looks just like black PVC". :D

    I did look at the other colours but they weren't great up close.


  • Registered Users, Registered Users 2 Posts: 27,253 ✭✭✭✭GreeBo


    Lumen wrote: »
    It's galvanised steel. Hand tools are required to stop rust.

    How does that work?:confused:


  • Advertisement
  • Registered Users, Registered Users 2 Posts: 31,138 ✭✭✭✭Lumen


    GreeBo wrote: »
    How does that work?:confused:

    According to instructions...
    Lindab wrote:
    Cut the gutters and pipes with plate shears or a hacksaw on a firm underlay on the ground. Never use an angle grinder. It heats the steel up up and thus destroyes [sic] the galvanization. The coating may also be scorched by hot chips or filings.

    I also read something about a hacksaw blade spreading the galvanic coating over the exposed steel, but not sure how true that is.

    TBH non-stainless steel seems like a stupid material for outdoor things, but I'm trying to keep the project plastic-free and thought copper might stain the cladding (plus this shed is already much better built than my house, so I have to draw the line somewhere).

    I got a nibbler drill attachment for cutting the hole for the outlet, that should be fun.

    edit: holy crap, the copper stuff costs about €23 per fascia bracket!


  • Registered Users, Registered Users 2 Posts: 27,253 ✭✭✭✭GreeBo


    Lumen wrote: »
    According to instructions...


    I also read something about a hacksaw blade spreading the galvanic coating over the exposed steel, but not sure how true that is.

    TBH non-stainless steel seems like a stupid material for outdoor things, but I'm trying to keep the project plastic-free and thought copper might stain the cladding (plus this shed is already much better built than my house, so I have to draw the line somewhere).

    I got a nibbler drill attachment for cutting the hole for the outlet, that should be fun.

    edit: holy crap, the copper stuff costs about €23 per fascia bracket!

    Ahh the heating...that makes sense.

    I couldnt think of how the steel knew what was cutting it!


    Yeah copper is crazy at the moment....did you look at alu?


  • Registered Users, Registered Users 2 Posts: 31,138 ✭✭✭✭Lumen


    GreeBo wrote: »
    Yeah copper is crazy at the moment....did you look at alu?
    Oh, I remember the other reason I didn't want copper, it'll get nicked!

    I did briefly look at alu but I vaguely recall reading that it was harder to install, and the Lindab install videos made the steel stuff look really easy, so I couldn't be bothered to keep searching.


  • Closed Accounts Posts: 9,764 ✭✭✭my3cents


    Lumen wrote: »
    It's galvanised steel. Hand tools are required to stop rust.

    I assume its much thicker than decent quality corrugated galvanized iron roof sheets because I routinely cut cgi with a cutting disk in an angle grinder and have never had a problem with rust?


  • Registered Users, Registered Users 2 Posts: 31,138 ✭✭✭✭Lumen


    my3cents wrote: »
    I assume its much thicker than decent quality corrugated galvanized iron roof sheets because I routinely cut cgi with a cutting disk in an angle grinder and have never had a problem with rust?

    Do you treat or paint the cut ends?


  • Closed Accounts Posts: 9,764 ✭✭✭my3cents


    Lumen wrote: »
    Do you treat or paint the cut ends?

    When I first started using cgi on roofs the thought did occur to me but I never got around to it and never had a problem. I've rarely if ever had to replace cgi that has rusted from a cut end and I found that the only realistic way of cutting it is with a thin stainless steel cutting disk in an angle grinder. I've tried plenty of other ways including a sheet metal saw (like a hacksaw strapped to a panel saw one of the better solutions) but keep going back to the ss cutting disks.

    I actually think the heat produced is partly a good thing as the galvanized can only melt and re-solidify hopefully over a some of the cut surface?

    However with a really thick section of steel thats galvanized I can imagine that it could hold enough heat to damage the galvanizing?


  • Registered Users, Registered Users 2 Posts: 31,138 ✭✭✭✭Lumen


    my3cents wrote: »
    However with a really thick section of steel thats galvanized I can imagine that it could hold enough heat to damage the galvanizing?
    More likely that thicker steel acts like a big heat sink to pull heat away from the galvanized surface.

    From the various forums I read, galvanized steel guttering is usually fine away from coastal exposure. Lindab used to do (and maybe still do) a "raw" galvanized finish but now they promote a variant that is also painted over the top.

    I'll probably splash a bit of black paint over the cut ends at some point, they're hidden under the unions so it doesn't have to be perfect.


  • Registered Users, Registered Users 2 Posts: 31,138 ✭✭✭✭Lumen


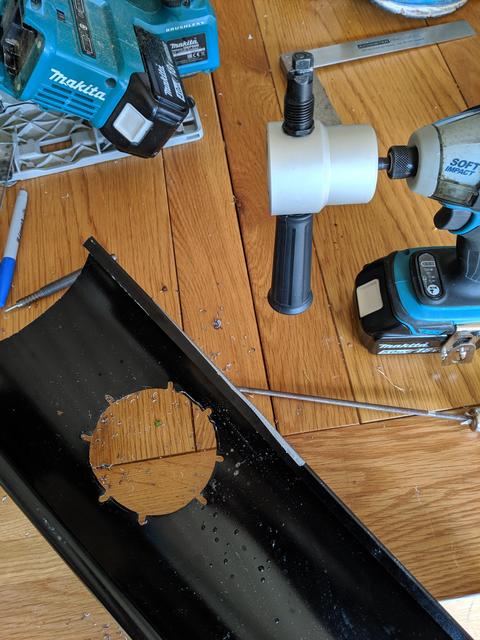
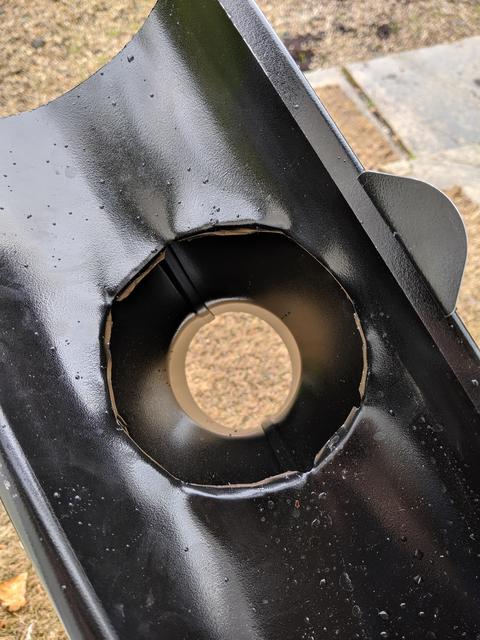
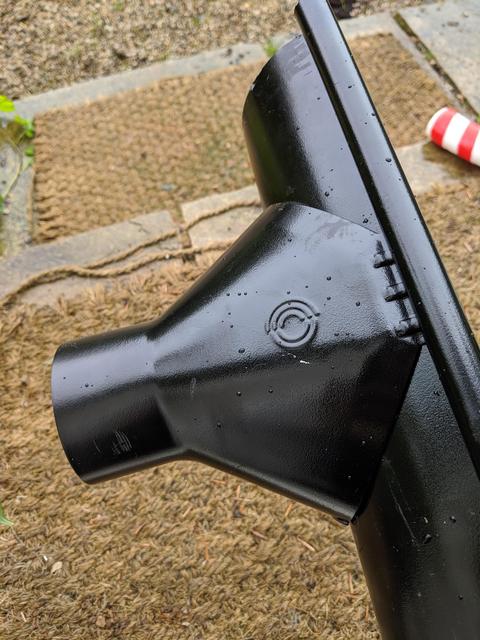
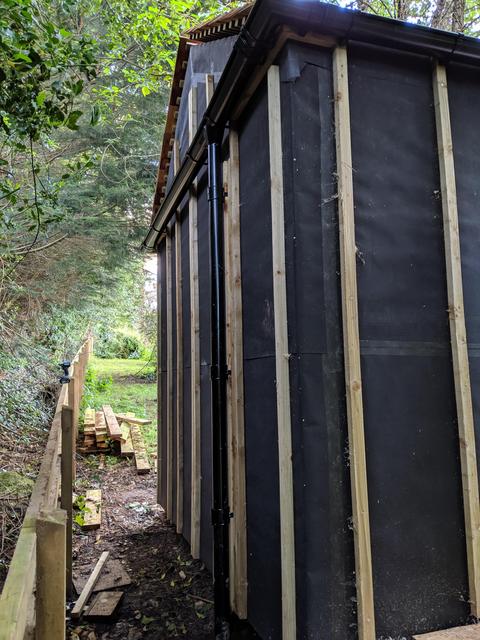
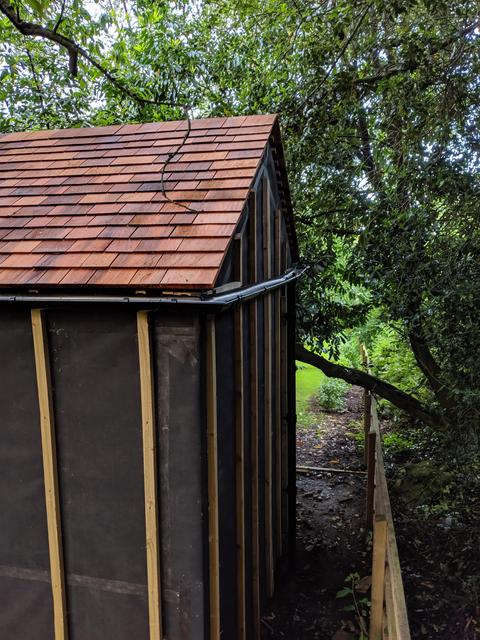
    Finished the guttering, apart from a leaf guard that's on back-order and one last union (I miscalculated quantity or lost one).

    This would be completely unremarkable except I got to use a new tool, a power nibbler drill attachment, to make the hole for the outlet.

    https://www.axminster.co.uk/axminster-power-nibbler-900038

    It makes for easy freehand chomping through sheet steel.

    Naturally everything looks worse in pictures than in real life, but I think it worked out OK. There's no sharp edges to cause injuries when sweeping leaves out the gutter.

    The downpipe is positioned to one side at the back of the shed to keep water away from the ground screws, hence the asymmetrical looking angles. Once I have the leaf guard the water will be routed underground to a 20m perforated drainage pipe I've dug in down the hedge line.

    1-b-GYh-Ss-V.jpg

    2-p8-CZGd-P.jpg

    3-WLk-Iw-Vb.jpg

    4-kc-F3c-BQ.jpg

    5-h-QR1-XIP.jpg


  • Closed Accounts Posts: 9,764 ✭✭✭my3cents


    So when you finally clad it you are going to have to take the guttering off and refix it allowing for the thickness of the cladding?


  • Registered Users, Registered Users 2 Posts: 31,138 ✭✭✭✭Lumen


    my3cents wrote: »
    So when you finally clad it you are going to have to take the guttering off and refix it allowing for the thickness of the cladding?
    Nope. The vertical cladding will butt up to the gutters, so they'll be part inside and part outside the ventilation gap.


  • Advertisement
  • Registered Users, Registered Users 2 Posts: 31,138 ✭✭✭✭Lumen


    Walked past the tourist information booth in DL yesterday and got some snaps.

    This is much like what I'm aiming for.

    IMG-20190615-153127.jpg IMG-20190615-153138.jpg IMG-20190615-153157.jpg IMG-20190615-153204.jpg IMG-20190615-153214.jpg IMG-20190615-153232.jpg IMG-20190615-153245.jpg


  • Registered Users, Registered Users 2 Posts: 31,138 ✭✭✭✭Lumen


    Warning: wankery forthcoming....

    The Siberian Larch cladding is really expensive, and it's even more expensive with factory-applied SiOO:X treatment, which provides consistent weathering and avoids the sort of staining patterns you see on that Tourist Information booth above.

    Basically it works out at 2.5k for the amount I need. Which seems absolutely insane. If I was to use normal pressure-treated PAO softwood it would be something like 600 quid.

    Aside from the fact that I want to get windows sorted before I clad, that's why I'm still dithering over it.

    The other thing is that I can't find a single example of vertical larch cladding combined with (western red) cedar roof shingles, possibly because the wood and architectural styles are from different continents.

    I fear I may end up with something expensive that looks awful, a gigantic architectural folly.

    Maybe cedar shingles all over would be better, if not really any cheaper....


  • Registered Users, Registered Users 2 Posts: 8,362 ✭✭✭Rows Grower


    Lumen, this is going on over 11 months. Just finish the shed.

    "Very soon we are going to Mars. You wouldn't have been going to Mars if my opponent won, that I can tell you. You wouldn't even be thinking about it."

    Donald Trump, March 13th 2018.


  • Registered Users, Registered Users 2 Posts: 31,138 ✭✭✭✭Lumen


    Lumen, this is going on over 11 months. Just finish the shed.
    I know, I know!

    Just door, steps and windows to go, the cladding is really only cosmetic.


  • Registered Users, Registered Users 2 Posts: 34,105 ✭✭✭✭listermint


    Lumen wrote: »
    Warning: wankery forthcoming....

    The Siberian Larch cladding is really expensive, and it's even more expensive with factory-applied SiOO:X treatment, which provides consistent weathering and avoids the sort of staining patterns you see on that Tourist Information booth above.

    Basically it works out at 2.5k for the amount I need. Which seems absolutely insane. If I was to use normal pressure-treated PAO softwood it would be something like 600 quid.

    Aside from the fact that I want to get windows sorted before I clad, that's why I'm still dithering over it.

    The other thing is that I can't find a single example of vertical larch cladding combined with (western red) cedar roof shingles, possibly because the wood and architectural styles are from different continents.

    I fear I may end up with something expensive that looks awful, a gigantic architectural folly.

    Maybe cedar shingles all over would be better, if not really any cheaper....

    Price around, some suppliers may come without the wankery price. If you ask wankery places and tell them what its for they think you have money.


    https://www.donedeal.ie/trailers-for-sale/larch-douglas-fir-timber-for-trailer-floor-bed/21704702


  • Registered Users, Registered Users 2 Posts: 1,517 ✭✭✭hesker


    If you want to fit vertical cladding you will need horizontal counterbattens. Also those gaps while they look good also allow easy access for our furry friends.

    Larch is one timber that takes quite well to working from green.

    I bought this from a sawmill for about 1/8th of the price I was being quoted for finished T&G.

    I did the T&G myself on a table saw and it worked out fairly well I think. I could have planed the surface to get an even better finish but I plan on letting it age and grey naturally anyway.

    That grey patching at the bottom was some rain splash that caught me out but it has faded out now.


  • Registered Users, Registered Users 2 Posts: 31,138 ✭✭✭✭Lumen


    That's lovely, hesker.

    Interesting about the costs. Was it Siberian Larch or more local stuff?

    The profile I'm looking at is the 15 degree double rainscreen, which I could probably do fine with my tracksaw.
    hesker wrote: »
    Also those gaps while they look good also allow easy access for our furry friends.

    Yeah, I read that mesh is suggested on all entries to the cavity but I'm not sure I can be bothered. I spent hours under the shed attaching the mouse mesh and it wasn't fun!
    hesker wrote: »
    That grey patching at the bottom was some rain splash that caught me out but it has faded out now.

    I'm currently creating a 50cm gravel section round the uphill half of the shed, slightly complicated (as ever) by the 10% slope. Hopefully the splash off the gravel will be clean enough not to stain.


  • Registered Users, Registered Users 2 Posts: 1,517 ✭✭✭hesker


    It’s Irish grown. The heartwood is the more resilient portion but you’ll pay a lot to get heartwood only.

    I reckon it will see me out. I took off a few timbers after about 3 years and it was perfect inside but as you probably know having the right venting and drainage design is key.

    Don’t regret for one moment making it myself. It would take you a bit of time but sure where’s the rush :)


  • Registered Users, Registered Users 2 Posts: 450 ✭✭Zebbedee


    Lumen wrote: »


    Maybe cedar shingles all over would be better, if not really any cheaper....

    Have you considered wainey edge natural cedar boards? The combination with cedar shingles looks great. I got 10 inch by 3/4 inch boards cut in the sawmill in Glenealy. Worked out very cheap.


  • Advertisement
  • Registered Users, Registered Users 2 Posts: 31,138 ✭✭✭✭Lumen


    Zebbedee wrote: »
    Have you considered wainey edge natural cedar boards? The combination with cedar shingles looks great. I got 10 inch by 3/4 inch boards cut in the sawmill in Glenealy. Worked out very cheap.
    Yeah, I was thinking that cedar+cedar would be good but had discounted using shingles as they are as expensive as the highest quality, most expensive treated Siberian larch and more fragile. Whereas the waney stuff might work.

    Got any pics?


  • Registered Users, Registered Users 2 Posts: 31,138 ✭✭✭✭Lumen


    Before I can clad it I needed to sort the ground splash problem on the uphill side of the shed since grass won't grow up to the shed due to tree shading, and I need to stop leaf fall from going under the shed and bridging the gap to the membrane.

    So: a bit of digging, corten steel lawn edging Tek-screwed to battens, sand for drainage and levelling, weed membrane to stop sand washing under the edging, gravel stablising grid, a couple of hundred kilos of "brown shingle", and....

    Looks a bit weird but should blend in once I've butted a bit of soil up to the edge and re-sown the grass.

    Now, I'm really going to make the door now...

    5-xahc8-KX.jpg

    4-Vg-BTnv-W.jpg

    3-QP1-Wb-ZY.jpg

    2-5-IEDY4-P.jpg

    1-e-Kz-Za-Fb.jpg


  • Registered Users, Registered Users 2 Posts: 521 ✭✭✭Shaunoc


    Very neat. Kevin McCloud will be around for interview


  • Posts: 3,637 ✭✭✭ [Deleted User]


    Shaunoc wrote: »
    Very neat. Kevin McCloud will be around for interview

    Ah now, steady on. Kevin's 60, so he'll likely have retired by the time Lumen's shed is ready for a camera crew to visit. :P


  • Registered Users, Registered Users 2 Posts: 34,105 ✭✭✭✭listermint


    Any Shed update ? its 2020, we need some news :)


  • Registered Users, Registered Users 2 Posts: 31,138 ✭✭✭✭Lumen


    listermint wrote: »
    Any Shed update ? its 2020, we need some news :)

    I tried to make a door and door frame from rough softwood construction timber, a tracksaw and a trimmer router and it went badly. The door did close but not with any precision.

    I've been sulking for a few months about my poor carpentry skills, and then I watched this video yesterday on what it actually takes in terms of skills and tools to do the thing I was trying to do

    Now I feel better about myself. So I think I'll just get a joinery company to do the door and window frames so I can finish the rest.


  • Advertisement
  • Registered Users, Registered Users 2 Posts: 34,105 ✭✭✭✭listermint


    Lumen wrote: »
    I tried to make a door and door frame from rough softwood construction timber, a tracksaw and a trimmer router and it went badly. The door did close but not with any precision.

    I've been sulking for a few months about my poor carpentry skills, and then I watched this video yesterday on what it actually takes in terms of skills and tools to do the thing I was trying to do

    Now I feel better about myself. So I think I'll just get a joinery company to do the door and window frames so I can finish the rest.


    Nice!

    Ya doors are a bitch if you are going for air tight stuff. You need a Planner Thicknesser, Jointer, Router or Biscuit jointer. Lots of fun.


    Meant to ask, for the Wood Fibre insulation you used, Was it Steico or what brand? how did you find its density. I see you screwed your cladding lengths to it. Was that into the wood fibre or through to the studs on the other side.

    Presently going through porch planning and wanted to use Wood Fibre because its easy to work and breathable. Some sections will have existing brick wall on it and need that to breathe out.


  • Registered Users, Registered Users 2 Posts: 31,138 ✭✭✭✭Lumen


    listermint wrote: »
    Meant to ask, for the Wood Fibre insulation you used, Was it Steico or what brand? how did you find its density. I see you screwed your cladding lengths to it. Was that into the wood fibre or through to the studs on the other side.

    Presently going through porch planning and wanted to use Wood Fibre because its easy to work and breathable. Some sections will have existing brick wall on it and need that to breathe out.

    GUTEX Ultratherm 100mm on roof, GUTEX Multitherm 80mm on walls, fixed with Spax 6x200/65 partial thread T-Star plus Wirox screws.

    https://www.baunativ.de/product_info.php?language=en&products_id=1086

    The screws go through battens on one side and studs on the other, so there's a fair bit of clamping force, plus enough density for the screw body to resist movement, and I need that resistance because there's nothing holding up the woodfibre from below, it's just clamped and screwed.

    If you want to screw just into the woodfibre you'd need a big fat plate head, mushroom fixing or maybe something like an express nail.


  • Registered Users, Registered Users 2 Posts: 521 ✭✭✭Shaunoc


    Good time to get stuck back in to shed?


  • Registered Users, Registered Users 2 Posts: 31,138 ✭✭✭✭Lumen


    Doesn't time fly!

    In January I was sulking about my lack of joinery skills and considering paying a professional to finish it. Then I made a chicken coop with hinges and a routed sliding door thing, and it all worked, and I stopped sulking and decided that I'd do it all myself because....DIY.

    So, baby steps....and then big steps.

    As usual I made this far more complicated than necessary, albeit everything on a 1/10 slope tends to be tricky

    I initially thought of resting the steps on a kind of concrete pinth. So I made a bit of concrete and reminded myself that I hate concrete, so I dug it up and decided to have the steps all wood, rising out of the ground, and to use epoxy and gravel drainage to protect the wood below ground.

    I could have used fancy hardwood, but given the experimental nature I didn't want to trash a load of expensive wood, so I made it out of standard planed 9x2 softwood.

    There are no screws, it's all routed and glued, then mounted from underneath on a couple of upside down 6" nails, so if I need to re-do anything I can just dig out the bottom bit and lift off the top bit.

    The insulation and membrane forms a run off underneath the top step, which is level with the threshold +/- 1mm, or will be when I've added an 18mm finish board to the threshold.

    Getting the stringers to meet flush with the queen posts and the top step level with the threshold was hard.

    Anyway, they're structurally perfect but pig ugly, so I'll sand them again and do a few coats of danish oil or something. If all else fails I'll just paint them black and put some cedar or larch treads on to fancy it up.

    Next stage: re-make the door frame and door. Then windows (yes, I'm making them myself). Then internal floor. Then cladding. Then something with the floating deck.

    Click for big versions.

    Relatedly, I know the gravel and corten edging looks sh!t, but I'll return to that when everything else is done.

    femi5Da.jpg 0leVDrV.jpg 0qnVwDo.jpg GNCB5yh.jpg 7MkCHU7.jpg qSytY90.jpg


  • Registered Users, Registered Users 2 Posts: 1,947 ✭✭✭whizbang


    That routing is class..

    I would like to see the gravel edging built up level with the base of shed..


  • Advertisement
Advertisement