Advertisement
If you have a new account but are having problems posting or verifying your account, please email us on hello@boards.ie for help. Thanks :)
Hello all! Please ensure that you are posting a new thread or question in the appropriate forum. The Feedback forum is overwhelmed with questions that are having to be moved elsewhere. If you need help to verify your account contact hello@boards.ie
Please note that it is not permitted to have referral links posted in your signature. Keep these links contained in the appropriate forum. Thank you.

https://www.boards.ie/discussion/2055940817/signature-rules
Hi there,
There is an issue with role permissions that is being worked on at the moment.
If you are having trouble with access or permissions on regional forums please post here to get access: https://www.boards.ie/discussion/2058365403/you-do-not-have-permission-for-that#latest

Restoring headlights

  • 16-11-2013 8:31pm
    #1
    Registered Users, Registered Users 2 Posts: 3,925 ✭✭✭


    Hi has anyone any tips on how to clean up the headlights?

    my tegs lights are gone a bit dull/yellowish over the years from previous owners

    any tips for me to get them looking like new :) ?


«1

Comments

  • Registered Users, Registered Users 2 Posts: 73,520 ✭✭✭✭colm_mcm


    T-cut/compound/toothpaste.


  • Registered Users, Registered Users 2 Posts: 3,925 ✭✭✭pudzey101


    colm_mcm wrote: »
    T-cut/compound/toothpaste.


    toothpaste yeah heard that works alright , but does it ?


  • Registered Users, Registered Users 2 Posts: 1,611 ✭✭✭cgarrad


    yeah, works well.


  • Registered Users, Registered Users 2 Posts: 3,925 ✭✭✭pudzey101


    cgarrad wrote: »
    yeah, works well.


    Ill give it a go tomorrow ha ha :) hows it work must be abrasive o something is it ::)


  • Registered Users, Registered Users 2 Posts: 12,611 ✭✭✭✭blade1


    Brasso


  • Advertisement
  • Registered Users, Registered Users 2 Posts: 3,925 ✭✭✭pudzey101


    blade1 wrote: »
    Brasso

    Does that really work?


  • Registered Users, Registered Users 2 Posts: 73,520 ✭✭✭✭colm_mcm


    pudzey101 wrote: »
    Does that really work?

    Yes.

    So does Mustard (the grainy type)


  • Registered Users, Registered Users 2 Posts: 3,925 ✭✭✭pudzey101


    colm_mcm wrote: »
    Yes.

    So does Mustard (the grainy type)

    jesus im learning all sorts tonight haha :) ill give the toothpaste a go tomorrow think thats the best option on the cheap isint it ?


  • Registered Users, Registered Users 2 Posts: 160 ✭✭Lazybones


    On my 2002 Passat which had badly discoloured headlights I tried tothpaste it only made a very slight difference.

    Depending on the state of the headlamps you may have to use other methods.

    what worked best for me was sanding by hand with 2500 grit wet/dry sandpaper (was majorly fearful of doing this - thought I was going to make a mess of the lights!)

    I used masking tape to protect the paintwork. Use lots of water (I had purchased a sprayer bottle in Aldi which proved very useful), as you sand you will get a milky residue as the failed protective layer on the lamps come off (they will look worse before they get better).


    Wipe the lamps dry with a cloth after sanding.


    Next I used Meguiars Ultimate Compound which gave the new look back to the lamps.


    Finally I polished both lamps with Simoniz wax to act as a protection layer.

    Gave a crystal clean look but does take a fair bit of elbow grease.

    There are headlamp cleaning kits from 3M with attachments that you can put on a drill.

    The method that works best for you will depend on how badly degraded your lamps are.

    Just my experience for what it's worth.

    Now I am building up my courage to do some wet sanding on my paintwork to fix some scratches........... maybe next weekend....maybe :-)


  • Registered Users, Registered Users 2 Posts: 113 ✭✭peejay01


    Lazybones wrote: »
    On my 2002 Passat which had badly discoloured headlights I tried tothpaste it only made a very slight difference.

    Depending on the state of the headlamps you may have to use other methods.

    what worked best for me was sanding by hand with 2500 grit wet/dry sandpaper (was majorly fearful of doing this - thought I was going to make a mess of the lights!)

    I used masking tape to protect the paintwork. Use lots of water (I had purchased a sprayer bottle in Aldi which proved very useful), as you sand you will get a milky residue as the failed protective layer on the lamps come off (they will look worse before they get better).


    Wipe the lamps dry with a cloth after sanding.


    Next I used Meguiars Ultimate Compound which gave the new look back to the lamps.


    Finally I polished both lamps with Simoniz wax to act as a protection layer.

    Gave a crystal clean look but does take a fair bit of elbow grease.

    There are headlamp cleaning kits from 3M with attachments that you can put on a drill.

    The method that works best for you will depend on how badly degraded your lamps are.

    Just my experience for what it's worth.

    Now I am building up my courage to do some wet sanding on my paintwork to fix some scratches........... maybe next weekend....maybe :-)

    I recently used one of the 3M kits that attach to the drill. They are really good but you may need to depending on the size of your headlights. I could have done with two for my lights as there were a few imperfections at the end.


  • Advertisement
  • Registered Users, Registered Users 2 Posts: 113 ✭✭peejay01


    First pic was before. This is after


  • Registered Users, Registered Users 2 Posts: 160 ✭✭Lazybones


    Nice work peejay01...... always satisfying to see a job well done, especially when you have done it yourself!

    Plus you always have the skills if the works needs to be done again in the future.


  • Registered Users, Registered Users 2 Posts: 3,925 ✭✭✭pudzey101


    are those the same lights PJ ? :D haha good job well worth the time and effort , fair play ~:D


  • Registered Users, Registered Users 2 Posts: 164 ✭✭dredg


    Do you seal the lights with anything after? My understanding is that headlights have a UV resistant coating and when that goes the plastic starts to oxidise. By restoring them you've stripped off the oxidation and any protection, which means they'll just oxidise again but faster.


  • Registered Users, Registered Users 2 Posts: 160 ✭✭Lazybones


    I used Simoniz wax as a protective layer..... I can always keeps this topped up as needs be.


  • Registered Users, Registered Users 2 Posts: 29,088 ✭✭✭✭_Kaiser_


    So the headlights on my A6 are a little cloudy - it's not bad but that's why I want to do something now before it becomes a bigger job.

    A search online suggests everything from toothpaste to vinegar to metal polish as possible home solutions.

    Has anyone any recommendations from stuff they've successfully used themselves?

    Cheers!


  • Registered Users, Registered Users 2 Posts: 13,976 ✭✭✭✭joujoujou
    Unregistered Users


  • Registered Users, Registered Users 2 Posts: 113 ✭✭peejay01


    Cheers lads. Yeh was something I had been meaning to do for a while. Well worth the hours spent on it.

    I never considered the uv protective layer being stripped away but am hoping that some sealant and wax will protect it!?


  • Registered Users, Registered Users 2 Posts: 1,652 ✭✭✭Chimaera


    I use Meguiars PlastX every time I wash the car. It's a polish designed especially for plastics andit seems to do a good job on protecting them in between.


  • Registered Users, Registered Users 2 Posts: 8,532 ✭✭✭JohnBoy26


    Kaiser2000 wrote: »
    So the headlights on my A6 are a little cloudy - it's not bad but that's why I want to do something now before it becomes a bigger job.

    A search online suggests everything from toothpaste to vinegar to metal polish as possible home solutions.

    Has anyone any recommendations from stuff they've successfully used themselves?

    Cheers!
    Cutting compound has worked well for me. In my experience it's more effective than toothpaste and you don't have to use as much elbow grease.


  • Advertisement
  • Registered Users, Registered Users 2 Posts: 29,088 ✭✭✭✭_Kaiser_


    JohnBoy26 wrote: »
    Cutting compound has worked well for me. In my experience it's more effective than toothpaste and you don't have to use as much elbow grease.

    Cheers.. something like this you mean?


  • Registered Users, Registered Users 2 Posts: 81,220 ✭✭✭✭biko


    I've tried several things, incl Brasso and toothpaste and in my view sanding is best to prevent yellowing after a while again.
    Then use a cutting compound and lastly seal with something UV-protecting.
    It depends on the state of them really. Pics would help.
    Are the headlights rough to the touch or smooth?


  • Registered Users, Registered Users 2 Posts: 3,925 ✭✭✭pudzey101


    So i gave the headlights a go with toothpaste today :) only got one up shining like new , other is a tad bit hazey/yellowish :)

    off to paint the windshield wipers tomorrow , there abit rusted :D


  • Registered Users, Registered Users 2 Posts: 1,639 ✭✭✭Zoney


    Looking to do this job myself too, and that's the first thing I noticed on a product I was thinking of buying "not suitable for treated or coated plastic" (or somesuch). So I held off on it. Sounds like there's little option but to remove the original coating, but are there any suggestions of something that's easy to apply as replacement protection, and more permanent than wax?

    Think I was looking at a Meguiars product alright, it showed a round brush pad on the front.


  • Registered Users, Registered Users 2 Posts: 81,220 ✭✭✭✭biko


    Most things work short-term, toothpaste included.
    In my mind best is very fine grit sandpaper and polish.


  • Registered Users, Registered Users 2 Posts: 84 ✭✭Sidewayslarry


    Usually if the headlights are gone 'yellow' and the smooth feel is gone off the light, the protective layer on the plastic will already have worn off the light so by sanding/buffing the light you will not make it any worse. The downside is that they will go 'yellow' again pretty quickly.

    One great long term solution (12 months +) is to use G-techniq G1 on them which has built in UV protection. Works a treat


  • Registered Users, Registered Users 2 Posts: 1,639 ✭✭✭Zoney


    biko wrote: »
    Most things work short-term, toothpaste included.
    In my mind best is very fine grit sandpaper and polish.

    What do you use for polish?


  • Registered Users, Registered Users 2 Posts: 19,885 ✭✭✭✭MetzgerMeister


    Usually if the headlights are gone 'yellow' and the smooth feel is gone off the light, the protective layer on the plastic will already have worn off the light so by sanding/buffing the light you will not make it any worse. The downside is that they will go 'yellow' again pretty quickly.

    One great long term solution (12 months +) is to use G-techniq G1 on them which has built in UV protection. Works a treat

    :D


  • Registered Users, Registered Users 2 Posts: 81,220 ✭✭✭✭biko


    Zoney wrote: »
    What do you use for polish?
    Some rubbing compound. Then car wax but there is speciality products.
    You can also use clear plastic film.
    headlight_protection_small.jpg


  • Advertisement
  • Registered Users, Registered Users 2 Posts: 29,088 ✭✭✭✭_Kaiser_


    biko wrote: »
    I've tried several things, incl Brasso and toothpaste and in my view sanding is best to prevent yellowing after a while again.
    Then use a cutting compound and lastly seal with something UV-protecting.
    It depends on the state of them really. Pics would help.
    Are the headlights rough to the touch or smooth?

    Sorry for the delay coming back to this.. been a busy few weeks

    So today, seeing as I'd also hoovered and cleaned the car I tried going at these headlights with a solution I got in a Motor Factors and after minimal/no improvement I tried the toothpaste option, and a glass/monitor cleaner I have that works wonders on other things.

    Not in this case though.. have a look:

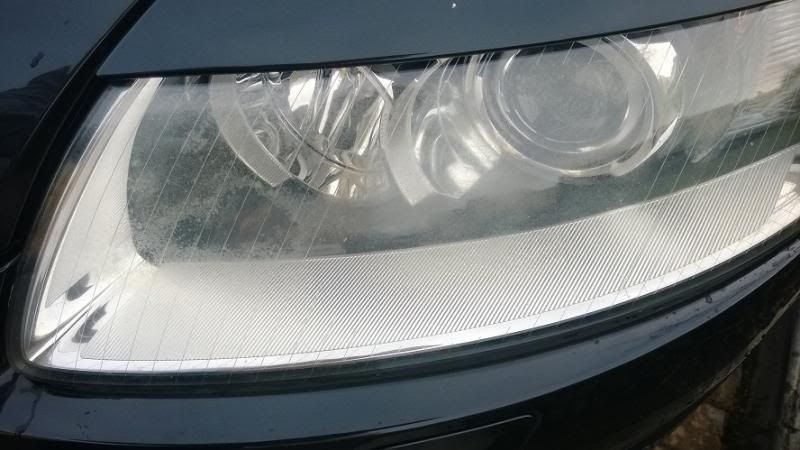
    WP_20131215_13_30_25_Pro.jpg

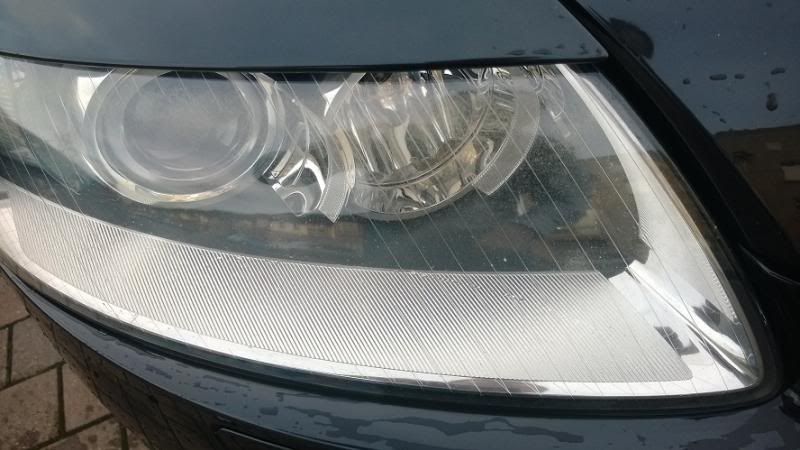
    WP_20131215_13_30_15_Pro.jpg

    As you can see the left side is badly in need of something but the right side has a few spots developing too. Any solution must be doable in a car parking space outside an apartment (:() or preferably I'd even bring her somewhere to get it done (as long as it wasn't crazy money).

    Or am I looking at a new headlight do ye reckon?


  • Registered Users, Registered Users 2 Posts: 1,072 ✭✭✭keithsfleet


    I find surgical spirits always works a gem on that problem.
    Done a few cars with it.


  • Registered Users, Registered Users 2 Posts: 13,976 ✭✭✭✭joujoujou
    Unregistered Users


    Honestly - it looks like they're dirty inside, correct me if I'm wrong. :o


  • Registered Users, Registered Users 2 Posts: 5,728 ✭✭✭George Dalton


    The best way to fix that is to flat it back with very fine wet and dry sandpaper to remove the cloudy layer of plastic (2000 grit works well) and then use fast cut compound to polish the new surface back up again. You can do it yourself by hand but a machine polisher makes it a much easier and quicker job. We can do them for you some day you are passing by if you want, should only take about 15 minutes to do both.


  • Registered Users, Registered Users 2 Posts: 29,088 ✭✭✭✭_Kaiser_


    The best way to fix that is to flat it back with very fine wet and dry sandpaper to remove the cloudy layer of plastic (2000 grit works well) and then use fast cut compound to polish the new surface back up again. You can do it yourself by hand but a machine polisher makes it a much easier and quicker job. We can do them for you some day you are passing by if you want, should only take about 15 minutes to do both.

    Sounds like a much better option - thanks George! :)

    How are you fixed over the next week or two?


  • Closed Accounts Posts: 4,620 ✭✭✭Roen


    Bit of a lurker here so hopefully this will help a little in return for the knowledge gleaned.

    I used a 3M headlight Restoration Kit I got from Amazon along with some Glass Sealant, UV Inhibitor and polish to do a number on mine on Christmas Eve.

    I could have done with two of the kits as my headlight lenses were pretty far gone to be honest. As such the job isn't as good as it could have been but is still a night and day comparison.

    Lessons learned?
    1. Get two kits if your headlight lenses are as far gone as mine. I spread the discs out between the two headlights, doing a better job on headlight one versus headlight two (pictured below).

    2. Pick a warmer day. The hands were in pain at the end of it.

    3. Don't load the polishing pad with polish and spin the drill up to full speed on a freshly charged battery. Will leave that to your imagination.

    Hope it helps anyone in the same predicament and thanks for the advice.

    xJzdfXSl.jpg

    rVLYQXFl.jpg


  • Advertisement
  • Registered Users, Registered Users 2 Posts: 1,639 ✭✭✭Zoney


    Finally got a chance to work on the headlights! Didn't think to order restoration kits online in advance though! Got by today with G3 scratch remover paste, it didn't quite get them perfect, but far better now. Will maybe try wet sanding tomorrow.

    Before - passenger side:
    290553.JPG

    After - passenger side:
    290554.JPG

    Before - driver's side (a lot worse):
    290555.JPG

    After - driver's side (not quite enough done!):
    290556.JPG

    Quick look at the lights!
    290557.JPG

    So not quite done yet! I'll be using that Glass sealant Roen mentioned - will order from Amazon. Already looks immensely better though! Amazing how much it spruces up the whole car - looks less tired!

    ps_before.JPG
    ps_after.JPG
    ds_before.JPG
    ds_after.JPG
    front_done.JPG


  • Registered Users, Registered Users 2 Posts: 720 ✭✭✭Pops_20


    One of my headlights is cloudy all over and the other one is perfectly fine. With the lights on at night, one side is much dimmer than the other.

    jhix.jpg

    evse.jpg


    I've tried toothpaste and baking soda, cutting compound and metallic polish, all with plenty of elbow grease and it hasn't worked. It's like the damage is within the plastic itself as opposed to on the surface.

    It may not look too bad in the photos but it's noticeable with the lights on.


  • Registered Users, Registered Users 2 Posts: 24,644 ✭✭✭✭punisher5112


    Pops_20 wrote: »
    One of my headlights is cloudy all over and the other one is perfectly fine. With the lights on at night, one side is much dimmer than the other.

    jhix.jpg

    evse.jpg


    I've tried toothpaste and baking soda, cutting compound and metallic polish, all with plenty of elbow grease and it hasn't worked. It's like the damage is within the plastic itself as opposed to on the surface.

    It may not look too bad in the photos but it's noticeable with the lights on.


    Looks like it could be the inside.


  • Registered Users, Registered Users 2 Posts: 1,652 ✭✭✭Chimaera


    @zoney: Go in to Joe McKennas and get some emery paper there for wet sanding. Looking at your lights in those pictures, you'll probably only want to give a very light rub with 1500 and 2000 grit. Use plenty of water as you're going along. Finish off with the G3 past afterwards.

    @Pops_20: The damage at the top of the light fitting shouldn't affect light output for that lamp - it's more of an aesthetic feature. The front surface looks a bit pitted alright - I'd try wet sanding before buying a new lamp. Probably start from 600 grit there.


  • Registered Users, Registered Users 2 Posts: 1,639 ✭✭✭Zoney


    Chimaera wrote: »
    @zoney: Go in to Joe McKennas and get some emery paper there for wet sanding. Looking at your lights in those pictures, you'll probably only want to give a very light rub with 1500 and 2000 grit. Use plenty of water as you're going along. Finish off with the G3 past afterwards.

    Thanks! Have some 1500 grit paper already, was going to use the G3 paste again after alright. How much of a difference would you say the extra step of the 2000 grit would make, or does using the 1500 grit just really need that next step anyway before the final finish? The advice I got when buying the sandpaper was plenty of water alright!

    Haven't done more yet - got sidetracked on Saturday with a different project as it happened (wheels/alloys), then the weather attacked!


  • Advertisement
  • Registered Users, Registered Users 2 Posts: 1,652 ✭✭✭Chimaera


    2000 leaves less work to do with the G3 and sealant at the end. Last time I did mine, I finished with 2000 and just finished them with Meguiars PlastX each time I washed the car. When I got the DA polisher last summer, I gave them a good working over with G3, mostly because I could :D

    When the weather warms up a bit, I'll probably go back and give them a good sanding again - they've gotten a little pitted in the last few years.


  • Registered Users, Registered Users 2 Posts: 3,925 ✭✭✭pudzey101


    Need to do this again to the missus car guys , what grit sandpaper do i start and finish with again ?


  • Registered Users, Registered Users 2 Posts: 81,220 ✭✭✭✭biko


    It's mentioned a few times already. Depending on how bad they are use 1500 and then 2000 wet, maybe start lower grit if they are really bad.
    Polish after. Finish with wax (pref UV) to protect from further damage.


  • Registered Users, Registered Users 2 Posts: 104 ✭✭bartbanis


    Can anyone recommend a product to restore headlights of car back to new or close to it? The lights seem to have a scum on them and very hard shifted. Any help greatly appreciated.


  • Registered Users, Registered Users 2 Posts: 20,195 ✭✭✭✭jimgoose


    Toothpaste and a brisk scrub with a toothbrush. I kid you not! :cool:


  • Registered Users, Registered Users 2 Posts: 104 ✭✭bartbanis


    jimgoose wrote: »
    Toothpaste and a brisk scrub with a toothbrush. I kid you not! :cool:
    anything is worth a try!


  • Registered Users, Registered Users 2 Posts: 3,925 ✭✭✭pudzey101


    u used ordinary toothpaste , and autosol metal polish , never got before and after pics but it did the job


  • Registered Users, Registered Users 2 Posts: 104 ✭✭bartbanis


    i have tried that plastx product , did a good job but problem is back again not long after lights were done.


  • Registered Users, Registered Users 2 Posts: 1 Bloggerirl


    I used the meguiars headlight restoration kit can't recommend it enough practically like brand new lights makes a big difference to the car...the results speak for themselves

    I'd upload a pic but it won't let me


  • Registered Users, Registered Users 2 Posts: 468 ✭✭Gordy6040


    Bloggerirl wrote: »
    I used the meguiars headlight restoration kit can't recommend it enough practically like brand new lights makes a big difference to the car...the results speak for themselves

    I'd upload a pic but it won't let me

    Interesting. I was just considering that kit in halfords.


  • Advertisement
Advertisement