Advertisement
If you have a new account but are having problems posting or verifying your account, please email us on hello@boards.ie for help. Thanks :)
Hello all! Please ensure that you are posting a new thread or question in the appropriate forum. The Feedback forum is overwhelmed with questions that are having to be moved elsewhere. If you need help to verify your account contact hello@boards.ie
Please note that it is not permitted to have referral links posted in your signature. Keep these links contained in the appropriate forum. Thank you.

https://www.boards.ie/discussion/2055940817/signature-rules

The "Today I did something to my car" thread

1311312314316317325

Comments

  • Registered Users, Registered Users 2 Posts: 3,813 ✭✭✭rizzee


    First clean in a week or so, well needed. Enjoy the weather folks!


  • Registered Users, Registered Users 2 Posts: 2,699 ✭✭✭advertsfox


    Got a new mini aerial, changed all remaining 501's to LED's (side indicators and dips) and cleared the rubbish out while looking for a dropped screw - can't find it now :(


  • Closed Accounts Posts: 405 ✭✭00833827


    taxed mine :-(


  • Registered Users, Registered Users 2 Posts: 3,813 ✭✭✭rizzee


    advertsfox wrote: »
    Got a new mini aerial, changed all remaining 501's to LED's (side indicators and dips) and cleared the rubbish out while looking for a dropped screw - can't find it now :(

    Looking to get smoked indicators, is that what you have? Must pop up to check yours out soon, i still keep a lookout :D


  • Registered Users, Registered Users 2 Posts: 3,813 ✭✭✭rizzee


    Sorry for double post, cant add photos in edit option on phone. Heres another picture, needs to be lowered badly!! Might respray alloys gold.. .

    2u8dyj7.jpg


  • Advertisement
  • Registered Users, Registered Users 2 Posts: 9,234 ✭✭✭Ardennes1944


    I'd go light bronze instead of gold, and i just got lamin-x for my indicators. The light smoke tint is very nice


  • Registered Users, Registered Users 2 Posts: 3,813 ✭✭✭rizzee


    Yeah sorry, thats what I meant. The bronze/gold colour similar to Imprezas :-) Will look up on that, cheers!

    Went on findapart and stuck a few part requests in, spoiler, side skirt's and few bits and bobs :-)

    @advertsfox where did you get the aerial? Any pictures?


  • Registered Users, Registered Users 2 Posts: 26,280 ✭✭✭✭Eric Cartman


    bmstuff wrote: »
    60.JPG

    what amp is that ? looks like it may be a good candidate for the e38


  • Registered Users, Registered Users 2 Posts: 122 ✭✭Kanye


    Despite this being my pride and joy, I only got around to getting it cleaned today for the first time in just way too long. It's shameful really, but I think it's come up well. The inside is still as new so haven't grabbed any pics of that. Marked difference between before/after!


    Before:

    257079.jpg


    After:

    257080.jpg


  • Registered Users, Registered Users 2 Posts: 1,363 ✭✭✭bmstuff


    what amp is that ? looks like it may be a good candidate for the e38

    JL Audio 600/6 Class D full range
    Very good sound quality for a class D
    Very popular in the US on all sort of bimmers, e39, e90 etc..
    I run 4 midranges, 4 tweeters and 2x 150 watts subs with it no problem, punches very good.


  • Advertisement
  • Registered Users, Registered Users 2 Posts: 239 ✭✭thats not gone well


    Today I decided to hard wire in a phone charger, mainly because I use it as a GPS and it’s nice to have it fully charged on arrival.
    I got a 3m iPhone cable and a cigarette lighter adapter from lidl a while back that had usb slots.
    In order to run the wire from the glovebox to the drivers a pillar, I went through the lower dashboard.
    On the drivers side there are 4 screws, one to the left of the steering column, two to the right, and one low down under a panel.

    img1169vq.jpg
    img1170qb.jpg

    Slide it towards you first, then to the right to remove it from the centre console.
    You also need to be careful of the foot well light that needs disconnecting.
    Because I planned out the wire routing, I also removed the air vent and light control pannel.
    Two screws at the bottom, pull out at the bottom and then down.

    img1165p.jpg
    img1163bm.jpg


    On the back you’ll find the three bulbs that light the pannel, these often need replacing, a common fault on high hour Volvo S40/V40 s. Twist out using a flat head screwdriver. Replacement bulbs are dealer recomended becasuse of the odd fitment
    I had fixed these previously so no need this time.

    img1164ng.jpg

    Next onto the centre console,
    Removed the radio and heater control panel cover.(( anticipated having to remove the radio surround today but got lucky with skinny arms!) The 3 bulbs in the heater control panel often need replacing at the same time as the others, remove the 4 visible screws and the two more under the radio. The control panel can then be wiggled out. Again I had already done this.
    img1154aj.jpg


    Onto the glove box, there’s a shelf in the glove box held on with two screws, remove them and unclip the shelf, revealing a nice hole for wires.

    img1150ft.jpg

    img1149ng.jpg


    The easy part was actually feeding the wires through the dashboard and over.
    I fed the wires out thorough the a-pillar/dashboard panel gap.

    img1157yye.jpg

    Then as the famous manuals say, assembly is the reverse of disassembly.
    A handy little nugget for other Volvo S40/V40 owners is if you remove one of the blanks and see the below, your car is pre-wired for heated seats! Its also on my list of mods.
    img1161zh.jpg

    img1160gn.jpg


    I haven’t fully completed the job, need a multimeter to determine the positive of the adaptor so I can wire it to the fuse box with this;

    img1177g.jpg

    Thanks for reading :)


  • Closed Accounts Posts: 9,606 ✭✭✭toastedpickles


    I cleaned mine :D And got horribly sunburned in the process

    I'm on fire :D


  • Registered Users, Registered Users 2 Posts: 7,302 ✭✭✭Supergurrier


    Don't clean in the sun !


  • Closed Accounts Posts: 9,606 ✭✭✭toastedpickles


    Don't clean in the sun !

    I didn't, I was in the shade, but I was sunburned anyways from being out earlier


  • Registered Users, Registered Users 2 Posts: 14,729 ✭✭✭✭CianRyan


    Don't clean in the sun !

    You can clean in the soon, just don't wax or polish in the sun.


  • Closed Accounts Posts: 9,606 ✭✭✭toastedpickles


    CianRyan wrote: »
    You can clean in the soon, just don't wax or polish in the sun.

    Stupid question but why?


  • Registered Users, Registered Users 2 Posts: 14,729 ✭✭✭✭CianRyan


    Stupid question but why?

    Not sure really, I presume the stuff just kind of bakes onto the car.
    This is why we need the detailing forum... NOW! :pac:


  • Closed Accounts Posts: 9,606 ✭✭✭toastedpickles


    CianRyan wrote: »
    Not sure really, I presume the stuff just kind of bakes onto the car.
    This is why we need the detailing forum... NOW! :pac:

    Moar advices!! :pac:

    I'll keep that in mind though


  • Registered Users, Registered Users 2 Posts: 7,302 ✭✭✭Supergurrier


    Cleaning in the sun more time for shampoo to dry into the paint/watermarks and all that bad kind of stuff.

    Polishing and waxing is obvious you aint gonna get no proper hazing in direct sunlight.

    Drying properly(good quality drying towel) and having the time to do it on a cool evening is the key to a spotless car

    I do be staring at the car looking like a leopard with water spots during a fine day off muttering to myself "Just you wait until 8 o'clock boyo"


  • Registered Users, Registered Users 2 Posts: 19,921 ✭✭✭✭MetzgerMeister


    Cian, have you actually tried to wash a car in direct sunlight like the sun we've had the past few days?

    First of all, the panels are roasting. The pre-rinse water will almost have dried off by the time you get to shampooing.

    The shampoo will almost evaporate and we should all know that you can't let shampoo dry into the paint.

    When you get to drying, the last few panels will already have dried before you get to them and will more than likely leave water marks.


  • Advertisement
  • Registered Users, Registered Users 2 Posts: 7,302 ✭✭✭Supergurrier


    As for polishing im not so sure, hand polishing still kidna scares me as the paint always goes wonky and i panic and have to use a wet cloth to get it all off :p

    (Saves for DA)


  • Registered Users, Registered Users 2 Posts: 14,729 ✭✭✭✭CianRyan


    Not been shampooing, just rinsing and quick detailing.
    The front of my house is in shade from about 13:00 anyway so I have more time to do it than I don't.
    I usually go in sections with the hose and I've never found myself with a leopard print car! Good thing to keep in mind though, didn't know the shampoo would dry onto the car either.

    Again, forum and stickies needed!
    As for polishing im not so sure, hand polishing still kidna scares me as the paint always goes wonky and i panic and have to use a wet cloth to get it all off :p

    (Saves for DA)

    Really? Comes off nice and clean for me. :)


  • Closed Accounts Posts: 9,606 ✭✭✭toastedpickles


    Same as meself there, except I've no access to a hose :(


  • Registered Users, Registered Users 2 Posts: 7,302 ✭✭✭Supergurrier


    You probably don't live in a radioactive limescale crazy chernobyl hard water area like me then.


  • Registered Users, Registered Users 2 Posts: 14,729 ✭✭✭✭CianRyan


    You probably don't live in a radioactive limescale crazy chernobyl hard water area like me then.

    That's Galways for ya.
    Up in my cousin's on Cleggan we took samples of tap and rain water and looked at them under a microscope.
    Let's just say we were drinking filtered rain water after that. :pac:
    Same as meself there, except I've no access to a hose :(

    Yikes! And I complain about not having a pressure washer...


  • Closed Accounts Posts: 9,606 ✭✭✭toastedpickles


    CianRyan wrote: »
    Yikes! And I complain about not having a pressure washer...

    Tis awful altogether :pac:

    Bitta hot water in a bucket, does the job just the same


  • Closed Accounts Posts: 12,985 ✭✭✭✭dgt


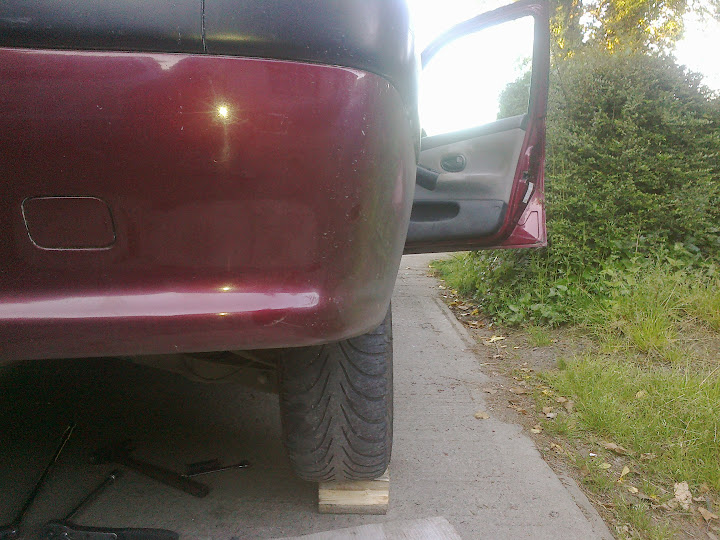
    Too much neg camber for big miles! Time to adjust :)

    Before
    Image706.jpg

    After
    Image707.jpg

    Yeah yeah, my tyres are mismatched and one needs replacing....

    IDTD getting it's head torqued down :) a right pig!
    Image708.jpg


  • Registered Users, Registered Users 2 Posts: 3,512 ✭✭✭arleitiss


    Replaced oil filter housing bushing today ( 11421432228). Took 3 hours, saved a good few finances.


  • Registered Users, Registered Users 2 Posts: 1,900 ✭✭✭Paddy@CIRL


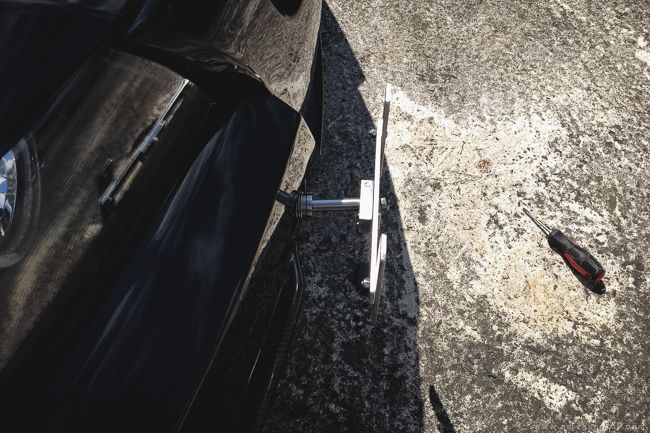
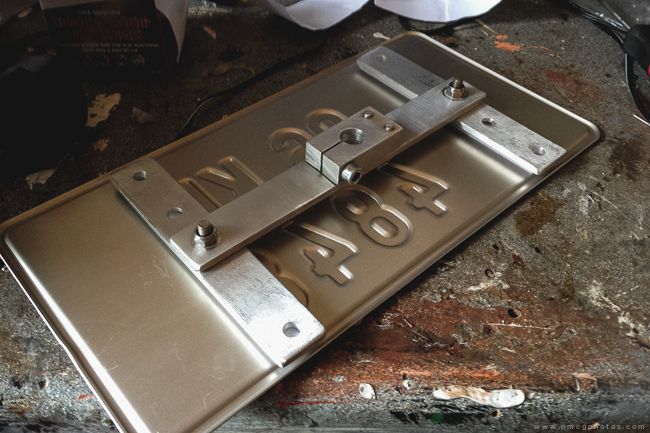
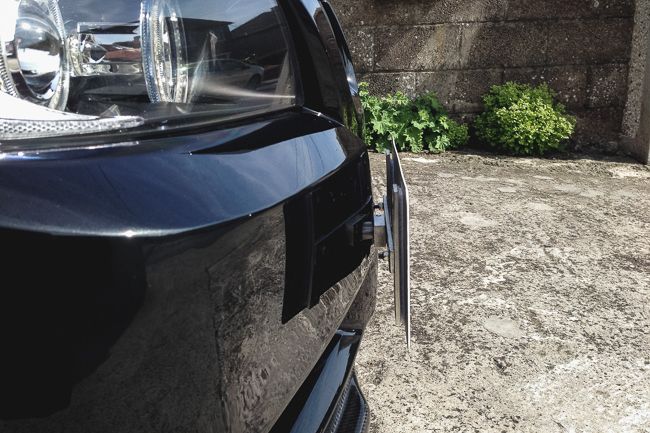
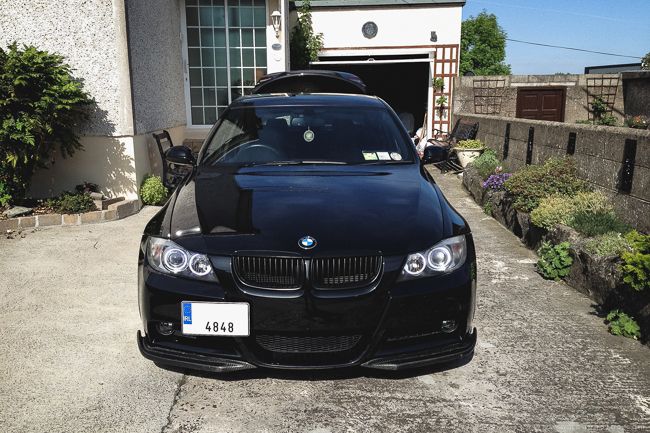
    Since I had the front plate holder removed and the bumper smoothed, I needed something to hold a plate that didn't require the front bumper to be re-drilled. I sourced a kit from M-Fest in California, which after weeks of no response from their customer support and a PayPal dispute, they finally shipped last Friday and it arrived yesterday.

    PMcGE90CustomPlateHolder-1_zps61366708.jpg

    As it turns out, it was a piece of over engineered ****.

    PMcGE90CustomPlateHolder-3_zps7e05606d.jpg

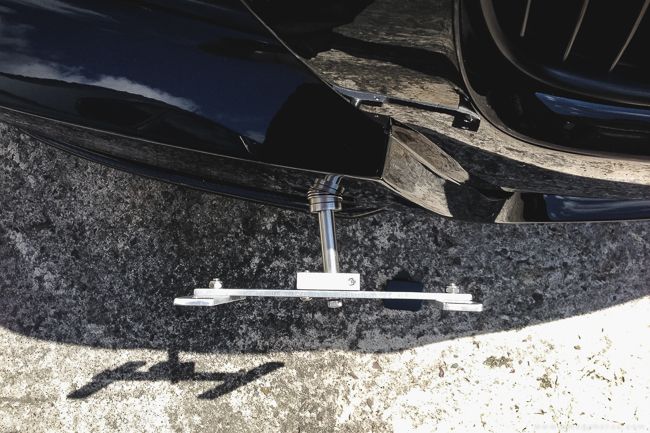
    The tow hook adapter was temperamental and liable to pop the plate shaft out at any time. The shaft also stuck out a mile from the front bumper and the plate frame wouldn't secure to the shaft so it would just spin and / or fall off.

    PMcGE90CustomPlateHolder-4_zps6b89d7c3.jpg

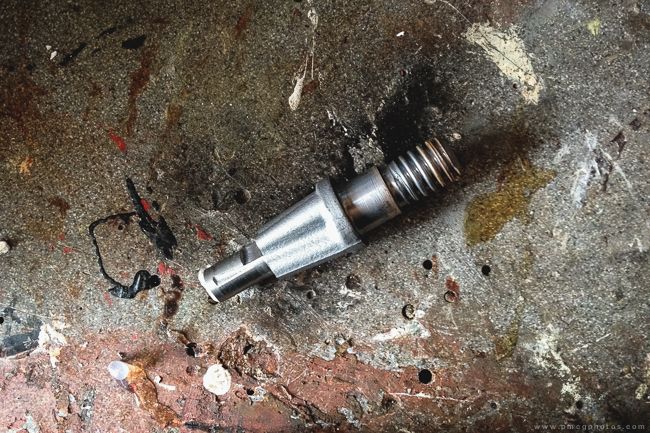
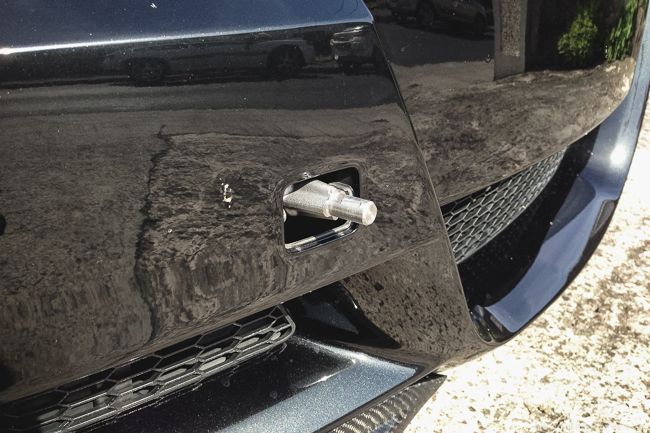
    I visited a local engineering place with an idea yesterday afternoon. Using the car's original tow hook, he machined it into a shorter and more simpler version of the M-Fest version. Note the slats so it can be tightened with the supplied 10mm spanner in the BMW's tool box.

    PMcGE90CustomPlateHolder-5_zpsc5c63723.jpg

    We re-used the plate frame, but used countersunk bolts and changed the allen key bolt which secures the frame to the shaft.

    PMcGE90CustomPlateHolder-7_zps0efb2a79.jpg

    With the modified tow hook installed and tightened, it's a simple case of popping the frame onto the shaft, aligning it and tightening one bolt.

    PMcGE90CustomPlateHolder-6_zpsbc370b7a.jpg

    The number plate is attached to the frame with velcro. It sits dead tight to the front bumper but won't touch it at speed.

    PMcGE90CustomPlateHolder-8_zps5e7951f9.jpg

    I can remove it in about 30 seconds or so with just a 5mm allen key and a 10mm spanner. Really happy with it now :)


  • Advertisement
  • Closed Accounts Posts: 12,985 ✭✭✭✭dgt


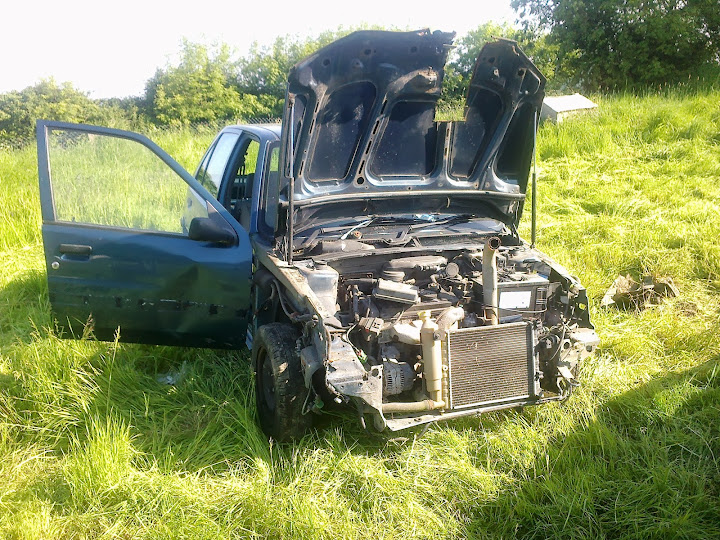
    One out
    Image711.jpg

    Then the other
    Image709.jpg

    You can see how it fell on me, it's a heavy f*cker, lucky I'm not damaged eh ;)

    So I had a good sit, then went back out to this...
    Image712.jpg

    Bit more....
    Image713.jpg

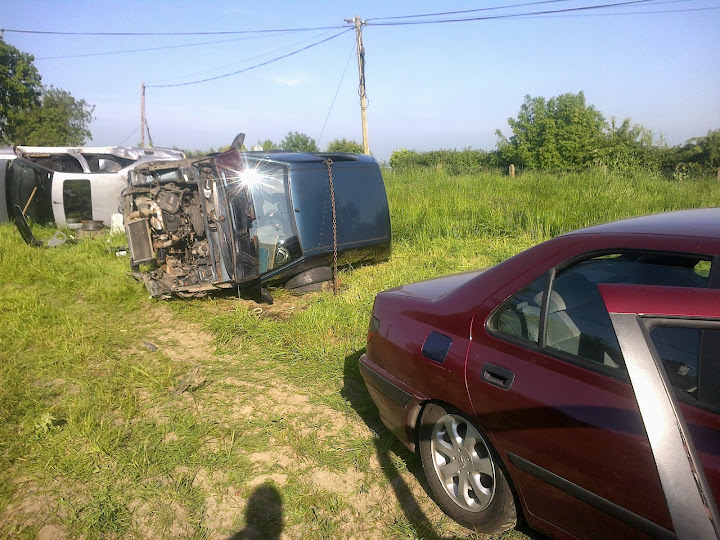
    Time to heel it on it's side.... D-Tractor to the rescue! :pac:
    Image714.jpg

    What's next? Hmmm....


This discussion has been closed.
Advertisement