Advertisement
Help Keep Boards Alive. Support us by going ad free today. See here: https://subscriptions.boards.ie/.
https://www.boards.ie/group/1878-subscribers-forum

Private Group for paid up members of Boards.ie. Join the club.
Hi all, please see this major site announcement: https://www.boards.ie/discussion/2058427594/boards-ie-2026

The "Today I did something to my bike" thread

12467195

Comments

  • Registered Users, Registered Users 2 Posts: 4,446 ✭✭✭sonic85


    changed coolant and gave it a good wash. under the fairings looked like it hadn't been cleaned in years! much better now


  • Registered Users, Registered Users 2 Posts: 11,363 ✭✭✭✭cantdecide


    eurofoxy wrote: »
    25) cant be arced anymore, put bike on adverts...As new....

    Not long to go now :rolleyes:

    Repaired ignition barrel loom. The blinkin' bike wouldn't switch off on Friday. It turned out to be a short from a kink in the loom that had been badly repaired so I had to splice in four new cables properly lengthened, staggered, soldered and insulated. The ignition lights are actually much brighter now.

    Then I discovered my clutch cable is fraying :rolleyes:


  • Registered Users, Registered Users 2 Posts: 6,923 ✭✭✭Wossack


    good catch!

    half considering getting the wheels powdercoated dark metalic red, like:

    img_10861896_00.jpg

    Ive the same model bike in silver, like in the pic (try and ignore the flames, bleugh)


  • Registered Users, Registered Users 2 Posts: 176 ✭✭designbydan


    Today (Well last night) I moved up to this Lovely Machine
    48012_10200928666078765_127845144_n.jpg

    Needs a good bit done to it.
    Speedo not working, same for odometer, BADLY needs new front tyre,
    Battery needed a good charge... while doing that this morning I cleaned the chain which was rusted to F*^&, So there'll be a new chain and sprocket on the way soon too. Also cleaned the fork seals which seamed to be leaking, they were mank inside, So bad I'll prob clean them again tomorrow when I have more time in the daylight (But stopped the leaking so yay)

    Gave the bike a good wash after work and took the above pic after.


  • Registered Users, Registered Users 2 Posts: 3,266 ✭✭✭Richard tea


    Headed out and bought a few bits & pieces to service the bike.

    Everything went well & as planed.

    I changed the oil, oil filter, 4 spark plugs. The Air filter did not need replacing. The old spark plugs were quite dirty. The old oil didn't seem that black but I know now myself when it was changed so I can work off that in future.
    I removed the tank to get at the spark plugs. The fuel overflow tubs are a pain to get back on the tank, Anyone any tips?? I left them disconnected for now. I wish I had of taken a recording of a before and after because I could swear she is purring better now.

    One thing is bothering me though. I adjusted the chain the other day. I followed the guide on that youtube video from Del boys garage. Most of the chain has the 1 1/2 inch play in it but the other part of the chain is quite tight. Almost feels too tight ( half inch play in it ). The are still 3 notches left on the swing arm for adjustment???? Could the chain be ****ed even before all adjustment notches are not used up yet????


  • Advertisement
  • Registered Users, Registered Users 2 Posts: 3,266 ✭✭✭Richard tea


    I removed the back brake caliper today to inspect the pads and what not. Everything was fine so I just gave it a spray down with brake cleaner and applied some copper grease to the back of the pads. Ill tackle the front caliper another time ( hope its as straight forward as the back ).

    I noticed for the first time today a leak coming from the bottom of the exhaust. Not much but a drip none the less. I thought here we go another list of things to sort out. It was great relief when the lads popped around and informed me that this was normal as there is a hole to drain off any water/condensation. The hole must have been clogged up because its the first time I noticed a drip.:)


  • Registered Users, Registered Users 2 Posts: 745 ✭✭✭Mr Sheen!


    I removed the back brake caliper today to inspect the pads and what not. Everything was fine so I just gave it a spray down with brake cleaner and applied some copper grease to the back of the pads. Ill tackle the front caliper another time ( hope its as straight forward as the back ).

    I noticed for the first time today a leak coming from the bottom of the exhaust. Not much but a drip none the less. I thought here we go another list of things to sort out. It was great relief when the lads popped around and informed me that this was normal as there is a hole to drain off any water/condensation. The hole must have been clogged up because its the first time I noticed a drip.:)

    Good to see you today. Grand spot you have for the bike and its looking really well. Get that out on the road Joe and sort out any teething problems. This a grand bike!


  • Registered Users, Registered Users 2 Posts: 9,460 ✭✭✭Wonda-Boy


    Fair play Joe great feeling when you service the bike yourself innit.....


  • Registered Users, Registered Users 2 Posts: 9,460 ✭✭✭Wonda-Boy


    (Yesterday) Swapped my FZ6 for most of the day to enjoy a nice BIRD.....really is a top notch bike and a quality piece of kit.


    20130414165926.jpg


  • Registered Users, Registered Users 2 Posts: 3,266 ✭✭✭Richard tea


    Took lookbehindyou advice and chopped off the damaged piece of the front mud guard. Worked a treat, just need to smooth it off now.

    I took the front sprocket housing apart for the first time also. The pic wont do it justice but there was quite alot of gunk/gunge clogged up in there.

    Just waiting on missus to finish school run and ill pop up to the garage for a re-fuel and a short spin to bed her in after the service.


  • Advertisement
  • Registered Users, Registered Users 2 Posts: 11,363 ✭✭✭✭cantdecide


    One thing is bothering me though. I adjusted the chain the other day. I followed the guide on that youtube video from Del boys garage. Most of the chain has the 1 1/2 inch play in it but the other part of the chain is quite tight. Almost feels too tight ( half inch play in it ). The are still 3 notches left on the swing arm for adjustment???? Could the chain be ****ed even before all adjustment notches are not used up yet????

    The way I was shown to adjust a chain is to find the tightest spot and adjust it to suit from there. You are likely to have more than one tight spot. My feeling is that the chain might well be past it if it were that crusty and old to begin with but I'd start by making another adjustment and keeping it well lubed. See if the the tight spot loosens out a little with time. If there's a split link on that chain and it's not a high-tech X-ring modern chain (which I'd imagine it wouldn't be if it rusted over) then you could always try removing it and soaking it in oil (I want to say kerosene but might be wrong). If all that fails, get used to the idea of replacing the chain. There's nothing like that new chain loveliness!!


  • Registered Users, Registered Users 2 Posts: 3,266 ✭✭✭Richard tea


    cantdecide wrote: »
    The way I was shown to adjust a chain is to find the tightest spot and adjust it to suit from there. You are likely to have more than one tight spot. My feeling is that the chain might well be past it if it were that crusty and old to begin with but I'd start by making another adjustment and keeping it well lubed. See if the the tight spot loosens out a little with time. If there's a split link on that chain and it's not a high-tech X-ring modern chain (which I'd imagine it wouldn't be if it rusted over) then you could always try removing it and soaking it in oil (I want to say kerosene but might be wrong). If all that fails, get used to the idea of replacing the chain. There's nothing like that new chain loveliness!!


    Will do. A new chain and sprocket are next on the list. I just have to wait till next months or the month afters pay check:mad: I have been reading alot about the different chains & although most say the x ring is better, quite alot of people have mentioned that the o ring lasted just as long as the x ring?? There is nearly 50 quid in the difference in price.


  • Registered Users, Registered Users 2 Posts: 9,460 ✭✭✭Wonda-Boy


    Joe,

    I got a gold D.I.D X chain with D.I.D performance front and rear sprockets for £110 delivered from the UK. And it was a tasty piece of kit.....


  • Registered Users, Registered Users 2 Posts: 11,363 ✭✭✭✭cantdecide


    Wonda-Boy wrote: »
    Joe,

    I got a gold D.I.D X chain with D.I.D performance front and rear sprockets for £110 delivered from the UK. And it was a tasty piece of kit.....

    Did you use a split link or did you manage to get a rivet link? I've never done my own C&S but was thinking about doing it to the gixxer if I could get around the special tool for the rivet link....

    Sorry for hijacking...


  • Registered Users, Registered Users 2 Posts: 3,266 ✭✭✭Richard tea


    cantdecide wrote: »
    Did you use a split link or did you manage to get a rivet link? I've never done my own C&S but was thinking about doing it to the gixxer if I could get around the special tool for the rivet link....

    Sorry for hijacking...


    Also Wonda can you post a link to the web site you got the c&s from?


  • Registered Users, Registered Users 2 Posts: 1,569 ✭✭✭The Don


    cantdecide wrote: »
    Did you use a split link or did you manage to get a rivet link? I've never done my own C&S but was thinking about doing it to the gixxer if I could get around the special tool for the rivet link....

    Sorry for hijacking...

    This may not be an option for you but when I put on my chain and sprockets I took off the rear swing arm.

    It was pretty easy on the Fazer. Prop her up on stands/blocks. Take off the rear wheel and caliper. Disconnect the shock linkage(s). Then you only have to remove covers and take out the pivot shaft bolt.

    The rear arm should be free to take out and then you can put on your new chain without having to split it.

    There may be a few more steps depending on your bike but if you have a Haynes manual and the tools it should be pretty straight forward.

    I'd prefer to do it this way rather than trust a link I put a chain back together with.


  • Registered Users, Registered Users 2 Posts: 975 ✭✭✭rat_race


    The Don wrote: »
    This may not be an option for you but when I put on my chain and sprockets I took off the rear swing arm.

    It was pretty easy on the Fazer. Prop her up on stands/blocks. Take off the rear wheel and caliper. Disconnect the shock linkage(s). Then you only have to remove covers and take out the pivot shaft bolt.

    The rear arm should be free to take out and then you can put on your new chain without having to split it.

    There may be a few more steps depending on your bike but if you have a Haynes manual and the tools it should be pretty straight forward.

    I'd prefer to do it this way rather than trust a link I put a chain back together with.

    I'm not an expert, but don't chains generally come unlinked, and usually with the rivet links? Mine have in the past...


  • Closed Accounts Posts: 1,236 ✭✭✭Tomohawk


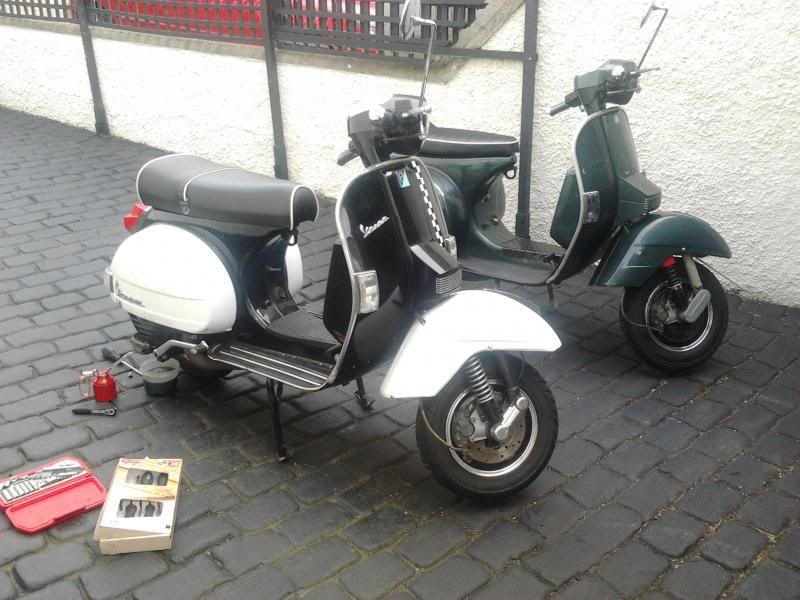
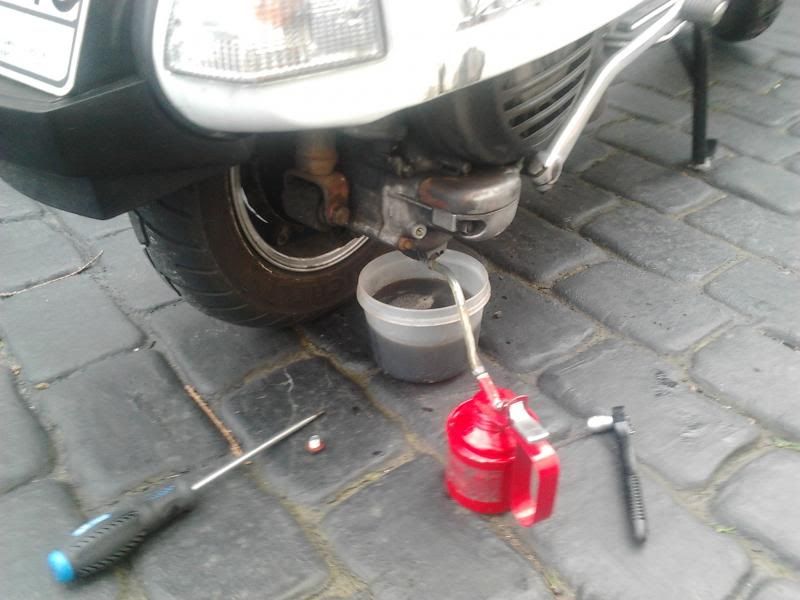
    Today I did a oil change on my PX200 Serie Speciale using SAE30 oil (black & white scooter). Tools used were a flat head screw driver and an 11mm socket for the oil nut underneath the engine casing. Ran the engine for 10 minutes and then dropped the old oil, it was in not too bad a condition, it wasn't black! Last changed the oil in september 2012, hadn't done much mileage since then. Filled up with new sae30 oil from the red squirt can, takes about a can full and let the overflow dribble off from the top hole(this is how you know you have the correct amount in when the oil levels off and stops dribbling out of hole). Job done, took about 20 minutes...that's the oil serviced for the year on this vespa!
    2013-04-15163527.jpg
    2013-04-15163442.jpg


  • Registered Users, Registered Users 2 Posts: 9,460 ✭✭✭Wonda-Boy


    Some newer bikes (mine 09) would have the same chain on from new and could be seamless, as in no split link. I was doing a service and replacing the sprocket carrier bearing at the same time so when it came to the chain I was knackered so I just angle grinded mine off only took a sec lol. I used the rivet link that came with the new chain. TBH, its quite easy to do and you dont need the "special" tool as a good strong vice grips to squeeze the new link on level and then a self tapping screw in the new link and tap it wide so it cant move to flair the links when seated level. You would need two people to flair the link, as one has to hold something (lump hammer) behind the link to take the force.

    I got the kit from Huntermotorcycles on ebay lads. It was very quick getting here.....


  • Registered Users, Registered Users 2 Posts: 3,266 ✭✭✭Richard tea


    Wonda-Boy wrote: »
    Some newer bikes (mine 09) would have the same chain on from new and could be seamless, as in no split link. I was doing a service and replacing the sprocket carrier bearing at the same time so when it came to the chain I was knackered so I just angle grinded mine off only took a sec lol. I used the rivet link that came with the new chain. TBH, its quite easy to do and you dont need the "special" tool as a good strong vice grips to squeeze the new link on level and then a self tapping screw in the new link and tap it wide so it cant move to flair the links when seated level. You would need two people to flair the link, as one has to hold something (lump hammer) behind the link to take the force.

    I got the kit from Huntermotorcycles on ebay lads. It was very quick getting here.....


    Nice one. They have a C&S kit for 84 sterling. I think delivery is £11


  • Advertisement
  • Registered Users, Registered Users 2 Posts: 9,460 ✭✭✭Wonda-Boy


    Nice one. They have a C&S kit for 84 sterling. I think delivery is £11

    Just make sure it will fit your bike Joe....


  • Registered Users, Registered Users 2 Posts: 3,266 ✭✭✭Richard tea


    Wonda-Boy wrote: »
    Just make sure it will fit your bike Joe....


    I will ask the seller first. The pic has a 520 chain but as far as I know I need a 525. It does say pic is for illustration purposes only though. Im still a bit confused about fitting it but sure ill tackle that at a later stage.


  • Registered Users, Registered Users 2 Posts: 9,460 ✭✭✭Wonda-Boy


    Well the 1st thing to get right is the size....the 520 is the width (not the length) so hop onto the Honda forums or google it and you be sorted.


  • Registered Users, Registered Users 2 Posts: 3,266 ✭✭✭Richard tea


    The seller got back to me. Its a 525 chain & he says it will fit my bike. I wont order it for a few days though.


  • Registered Users, Registered Users 2 Posts: 240 ✭✭dwelby101


    Hi there,

    I'm sure this is the wrong place to ask this, but you guys seem to know what you are talking about and since a recent post was about an oil change, i just thought I'd ask here... So recently I sent my bike to get serviced after I bought It second-hand (just to make sure it wasnt a total death trap) everything seemed ok, just some basic checks were done and an oil change... the mechanic must have put too much oil into the engine, and I'm saying this because when I brought it back to sort out another issue he had to drain some oil, and I hadn't touched the oil since the previous service. So my question is this: if there is too much oil in the engine, is it possible for the excess oil to get pushed back into a carburetor causing the float in said carb to get stuck allowing too much fuel to build up in carb causing the engine to run too rich...
    I know there are a lot of "this causing that" in what i just said, but I have a feeling the stem of the problem was the extra oil, I just don't know enough to be sure.


  • Closed Accounts Posts: 1,236 ✭✭✭Tomohawk


    Overfilling your engine oil results in excessive internal air pressures which causes gaskets and seals to fail. Another side-effect of overfilling is oil aeration which causes it to foam up inside the crank case. Once this happens, the oil loses it's ability to properly lubricate the internal components and will eventually lead to seizing. The clutch may slip and oil may get up into your air filter and block it. Bad news all around! Drain it to the proper level asap.

    Sometimes the engine mightn't start up if there too much oil. Completely drain it and check the magnetic sump plug for swarf or metal shavings, then clean it, replace and refill to the correct level...


  • Banned (with Prison Access) Posts: 6,194 ✭✭✭KamiKazi


    Bought a new set of clocks for the R6 as the old tachometer was spazzing out.

    Now when it gets noise tested I'll be able to rev up to 7k accurately, instead of the noise test guy seeing that it doesn't work and just saying 'just give it a handful!' :pac:


  • Registered Users, Registered Users 2 Posts: 1,551 ✭✭✭batman_oh


    Went for a spin as had enough of exams and study!
    image1.jpeg


  • Registered Users, Registered Users 2 Posts: 1,569 ✭✭✭The Don


    rat_race wrote: »
    I'm not an expert, but don't chains generally come unlinked, and usually with the rivet links? Mine have in the past...

    I'm not sure. I've only done it once and the DID chain I got wasn't split.


  • Advertisement
  • Registered Users, Registered Users 2 Posts: 176 ✭✭designbydan


    Got 'new' clocks and pillion foot pegs for my bros the other day, was looking forward to putting them on when I got home after work until the clutch cable snapped on me while I was out for lunch yesterday.

    Bike is now sitting in work waiting for a new cable
    (Which I luckily ordered along with a speedo cable Saturday night from Ebay)

    I knew it was frayed already but was hoping it would hold out until the new cable arrived.

    Bought a weekly bus ticket today. . poxy public transport I hate it. with any luck the cable will be delivered today and I can bring it back in tomorrow and be back on the road


Advertisement