Advertisement
If you have a new account but are having problems posting or verifying your account, please email us on hello@boards.ie for help. Thanks :)
Hello all! Please ensure that you are posting a new thread or question in the appropriate forum. The Feedback forum is overwhelmed with questions that are having to be moved elsewhere. If you need help to verify your account contact hello@boards.ie

Solar PV: Planning and What to expect at install

  • 19-11-2021 9:30pm
    #1
    Registered Users Posts: 189 ✭✭


    So, I started looking into Solar PV a few months ago and I found the various threads on Boards fantastic so thank you to all who post sharing your knowledge, experiences and opinions on value of quotes for Solar PV!

    So now its time to return the favour and I am going to post my experience, tips and pictures of my install (I often found myself wondering what the install would look like but never came across any threads with pictures of installs).

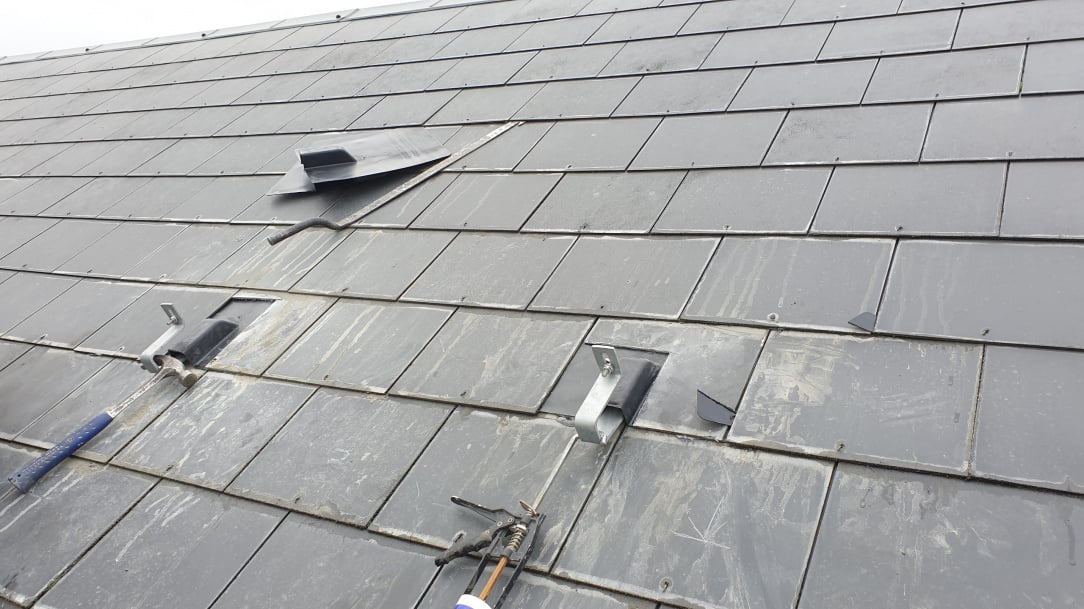
    Bracket Fitting:

    Roofer has to remove a slate and cut notch to fit each bracket. There is a plastic slate with a hood that slides up under other slates to seal the roof. See one not fitted at the top of this picture below.


    The bracket is secured directly to the rafter with 2 fixings about 100mm long. Once the brackets installed, the rails are attached to the brackets .


    Finished rails top and bottom 


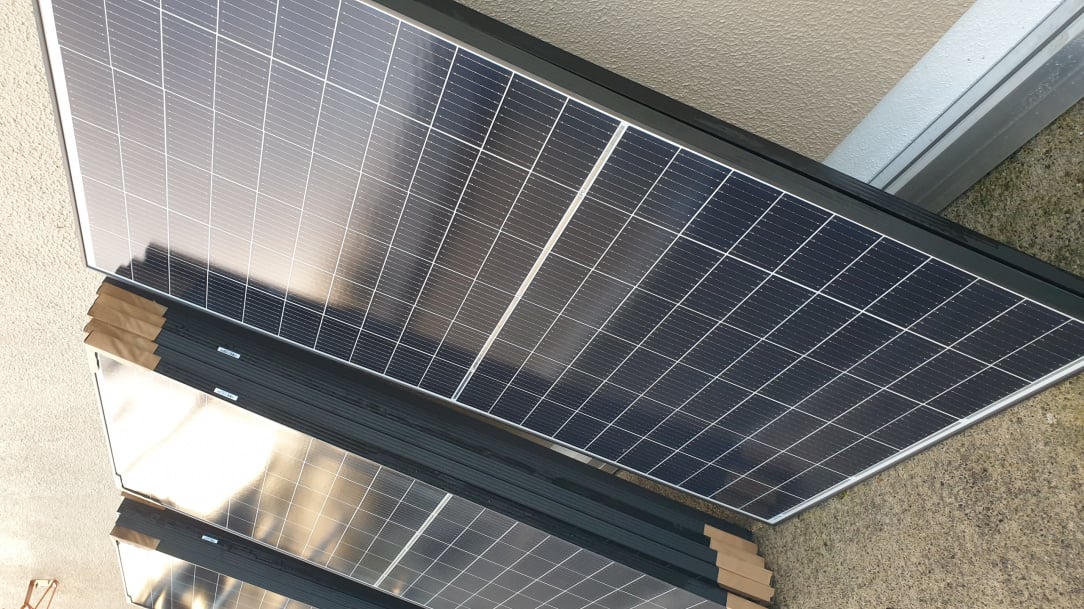
    Front of Solar Panel


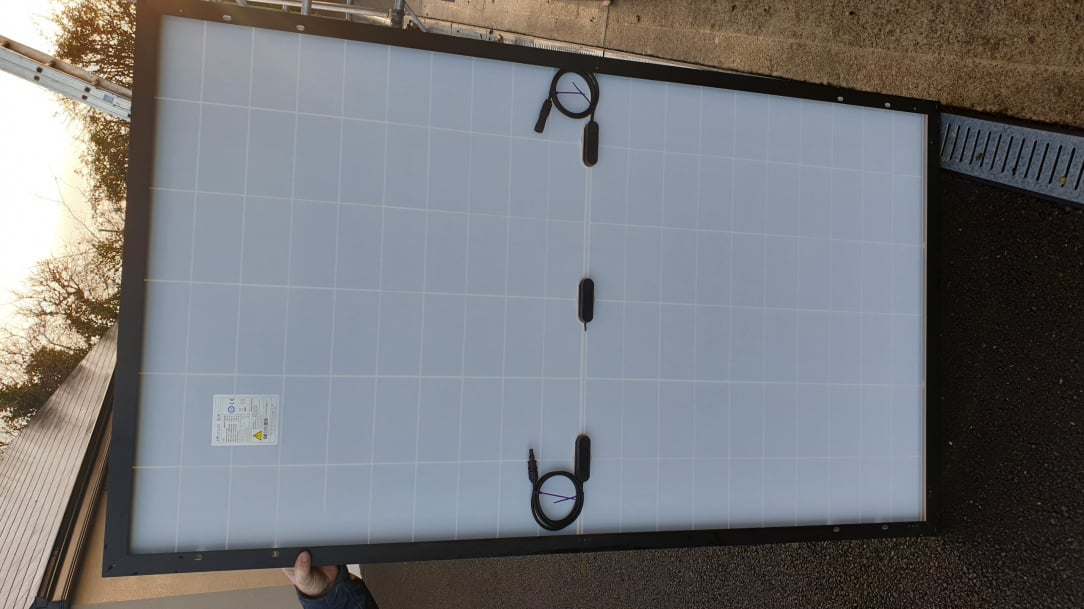
    Back of Solar Panel


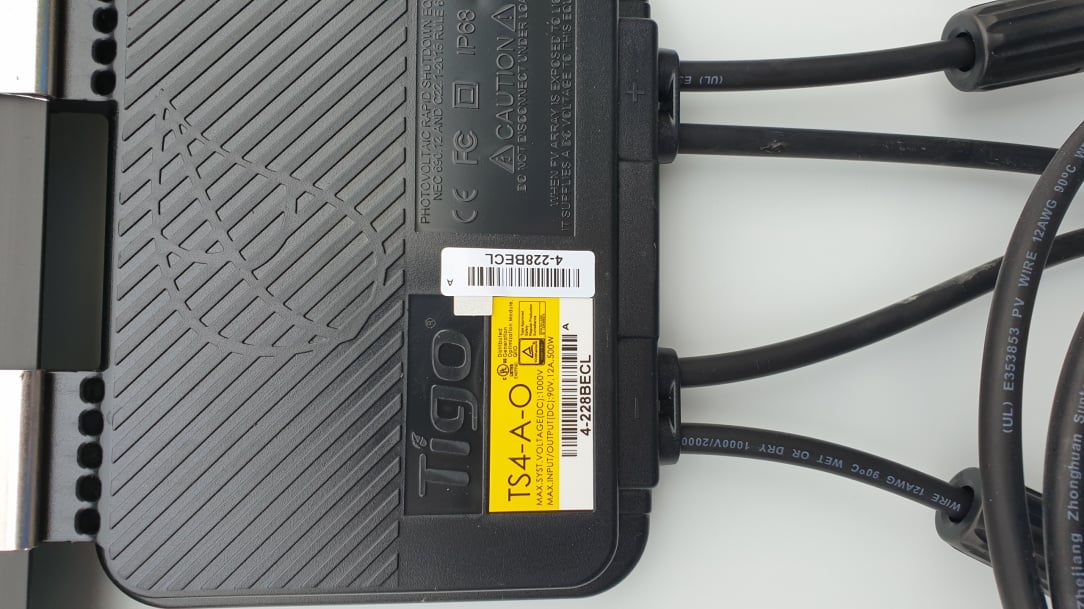
    Back of Solar Panel with Optimiser attached


    Optimisers:

    : If you are going to have any shadows on your panels then you need optimisers where shadows will fall. Why? Because if the sun is shining and one panel on a string of panels goes into shadow, then it is as if all your panels are in shadow. If an optimiser is fitted on the panel where the shadow is cast, they that panel stops but all others will continue to generate power. Be sure and ask your installer for them if you think you need them. My installer didn't push them.


    Picture of Inverter Mid install below showing connection point for AC back up. Not sure if all inverters have this connection but the Solis hybrid inverters do. This allows you to run a few small items (up to 3kw rating) from your batteries in the event of a power outage for as long as you have charge in your batteries. This could come in handy for planned power outages where you can ensure your batteries are fully charged from the grid and use the back up connect to power things like freezer or fridge. Some people just mount a socket in the attic and run down a lead from attic if needed. I got my installer to run the lead down to the utility and mount a double socket on the wall beside the freezer socket for easy change over. I can then plug an extension lead to have power on my worktop for small things like phone charger or wifi router. Please note the power will only last as long as your batteries have charge. If power outage was a day or two, the solar won’t charge up your batteries as they disconnect automatically in the event of a power outage.


    Install Internally:

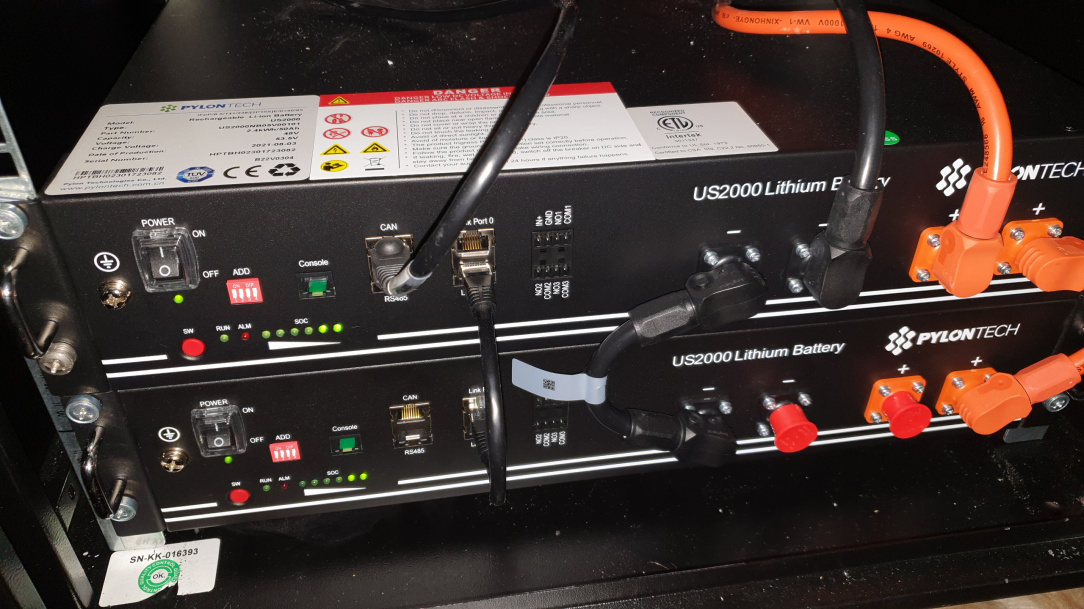
    The inverter, the batteries and the various switches and meters all take up a nice bit of space. I had hoped to fit the inverter in a larger corner press beside my distribution board in the utility and the batteries in a press underneath however the batteries hadn’t a chance of fitting in the press! I had wanted to do this so I could have easy access to inverter to adjust charging times for battery depending on sunshine forecast. Also, thought it would be safer from fire perspective. In the end I had to revert to my attic which was a little disappointing (cant see myself being as bothered to go up and down to attic to adjust times for night time charging as often as I would have if in utility so not getting the max benefit of the system). Also, just for safety I installed a battery smoke alarm in the attic as the batteries and inverter are located right over my bedroom 


    Batteries


    Install Externally

    Most important thing here is the aspect of your roof and potential for shadows. In my case, my roofs were pretty ideal with back of house SE facing and side was SW facing (with chimney) giving me a mix to get solar across the day.

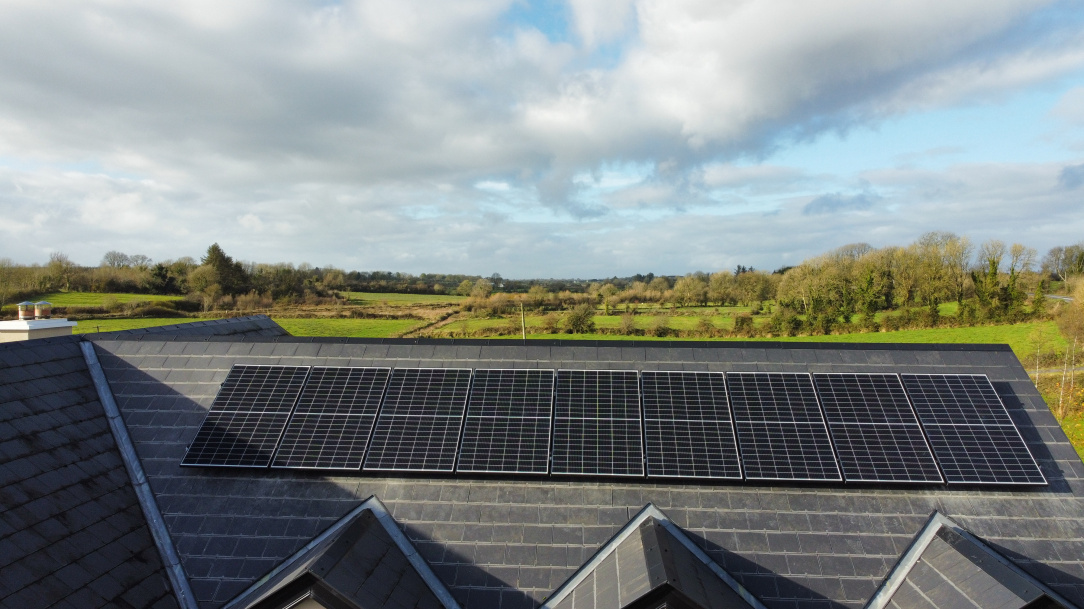
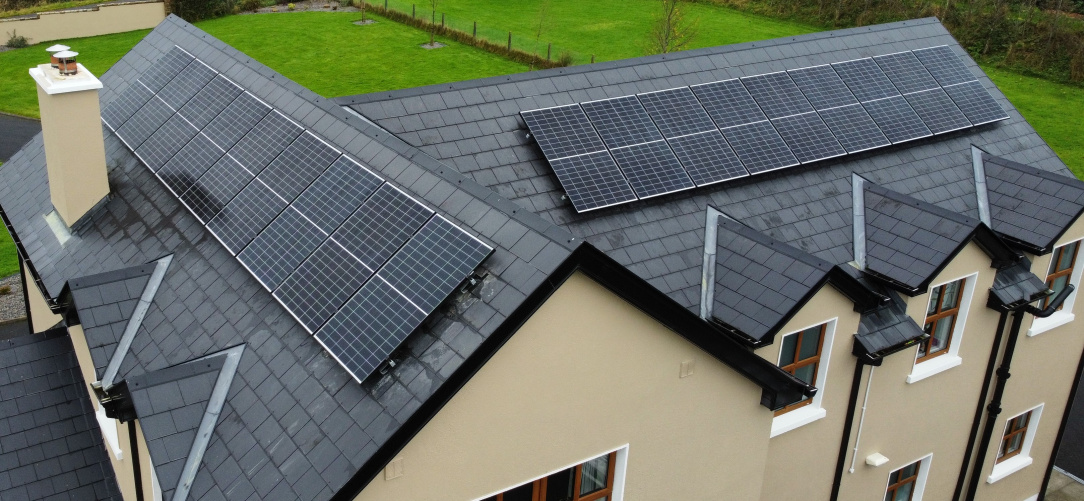
    I thought I would have no issues with shadows on my SE roof and some on my SW because of the chimney. But as you can see below, I was lucky that it was sunny the day of the install, so I sent up the drone to see was there any shadows and low and behold I was getting shadows on not one but 2 panels on my SE roof caused by my SW roof! This was mid Nov as about 130pm 

    This got me thinking what would the shadows be like at different times of the year when sun is higher and lower in Summer and winter? So, I went back through drone pictures I happened to have taken of the house last Summer and was able to get some good info on how shadows cast on my roof. In the end I determined I need 6 optimisers on my SW roof because of the chimney. So my advice to you is if you are planning far enough ahead, take note of where shadows are on your roof at different times of the day and different times of the year. I know not everyone has a drone (it was definitely handy for me!) but you might still be able to get some pictures or see from the ground. It could be worth your while. It would have killed me if I had only seen the shadow on the panels after the installer was gone…thankfully wasn’t the case!

    Roof Shadows:


    Roof Install Both Roofs Isometric


    Roof Install Both Roofs Plan


    So, in the end my install included:

    -       6kw Solis Hybrid Inverter

    -       18No 345w JA Solar Panels on a slate roof with renosol fixing system

    -       8 x optimisers

    -       2 x 2.4kw Pylontech Batteries

    -       Socket installed in my Utility fed from the AC Back up on the Inverter


    The solis inverter has the capability to charge the batteries overnight using my night rate (im sure others do too, im just not familiar with other systems). Ive my solar pv in just over a week now and am charging batteries to 90% overnight and am finding that the batteries combined with the limited solar for this time of year (daily yield so far between 1.5kw and 4kw all on overcast or wet days with virtually no sun in Galway/Mayo area) are getting me to 6pm so only paying day rate electricity for 5 hrs! Not bad for this time of year!

    Happy Planning All!

    Post edited by ELCAT2009 on


Comments

  • Registered Users Posts: 547 ✭✭✭Blue4u


    Do you not have the ability to change the setting via wifi? so you dont have to go to attic to change?


  • Registered Users Posts: 189 ✭✭ELCAT2009


    No you cant change the times of charge from the app. The app shows whats going on but cant do much with settings unfortunately.


  • Registered Users Posts: 547 ✭✭✭Blue4u


    Ahh ok, I have GIVenergy system and you can control via web/app


  • Registered Users Posts: 189 ✭✭ELCAT2009


  • Registered Users Posts: 315 ✭✭RTT


    Enniskillen crew do your install? Looks similar to mine. I see you have spray foam attic insulation. Do you notice much of a difference? I'm looking to get it done myself.


  • Advertisement
  • Registered Users Posts: 189 ✭✭ELCAT2009


    Yip Enniskillen crew. Have that icyene spray on insulation since I built the house back in 2010. Very happy with it. I have alot of dormers so thought it was the best way to get sealed insulation to the attic. That spray on insulation is open cell which is important to allow the roof and rafters to breath. Closed cell spray on only suitable for metal roofs like sheds I believe.


  • Registered Users Posts: 315 ✭✭RTT


    Great, thanks. Do you notice any condensation in the attic with it? Would you mind sending me a PM with who did the spray foam insulation please? Thanks


  • Registered Users Posts: 189 ✭✭ELCAT2009


  • Registered Users Posts: 2,363 ✭✭✭bullit_dodger


    Nice work Elcat2009 for taking the time our and posting the piccies. Kudos.


  • Registered Users Posts: 1,686 ✭✭✭Deagol


    Those panels right under the chimney are going to be a lot of trouble. Even with optimizers I've found any shadow that takes out the majority of a panel or two drags the whole string down considerably. From my own experience at least, I wouldn't have installed those panels so close to that chimney.

    Let us know how you get on! Thanks for taking the time to show the install!!


  • Advertisement
  • Registered Users Posts: 189 ✭✭ELCAT2009


    I hope not! I had originally thought I would fit 8 on that roof with 2 and 6 either side of the chimney as per below picture keeping panels to outer edge of roof away from chimney. The installer convinced me it would be better to add in a 9th panel and run in a continuous line. Would look better and be stronger /more secure on the roof all as one. I could see that logic and with that roof SW facing I want the panels as secure as they could be! I ended up placing 6 optimisers around the chimney (with my original plan I thought 2 would work closest to chimney).

    What kind of problems have you noticed...would the optimisers have stopped working for you making it inefficient? Is there a way to check historical data for each string on the solis inverters?


  • Registered Users Posts: 2,716 ✭✭✭brightkane


    This is exactly what I needed to read. Thanks for posting. How much are the optimizers? Can you pm me your spray foam installer also if you don't mind. I am thinking of foam and solar but thinking solar first and foam to then seal?


  • Registered Users Posts: 189 ✭✭ELCAT2009


    Optimisers are anywhere between €50 and €80 each. PM sent with spray insulation installer


  • Registered Users Posts: 532 ✭✭✭idc


    If your inverter doesn't provide historical stats per string (mine doesn't) you can get that from the optimisers (well the stats for the optimised panels). But is an extra 200+ I think for the two devices you need to add to do this.


  • Registered Users Posts: 189 ✭✭ELCAT2009


    I have a Solis...dont think it provides historical. I can see what each string is providing live and the combined power total on a graph for the day as per below


  • Registered Users Posts: 1,686 ✭✭✭Deagol


    12 of my panels are on the ground so I can cover them at will if I want. As a quick experiment one day in the summer - I noted the total power from the string of 12 and then partially covered one but other 11 were perfectly in sun on a clear day. Optimisers on all 12, you'd expect the power to go down by roughly 8.3%. But in fact the value went down by over 30%. I wish I done it without the optimisers before I installed them as the same experiment should have affected (as I can see by my roof panels that don't have optimizers and start to get shadows at this time of year) it by>90% so the optimizers do work. But they don't fully switch off the panel so it drags the others down too. If we get a perfectly cloudless day next spring / summer I'm going to experiment a bit more to find out if fully covering a panel makes the optimizer work better or worse etc.


  • Registered Users Posts: 793 ✭✭✭reklamos


    Nice and clean install. What is the reason for 8 optimizers? There are 9 panels on the roof with chimney roof, should there not be 9? Also that roof has enough space for one more panel. If I to be pedantic then the batteries are not connected as per manual. Now with 2 units I do not think that would make much difference.

    Remote control is not available through Solis app but it is doable with other means of automation.


  • Registered Users Posts: 189 ✭✭ELCAT2009


    Thats interesting....definitely worth experimenting where you have access.


  • Registered Users Posts: 189 ✭✭ELCAT2009


    I actually only have 6 optimsers on that roof (6 panels closest to chimney) as these most effected by chimney during sunshine. The other 2 optimisers are on my other roof (SE) and only the 1st 2 panels are effected by shadow of the SW roof.

    I know I could have fitted a 10th panel in the end on this roof but I was already was over budget! I had given the go ahead based on 14 panels and 5kw inverter!

    What's the issue with battery install or how should they be connected? Is there any safety / fire risk because they are connected wrong?


  • Registered Users Posts: 1,813 ✭✭✭deravarra


    Well done!

    I've been looking for something like this.

    Also very interested in the spray foam as this is something I'd been thinking about.

    Do you think it would make much of a difference in retaining heat in a 2 storey house? I notice every time I open the attic door in the colder months that the air coming down through the opening makes me think what it must feel like in the north pole! Meanwhile, the rest of the house is toasty enough.


  • Advertisement
  • Registered Users Posts: 189 ✭✭ELCAT2009


    Thanks.

    In relation to the spray insulation I imagine it would help. I chose it as i saw it as the best way to achieve airtightness with so many dormers when I was building in 2010. I'm not an expert in it so take below as opinion rather than fact! If i recall from my research 10+ years ago you should use open cell spray insulation and a breathable felt to ensure the roof and timbers can breathe. If timbers can't breathe things like dry rot could become an issue. I have no water tank in my attic (it's in my shed) so attic is bone dry. If you have a water tank would recommend that it is covered with lid and insulated to keep any moisture from tank getting into attic space.

    Closed cell spray insulation should only be used in metal roofs like sheds.


  • Registered Users Posts: 793 ✭✭✭reklamos


    I do no think there is any fire risk. Also these are LiFePO4 batteries so they do not light up the same as Li-ion. Ideally the positive and negative from inverter should be connected to first and last battery in a string. In your case they are going to top battery. See image from manual


  • Registered Users Posts: 189 ✭✭ELCAT2009


    I just discovered i can look at the historical data for the individual inverter strings and a whole lot of other historical data such as battery SOC / SOH and much more down as far as 5minute intervals!. I just need to log on to the desktop version rather than the app! Will definitely be useful to analyise over the course of a year.


  • Registered Users Posts: 8 SE Galway


    Hello ELCAT2009,

    Thanks for all the information re the solar install.

    I'm looking to install PV panels on a section of roof which also has spray foam in place. In your situation was the spray foam all ready in place before you installed your PV system? If so, was it difficult to pass the wires from the PV panels through the insulation to the interior of the attic space? What advice or tips would you have in relation to completing this part of the installation?

    Thanks in advance.


Advertisement