Advertisement
If you have a new account but are having problems posting or verifying your account, please email us on hello@boards.ie for help. Thanks :)
Hello all! Please ensure that you are posting a new thread or question in the appropriate forum. The Feedback forum is overwhelmed with questions that are having to be moved elsewhere. If you need help to verify your account contact hello@boards.ie

Question on windowsill replacement

Options
2»

Comments

  • Registered Users Posts: 6,366 ✭✭✭The Continental Op


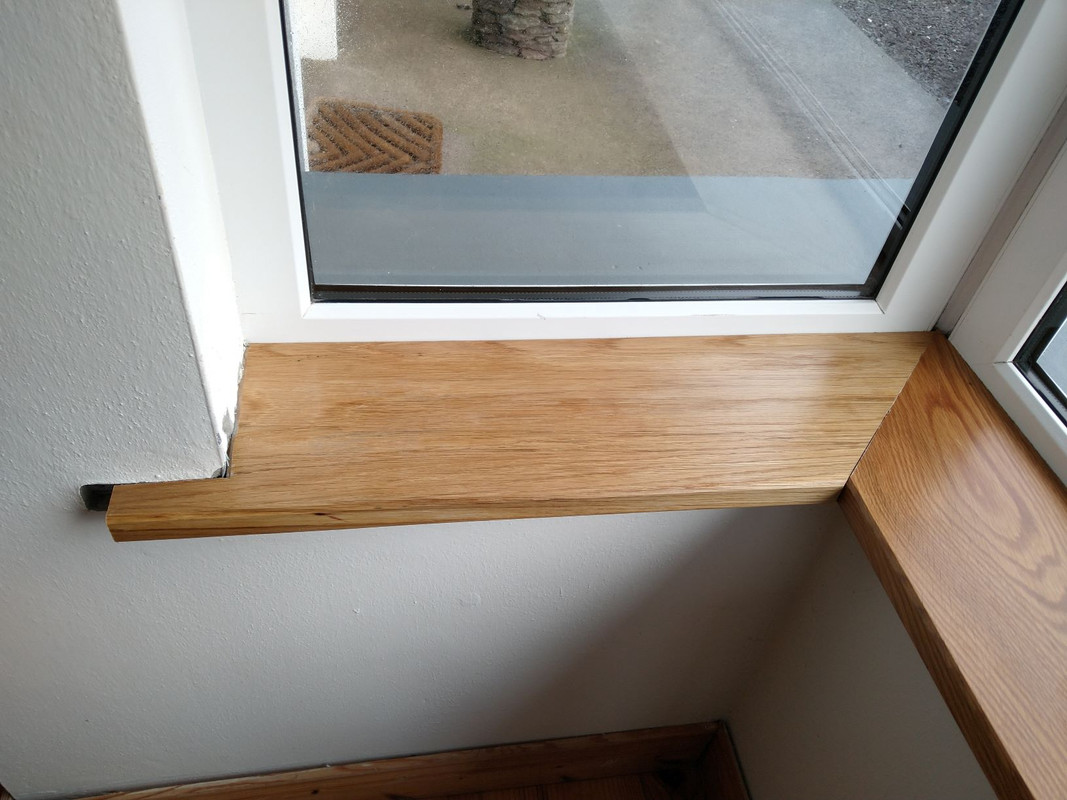
    From the pictures it looks like an error was made cutting one miter (the front bevel was at the back) then to patch the job up the board was turned over and a new miter made with the mistake patched up in the corner?

    Wake me up when it's all over.


  • Registered Users Posts: 13,063 ✭✭✭✭Igotadose


    We finished 4 boards for two windows in our living room: Two long boards and two short ones. The latter were intended for the sides of the bay window. The long boards were used for the front of the bay window and for a picture window. One of the sides of the bay window, with the misaligned miter I showed earlier, is here:

    mismatch-medium.jpg

    The workers first cut the two shorter boards, using the original window boards as templates. Those two finished and cut boards are now sitting in the shed. They were so badly mis-cut that they could not be used. The cuts were severely misaligned.

    The workers then had to get two long window boards AND two short window boards out of the two long boards that remained. That meant they had to piece together boards, and that they had to flip one section from the "right" side to the "wrong" side. That wrong-sided piece is the mis-coloured piece shown in this photo.

    The 'patched' board is the other window board in the room, in front of another window. The patch seems to have been done because they cut one of the side pieces from that board.

    Thank you everyone for your replies, you've given me plenty to think about especially about paying him.


  • Registered Users Posts: 3,862 ✭✭✭tabby aspreme


    That looks more like Red Oak than White Oak, if it took two and a half days to fit window boards badly, they were totally in over there heads and neither of them was a carpenter, how did they fix the boards too the wall underneath.


  • Administrators Posts: 53,464 Admin ✭✭✭✭✭awec


    Lol that is a complete shambles. The cut where the board meets the wall is a disgrace. The board should surely go in under the wall a bit.

    How did they expect you to finish that off? Filler will look ridiculous with unpainted boards, it will be obviously wonky every time you look at it.

    I’d get them to pay for the boards and get it done again. But by someone else.


  • Registered Users Posts: 13,063 ✭✭✭✭Igotadose


    That looks more like Red Oak than White Oak, if it took two and a half days to fit window boards badly, they were totally in over there heads and neither of them was a carpenter, how did they fix the boards too the wall underneath.

    They are glued in. How do you get them out?


  • Advertisement
  • Registered Users Posts: 3,862 ✭✭✭tabby aspreme


    Igotadose wrote: »
    They are glued in. How do you get them out?

    Any idea what type of glue


  • Registered Users Posts: 13,063 ✭✭✭✭Igotadose


    Any idea what type of glue

    No idea.


  • Registered Users Posts: 6,366 ✭✭✭The Continental Op


    Depends if you mind the look of it or not but there might be a way to save that with a "worktop joint trim". Basically it would just cover up that mess of a joint with a raised strip of Stainless Steel, Aluminum or Plastic. Example.

    Wake me up when it's all over.


  • Registered Users Posts: 3,618 ✭✭✭chooseusername


    Depends if you mind the look of it or not but there might be a way to save that with a "worktop joint trim". Basically it would just cover up that mess of a joint with a raised strip of Stainless Steel, Aluminum or Plastic. Example.
    That example is for a bullnose worktop butted joint.
    Don't think it would work for a mitre joint


  • Registered Users Posts: 5,200 ✭✭✭hots


    If any DIYer did that they'd be disappointed with the outcome, there's no way that's the work of a pro.


  • Advertisement
  • Registered Users Posts: 27,114 ✭✭✭✭GreeBo


    Igotadose wrote: »
    They are glued in. How do you get them out?

    I'm not sure what they would be glued to? I don't think there would be enough material underneath to hold, especially if they didn't set them into the walls at all.

    Since they are going for the bin, just rip then out!


  • Registered Users Posts: 13,063 ✭✭✭✭Igotadose


    GreeBo wrote: »
    I'm not sure what they would be glued to? I don't think there would be enough material underneath to hold, especially if they didn't set them into the walls at all.

    Since they are going for the bin, just rip then out!

    Thanks again for the replies.

    These window boards are over concrete block that was filled in, basically cavity block filled in with insulation and mortar. Unfortunately no photo, but there's enough rigid substrate for the gluing. They did fill in gaps with spray-foam insulation.

    I'd hoped to only have to replace the one on the left that doesn't match, as the central board and the one on the right do match up pretty well. And, yeah, the one with the patch probably will replace the whole thing.


  • Registered Users Posts: 4,677 ✭✭✭ShamNNspace


    Those mitre joints on the bay window won't stay flush over time unless they're biscuit jointed together or something similar imo especially if there's a rad near them


  • Registered Users Posts: 6,366 ✭✭✭The Continental Op


    Igotadose wrote: »
    Thanks again for the replies.

    These window boards are over concrete block that was filled in, basically cavity block filled in with insulation and mortar. Unfortunately no photo, but there's enough rigid substrate for the gluing. They did fill in gaps with spray-foam insulation.

    I'd hoped to only have to replace the one on the left that doesn't match, as the central board and the one on the right do match up pretty well. And, yeah, the one with the patch probably will replace the whole thing.

    To my mind the one on the left is correct but still needs moving a tad to the right before you can expect a good miter.

    Wake me up when it's all over.


  • Registered Users Posts: 9,002 ✭✭✭mad m


    After the amount of work the OP put into finishing window boards I’d be severely pi$$ed off. Terrible workman ship.


  • Registered Users Posts: 7,506 ✭✭✭the_pen_turner


    mad m wrote: »
    After the amount of work the OP put into finishing window boards I’d be severely pi$$ed off. Terrible workman ship.

    So would I. Its shockingly careless. Saying that the op has vastly over stated the time put into sanding and garnishing them . At least I hope they didn't spend weeks doing it. 3 to 4 hours max with DIY tools.


  • Closed Accounts Posts: 1,301 ✭✭✭John Hutton


    OP, if you took a bash at it yourself and ended up with that I'm not sure it would even stumble over the line into the "it'll do" category.

    I wouldn't pay him at all, and would pressure him to replace the wood as it all has to be done again.


  • Registered Users Posts: 13,063 ✭✭✭✭Igotadose


    So would I. Its shockingly careless. Saying that the op has vastly over stated the time put into sanding and garnishing them . At least I hope they didn't spend weeks doing it. 3 to 4 hours max with DIY tools.

    We worked an hour or so a night (in my cold garden shed.) There are 3 coats of sealer on both sides, each coat sanded. Then a coat of wax also both sides. As the facilities in the shed were pretty primitive (Screwfix took over a month to deliver the sawhorses we desperately needed to work!), we worked very slowly and carefully. There were 5 planks, 3 of them around 8 feet long, 2 smaller ones that should have been on each side of the bay but due to failings by the carpenter were not used.


Advertisement