Advertisement
If you have a new account but are having problems posting or verifying your account, please email us on hello@boards.ie for help. Thanks :)
Hello all! Please ensure that you are posting a new thread or question in the appropriate forum. The Feedback forum is overwhelmed with questions that are having to be moved elsewhere. If you need help to verify your account contact hello@boards.ie
Hi there,
There is an issue with role permissions that is being worked on at the moment.
If you are having trouble with access or permissions on regional forums please post here to get access: https://www.boards.ie/discussion/2058365403/you-do-not-have-permission-for-that#latest

Question on windowsill replacement

  • 11-12-2020 5:53pm
    #1
    Registered Users, Registered Users 2 Posts: 14,199 ✭✭✭✭


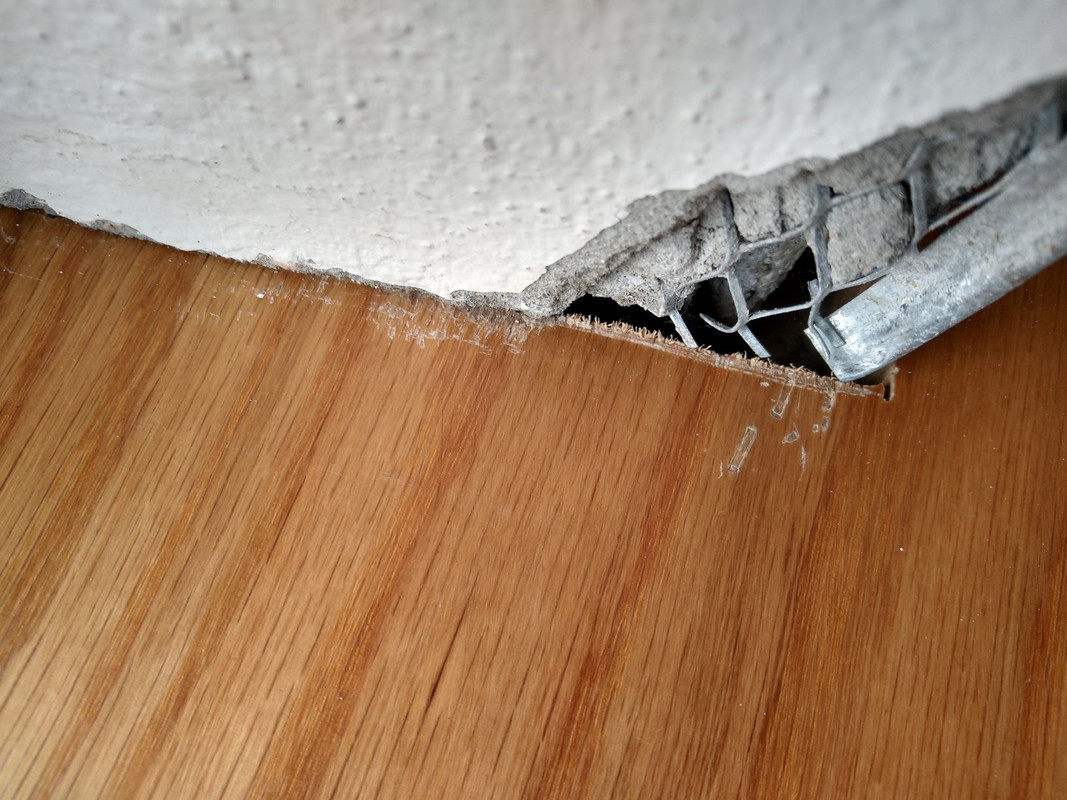
    Just had some old, water damaged pine windowsills replaced with new oak planking, 8 inches wide. What does it mean when the edge of the new planks, post installation, looks like this:
    scratches-medium.jpg

    Thanks


Comments

  • Registered Users, Registered Users 2 Posts: 34,216 ✭✭✭✭listermint


    I'm not sure what our are asking here. What do you mean what does it mean....


  • Registered Users, Registered Users 2 Posts: 14,199 ✭✭✭✭Igotadose


    Should they be so 'frayed' looking, for want of a better word? They look rough to me, like the blade used to cut them was wrong somehow or dull or both


  • Registered Users, Registered Users 2 Posts: 2,374 ✭✭✭J.R.


    had you intended to put up a photo to illustrate?


  • Registered Users, Registered Users 2 Posts: 9,609 ✭✭✭CoBo55


    Maybe he used an air saw...


  • Registered Users, Registered Users 2 Posts: 1,090 ✭✭✭dok_golf


    CoBo55 wrote: »
    Maybe he used an air saw...

    :D:D:D


  • Advertisement
  • Registered Users, Registered Users 2 Posts: 1,090 ✭✭✭dok_golf


    Strange, if you hover the cursor over the thread description on the main menu, there is a link there??


  • Registered Users, Registered Users 2 Posts: 9,609 ✭✭✭CoBo55


    Nothing on the touch site.


  • Registered Users, Registered Users 2 Posts: 34,216 ✭✭✭✭listermint


    I'm unsure the nature of he thread tbh . But from the picture attached all you need is some polyfilla to finish it cleanly.

    If you are giving out about a frayed finish on timber that won't be seen then I've no real answer to that. Its under the plaster...


  • Registered Users, Registered Users 2 Posts: 14,199 ✭✭✭✭Igotadose


    To (hopefully) help clarify. The wood was excellent quality before the sawing and installation took place. We sanded it, steel wooled and sealed it, that was our part of the agreement, and gave the wood to the installer.

    After it was installed, the visible ends were very rough (these are windowsills), as if the wrong kind of saw blade was used to cut them - I think you'd need a 'cross-cut' style blade for hardwood (oak) rather than what looks like a lighter-grade blade for pine suitable for ripping.

    If you were cutting oak planking to fit, what kind of circular saw blade would you use, is actually my question. I think the 'rough' edges indicate either the wrong blade uses, or a worn one, or both.

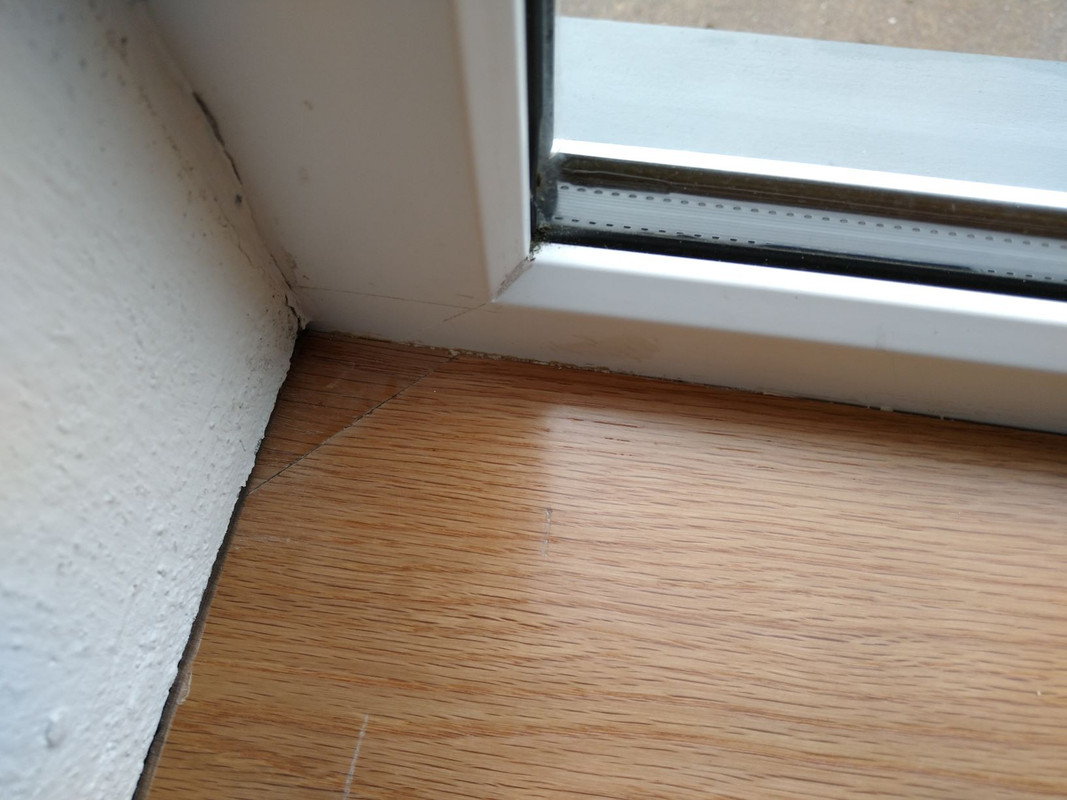
    In addition, there's all kinds of scratches, just some visible in this photo. One corner that had to be mitered, is misaligned badly, and it seems like during the installation another corner broke off so the carpenter created a triangular patch and stuck it in, it looks pretty bad.

    There's a visible ink mark on the surface of one of the boards, I guess they used a pen to mark a measurement.


  • Registered Users, Registered Users 2 Posts: 12,877 ✭✭✭✭Calahonda52


    It means it was cut with a jig saw.
    All will be covered when the job is finished so sleep easy

    “I can’t pay my staff or mortgage with instagram likes”.


  • Advertisement
  • Registered Users, Registered Users 2 Posts: 9,016 ✭✭✭mad m


    Window cill = External
    Window board = Internal


  • Registered Users, Registered Users 2 Posts: 14,199 ✭✭✭✭Igotadose


    mad m wrote: »
    Window cill = External
    Window board = Internal

    Thanks for the clarification. It's window boards we had done.


  • Registered Users, Registered Users 2 Posts: 3,188 ✭✭✭Dr_Colossus


    Igotadose wrote: »
    To (hopefully) help clarify. The wood was excellent quality before the sawing and installation took place. We sanded it, steel wooled and sealed it, that was our part of the agreement, and gave the wood to the installer.

    ...

    In addition, there's all kinds of scratches, just some visible in this photo. One corner that had to be mitered, is misaligned badly, and it seems like during the installation another corner broke off so the carpenter created a triangular patch and stuck it in, it looks pretty bad.

    There's a visible ink mark on the surface of one of the boards, I guess they used a pen to mark a measurement.

    Can you post photos of the scratches and triangular patch, sounds bad.
    As others have said the cut visible in first photo while rough isn't of any concern as will not be visible but it wouldn't have killed the installer to sand smooth the finish. The visible scratches however will need to be repaired as they will be visible so defeats your previous work and sealing.


  • Registered Users, Registered Users 2 Posts: 9,609 ✭✭✭CoBo55


    mad m wrote: »
    Window cill = External
    Window board = Internal

    Sill, it's window sill..


  • Registered Users, Registered Users 2 Posts: 14,199 ✭✭✭✭Igotadose


    Can you post photos of the scratches and triangular patch, sounds bad.
    As others have said the cut visible in first photo while rough isn't of any concern as will not be visible but it wouldn't have killed the installer to sand smooth the finish. The visible scratches however will need to be repaired as they will be visible so defeats your previous work and sealing.

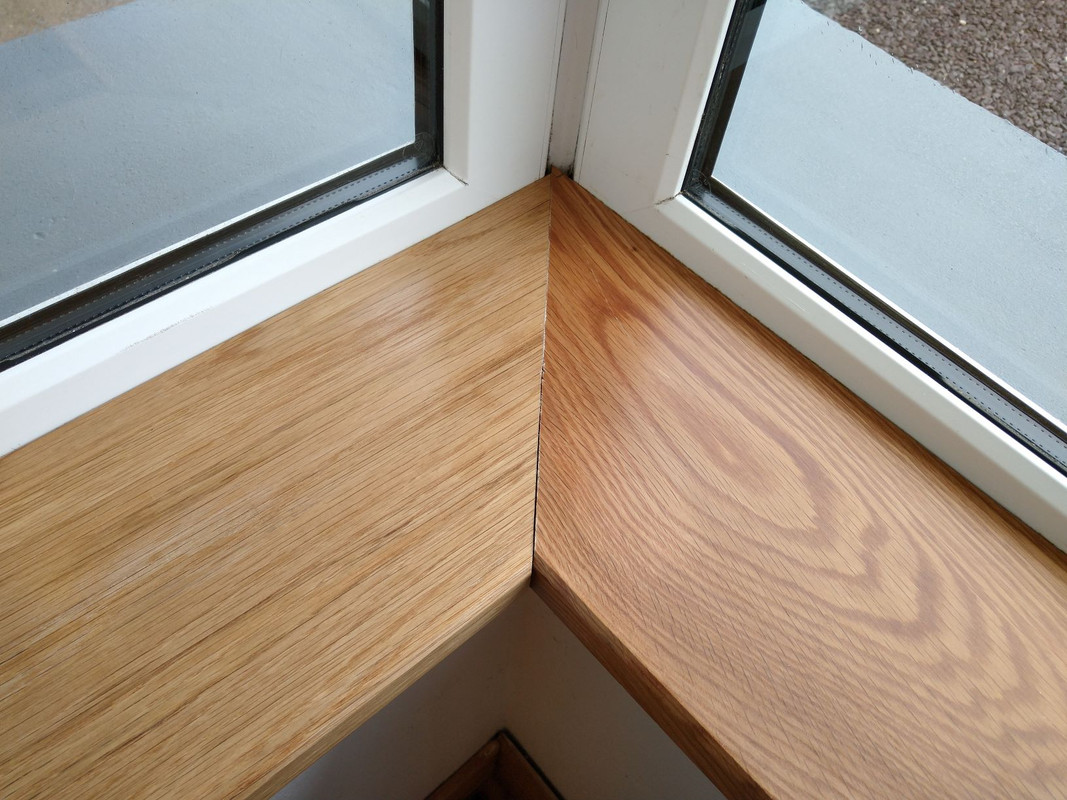
    Here is the misaligned corner. The color is very different between the two boards, the leftmost board was installed upside down, with the 'bad' side up, you can make out the pen mark on the upper left of the darker board to the right

    bad-Corner-medium.jpg


    Here is the patched board, the patch is the triangle in the upper left corner
    scratchandpatch-medium.jpg


  • Registered Users, Registered Users 2 Posts: 1,090 ✭✭✭dok_golf


    if its bothering you, why not paint them?


  • Administrators Posts: 54,417 Admin ✭✭✭✭✭awec


    The misaligned corner and the patch is pretty shoddy work.

    The OP clearly didn’t buy oak window boards to paint them.


  • Registered Users, Registered Users 2 Posts: 9,609 ✭✭✭CoBo55


    Igotadose wrote: »
    Here is the misaligned corner. The color is very different between the two boards, the leftmost board was installed upside down, with the 'bad' side up, you can make out the pen mark on the upper left of the darker board to the right

    bad-Corner-medium.jpg


    Here is the patched board, the patch is the triangle in the upper left corner
    scratchandpatch-medium.jpg

    That's absolutely shocking workmanship I wouldn't blame you for being upset.


  • Registered Users, Registered Users 2 Posts: 31,218 ✭✭✭✭Lumen


    Whatever about the shocking alignment, have those mitres been cut with a jigsaw?


  • Registered Users, Registered Users 2 Posts: 3,510 ✭✭✭KaneToad


    A picture really does paint a thousand words. I initially thought OP was being overly fussy.

    But that job looks like something I would do, as a below average DIYer, rather than the work of a professional.


  • Advertisement
  • Registered Users, Registered Users 2 Posts: 14,199 ✭✭✭✭Igotadose


    Lumen wrote: »
    Whatever about the shocking alignment, have those mitres been cut with a jigsaw?

    Thanks for the comments. I think part of the misalignment problem, is that the cut of the darker board is not 'crisp'. It seems to drift around a little and not be 100% straight (kind of bows out at one point). Would that indicate a jigsaw for mitering?

    We're sadly considering hiring someone else to repeat the job. We haven't been billed yet, and that's the next problem as I don't feel like we should pay for such shoddy work.


  • Registered Users, Registered Users 2 Posts: 3,188 ✭✭✭Dr_Colossus


    Igotadose wrote: »
    We're sadly considering hiring someone else to repeat the job. We haven't been billed yet, and that's the next problem as I don't feel like we should pay for such shoddy work.

    You should be billing them for new window board rather than the other way round. Have they done any other work in the house and what's the quality of that like.


  • Registered Users, Registered Users 2 Posts: 14,199 ✭✭✭✭Igotadose


    You should be billing them for new window board rather than the other way round. Have they done any other work in the house and what's the quality of that like.

    The installer, had done some window replacement for us, just swapping 1 vinyl window for another. That work was fine. He normally worked solo. He also is the 'regular window guy' out here and everyone has used him.

    We had him out to repair another window, the mechanical arm had busted so it wasn't closing properly. He did that and we got to discussing the window boards since they were in terrible shape and whether we needed new windows. He said we didn't but he could replace the window boards with white oak ones and it'd look great. Fast forward about 6 weeks, the boards are delivered, we spend the better part of 2 weeks sanding and polyurethaning them, and hand them off to him and his assistant.

    For this job, he had a 'carpenter' with him, I suspect he thought it was a bit beyond him (and obviously it was.) After two half days of work, which we supervised as best we could, they never asked any questions except 'have you a pen I could borrow' which made me really nervous, and that they needed a small sliver of wood to align something, they were going to use an unfinished scrap but I persuaded them to take it off a finished scrap and they did. LIke, that wasn't obvious.

    Anyway, 2 half-days of work, they're done, take their stuff and leave, and we finally get to look really close at the work. The results are as you see above. I should probably have been more assertive about watching their every move, but I had no reason to suspect they'd do such shoddy work, the installer had been very good and everyone's used him for years. The only knock against him I've heard is that he's somewhat expensive.

    Thing is, if I get the work redone, I don't want him doing it. Why should I expect better results? I've located a furniture maker out here who is also well recommended but we're going to look at some of his work soon, he's the type that builds everything in the workshop and then installs it, so I expect he can measure better than these guys. It's pretty clear they mismeasured things, too.


  • Registered Users, Registered Users 2 Posts: 31,218 ✭✭✭✭Lumen


    As an inexperienced amateur, there's not much harder than working with unpainted wood, because there's no margin for error. With a painted finish you can fix problems with filler, you've no hope with exposed grain. That's why professional carpenters exist.

    If he has a good rep then it's likely he just stepped outside his comfort zone, or had a spectacularly bad day.

    I would simply say "this is far below your usual standard of work" and see how it goes, but if he wants to be paid then I don't see how it can be left like that, everyone who goes round to your house will ask which clown did it, is that what he wants? Remember that even if you pay nothing you'll have wasted a load of effort on the wood prep and a load of time getting the job redone by a real finish carpenter.


  • Registered Users, Registered Users 2 Posts: 27,367 ✭✭✭✭GreeBo


    It looks like you got expensive materials and cheap installers I'm afraid.

    As lumen said, unpainted wood has very fine margins, I'd have templated it all with plywood to get it perfect.
    I'd also have used a good chop or circular saw on a bench, these look hand cut in the floor to me.

    I certainly wouldn't be paying, but don't think you can get compensated either, you both need to just walk away.


  • Registered Users, Registered Users 2 Posts: 7,596 ✭✭✭the_pen_turner


    are you telling us that it took them 2 and a half days to fit that window board

    the fuzzy edges dont matter
    the join is bad but could be fixed, its cut too long. they didnt cut to the marked line at all

    the bit added on is terrible , no excuse for that. even if it was being painted that wouldnt be ok


  • Administrators Posts: 54,417 Admin ✭✭✭✭✭awec


    are you telling us that it took them 2 and a half days to fit that window board

    the fuzzy edges dont matter
    the join is bad but could be fixed, its cut too long. they didnt cut to the marked line at all

    the bit added on is terrible , no excuse for that. even if it was being painted that wouldnt be ok

    Surely they need a new board to fix that join. One board is now cut too short.


  • Registered Users, Registered Users 2 Posts: 4,850 ✭✭✭ShamNNspace


    Is that w/b with the patch installed between 2 walls? Did the installer stupidly cut off a corner in order to angle the w/b in?


  • Registered Users, Registered Users 2 Posts: 7,596 ✭✭✭the_pen_turner


    awec wrote: »
    Surely they need a new board to fix that join. One board is now cut too short.

    sorry i wasnt thinking. the one on the left will need a new one. due to the corner bodged back on. it depends on how much extra is under the wall. the one on the right is too long but the left one might have enough to move to the left.


    i dont like the colour match either. i wouldnt be happy. different cuts of the tree and hugly diferent colours. not convinced they are both white oak


  • Advertisement
  • Registered Users, Registered Users 2 Posts: 4,068 ✭✭✭chooseusername


    Looks like not enough timber ordered,
    and had to turn over the mitre cut ,
    probably accounted for the corner fiasco as well.


  • Registered Users, Registered Users 2 Posts: 7,474 ✭✭✭The Continental Op


    From the pictures it looks like an error was made cutting one miter (the front bevel was at the back) then to patch the job up the board was turned over and a new miter made with the mistake patched up in the corner?

    Wake me up when it's all over.


  • Registered Users, Registered Users 2 Posts: 14,199 ✭✭✭✭Igotadose


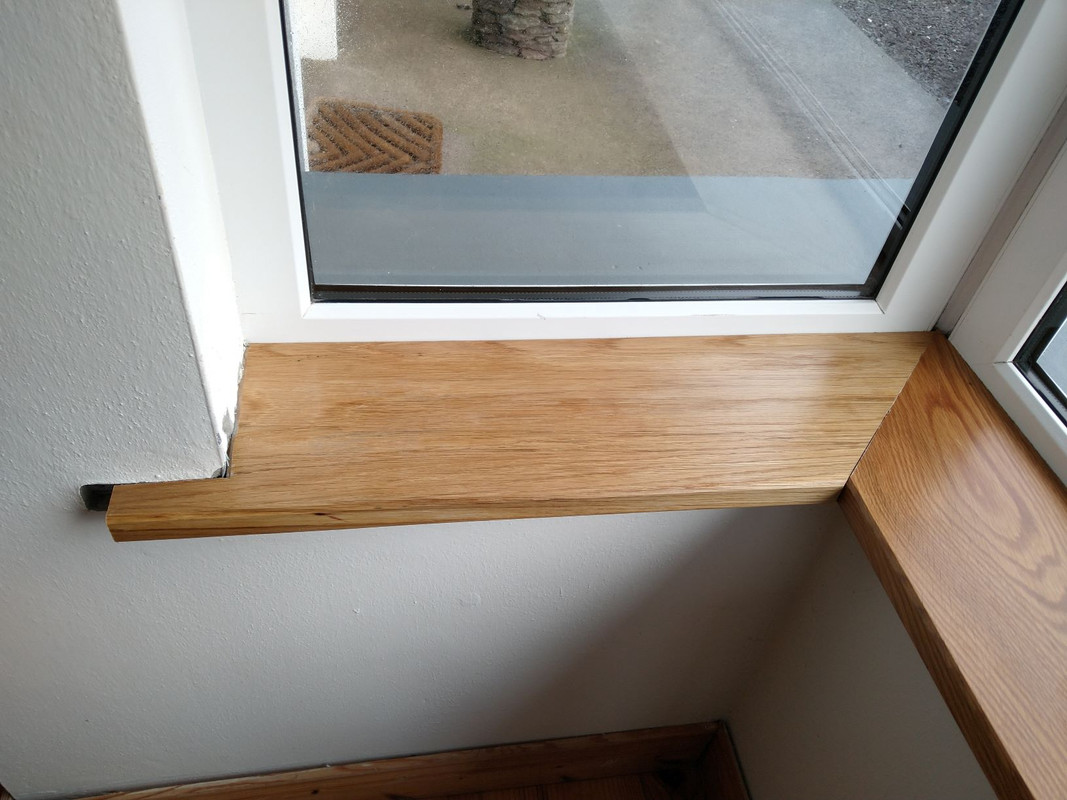
    We finished 4 boards for two windows in our living room: Two long boards and two short ones. The latter were intended for the sides of the bay window. The long boards were used for the front of the bay window and for a picture window. One of the sides of the bay window, with the misaligned miter I showed earlier, is here:

    mismatch-medium.jpg

    The workers first cut the two shorter boards, using the original window boards as templates. Those two finished and cut boards are now sitting in the shed. They were so badly mis-cut that they could not be used. The cuts were severely misaligned.

    The workers then had to get two long window boards AND two short window boards out of the two long boards that remained. That meant they had to piece together boards, and that they had to flip one section from the "right" side to the "wrong" side. That wrong-sided piece is the mis-coloured piece shown in this photo.

    The 'patched' board is the other window board in the room, in front of another window. The patch seems to have been done because they cut one of the side pieces from that board.

    Thank you everyone for your replies, you've given me plenty to think about especially about paying him.


  • Registered Users, Registered Users 2 Posts: 4,099 ✭✭✭tabby aspreme


    That looks more like Red Oak than White Oak, if it took two and a half days to fit window boards badly, they were totally in over there heads and neither of them was a carpenter, how did they fix the boards too the wall underneath.


  • Administrators Posts: 54,417 Admin ✭✭✭✭✭awec


    Lol that is a complete shambles. The cut where the board meets the wall is a disgrace. The board should surely go in under the wall a bit.

    How did they expect you to finish that off? Filler will look ridiculous with unpainted boards, it will be obviously wonky every time you look at it.

    I’d get them to pay for the boards and get it done again. But by someone else.


  • Registered Users, Registered Users 2 Posts: 14,199 ✭✭✭✭Igotadose


    That looks more like Red Oak than White Oak, if it took two and a half days to fit window boards badly, they were totally in over there heads and neither of them was a carpenter, how did they fix the boards too the wall underneath.

    They are glued in. How do you get them out?


  • Advertisement
  • Registered Users, Registered Users 2 Posts: 4,099 ✭✭✭tabby aspreme


    Igotadose wrote: »
    They are glued in. How do you get them out?

    Any idea what type of glue


  • Registered Users, Registered Users 2 Posts: 14,199 ✭✭✭✭Igotadose


    Any idea what type of glue

    No idea.


  • Registered Users, Registered Users 2 Posts: 7,474 ✭✭✭The Continental Op


    Depends if you mind the look of it or not but there might be a way to save that with a "worktop joint trim". Basically it would just cover up that mess of a joint with a raised strip of Stainless Steel, Aluminum or Plastic. Example.

    Wake me up when it's all over.


  • Registered Users, Registered Users 2 Posts: 4,068 ✭✭✭chooseusername


    Depends if you mind the look of it or not but there might be a way to save that with a "worktop joint trim". Basically it would just cover up that mess of a joint with a raised strip of Stainless Steel, Aluminum or Plastic. Example.
    That example is for a bullnose worktop butted joint.
    Don't think it would work for a mitre joint


  • Registered Users, Registered Users 2 Posts: 5,200 ✭✭✭hots


    If any DIYer did that they'd be disappointed with the outcome, there's no way that's the work of a pro.


  • Advertisement
  • Registered Users, Registered Users 2 Posts: 27,367 ✭✭✭✭GreeBo


    Igotadose wrote: »
    They are glued in. How do you get them out?

    I'm not sure what they would be glued to? I don't think there would be enough material underneath to hold, especially if they didn't set them into the walls at all.

    Since they are going for the bin, just rip then out!


  • Registered Users, Registered Users 2 Posts: 14,199 ✭✭✭✭Igotadose


    GreeBo wrote: »
    I'm not sure what they would be glued to? I don't think there would be enough material underneath to hold, especially if they didn't set them into the walls at all.

    Since they are going for the bin, just rip then out!

    Thanks again for the replies.

    These window boards are over concrete block that was filled in, basically cavity block filled in with insulation and mortar. Unfortunately no photo, but there's enough rigid substrate for the gluing. They did fill in gaps with spray-foam insulation.

    I'd hoped to only have to replace the one on the left that doesn't match, as the central board and the one on the right do match up pretty well. And, yeah, the one with the patch probably will replace the whole thing.


  • Registered Users, Registered Users 2 Posts: 4,850 ✭✭✭ShamNNspace


    Those mitre joints on the bay window won't stay flush over time unless they're biscuit jointed together or something similar imo especially if there's a rad near them


  • Registered Users, Registered Users 2 Posts: 7,474 ✭✭✭The Continental Op


    Igotadose wrote: »
    Thanks again for the replies.

    These window boards are over concrete block that was filled in, basically cavity block filled in with insulation and mortar. Unfortunately no photo, but there's enough rigid substrate for the gluing. They did fill in gaps with spray-foam insulation.

    I'd hoped to only have to replace the one on the left that doesn't match, as the central board and the one on the right do match up pretty well. And, yeah, the one with the patch probably will replace the whole thing.

    To my mind the one on the left is correct but still needs moving a tad to the right before you can expect a good miter.

    Wake me up when it's all over.


  • Registered Users, Registered Users 2 Posts: 9,016 ✭✭✭mad m


    After the amount of work the OP put into finishing window boards I’d be severely pi$$ed off. Terrible workman ship.


  • Registered Users, Registered Users 2 Posts: 7,596 ✭✭✭the_pen_turner


    mad m wrote: »
    After the amount of work the OP put into finishing window boards I’d be severely pi$$ed off. Terrible workman ship.

    So would I. Its shockingly careless. Saying that the op has vastly over stated the time put into sanding and garnishing them . At least I hope they didn't spend weeks doing it. 3 to 4 hours max with DIY tools.


  • Closed Accounts Posts: 1,301 ✭✭✭John Hutton


    OP, if you took a bash at it yourself and ended up with that I'm not sure it would even stumble over the line into the "it'll do" category.

    I wouldn't pay him at all, and would pressure him to replace the wood as it all has to be done again.


  • Registered Users, Registered Users 2 Posts: 14,199 ✭✭✭✭Igotadose


    So would I. Its shockingly careless. Saying that the op has vastly over stated the time put into sanding and garnishing them . At least I hope they didn't spend weeks doing it. 3 to 4 hours max with DIY tools.

    We worked an hour or so a night (in my cold garden shed.) There are 3 coats of sealer on both sides, each coat sanded. Then a coat of wax also both sides. As the facilities in the shed were pretty primitive (Screwfix took over a month to deliver the sawhorses we desperately needed to work!), we worked very slowly and carefully. There were 5 planks, 3 of them around 8 feet long, 2 smaller ones that should have been on each side of the bay but due to failings by the carpenter were not used.


Advertisement