Advertisement
If you have a new account but are having problems posting or verifying your account, please email us on hello@boards.ie for help. Thanks :)
Hello all! Please ensure that you are posting a new thread or question in the appropriate forum. The Feedback forum is overwhelmed with questions that are having to be moved elsewhere. If you need help to verify your account contact hello@boards.ie
Please note that it is not permitted to have referral links posted in your signature. Keep these links contained in the appropriate forum. Thank you.

https://www.boards.ie/discussion/2055940817/signature-rules

Cosmos Blue Rev 5 Toyota MR2 Detailing

Options
245

Comments

  • Registered Users Posts: 3,668 ✭✭✭eringobragh


    END RESULT:

    img0650large.jpg

    img0655large.jpg

    img0660large.jpg

    img0649large.jpg


    SIDE BY SIDE:

    OLD -vs- NEW...slowly getting there :)


    img0663large.jpg


    Tomorrows Job (weather prevailing) - Top Half Drivers Door....Clayed and ready to go

    img0656large.jpg

    img0662large.jpg

    ...............enough for one day...off to the pub for the Match now :D


  • Registered Users Posts: 3,668 ✭✭✭eringobragh


    Hard day at it...paint was in bits as per rest of car..

    side by side pic says it all

    img0682large.jpg

    I made ****e of the small pad...its ripped in places :( ...we had a good run! Running low of Menzerna as well :o

    img0707large.jpg


    .............more pics to follow!


  • Registered Users Posts: 3,668 ✭✭✭eringobragh


    My weekends will free right up once this has been done. There's a few stonechips on the door, I will sort these once the paint correction has been done.

    Done today: Top Half Drivers door, 2 x Popup lights and went over the wing again from the first day as my technique has improved since then and was able to shift a fair few scrapes that were left there.


    RDS - Clearcoat - 99% Improvment

    BEFORE:

    img0667large.jpg

    AFTER (Yes! Its still there)

    img0686large.jpg


    Door - more clearcoat scratching FFS

    BEFORE:

    img0666large.jpg

    AFTER:

    img0671largeo.jpg


    BEFORE:

    img0675largey.jpg

    AFTER:

    img0679large.jpg


    BEFORE:

    img0665large.jpg

    AFTER:

    img0691large.jpg


    SIDE By SIDE: Drivers door:

    img0680large.jpg

    img0681large.jpg

    img0683large.jpg


    Drivers Wing: (Redo)

    img0698large.jpg

    img0696large.jpg


  • Registered Users Posts: 3,668 ✭✭✭eringobragh


    CONTD.......

    Popup light - covers

    BEFORE:

    img0705large.jpg

    AFTER:

    img0709large.jpg


    BEFORE:

    img0703large.jpg

    AFTER:

    img0712large.jpg


    Another scrape:

    BEFORE:

    img0701large.jpg


    img0700large.jpg

    AFTER:

    img0706large.jpg


    END RESULTS:


    img0708large.jpg

    img0695large.jpg

    img0692large.jpg

    img0713large.jpg

    img0699large.jpg


    Getting there:

    img0722large.jpg

    Tomorrows work (maybe!)

    Bonnet:

    img0721large.jpg

    img0720large.jpg


    1 small pad down I might do the bonnet tomorrow if I feel like somemore detailing..........


  • Registered Users Posts: 4,899 ✭✭✭Vexorg


    Pretty impressive work there, its great looking through your updates. How much masking tape have you used? :)


  • Advertisement
  • Registered Users Posts: 3,668 ✭✭✭eringobragh


    Vexorg wrote: »
    Pretty impressive work there, its great looking through your updates. How much masking tape have you used? :)

    1 roll gone already! :P, 1 menzerna 250ml nearly gone and 1 pad fecked...:pac:


  • Closed Accounts Posts: 2,224 ✭✭✭barone


    well done, i was like you a year ago,got a kestrel da and hadn't a clue, did a old civic and was very happy,now when i look at a car i see potential with faded and scratched paintwork :)


  • Registered Users Posts: 3,668 ✭✭✭eringobragh


    Feckin Irish weather...clayed, taped and as soon as the pad hit the car the rain appears :(

    img0733large.jpg


  • Registered Users Posts: 3,668 ✭✭✭eringobragh


    Feckin disaster - rained twice in between buffing, i'm nearly out of Menzerna, my small medium cut pad is proper fucked now

    :( ...overall I'd say an 85% improvement...a few bits to go over but happy with the difference in colour...its starting to look

    well.

    Scratch

    BEFORE:

    img0734large.jpg

    AFTER

    img0737large.jpg


    Clearcoat scraping

    BEFORE:

    img0729large.jpg

    AFTER:

    img0740large.jpg


    Small Pad out of action...I used some rope each side to prop up the bonnet as the scratching on the edge was bad..worked very well

    img0741large.jpg


    Side by Side - Before/After

    img0746large.jpg


    More clearcoar scratching..eres not a piece of this car unscratched

    BEFORE:

    img0748large.jpg

    img0749large.jpg

    AFTER:

    img0750large.jpg

    img0751large.jpg


    Another Side by Side - Before/After

    img0752large.jpg


    This was the worst part of the bonnet...it was very noticeable without the halogen light...and bugged the shi out of me!

    BEFORE:

    img0756large.jpg

    img0761large.jpg

    img0759largef.jpg


  • Registered Users Posts: 3,668 ✭✭✭eringobragh


    CONTD...............


    AFTER (Yes it's still there...but only if you look closely):

    img0762large.jpg

    img0763large.jpg


    BEFORE:

    img0758large.jpg

    AFTER:

    img0764large.jpg

    Side by Side:
    img0767large.jpg


    RDS - Reduced by 50%

    BEFORE:


    img0728large.jpg

    AFTER:

    img0790large.jpg


    END RESULTS:


    img0784large.jpg

    img0782large.jpg

    img0781large.jpg


    Side by Side - Bonnet -vs- Bumper ...the difference says it all.

    img0780large.jpg

    img0778large.jpg

    BEADING - Not quite biblical yet!!!

    img0769largey.jpg


    Enough done for one weekend.


  • Advertisement
  • Registered Users Posts: 3,730 ✭✭✭E39MSport


    Looking forward to the final result incl wheels.


  • Registered Users Posts: 4,377 ✭✭✭Curran


    Whats on the bonnet for the beading?


  • Registered Users Posts: 3,668 ✭✭✭eringobragh


    Curran wrote: »
    Whats on the bonnet for the beading?

    thats just from the menzerna :D


  • Registered Users Posts: 4,377 ✭✭✭Curran


    thats just from the menzerna :D

    I was thinking it looked like beading from polish alright! ;)

    Now that you say it, have you been washing down the panels after you finish polishing, before adding your LSP? Would suggest you do if you havent been, as the LSP wont last as long with the polish on the panel. Also, when the polish is on the panel, it can sometimes hide very light marks, as they are filled in. Washing the panel with a APC will do the job! ;)


  • Registered Users Posts: 3,668 ✭✭✭eringobragh


    Curran wrote: »
    thats just from the menzerna :D

    I was thinking it looked like beading from polish alright! ;)

    Now that you say it, have you been washing down the panels after you finish polishing, before adding your LSP? Would suggest you do if you havent been, as the LSP wont last as long with the polish on the panel. Also, when the polish is on the panel, it can sometimes hide very light marks, as they are filled in. Washing the panel with a APC will do the job! ;)

    Haven't made it to the LSP stage yet..once all the panels are cleared I'll be washing and then finally LSP....still 50% left to do :(


  • Registered Users Posts: 3,668 ✭✭✭eringobragh


    Spent the day detailing nursing a hangover...first and last time I'm ever doing that.. Some difference to the look of the car..feckin nackered.

    Heres a taster of whats to come.

    From this:


    img0833large.jpg


    To this:


    img0841large.jpg


    img0842large.jpg

    about 3/4 done at this stage.


  • Registered Users Posts: 4,899 ✭✭✭Vexorg


    Nice work.


  • Registered Users Posts: 3,843 ✭✭✭Jimdagym


    There CANT be any left!!
    It looks new. Its a tribute to your infinite patience.
    Have you any clue as to how many hours you have spent on it, or do you try not to think about such things?


  • Registered Users Posts: 3,668 ✭✭✭eringobragh


    Jimdagym wrote: »
    There CANT be any left!!
    It looks new. Its a tribute to your infinite patience.
    Have you any clue as to how many hours you have spent on it, or do you try not to think about such things?

    Cheers :cool:...It will be 50hours I reckon (when done)...but Its a labour of love :cool:

    Left to do:

    Mirrors
    A Pillar
    bottom half of both sides
    engine cover and sides
    Spoiler
    Rear bumper
    side moldings


  • Registered Users Posts: 3,668 ✭✭✭eringobragh


    As promised...

    A tough enough job todo but worth it IMO! Nearly died when I thought I burnt through the clearcoat, thankfully it was only a build up of polish....lesson learned concentration is needed when DAing the car!

    Car is completely transformed with the bumper done..my neoghbour came out and told me it was looking well! I've a dilema with the bumper lip, the paint is chipped to feck one side and thinking of wrapping it in carbon fibre..let me know what you thinK?


    Plate surround taken off to polish easier (need a new plate as well, old one is bent)

    img0795large.jpg

    I recommend getting a creeper for the low panels - I already had this..

    img0830large.jpgthis

    No not an oil change - this was all the dirt that came off the bumper!

    img0844largep.jpg


    BEFORE:

    img0806large.jpg

    img0805large.jpg

    AFTER:

    img0820large.jpg

    img0814larger.jpg


    Side By Side:

    sidelarge.jpg


    BEFORE:

    img0848large.jpg

    AFTER:

    img0852large.jpg


    BEFORE:

    img0799large.jpg

    AFTER:

    img0876large.jpg


    BEFORE:

    img0796large.jpg

    AFTER:

    img0875largef.jpg


    BEFORE:

    img0824large.jpg


  • Advertisement
  • Registered Users Posts: 3,668 ✭✭✭eringobragh


    CONTD

    AFTER:

    img0837large.jpg


    BEFORE:

    img0828large.jpg

    AFTER:

    img0831large.jpg


    BEFORE:

    img0850large.jpg

    AFTER:

    img0853large.jpg


    LIP

    SIDE by SIDE:

    img0860large.jpg


    LIP - badly chipped...I was thinking of wrapping this is carbon fibre as I don't want to shell out for a respray only for the stones to wreck it again

    img0863large.jpg

    Heres one that was done already:

    IMG_3925.jpg

    Verdict lads???


    BEFORE:

    img0833large.jpg

    AFTER:

    img0841largee.jpg

    img0842large.jpg


    END RESULTS:

    I'm changing these to LED crystal clear ones from MR2-ben...b4ss has them on this 2 and they look great.

    img0867large.jpg

    img0866large.jpg

    img0872large.jpg


    ENJOY :)


  • Registered Users Posts: 3,730 ✭✭✭E39MSport


    Fair play, once again. It's a good feeling when you get that far into it. Nice work.

    I'd say that's definitely snow foam eligible ;)


  • Registered Users Posts: 3,668 ✭✭✭eringobragh


    E39MSport wrote: »
    Fair play, once again. It's a good feeling when you get that far into it. Nice work.

    I'd say that's definitely snow foam eligible ;)

    Cheers man, I can finally see light at the end of the tunnel...thanks again for the foam and padding.

    I was luckier with my bumper then yours the scratching buffed out nicely :cool:

    I've decided since. I'm going to wrap the lip in carbon fibre...worst case scenario I peel it off :pac:


  • Registered Users Posts: 3,730 ✭✭✭E39MSport


    Cheers man, I can finally see light at the end of the tunnel...thanks again for the foam and padding.

    I was luckier with my bumper then yours the scratching buffed out nicely :cool:

    I've decided since. I'm going to wrap the lip in carbon fibre...worst case scenario I peel it off :pac:

    Yeah, the lip is letting it down a bit. Should look good.


  • Registered Users Posts: 3,668 ✭✭✭eringobragh


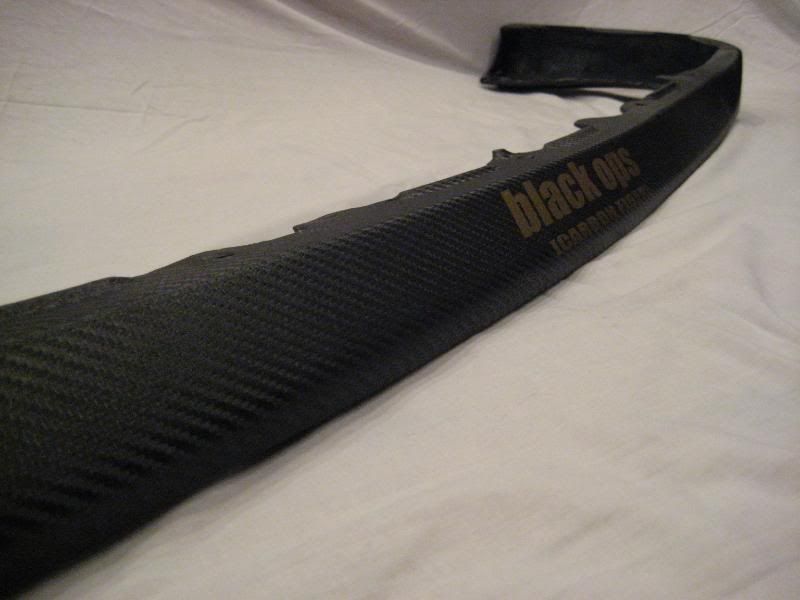
    Got the carbon fiber vinyl for the splitter today. Unfortunately didn't get much further then looking at it.

    img0885rt.jpg

    Typical its always the last screw that won't budge. grrr

    img0881as.jpg

    Noticed a small crack on the base of the lip after removal

    img0883nt.jpg

    Bit o' isopon both sides should hold her for a while :)

    img0884vx.jpg

    Might wrap it tomorrow after work.


  • Registered Users Posts: 3,730 ✭✭✭E39MSport


    Some transformation. Keep her lit. Don't think you've posted too many full body shots.


  • Registered Users Posts: 3,668 ✭✭✭eringobragh


    Started the carbon wrapping yesterday...not a flawless job but all the imprefections are only viewable by the field mice under the car :) ...twas a tricky job especially as it was first time and it was a pretty curvy piece. Was up to midnight wrapping the thing!

    I decided to drill out the rivets of the brackets to make my life easier...that and some of the rivets and broken anyway.

    img0888largeu.jpg

    img0889large.jpg

    I might be guilty of this bend! I tipped a garage door one way at low speed (no marks on bumper) but it left its mark...pliers straightened it out.

    img0892large.jpg

    The 'ONE' screw that wouldn't budge during the removal of the lip.

    img0893large.jpg


    Wrap in progress...thanks to my Girlfriend who helped with the process ;)

    img0896large.jpg

    Done...

    img0899largey.jpg

    ...Fitted pics coming.


  • Registered Users Posts: 3,668 ✭✭✭eringobragh


    Very Happy with the final result...just in the last half hour..pics aren't great as it was getting dark but I took one of it propped up on boxes before I bolted it on..I like the look anyway, think it suits the car.

    Wasn't able to get a flawless wrap but the part everyone sees is perfect...just the fussy field mice running under the car might have something to say :D ....I reckon it will be pebble dashed to bits in 12 months time anyway.

    Had to rivert back the old supports...Aldi riverter on the shelf the last 2 years...I knew I would find a use for it someday :D

    img0914large.jpg

    Side view:


    img0917large.jpg

    Final Product:

    BEFORE:

    img0879large.jpg

    AFTER:

    img0916large.jpg


    Up close:

    BEFORE:

    img0880large.jpg

    AFTER:

    img0919large.jpg


    ......Beer time :cool:


  • Registered Users Posts: 4,899 ✭✭✭Vexorg


    Nice work, quite an improvement.


  • Advertisement
  • Registered Users Posts: 3,668 ✭✭✭eringobragh


    Vexorg wrote: »
    Nice work, quite an improvement.

    Cheers man...:cool:


Advertisement