Advertisement
If you have a new account but are having problems posting or verifying your account, please email us on hello@boards.ie for help. Thanks :)
Hello all! Please ensure that you are posting a new thread or question in the appropriate forum. The Feedback forum is overwhelmed with questions that are having to be moved elsewhere. If you need help to verify your account contact hello@boards.ie
Hi there,
There is an issue with role permissions that is being worked on at the moment.
If you are having trouble with access or permissions on regional forums please post here to get access: https://www.boards.ie/discussion/2058365403/you-do-not-have-permission-for-that#latest

A Lean-To Tale (with pics & maybe vids)

  • 08-09-2011 4:59pm
    #1
    Registered Users, Registered Users 2 Posts: 3,429 ✭✭✭


    I am currently

    restoring an old boat

    . It resides out in the open with no protection from the rain. So I have decided to bite the bullet and build a leanto on the back of my (rented) house. The leanto will serve to cover my boat, but also give me a great new dry space where I can store fuel, kennel, shelves for paint, plants etc.....and a place to sit out under in the rain.

    Rather than documenting the construction of a leanto on my boat thread, I might aswell do it here where people may be interested, or may be able to offer or take advice. Bear in mind I'm no expert, I'm doing this on the advice of others such as local builders providers, a local builder and my landlord who kindly gave me permission.

    The leanto needs to be robust. Very robust. You have no idea of the storms we get here in the winter (and the summer). The back of my house is overlooking Lough Arrow, Co. Sligo on a hill so it takes the full brunt of anything northerly. Also I have a span of 10ft so I need to use appropriate rafters.

    Then, there are complexities with the building. Its a very old stone cottage that was restored. The exterior is old stone walls now covered in pebble dash. So I can't drill them too heavy. For that reason, I won't rawlbolt a beam into them. Instead I'll need to use uprights strapped to the back wall and let them take the weight. Drilling and screwing in the strapping is much lighter and easier on the wall and the uprights then bear the load. The back wall is not straight. There's an extension that jutts out about 2ft. It also extends the roof profile downwards so it's complex to surround with pvc sheet. There's also a boiler attached to this extension.

    Materials:
    ======
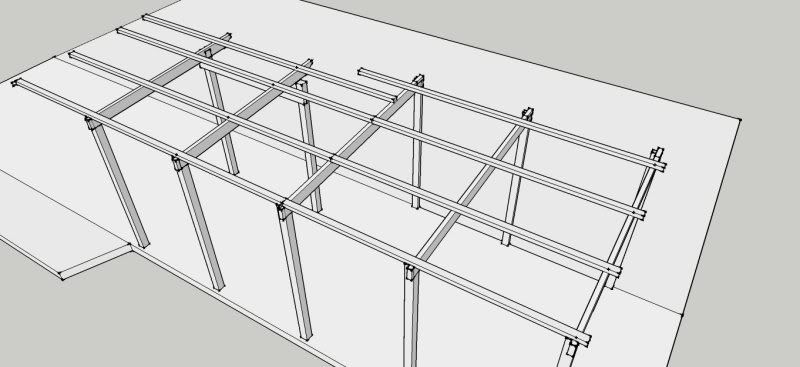
    I'll use 4x2 uprights strapped to the walls to bear the weight on the inside, and 4x4 posts to bear the weight on the outside. I am going with 6x2 rafters to cover the 10ft span and not sag. I might halflap joint these to the posts and brace them with metal L brackets. I'll use 4 runs of 3x2 cross runners on their flat on top of the rafters. Then it's pvc sheets screwed down with those special screw/rubber grommit assemblies. I'm going to attach the 4x4 posts to the concrete yard floor using fencefix bolt down surrounds.

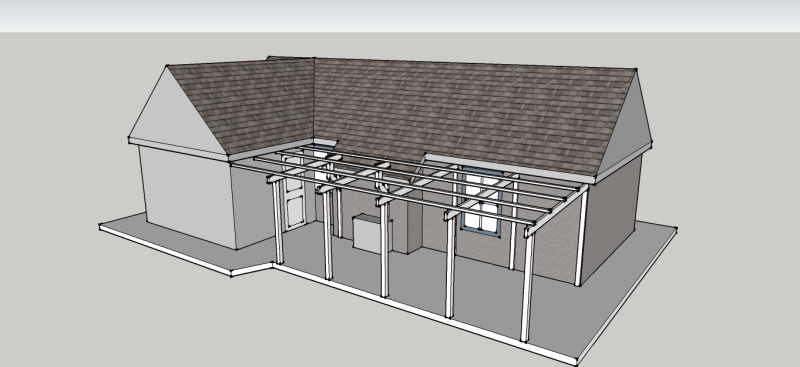
    I took a lot of measurements and put it together in

    google sketchup.

    This is a free drawing and 3D modelling tool. It's stunning, very quick and easy to learn, they have tons of video tutorials and tons more on youtube. Highly recommend this to anyone who is considering anything that may need a bit of design or planning.

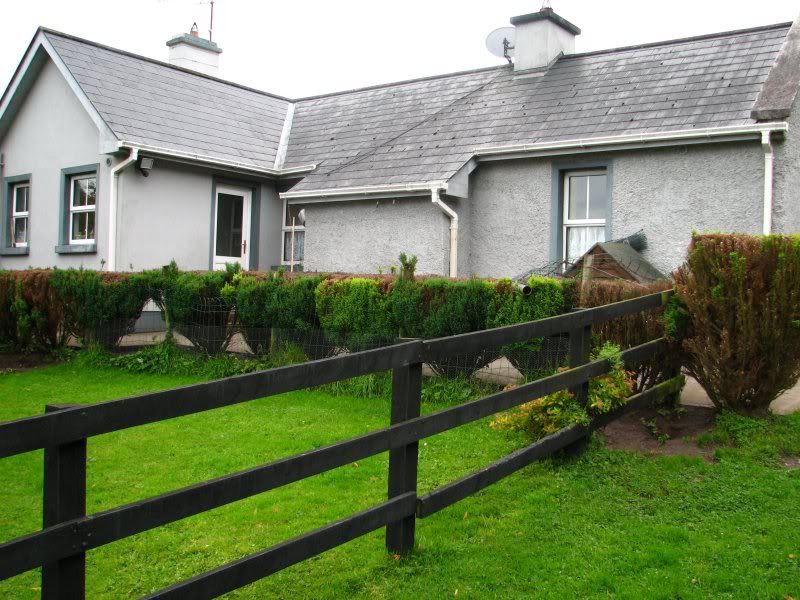
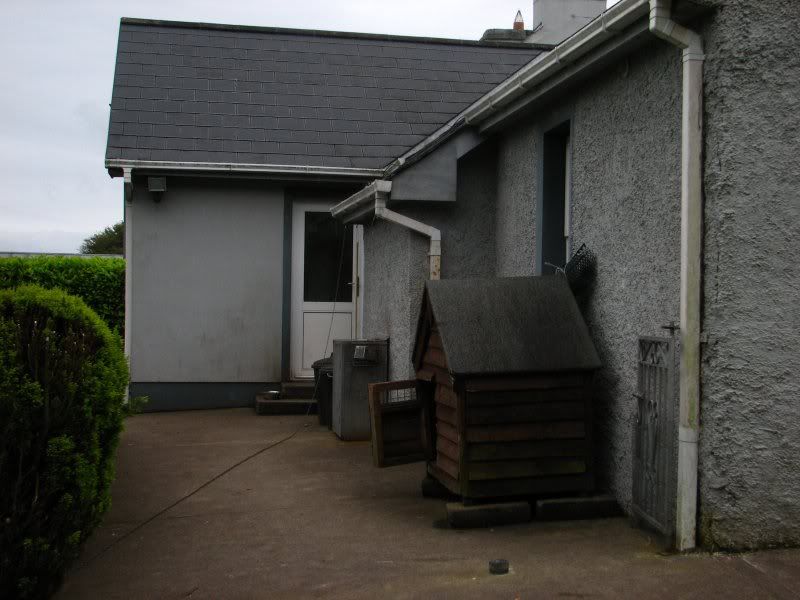
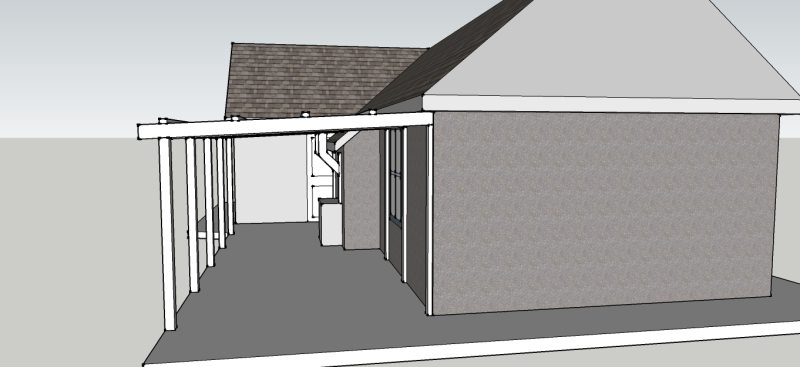
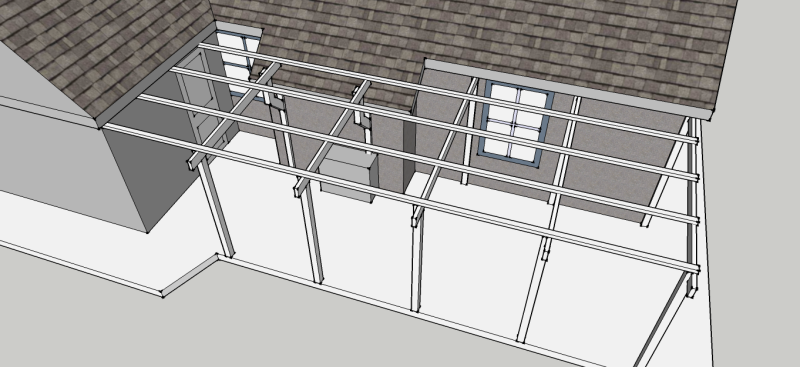
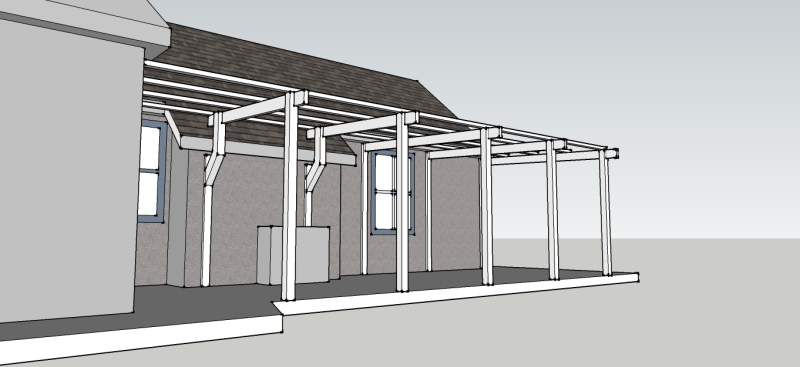
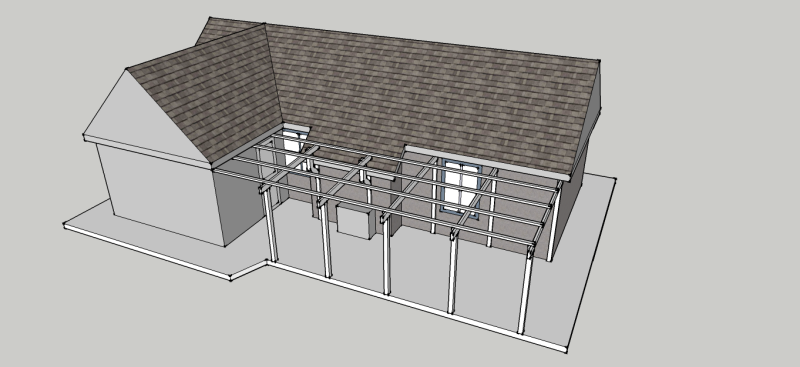
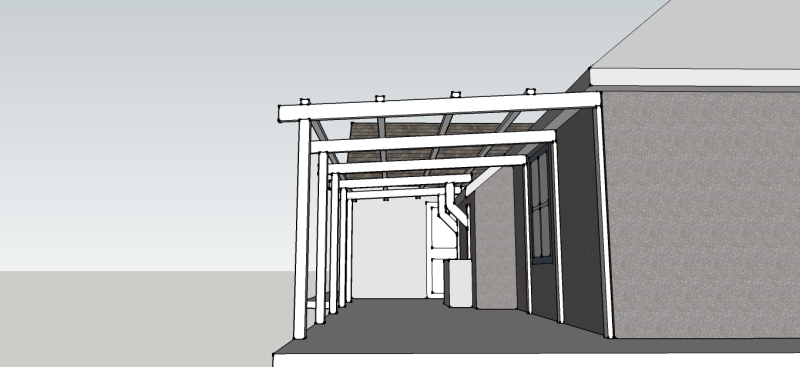
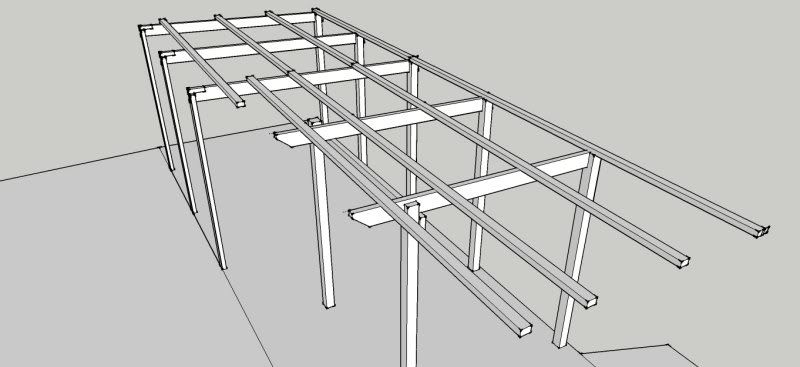
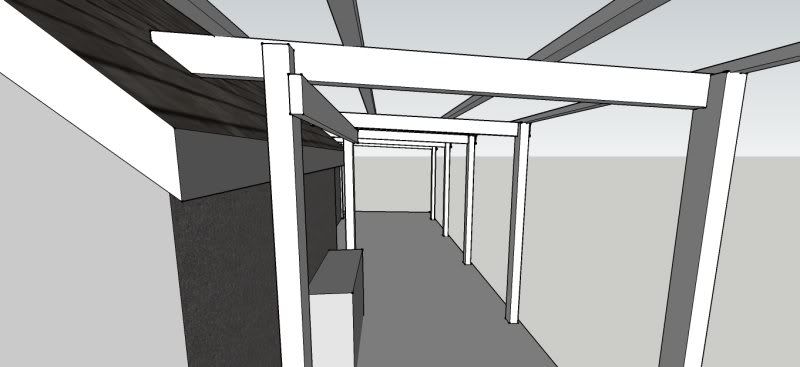
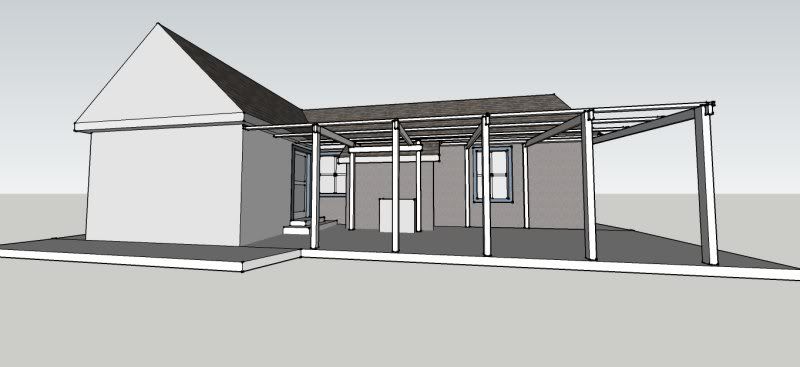
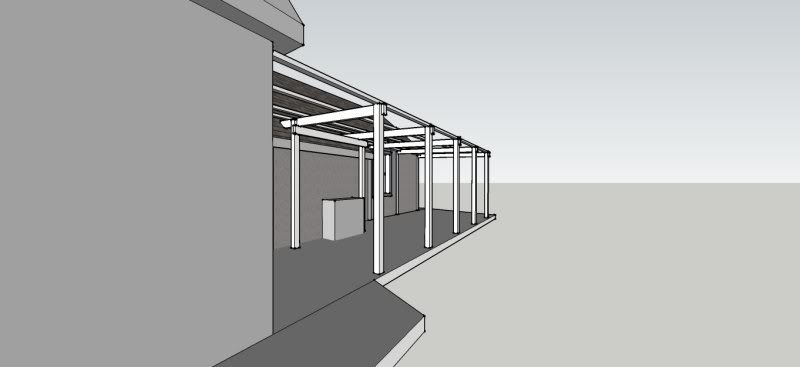
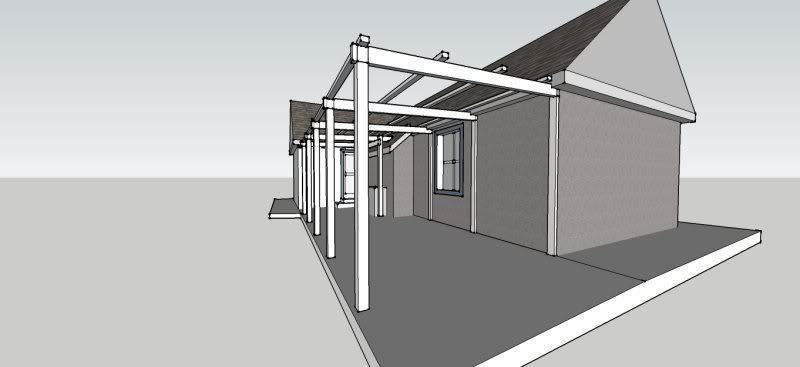
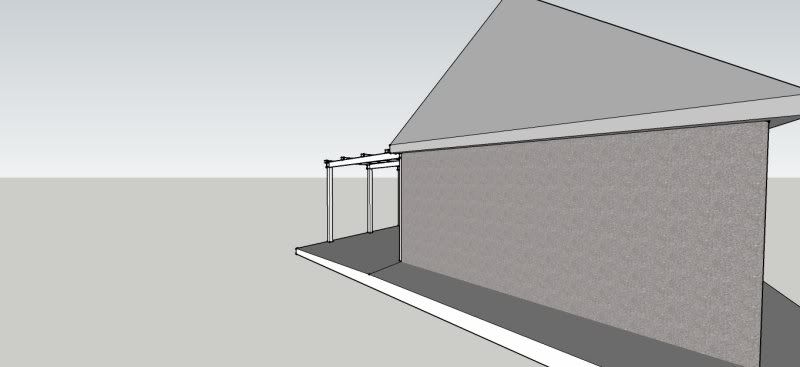
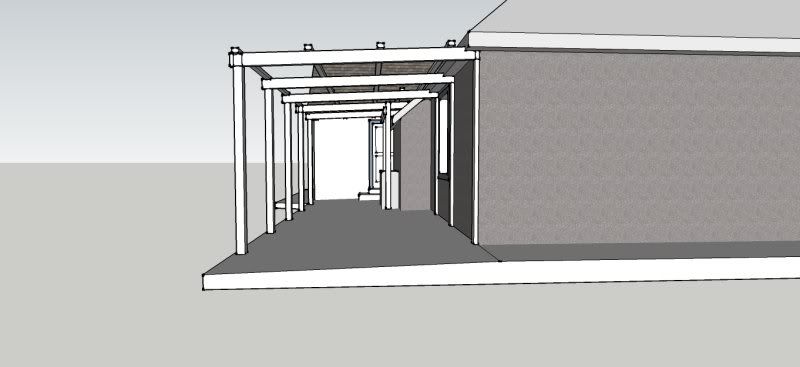
    Here's a few images from the sketch. I modelled the back of the house pretty much exactly as it actually is. This sketch allowed me to see all the issues and problems I'm gonna face before hand, especially wrt the extenstion, boiler etc. I now have a cutlist, angles worked out etc. The solution for supporting the rafters at the extension i sstill up in the air, I may end up just using uprights brought out from the back wall anough to clear the roof overhang.

    1. The house.

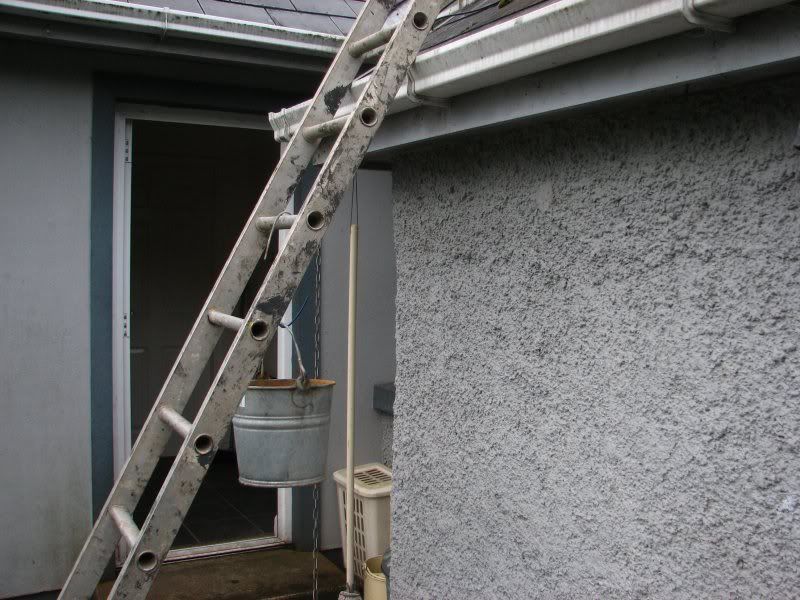
    1. The backyard in reality. This is where I'm gonna build the leanto.

    2. Complicated by this extension which brings the roof down

    3. I modelled the house, then built the leanto, finding all the problems and issues along the way virtually.

    Post edited by delly on


«1345

Comments

  • Registered Users, Registered Users 2 Posts: 28,404 ✭✭✭✭vicwatson


    I took a lot of measurements and put it together in google sketchup. This is a free drawing and 3D modelling tool. It's stunning, very quick and easy to learn, they have tons of video tutorials and tons more on youtube. Highly recommend this to anyone who is considering anything that may need a bit of design or planning.

    Brilliant dnme, I'll keep a very close eye on this thread as I am strongly thinking along the lean to line myself and have been for a while. I'll throw in any pointers I can to help.

    I've always liked the idea to be able to sit out when lashing rain (as in fairness in Summer it's usually warm enough to sit out - but not in the rain !!!)

    Cheers

    Are you going to run drainpipes off it to a storm drain or.....? I note there is an existing down pipe by the sloping part of the house jutting out and on the extension. Ideally the fall of the roof will be away from the house but perhaps it can be integrated to use the existing downpipes in situ?

    You say you are using pvc sheets? are they the corrugated plastic ones?


  • Registered Users, Registered Users 2 Posts: 3,429 ✭✭✭dnme


    vicwatson wrote: »
    Brilliant dnme, I'll keep a very close eye on this thread as I am strongly thinking along the lean to line myself and have been for a while. I'll throw in any pointers I can to help.

    I've always liked the idea to be able to sit out when lashing rain (as in fairness in Summer it's usually warm enough to sit out - but not in the rain !!!)

    Cheers

    Are you going to run drainpipes off it to a storm drain or.....? I note there is an existing down pipe by the sloping part of the house jutting out and on the extension. Ideally the fall of the roof will be away from the house but perhaps it can be integrated to use the existing downpipes in situ?

    You say you are using pvc sheets? are they the corrugated plastic ones?

    Vic,

    I'll let is slope away from the house. I realise there will be a new concentrated drain-off falling onto the hedge and if it does become a problem, I can always add gutters later. The existing gutters you mention have drains that I can link to.

    I'm looking at pvc corrugated sheets. They are very expensive though. My max stretch on these is €20 a sheet and I'd prefer 12ft sheets rather that 10ft to give me a bit of leeway for an overhang. I might have to make do with 10ft's and bring the outer posts in 4-6 inches to get my overhang.

    Homebase have 10fts for 20 quid, my local BP has 12fts for 34 quid (Id say they are heavier).


  • Registered Users, Registered Users 2 Posts: 3,429 ✭✭✭dnme


    Day 1

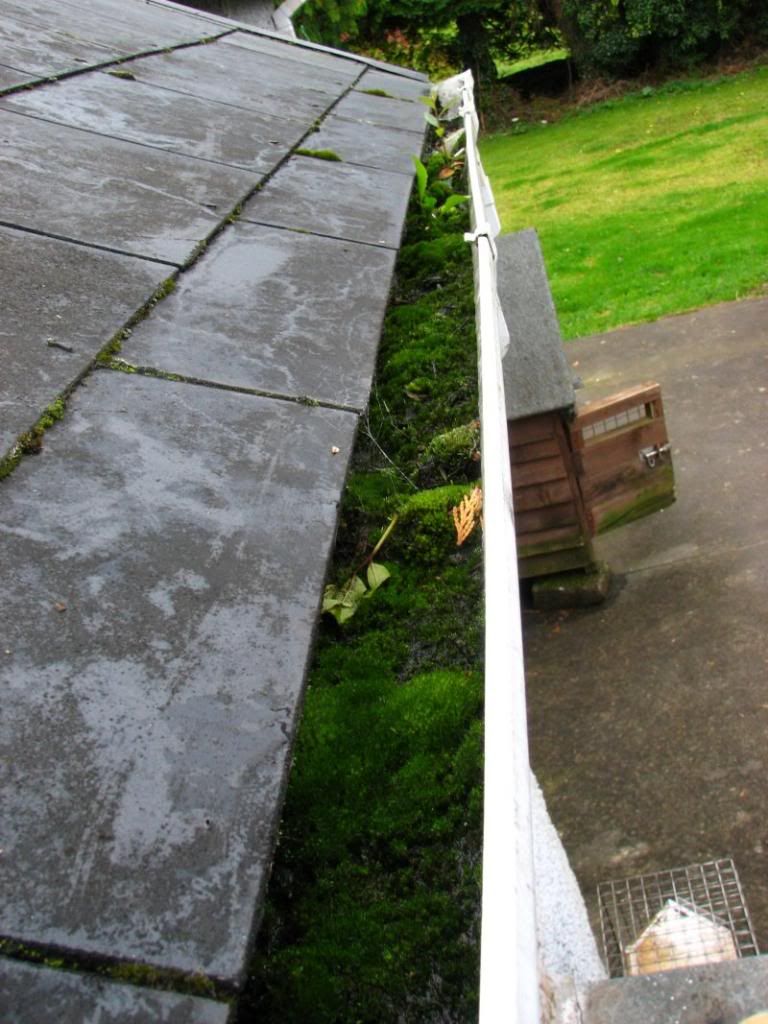
    Bit embarrassed about this post. The state of me gutters...jayzzez:eek:. Anyheew:D Job 1 is a crucial critical element to the overall project.

    Yes ........ Clean.......Those.........Gutters.

    I plan to run the pvc roof in under them so access to them in future will be limited. May aswell clean them now and while I'm at it, give the outside of them and the facia, a good scrub. There is heavy rain due here later tonight so that'll flush em a treat.

    No biggie here, I just used a bucket on a hook to the ladder, a big spoon and a fireside brush to clean out the gank in the gutters. Then warm soapy water, same brush and a cloth to wipe the outside of them and the facia clean. Place looks amazing (they were pretty mank in fairness......oh the shame!).

    I've decided to make a move on this project so I have hit the credit card and ordered the wood and fixings today. Got a good deal and some discount from my local builders providers.

    It's amazing how the right person behind the counter makes all the difference. yesterday I went in there with a sketch and started speaking to one of the lads about what I might need, what materials to use etc. He wasn't interested AT ALL! Kinda resented me looking for free advice, he was sarcy and in the middle of dealing with me, he took a phone call that went on and on. After 5 minutes looking like an idiot, I walked out. I went next door for a coffee and a cool down. I went back in half hour later and met another one of the lads. This time it was completely different. He spent 20 minutes with me, brought me all around the yard showing me different materials, gave me great advice etc. If the first person sucks (and god knows there's a few of em about), go to the next!

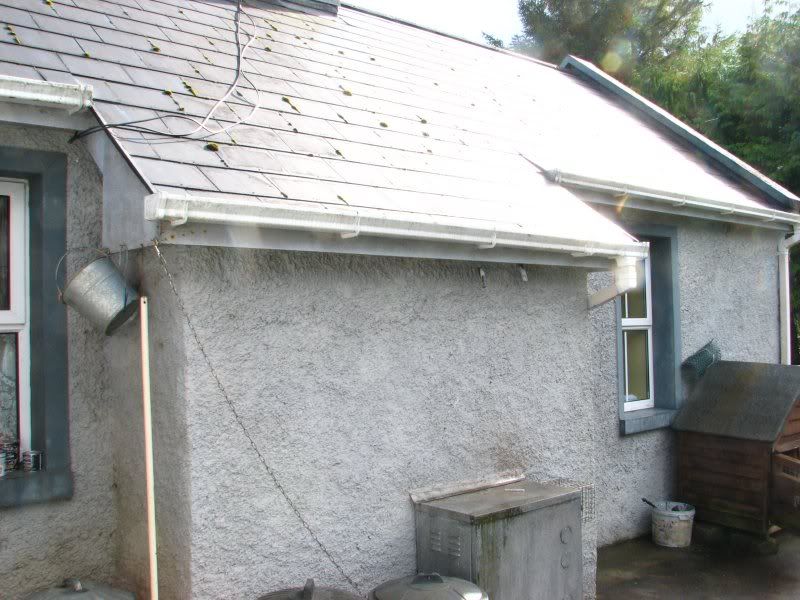
    1. What worries me is the fact that I kept walking under it.
    Img_7711.jpg


    2. Yummy! I swear to god, I do clean these every couple of years :rolleyes:
    Img_7713.jpg

    3. Any work that yields instant results is so enjoyable. Managed to clean a bit of the roof (moss) also with a sweeping brush and the right attitude.:cool:
    Image1.jpg

    4. Before and after #2.
    Image2.jpg


  • Registered Users, Registered Users 2 Posts: 67 ✭✭Kingchip


    That's a brilliant drawing fair play to you and great job on the gutters. Don't know if you got sorted with the pvc sheets or if your budget will stretch but I clad a lean-to in tile effect steel from a company in West Meath. Looks the business just like roof tiles, comes in 1 metre wide sheets and you can specify the length. The sheets I needed where 1mt x 3mt and cost 40 each.

    If you want the name of the company I'll PM it you.


  • Registered Users, Registered Users 2 Posts: 3,429 ✭✭✭dnme


    Kingchip wrote: »
    That's a brilliant drawing fair play to you and great job on the gutters. Don't know if you got sorted with the pvc sheets or if your budget will stretch but I clad a lean-to in tile effect steel from a company in West Meath. Looks the business just like roof tiles, comes in 1 metre wide sheets and you can specify the length. The sheets I needed where 1mt x 3mt and cost 40 each.

    If you want the name of the company I'll PM it you.

    Hi Kingchip, many thanks for the offer. Cost is my no.1 one issue. Unemployed etc. I need this job done by end of September so I am relying on the cc which gives me a breathing space to go ahead and save up during the month. I want to stick with transparent pvc because it will allow the light into both windows. The back of the house looks out onto L. Arrow so very scenic, dont want to darken it in any way.


  • Advertisement
  • Banned (with Prison Access) Posts: 15,858 ✭✭✭✭paddy147


    Thats prety cool allright.

    Looking forward to seeing the end result.:)


  • Registered Users, Registered Users 2 Posts: 67 ✭✭Kingchip


    No worries,
    Good luck with it, if it turns out half as good as the drawing you'd want to be hitting the landlord for a few quid :D


  • Registered Users, Registered Users 2 Posts: 28,404 ✭✭✭✭vicwatson


    I'm looking at pvc corrugated sheets. They are very expensive though. My max stretch on these is €20 a sheet and I'd prefer 12ft sheets rather that 10ft to give me a bit of leeway for an overhang. I might have to make do with 10ft's and bring the outer posts in 4-6 inches to get my overhang.

    Homebase have 10fts for 20 quid, my local BP has 12fts for 34 quid (Id say they are heavier).

    If you have a Farmers Co-Op nearby they might do a better deal, that or ask your local BP their best price per sheet, I think it's worth it these days, most places are willing to cut even a few quid off.

    Good gutter cleaning !:cool:


  • Registered Users, Registered Users 2 Posts: 3,429 ✭✭✭dnme


    I have a contact (boardsie) currently working on a price for pvc for me (thanks to this thread). I'll wait and see what he says. Apart from that, haggling is the way to go. Only problem with the big multiples is, they don't haggle whereas your local BP will if you are a friendly regular....I reckon that they build it into the price.


  • Registered Users, Registered Users 2 Posts: 3,429 ✭✭✭dnme


    Couldn't resist. The official project song!:D


  • Advertisement
  • Registered Users, Registered Users 2 Posts: 2,300 ✭✭✭martinn123


    Great idea to share this with us all. I have just read the thread on the Boat, great work.

    Couple of questions on the shed, if you don't mind

    Height, from the pics I see you are fixing the wallplate, above the window, and below the gutter, assuming a pitch of say 5deg, what height have you at the front, i.e away from the house. Unless the ground is falling away from the house, you may have a height which is too low to be practical.

    Roof, how do you propose joining the wallplate to the part of the roof, which protrudes into the shed area, as its lean-to slated roof, are you lifting the slates, or how do you propose sealing it.

    wish you the best of luck, will follow with interest,

    friend of mine did a similar project few years ago, had to build the shed around the boat as it was too big to move, you guessed it when boat finished he could not get it out the door, so the shed had to come down.:D


  • Registered Users, Registered Users 2 Posts: 3,429 ✭✭✭dnme


    martinn123 wrote: »
    Great idea to share this with us all. I have just read the thread on the Boat, great work.

    Couple of questions on the shed, if you don't mind

    Height, from the pics I see you are fixing the wallplate, above the window, and below the gutter, assuming a pitch of say 5deg, what height have you at the front, i.e away from the house. Unless the ground is falling away from the house, you may have a height which is too low to be practical.

    Roof, how do you propose joining the wallplate to the part of the roof, which protrudes into the shed area, as its lean-to slated roof, are you lifting the slates, or how do you propose sealing it.

    wish you the best of luck, will follow with interest,

    friend of mine did a similar project few years ago, had to build the shed around the boat as it was too big to move, you guessed it when boat finished he could not get it out the door, so the shed had to come down.:D


    Hi Martin.

    1. There is no wall plate. Not sure what you mean by this. I'm using uprights at the wall to bear the rafters. The yard falls away as you move outwards but it's not uniform along the yard, so I'll have to use a plumb line. Perhaps workout and roughly install the first and last rafters, and use lines between them.

    2. Roof protruding into the shed? There is no shed! I assume you mean the extension? I'll have to feel me way through this. The pvc will wrap around going from underneath the gutter, to above the tiles. I'll try and get a cross beam in under there as close to where the pvc meets the roof as possible.

    Like I say, it's a bitch (complex) building to work with.


  • Registered Users, Registered Users 2 Posts: 2,300 ✭✭✭martinn123


    dnme wrote: »
    Hi Martin.

    1. There is no wall plate. Not sure what you mean by this. I'm using uprights at the wall to bear the rafters. The yard falls away as you move outwards but it's not uniform along the yard, so I'll have to use a plumb line. Perhaps workout and roughly install the first and last rafters, and use lines between them.

    2. Roof protruding into the shed? There is no shed! I assume you mean the extension? I'll have to feel me way through this. The pvc will wrap around going from underneath the gutter, to above the tiles. I'll try and get a cross beam in under there as close to where the pvc meets the roof as possible.

    Like I say, it's a bitch (complex) building to work with.

    Sorry if I was not clear, the rafters as you have sketched it, with the uprights, join the wall of the house, above the windows, and below the soffit, from the pic's and assuming the door is about 2100mm in height, it looks as if you have 200mm to the soffit, so the rafter, and final roof covering, will adjoin house wall there. You might need to flash this to prevent water getting in. My concern is the internal head height at the front, as the roof is falling slightly from the house, say 5deg, what will be the head height, internally at the front, I am visualising the boat, on a trailer and you working in the boat.

    Joining at the extention is going to be a problem, as the height of the soffit changes/ lowers. Your sketch illustrates this, you can see the extention protruding into the area of the lean to, ideas anyone?


  • Registered Users, Registered Users 2 Posts: 3,429 ✭✭✭dnme


    martinn123 wrote: »
    Sorry if I was not clear, the rafters as you have sketched it, with the uprights, join the wall of the house, above the windows, and below the soffit, from the pic's and assuming the door is about 2100mm in height, it looks as if you have 200mm to the soffit, so the rafter, and final roof covering, will adjoin house wall there. You might need to flash this to prevent water getting in. My concern is the internal head height at the front, as the roof is falling slightly from the house, say 5deg, what will be the head height, internally at the front, I am visualising the boat, on a trailer and you working in the boat.

    Joining at the extention is going to be a problem, as the height of the soffit changes/ lowers. Your sketch illustrates this, you can see the extention protruding into the area of the lean to, ideas anyone?

    Height should be ok. I have 8ft to play with at the facia. The boat on trailer is about 6'10 - say 7ft. Boat beam is 6ft. But you know, even if the boat never went in under the leanto, it's still worth building as a place for all the work, carpentry etc for the boat plus all the other reasons I mention above.


  • Registered Users, Registered Users 2 Posts: 2,300 ✭✭✭martinn123


    dnme wrote: »
    Height should be ok. I have 8ft to play with at the facia. The boat on trailer is about 6'10 - say 7ft. Boat beam is 6ft. But you know, even if the boat never went in under the leanto, it's still worth building as a place for all the work, carpentry etc for the boat plus all the other reasons I mention above.

    Yes it should be OK, I see you have 2 steps down from the back door, so the floor will be at the path level, if you have 8' to the soffit, and use 6X2 rafters, your internal head height should be 8' less 6'' less 2'' for flashing to house wall, so about 7'4'' or thereabouts. Just dont stand up in the boat.:eek:
    Agree its well worth while, best of luck.


  • Registered Users, Registered Users 2 Posts: 3,429 ✭✭✭dnme


    martinn123 wrote: »
    Yes it should be OK, I see you have 2 steps down from the back door, so the floor will be at the path level, if you have 8' to the soffit, and use 6X2 rafters, your internal head height should be 8' less 6'' less 2'' for flashing to house wall, so about 7'4'' or thereabouts. Just dont stand up in the boat.:eek:
    Agree its well worth while, best of luck.


    My height measurements of the boat were very conservative, taken while she's up on high chocs. In reality she will sit lower. Her actual specs are

    Overall Length - 17'
    Overall Beam - 6' 4"
    Headroom - 5'
    Overall Depth - 5' 6"
    Weight (complete)- 740 lbs (335.66 kgs)
    Draught - 12"

    Not too worried about working around her (on the outside), as long as I can work in cabin and on deck (I'll be in the boat mostly).


  • Registered Users, Registered Users 2 Posts: 2,182 ✭✭✭alexlyons


    good work dnme, glad to see you are getting a dry place to work, looks well planned.

    on a side note, just about to start your three day trek to the bus. i've taken my time reading it and its absolutely amazing :)


  • Registered Users, Registered Users 2 Posts: 3,429 ✭✭✭dnme


    alexlyons wrote: »
    good work dnme, glad to see you are getting a dry place to work, looks well planned.

    on a side note, just about to start your three day trek to the bus. i've taken my time reading it and its absolutely amazing :)

    Thanks Alex, enjoy the "magic bus". It was some experience., Deeply moving and sad also. I feel for the guy now. I admire him and feel a bit closer to him having seen his final resting place in the wilderness.


  • Registered Users, Registered Users 2 Posts: 3,429 ✭✭✭dnme


    Day 2

    I know, the pace is lightening and I'm leaving a lot of people behind.:D Truth is...I'm waiting for the local BP to deliver me timbers. (Hang on, I'm having a Popeye flashback for some reason). Stuff will probably be here tomorrow or Monday. Then I'll likely be hampered with the constant rain. Can't see myself out there snapping chalk lines or firing up power tools if it's raining so the message for today is . . . . . . .bear with me.:rolleyes:

    In the meantime, there's alway s work to be done. Gotta trim that hedge that runs along the outside of the yard. It's overhanging and will obstruct work. That hedge has been there for a few years. It's horrible, I'd love to get rid of it. it's practically dead and sheds needles all over the yard all the time not to mention being highly acidic and doing nothing for the garden, the wildlife or the environment.


    1. Any excuse to use my recip saw. One of my favourite tools. MAKES ME FEEL LIKE THE TERMINATOR. And yes, that's the dam boat in the background.
    173847.jpg


    2. A wheel barrow and just the right amount of attitude.:rolleyes:
    173848.jpg


    3. Meet Honey, the wonderdog. She inspects all works around here. Jobs a gud'un and time for a steak dinner just before the rain.
    173849.jpg


  • Registered Users, Registered Users 2 Posts: 1,428 ✭✭✭quietsailor


    Hey there, my first time posting with you but I've spent several hours with you already in spirit reading these two fascinating threads dnme.

    I made a similar, but smaller, lean-to style shed at home for my boiler. I had the same issue with sealing the corrugated perspex to the pebble dash and drilling into the old style stone and mortar construction (I realise your going with supports but just in case it might make it easier for you). I hope you don't take this as arrogance (me telling you what to do) but as some advice that may be helpful.

    1. What I did was mark the wall with a chalk line where the top and bottom of the beam attaching to the wall would be.
    2. Get rawlbolts - the type that have a bolt in them rather than a stud fixed to the rawlbolt and nut arrangement (I used 12mm ones), and replace the bolt with lengths of stud bar. The bar needs to be long enough to go through the rawlbolt, through the timber and have 1" to 2" extra length.
    When you’re cutting the stud bar thread nuts onto each side of the cut you intend to make.
    Rotate the end of the cut stud bar either on the belt sander or the edge of the grinding disc, keeping the bar as parallel to the grinder as possible – 30 degrees is good.
    3. Work the nuts clockwise & anti-clockwise at the cut and it will clean up the threads to make life easier in the future. [/INDENT]Mark the length plus a little of the rawlbolt on the drill bit - you can buy fancy depth stops but I just wound some elec tape onto the drill bit.
    4. Next drill into the wall in several places between the 2 chalk lines until you feel that you've drilled into stone. Fill any useless holes with sand & cement mix.
    5. Insert the rawl bolts BUT DON'T TIGHTEN THEM. Offer the timber up against the wall at the height and level you want it to be - you'll need help or lots of supports for this job.
    6. Using a hammer drive the timber against the stud bars so it marks the timber, take down the timber and drill it through (make the hole slightly bigger than the stud bar).
    7. The beam will now fit over the stud bar at roughly the level and height you want so after adjusting it as much as you can to get it perfect tighten nuts over the stud bar - use large washers (I call them penny washers, they're much larger in diameter than a normal washer)
    8. For tidiness you can cut off the excess stud bar with a grinder or alternatively keep them long to use as hooks to hang items off of.
    9. I overlapped the sheets by at least one full corrugation, it sounds windy in your spot so maybe two corrugations and put fixing screws on the TOP of each corrugation but not side by side - it might weaken the perspex.
    10. When we were sealing the perspex to the wall I used cement and found that it was easier to seal each sheet as I put it up. If I attached more than one sheet to the frame and then tried to seal it I had to crawl across the perspex and it creaked alarmingly.

    When cutting the perspex the corrugations make it a ba***rd to cut, it tends to shatter. I ended up using a very slow speed on the jigsaw and the finest metal cutting blade I could get.
    Even at that it had to be cut on an extremely flat surface and I ended up sandwiching it between two other lengths of perspex, all clamped together, to make it more rigid.

    I hope that's of some use to you, good luck on the lean-to build and even more luck on the boat renovation.


  • Advertisement
  • Registered Users, Registered Users 2 Posts: 3,429 ✭✭✭dnme


    Quietsailor,

    I'm alway happy top get help and advice from others. Many thanks to you. Alas...in this case

    1. landlord has not given permission for wall to bear weight. he requests that weight be taken by timber uprights.

    2. Job i splanned and stuff is all ordered based on that plan.


  • Registered Users, Registered Users 2 Posts: 3,429 ✭✭✭dnme


    After a few pointed out the issues with headroom, the slope on the yard and the steps at the back door. I decided to revise the drawing to refelct these realities. The yard now falls away 4" as per real life. The steps are in and I have simplified the way I am supporting the rafters at the extension.

    I have pushed the rafters up 2". This means that I would need to cut a reveal in them to accomodate the facia. I am struggling to get the cross beams to meet the wall over the backdoor, there is very little wall space avove that door. Only good point here is that, that wall where the door is, is a new block wall so drilling / weight not an issue. As you can see, I've way too much time on my hands and insomnia.


    1. Revised simplified extension surround.
    Image1.jpg


    2. Decluttered views.
    housenew3f.jpg
    housenew3g.jpg


    3. From back door (very wide angle)
    housenew3i.jpg

    4. From garden
    housenew3j.jpg

    5. From footpath walking around towards backyard
    housenew3k.jpg

    6. Open end
    housenew3l.jpg

    7. Open end
    housenew3m.jpg


    8. Open end, Yard falls off correctly. This small sloope made it tricky to do until I got the hang of it.
    housenew3n.jpg


  • Registered Users, Registered Users 2 Posts: 2,921 ✭✭✭2 stroke


    Hi dnme, I am considering a similar project myself so will be following this thread with interest. I plan to use multiwall polycarbonate, so if you find a cheap source of this, let me know.

    Concern has been mentioned about how to join your project to the house. Quite a bit of wind can get caught under the structure. I sugest a small gap, c50mm, between sheeting and the house to allow air presure to escape. Yes you will get some rain through this, but its a shelter not living accomadation.


  • Registered Users, Registered Users 2 Posts: 3,429 ✭✭✭dnme


    2 stroke wrote: »
    Hi dnme, I am considering a similar project myself so will be following this thread with interest. I plan to use multiwall polycarbonate, so if you find a cheap source of this, let me know.

    Concern has been mentioned about how to join your project to the house. Quite a bit of wind can get caught under the structure. I sugest a small gap, c50mm, between sheeting and the house to allow air presure to escape. Yes you will get some rain through this, but its a shelter not living accomadation.

    jeez stroke, thats good advice, I nnever thought of that before. My engineering head is now whirring on this one? How to solve and retain dryness...:p

    Well the timbers arrived today. The world of builders materials has gone metric. Kinda caught me out a bit did that. For example, I ordered 8ft 4x4 posts for the perimeter supports. What I got was posts mitred at one end. longside 7'10", and short side is only 7'6". All the stuff is metric, I'm missing a couple of inches off most lengths. (no missus no, dont!!)

    Now when ordering, I couldn't be arsed to check this. In the shop, we spoke in feet and ionches, the dockets show a mix of imperial and metric. The whole thing is a mess really. I'll be able to work around it somehow but it's worth considering if you're ever buying lumber. The simplest thing to do is work in metric from the start.

    It's a full blown storm here today. I can't even measurre as the wind is lashing the tape all over the shop. Still, I'll get a few inner uprights and strapping cut and see what else I can get away with.


  • Registered Users, Registered Users 2 Posts: 2,917 ✭✭✭red sean


    Hi dnme,
    Those drawings are quality. What programme did you use?


  • Registered Users, Registered Users 2 Posts: 125 ✭✭Jack_regan


    I know it might not look the best but you could always stick a concrete block under the uprights if you need to gain a few inches. Also just on a side note, it might be worth putting some kind of a damp proof course under the timber uprights just to stop moisture coming up through the concrete slab. You can get rolls of dpc (black plastic stuff) in any builders providers.

    The wind really is going to be the main problem for you with this project and it definitely requires further investigation before committing to your plan. The last thing you want is to lose your roof in a gale.

    I've never come across a mitred length of timber like that, very unusual in my opinion. I guess they the guys cutting the timber for you must have known that you like a challenge.


  • Registered Users, Registered Users 2 Posts: 3,429 ✭✭✭dnme


    With regard to damp proffing the bottom ends of the timbers, I have been thinking about this also. If I put a dpc under the posts, this might act as a water retainer for water that flows down along and through the posts. So I am wondering would I be better off resting the timber on some sort of stand-off? The outer posts will sit in metal surrounds that ar ebolted to the ground. These have drainage holes in each corner and I might lift the timbers an inch inside them, but what to rest it on? What about a shovelfull of pebbles?

    With regard to the wind, I have taken it into consideration from the start. I am over-engineering the job because of it.

    The mitred posts are probably fencing posts with the top cut at an angle to allow rain top flow off. I am told that the local BP wouild not have any other 4x4 types in that length. I'll ring them monday morning and double check. Might also ring around a few others.


  • Registered Users, Registered Users 2 Posts: 3,429 ✭✭✭dnme


    red sean wrote: »
    Hi dnme,
    Those drawings are quality. What programme did you use?

    Have a look at the very first post.


  • Registered Users, Registered Users 2 Posts: 1,167 ✭✭✭TopTec


    Is the timber tanalised dnme?

    TT


  • Advertisement
  • Registered Users, Registered Users 2 Posts: 3,429 ✭✭✭dnme


    TopTec wrote: »
    Is the timber tanalised dnme?

    TT

    Yeah, just the outer 4x4 posts, definately treated. I'll slap some preservative on the rest. I'd like to have a tin handy during cutting and construction to paint all the insides of joints etc. What would you recommend?


  • Registered Users, Registered Users 2 Posts: 125 ✭✭Jack_regan


    dnme wrote: »
    With regard to damp proffing the bottom ends of the timbers, I have been thinking about this also. If I put a dpc under the posts, this might act as a water retainer for water that flows down along and through the posts. So I am wondering would I be better off resting the timber on some sort of stand-off? The outer posts will sit in metal surrounds that ar ebolted to the ground. These have drainage holes in each corner and I might lift the timbers an inch inside them, but what to rest it on? What about a shovelfull of pebbles?

    With regard to the wind, I have taken it into consideration from the start. I am over-engineering the job because of it.

    The mitred posts are probably fencing posts with the top cut at an angle to allow rain top flow off. I am told that the local BP wouild not have any other 4x4 types in that length. I'll ring them monday morning and double check. Might also ring around a few others.


    Ah that explains it alright, fence posts up my way are usually mitred on both sides to a point for driving into the ground. There is a slight chance that the bp might have 16 foots or 4.8 metre lengths of 4 by 4 that you could cut in half, it's an unusual size though and they're more likely to have 4 by 3 or 6 by 3 in 16 fts.

    With regards to the timber uprights and damp proof course, I had the same concerns as you when we were putting in the timber frame for the door on the house, I ended up sticking a piece of lead to the bottom of the timber door frame with tech 7.You can buy lead off a roll by the foot.(ie. you don't have to buy a full roll.) It seems to be working. It's mainly the rising damp that you want to stop with the dpc. I know there is a risk of water pooling in the dpc but it will dry eventually with the wind/sun.

    I've not come across anybody using pebbles as a dpc before, but that doesn't mean it won't work, you could be on to something there.

    I know you're over engineering the structure, just don't trap the wind, that's all. The wind needs to be able to escape but sure you know that yourself.


  • Registered Users, Registered Users 2 Posts: 125 ✭✭Jack_regan


    dnme wrote: »
    Yeah, just the outer 4x4 posts, definately treated. I'll slap some preservative on the rest. I'd like to have a tin handy during cutting and construction to paint all the insides of joints etc. What would you recommend?

    Protim wood preservative.


  • Registered Users, Registered Users 2 Posts: 1,167 ✭✭✭TopTec


    Any proprietry preserver, Sadolin is very good, cuprinol is fine but any will do - waterbased preferably. I know Lidls have been doing some german stuff - no idea what its like.

    I would stand all your uprights in a shallow tray of the preserver to get a good penetration prior to erecting..

    Forget the Dpc, if you have drain holes in the fixings, that will be fine. Dpc isn't designed for that application. Standing the posts on gravel or pebbles will make no difference. As long as they don't remain in water they will be fine.

    My Uncle, a fencer, used to soak the bottom third of the posts in creosote. let it go off then stand the posts in a burning brazier for a few minutes. The outside layer of wood, burnt, would seal in the creosote and prevent water ingress.

    He swore to me that any post put into the ground prepared this way would last 25 years!!

    TT


  • Registered Users, Registered Users 2 Posts: 3,429 ✭✭✭dnme


    @TopTec

    Many thanks. Why water based specifically?


  • Registered Users, Registered Users 2 Posts: 1,167 ✭✭✭TopTec


    Non-Toxic, good penetration, usually animal friendly.

    TT


  • Advertisement
  • Registered Users, Registered Users 2 Posts: 3,429 ✭✭✭dnme


    TopTec wrote: »
    Non-Toxic, good penetration, usually animal friendly.

    TT

    Ah ok, I could never figure out how water based stuff prevents or protects against.......well water! ???


  • Registered Users, Registered Users 2 Posts: 125 ✭✭Jack_regan


    I've used the some of the sadolin products before and found them to be good. The ones I was using were not water based if that's important to you. They are expensive though especially compared to the stuff you'll get in lidl.

    http://www.sadolin.co.uk/global_assets/pdf/datasheets/WoodPreserver.pdf

    I'm not sure about the cuprinol stuff, I've never used it.

    Anyway just making sure you're aware that all of these preservers are only recommended for above dpc level. Top Tec is right about dpc not being designed for you're application but I'd always favour having some kind of dpc if at all possible. It sounds like the fixings you are using might be holding the uprights up off the slab anyway which means you can forget about the dpc.

    You can't get the creosote stuff anymore, there is stuff called creosote substitute which probably does exactly what it says on the tin.

    Definitely worth soaking the uprights in whatever preserver you decide to get, good advice there. (the longer the better)

    Have you decided what your using for fixing? (screws, nails, coachbolts etc)


  • Registered Users, Registered Users 2 Posts: 3,429 ✭✭✭dnme


    Jack_regan wrote: »
    Have you decided what your using for fixing? (screws, nails, coachbolts etc)

    all of these.


  • Registered Users, Registered Users 2 Posts: 1,167 ✭✭✭TopTec


    Just one other point I would make dnme, about the physical fixing of the structure to the house.

    Due to lateral movement of the structure on it longside away from the back door, the lateral roof members will have to be fixed to the house above and to the left of the back door. I see your plan is to butt these members underneath the existing soffits but not against a wall plate, or length of timber fixed to the wall.

    I would suggest, in that case, you use something like joist hangers to fix the roof joists to the wall.

    TT


  • Registered Users, Registered Users 2 Posts: 3,429 ✭✭✭dnme


    TopTec wrote: »
    Just one other point I would make dnme, about the physical fixing of the structure to the house.

    Due to lateral movement of the structure on it longside away from the back door, the lateral roof members will have to be fixed to the house above and to the left of the back door. I see your plan is to butt these members underneath the existing soffits but not against a wall plate, or length of timber fixed to the wall.

    I would suggest, in that case, you use something like joist hangers to fix the roof joists to the wall.

    TT

    Yea TT, My plans dont include any fixings, too complicated to draw. But I intend to brace somehow. it might be too tight ot get a beam up there, if so, I'll try L brackets under the cross members or something else.


  • Advertisement
  • Registered Users, Registered Users 2 Posts: 7,786 ✭✭✭slimjimmc


    TopTec wrote: »
    Just one other point I would make dnme, about the physical fixing of the structure to the house.

    Due to lateral movement of the structure on it longside away from the back door, the lateral roof members will have to be fixed to the house above and to the left of the back door. I see your plan is to butt these members underneath the existing soffits but not against a wall plate, or length of timber fixed to the wall.

    I would suggest, in that case, you use something like joist hangers to fix the roof joists to the wall.

    TT
    Yeah, was just thinking that too, perhaps run a larger joist along the outer edge similar to the short one over the house extension to stiffen the structure even more.


  • Registered Users, Registered Users 2 Posts: 3,429 ✭✭✭dnme


    Folks, as you may know, the back yard falls away from the house by about 4" on the outside. I know it doesn't sound much, but it looks and feels like a substantial angle, especially if you stand on it. So it occurs to me that my post surround brackets will not be level. Just went out, positioned one and photographed it. It is indeed, way off level.

    174011.jpg

    How would you solve this. I need to put something under the bracket along its outside to level it, could I use washers? what do you think?


  • Registered Users, Registered Users 2 Posts: 1,167 ✭✭✭TopTec


    Well, you effectively have only two options - Shim the outer edges with washers, you wont need much to level them.

    Or cut out a socket on the slab for the brackets to fit in, then using a strong mix of mortar fill the socket hole so that it is level.

    TT


  • Registered Users, Registered Users 2 Posts: 3,429 ✭✭✭dnme


    TopTec wrote: »
    Well, you effectively have only two options - Shim the outer edges with washers, you wont need much to level them.

    Or cut out a socket on the slab for the brackets to fit in, then using a strong mix of mortar fill the socket hole so that it is level.

    TT

    Oh yeah, so I'd be kinda burying the bracket. That sounds more robust but the washers are far simpler and less work.

    EDIT: Cutting out a socket might leave me with pools where water gathers also.

    The angles I'm dealing with are tiny but make a big difference over lengths and they effect square. The angle that the concrete falls is 2 degrees from level. If I were to place the rafters parrallel to the ground, they'd meet the wall at 88 degrees, I'll add another 2 or 3 degrees to their fall off.


  • Registered Users, Registered Users 2 Posts: 3,429 ✭✭✭dnme


    Another question for those in the know, If might decide to add extra bracing to the old walls by rawl bolting the uprights to it. I would probably need to try a few different locations with the drill before I lfelt like I was into solid stone (the walls really are bad). So lets say, I find a couple of good spots, drill for my rawl bolt, fix the bolt etc. How do I then locate the holes to be drilled in my upright accurately?


  • Registered Users, Registered Users 2 Posts: 2,921 ✭✭✭2 stroke


    I'm sure your landlord wont be happy with you making a pin cushion of his walls. Decide where you want support, then drill through the timber into the wall. Then deal with whatever you find in the wall at that point, I suggest chemical fixings/ threaded bar.


  • Registered Users, Registered Users 2 Posts: 1,167 ✭✭✭TopTec


    dnme wrote: »
    If might decide to add extra bracing to the old walls by rawl bolting the uprights to it.

    Just a thought. If you are going to do this dnme then fit a wall plate. This then gets rid of the need for most of the uprights and you can drill through the plate along its length to find a solid fixing.

    This gives you a far easier product to fix your roof to.

    TT


  • Registered Users, Registered Users 2 Posts: 3,429 ✭✭✭dnme


    TopTec wrote: »
    Just a thought. If you are going to do this dnme then fit a wall plate. This then gets rid of the need for most of the uprights and you can drill through the plate along its length to find a solid fixing.

    This gives you a far easier product to fix your roof to.

    TT


    TT, whats a wall plate, whats it made of ?

    Landlord didn't really want the wall to have to bear the weight, so we agreed on uprights strapped to the wall. These will bear the weight. What I want to do is add extra bracing by rawl bolting them to the wall. The wall is very old stone covered in a coat of pebble dash. It's really poor to drill into so I would need the ability to have several goes with the drill before I found good solid stone.


  • Registered Users, Registered Users 2 Posts: 2,921 ✭✭✭2 stroke


    dnme wrote: »
    I would need the ability to have several goes with the drill before I found good solid stone.

    If the wall is that bad, you are better off making a good chemical fixing into a forgiving part of the wall than to anchor into a stone that your structure is going to shake loose.


  • Registered Users, Registered Users 2 Posts: 3,429 ✭✭✭dnme


    2 stroke wrote: »
    If the wall is that bad, you are better off making a good chemical fixing into a forgiving part of the wall than to anchor into a stone that your structure is going to shake loose.

    Are those chemical fixings that strong? We're talking about the glass inserts right ? On another note, I've just been up to the attic and notice a line or two of new blocks along the top of the wall, so a cross beam bolted to that is again an option. I should have inspected that from the getgo but landlord was insistant.

    Weather is bloody awful. Rain all night and now heavy drizzle all day. No end to it. All my timbers are out in the garden on three pallets with dodgy leaky tarps over them. There's no avoiding the timber getting wet.


  • Advertisement
Advertisement