Advertisement
If you have a new account but are having problems posting or verifying your account, please email us on hello@boards.ie for help. Thanks :)
Hello all! Please ensure that you are posting a new thread or question in the appropriate forum. The Feedback forum is overwhelmed with questions that are having to be moved elsewhere. If you need help to verify your account contact hello@boards.ie

Soldering hell

Options
  • 19-07-2020 8:13pm
    #1
    Registered Users Posts: 31,017 ✭✭✭✭


    I'm currently attempting to solder some 24V LED strips.

    The contacts are tiny and close together, and the combination of my crappy cheap soldering iron and no skill is proving very frustrating.

    I've about 90 connections to solder and have only done about a third, and am losing the will to live.

    Will a decent soldering set up help? Specifically, a choice of tips, temperature control, liquid flux and flux cleaner, and some clamping setup?

    Are there shops around Dublin or Wicklow that sell this stuff? I checked the usual suspects (Screwfix, builders providers, Woodies, McQuillans) but could only find very basic ones with no temperature control.

    Or do I just need to practice?


«1

Comments

  • Registered Users Posts: 3,404 ✭✭✭corkgsxr


    I would say you need to look at more electronics places rather than home diy


  • Posts: 7,499 ✭✭✭ [Deleted User]


    Just get a basic hakko one.
    No temp control needed.
    Do you have flux ? It's super important.
    Also you need the right size solder.


  • Moderators, Regional Abroad Moderators Posts: 5,374 Mod ✭✭✭✭aido79


    Lumen wrote: »
    I'm currently attempting to solder some 24V LED strips.

    The contacts are tiny and close together, and the combination of my crappy cheap soldering iron and no skill is proving very frustrating.

    I've about 90 connections to solder and have only done about a third, and am losing the will to live.

    Will a decent soldering set up help? Specifically, a choice of tips, temperature control, liquid flux and flux cleaner, and some clamping setup?

    Are there shops around Dublin or Wicklow that sell this stuff? I checked the usual suspects (Screwfix, builders providers, Woodies, McQuillans) but could only find very basic ones with no temperature control.

    Or do I just need to practice?

    Would something like this help?

    https://www.sparks-magazine.co.uk/soldering-clip-promises-to-make-led-strip-lighting-easy-to-install/

    I've never used it nor have I ever soldered LED strips but I just saw an article on this the other day and it seems like a good idea.


  • Registered Users Posts: 31,017 ✭✭✭✭Lumen


    Just get a basic hakko one.
    No temp control needed.
    Do you have flux ? It's super important.
    Also you need the right size solder.

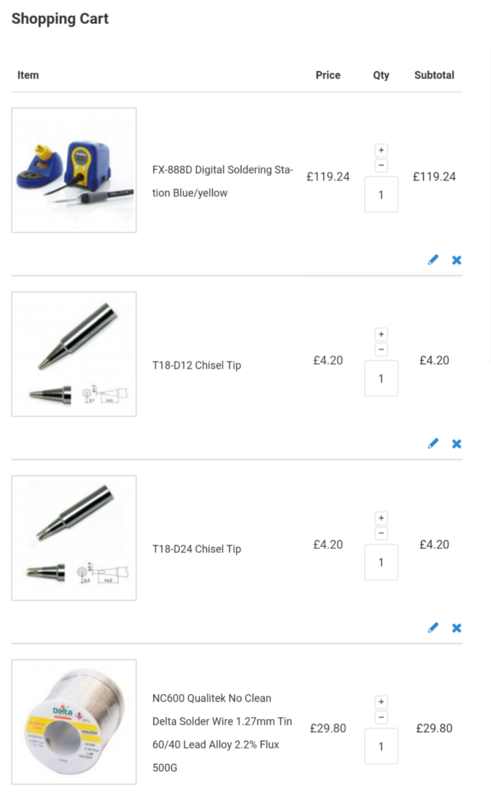
    Thanks. How's this look?

    1.2 and 2.4mm chisel tips, 1.27mm 60/40 leaded solder.

    Is flux needed if I'm using flux cored solder?

    Screenshot-20200719-221107.png


  • Closed Accounts Posts: 1,049 ✭✭✭GinSoaked


    I'd pre-tin the copper wire first and also pre-tin the connections on the LED's then you don't use any more solder when you make the connections. If you do need to flow some more solder into the joint then you heat the joint and apply the solder to the joint not the soldering iron tip. If the solder won't flow then in most cases the bit needs cleaning and tinning.

    Keep the soldering iron bit clean with the tip covered in clean shiny solder. This cleaning and tinning of the bit is very important. Tinning the bit is just keeping it "wet" with a tiny amount of solder on it. As soon as the solder on the iron goes grey clean it and re-tin.

    So strip wires dip ends into flux heat the copper up and flow a bit of solder into the wire.

    Then a dab of flux on the LED terminals and heat them enough to flow a small amount of solder onto them. Next hold the pre-tinned copper onto the pre-tinned connection and heat them with the soldering iron. If necessary apply a bit of flux first.

    In a lot of cases with good multicore solder you won't need to use additional flux very often. If you are making connections to existing solder that is a bit "grey" looking and not shiny then use flux. Ideally only make joints between shiny recently tinned surfaces.

    Tinning = an old term I use for soldering.

    While I'm prepared to be shot down over any of that because I have done very little surface mount work I have made up hundreds if not thousands of circuit boards on piece rate so have do have a bit of experience but it was a long time ago.

    Edit>
    Lumen wrote: »
    Thanks. How's this look?

    1.2 and 2.4mm chisel tips, 1.27mm 60/40 leaded solder.

    Is flux needed if I'm using flux cored solder?

    RE: flux no you don't need extra flux but its really handy for getting a really good joint particularly when things aren't working out and I've always found it useful when re-soldering old connections.

    Didn't think you could get lead based solder anymore, when I was using a lot of it silver solder was always thought to be the best but don't know what is current thinking.


  • Advertisement
  • Registered Users Posts: 31,017 ✭✭✭✭Lumen


    So I measured the terminals and the three copper dots are 2mm diameter with 1mm spacing between them.

    So would the 1.2mm chisel tip and 1.27mm solder wire be the right sizes?


  • Registered Users Posts: 817 ✭✭✭3d4life


    Lumen wrote: »
    Thanks. How's this look?

    ... 60/40 leaded solder.......

    Its an age since I had an involvement in electronic assy. so I may be wrong but wasnt lead alloy solder banned by Brussels ?

    You might be up against some issue with lead free Vs lead solders

    ( BTW I seem to recall we had to junk a lot of soldering irons back then because the melting point of lead free solder was higher than tin/lead solder. )


  • Closed Accounts Posts: 1,049 ✭✭✭GinSoaked


    Lumen wrote: »
    So I measured the terminals and the three copper dots are 2mm diameter with 1mm spacing between them.

    So would the 1.2mm chisel tip and 1.27mm solder wire be the right sizes?

    Once you get the knack you'll be able to solder that with a hammered out lump of copper pipe heated on gas ring :D

    While the solder and bit sizes make a difference its your soldering technique that is the main thing.

    In my experience the smaller the joint the easier it is to get wrong. Easy to heat up a big joint and flow in loads of solder. Much harder to have everything just right and make a small joint with the minimum amount of heat.

    Edit> Yes that would be a sensible choice of bit and solder size but throw in a 1mm (or up to 2mm) Round Slopped bit and see how you get on with it.


  • Registered Users Posts: 31,017 ✭✭✭✭Lumen


    3d4life wrote: »
    Its an age since I had an involvement in electronic assy. so I may be wrong but wasnt lead alloy solder banned by Brussels ?

    You might be up against some issue with lead free Vs lead solders

    ( BTW I seem to recall we had to junk a lot of soldering irons back then because the melting point of lead free solder was higher than tin/lead solder. )

    I think it's still being phased out. From what I've read it's easier to work with, and I need all the help I can get.

    edit: on second thoughts I'll switch to lead free solder. My world doesn't need more pollution.


  • Closed Accounts Posts: 1,049 ✭✭✭GinSoaked


    Lumen wrote: »
    I think it's still being phased out. From what I've read it's easier to work with, and I need all the help I can get.

    At the very least get a solder that states it has a Rosin flux core.

    You really don't need more help.

    KEEP THE BIT CLEAN AND TINNED and you'll be fine.

    A dry dirty soldering iron bit doesn't transmit heat to the joint properly if at all and is the source of many soldering problems. How you can melt components and strip copper tracks off circuit board while not melting the solder seems against the laws of physics but its what happens when the bit gets dried out and oxidises.


  • Advertisement
  • Registered Users Posts: 31,017 ✭✭✭✭Lumen


    On sober overnight reflection I think my main problem is the conical bit I have. The solder seems to get drawn up from the tip on to the fat part, and so I can't actually use the tip to deposit any solder.

    Since compatible solder tips from a local shop seems an impossible dream, I might just lightly grind the tip I have into a chisel, clean it up and have another crack.


  • Closed Accounts Posts: 1,049 ✭✭✭GinSoaked


    Lumen wrote: »
    On sober overnight reflection I think my main problem is the conical bit I have. The solder seems to get drawn up from the tip on to the fat part, and so I can't actually use the tip to deposit any solder.

    Since compatible solder tips from a local shop seems an impossible dream, I might just lightly grind the tip I have into a chisel, clean it up and have another crack.

    Back before the likes of Curie Point soldering iron bits it was common to take a file to a bit to clean it up. On a my cheap old Antex soldering iron I still do it occasionally however once you start doing that its a one way street you remove and protective coating and have to keep doing it. It is very likely filing the bit will help but you only need clean up the tip. Once clean immediately re tin it, which just means heating it up and putting a dab of solder on it and then whipping the solder off.

    If you are using the soldering iron to transfer solder you are doing it wrong. You are heating up the solder unnecessarily which allows the surface of the blob of solder to oxidize and prevent it from sticking. The soldering iron heats the joint the hot joint melts the solder. You start the process by having a light covering of solder on the tip of the bit. If the solder bobbles and rolls off the tip of the bit the bit is dirty but you only need keep the business end of the bit that touches the components clean.


  • Registered Users Posts: 31,017 ✭✭✭✭Lumen


    Thanks GinSoaked, this guidance is invaluable!

    OK, this is what it looks like right now before cleanup, and my shoddy work (this is one of the least awful examples!).

    image.png


    image.png


  • Closed Accounts Posts: 1,049 ✭✭✭GinSoaked


    Oh dear!

    Soldering Iron >>>>>>>>>>>>>>>>>>>>>>>>>>>>>>>>>>>>>>>>>> Bin, you can't learn to solder using that but you could solder with it if you had a decent technique.

    Pre tin the wires! Heat the stripped back wire with the soldering iron then flow some solder into it. Then apply the wire already full of solder to the contact and heat the wire allow the solder to melt from the wire onto the contact and when you can see a surface tension effect pulling the solder across the contact remove the heat.

    I'd also pre tin the contact pads and or give them a coat of flux. With a crap soldering iron bit like that you can still tin the wires and heat the wire so consider just flux on the contact pads if the joints don't work out as they should.

    The process to tin the bare wire and make the joint can almost be one movement so the wire is still warm, about 10 seconds for the process to make the joint say 20 if you include stripping the wire and twisting the ends.

    And a final point for emphasis keep whatever part of the soldering iron you are heating the joint clean with a light covering of solder.


  • Registered Users Posts: 2,637 ✭✭✭brightspark


    Lumen wrote:
    On sober overnight reflection I think my main problem is the conical bit I have. The solder seems to get drawn up from the tip on to the fat part, and so I can't actually use the tip to deposit any solder.


    You don't use the iron to deposit solder, you use it to heat the parts that need to be joined. (Being "wet" with solder assists the heat transfer).


  • Registered Users Posts: 827 ✭✭✭autumnalcore


    That soldering iron is apalling but unless you're planning on doing this sort of thing regularly a 25w antex style iron is more than sufficient. If you want to spend more I would just get one of the chinese t12 hakko knockoffs tips are dirt cheap on aliexpress.

    If I was going to spend £130 I'd look out for an old metcal with tips and accessories, mine is about 20 years old did 13 of that 24/7 in a factory I worked in.


  • Closed Accounts Posts: 1,049 ✭✭✭GinSoaked


    That soldering iron is apalling but unless you're planning on doing this sort of thing regularly a 25w antex style iron is more than sufficient. If you want to spend more I would just get one of the chinese t12 hakko knockoffs tips are dirt cheap on aliexpress.

    If I was going to spend £130 I'd look out for an old metcal with tips and accessories, mine is about 20 years old did 13 of that 24/7 in a factory I worked in.

    I've just about worn out my 40 year old old Antex soldering iron and was thinking of replacing it recently. I rarely do any soldering now but when I do its quicker to grab the old Antex than it is to plug in my chinese variable temperature soldering station which takes up too much precious work space and then needs to be put away after. I was thinking about a Weller W 61 Soldering Iron because I used to have the older W 60 but really can't justify the cost and will problably get the Antex linked below to keep handy in my electrical tool box.

    If buying something like this https://www.amazon.co.uk/Antex-S582470-XS25-Soldering-yellow/ then I also recommend getting a stand like this https://www.amazon.co.uk/Antex-H400020-ST4-Bench-Stand/dp/B002GMN64C/


  • Registered Users Posts: 827 ✭✭✭autumnalcore


    GinSoaked wrote: »
    I was thinking about a Weller W 61 Soldering Iron because I used to have the older W 60 but really can't justify the cost and will problably get the Antex linked below to keep handy in my electrical tool box.

    I never understood the weller fat, heavy, unwieldy cable and burns the hands off you after its been on for a couple of hours. 60w is too much for a lot of work.


  • Closed Accounts Posts: 1,049 ✭✭✭GinSoaked


    I never understood the weller fat, heavy, unwieldy cable and burns the hands off you after its been on for a couple of hours. 60w is too much for a lot of work.

    Would never use that sort of soldering iron for very long. But its a handy size for the electrical tool box if you want one tool that can tackle a lot of types of work when away from the bench.

    For the OP it would be overkill by a long way but would still do the job. All he has to do really is tin a lot of wires and then heat them for a few seconds to solder them to the LED circuit boards.

    Funny you should say "burns the hands off you" as my old W60 was "retired" after it nearly burnt the house down :o . Not sure what finally went wrong with it but after a couple of minutes plugged in it would get too hot too hold and when I checked it out with a view to repairing it there was nothing but a blackened mess inside the handle.


  • Registered Users Posts: 4,947 ✭✭✭Padre_Pio


    Lumen wrote: »
    Thanks GinSoaked, this guidance is invaluable!

    OK, this is what it looks like right now before cleanup, and my shoddy work (this is one of the least awful examples!).

    I don't want to even see the most awful ones:eek::eek:.

    First off, don't even think of using those Aldi "straight to the wall" soldering irons. They're only fit for plumbing and the bin.

    Any soldering station with temp control would do the trick. I have two of these: https://ie.farnell.com/tenma/21-10115-uk/soldering-station-60w-220v-uk/dp/2064549 they do the job just fine (BTW price is ex.VAT).
    Something like this would be light years better than what you have: https://uk.banggood.com/110-265V-967-Power-Electric-Soldering-Station-SMD-Rework-Welding-Iron-Holder-Set-p-1262788.html?rmmds=category&cur_warehouse=CN

    Buy a 1.5 chisel tip. More than 1.5 is bigger than your pad size and difficult to place. Chisels put down more heat than round ones. I don't know why round ones are the default in all soldering irons.
    Buy some 0.5mm solder. Solder more than 0.5mm is hard to control how much you're feeding in.
    Buy the brass wool tip cleaner, far better than the sh*te yellow sponges.

    A good workman never blames his tools, but I definitely blame yours.

    Watch this if you're in any way interested in this kind of work: https://www.youtube.com/watch?v=J5Sb21qbpEQ


  • Advertisement
  • Registered Users Posts: 5,367 ✭✭✭DublinDilbert


    As per above a cheap 25w antex soldering iron will do that job just fine.

    If you want to spend a bit more RS have their own brand ones, plus sell all the bits
    https://ie.rs-online.com/mobile/p/soldering-stations/1611962/


  • Registered Users Posts: 23,320 ✭✭✭✭ted1


    Lumen wrote: »
    I'm currently attempting to solder some 24V LED strips.

    The contacts are tiny and close together, and the combination of my crappy cheap soldering iron and no skill is proving very frustrating.

    I've about 90 connections to solder and have only done about a third, and am losing the will to live.

    Will a decent soldering set up help? Specifically, a choice of tips, temperature control, liquid flux and flux cleaner, and some clamping setup?

    Are there shops around Dublin or Wicklow that sell this stuff? I checked the usual suspects (Screwfix, builders providers, Woodies, McQuillans) but could only find very basic ones with no temperature control.

    Or do I just need to practice?

    You know you can get connection blocks that basically Snap on ?

    LitaElek 10pcs 4 Pin LED Connector for 10mm Wide RGB 5050 Flexible LED Strip Light Solderless RGB LED Ribbon LED Tape Light Connector Adapter https://www.amazon.co.uk/dp/B01EJG83KE/ref=cm_sw_r_cp_api_i_tr3fFbZGPJ9W2

    Also how long will the strip be? You’ll. need a decent power supply. Maybe you are using the wrong lighting. What’s the end purpose?


  • Registered Users Posts: 23,320 ✭✭✭✭ted1


    Lumen wrote: »
    Thanks GinSoaked, this guidance is invaluable!

    OK, this is what it looks like right now before cleanup, and my shoddy work (this is one of the least awful examples!).

    image.png


    image.png

    That gauge cable is horrible, cat 5 should be well up to the job


  • Registered Users Posts: 751 ✭✭✭Roadtoad


    Granddad:

    Heat the work, not the solder.
    Practice.


  • Registered Users Posts: 31,017 ✭✭✭✭Lumen


    ted1 wrote: »
    You know you can get connection blocks that basically Snap on ?

    LitaElek 10pcs 4 Pin LED Connector for 10mm Wide RGB 5050 Flexible LED Strip Light Solderless RGB LED Ribbon LED Tape Light Connector Adapter https://www.amazon.co.uk/dp/B01EJG83KE/ref=cm_sw_r_cp_api_i_tr3fFbZGPJ9W2

    Also how long will the strip be? You’ll. need a decent power supply. Maybe you are using the wrong lighting. What’s the end purpose?

    I have those connectors. They don't really work with that strip. Hence the soldering attempt! Also I am running them through studs and want the lighting flush, and the connectors are wider than the alu profile internal diameter.

    I have a 300W power supply. The LED strips are 20W/m. There will be 10m.

    While dithering about soldering and waiting on a quote for a Hakko I did this. It's not ideal as the LEDs are on inside the stud.

    The dimming isn't clear due to exposure compensation on my phone.


  • Registered Users Posts: 31,017 ✭✭✭✭Lumen


    ted1 wrote: »
    That gauge cable is horrible, cat 5 should be well up to the job

    As far as I can tell cat 5 uses 0.5mm (0.2mm2) wires. Is that sufficient to be taking 24V @ 5A? I guess it depends on the distance.


  • Closed Accounts Posts: 1,049 ✭✭✭GinSoaked


    Lumen wrote: »
    As far as I can tell cat 5 uses 0.5mm (0.2mm2) wires. Is that sufficient to be taking 24V @ 5A? I guess it depends on the distance.

    First of all are you really using 120 Watts of power on one cable?

    Secondly I always associate cat 5 with a 0.5 Amp current capacity per conductor. Checking online indicates its a little higher than that but not much.

    Certainly that cable in the picture is way to big for one LED. I suspect you could run more cables and split the lamps into say 4 groups and use thinner cable 1mm2 assuming your current plan is powering them one off each other in one group?


  • Registered Users Posts: 31,017 ✭✭✭✭Lumen


    GinSoaked wrote: »
    First of all are you really using 120 Watts of power on one cable?

    Yes. This is the product:

    https://www.hiline-lighting.co.uk/gb/tunable-white-led-tape/562-tunable-white-led-strip-120-2in1-ip00-5060440713859.html

    It comes in a 5m reel. As far as I can tell these products are usually designed to cope with at least the supplied length connected without splitting.

    That's why I'm using 24V, it keeps the current to 5A.
    GinSoaked wrote: »
    Secondly I always associate cat 5 with a 0.5 Amp current capacity per conductor. Checking online indicates its a little higher than that but not much.

    Certainly that cable in the picture is way to big for one LED. I suspect you could run more cables and split the lamps into say 4 groups and use thinner cable 1mm2 assuming your current plan is powering them one off each other in one group?

    My original plan was to cover the 5m with 8x50cm strips, and connect those strips in series with the wires in my original pic. That would mean there were no live LEDs inside the studding.

    The strip shown in the video above is continuous, with live LEDs inside the 10mm hole I drilled into the stud (well, it's a rafter, but whatever). It's not ideal, but the extra heat will probably just cause the LEDs in the stud to fail prematurely in which case the problem solves itself.

    I could wire them in parallel but that would mean I'd end up with a wiring loom, and that's messy and besides, these LED strips are supposed to be fine in series at those lengths without too much voltage drop.

    edit: when I'm done with the two 5m strips I should get somewhere around 12,000 lumens of output, which sounds ridiculous but the indirectness of bouncing off the ceiling makes it tolerable and useful. It's daylight brightness, more or less.


  • Registered Users Posts: 4,947 ✭✭✭Padre_Pio


    ted1 wrote: »
    That gauge cable is horrible, cat 5 should be well up to the job

    The cable is fine, the soldering job makes it look worse than it is.
    Wouldn't put 5A through CAT5 (although prob rare you'll run at 5A continuous)

    If you soldered the wires properly, then stick on a dab of hot glue you'll be laughing.


  • Advertisement
  • Registered Users Posts: 31,017 ✭✭✭✭Lumen


    Great, so I've ordered a RS soldering station, 0.5mm 63/37 solder and this handy little workstation.

    https://ie.rs-online.com/web/p/soldering-accessories/1466439/?sra=pstk
    Padre_Pio wrote: »
    Watch this if you're in any way interested in this kind of work: https://www.youtube.com/watch?v=J5Sb21qbpEQ

    Finally, decent soldering videos!


Advertisement