Advertisement
If you have a new account but are having problems posting or verifying your account, please email us on hello@boards.ie for help. Thanks :)
Hello all! Please ensure that you are posting a new thread or question in the appropriate forum. The Feedback forum is overwhelmed with questions that are having to be moved elsewhere. If you need help to verify your account contact hello@boards.ie
Hi all! We have been experiencing an issue on site where threads have been missing the latest postings. The platform host Vanilla are working on this issue. A workaround that has been used by some is to navigate back from 1 to 10+ pages to re-sync the thread and this will then show the latest posts. Thanks, Mike.
Hi there,
There is an issue with role permissions that is being worked on at the moment.
If you are having trouble with access or permissions on regional forums please post here to get access: https://www.boards.ie/discussion/2058365403/you-do-not-have-permission-for-that#latest

Arcade Talk 24/7/365

199100102104105151

Comments

  • Moderators, Category Moderators, Computer Games Moderators, Society & Culture Moderators Posts: 34,633 CMod ✭✭✭✭CiDeRmAn


    Would anyone have an egret 2 or egret 3 2L12B panel with a layout like the one below?

    Would anyone strip the panel down and take some measurements or else entrust it to me via parcel motel to let me do it? I'd pay costs obviously.

    I have a small project in mind but dimensions of this panel type don't see to be on the net.

    Open to ideas and alternatives.

    Thanks for reading!

    sell-e3p1.jpg

    FFS!!


  • Registered Users, Registered Users 2 Posts: 8,885 ✭✭✭Steve X2


    Would anyone have an egret 2 or egret 3 2L12B panel with a layout like the one below?

    Would anyone strip the panel down and take some measurements or else entrust it to me via parcel motel to let me do it? I'd pay costs obviously.

    I have a small project in mind but dimensions of this panel type don't see to be on the net.

    Open to ideas and alternatives.

    Thanks for reading!

    sell-e3p1.jpg

    That's the exact one I've got in my E3. €1000 euro for me to take it out of the cab and measure. Free if you want me to measure it while installed :)


  • Registered Users, Registered Users 2 Posts: 2,920 ✭✭✭TechnoFreek


    CiDeRmAn wrote: »
    FFS!!

    Why? I know it's a big request! Trying to get a panel fabricated and I need some dimensions.


  • Moderators, Category Moderators, Computer Games Moderators, Society & Culture Moderators Posts: 34,633 CMod ✭✭✭✭CiDeRmAn


    Why? I know it's a big request! Trying to get a panel fabricated and I need some dimensions.

    I know, I be joking....
    Plus, if you are fabricating one, sure how easy would it be to make two!
    One for a certain Category Mod hereabouts.... :o


  • Registered Users, Registered Users 2 Posts: 35,259 ✭✭✭✭o1s1n
    Master of the Universe


    I can hear Retr0's newest GnG excuse on the horizon

    'It was the two player panel! it puts player 1 too far to the left and then you can't see the screen properly - you wouldn't get this on an original Capcom machine!'


  • Registered Users, Registered Users 2 Posts: 2,920 ✭✭✭TechnoFreek


    Steve X2 wrote: »
    That's the exact one I've got in my E3. €1000 euro for me to take it out of the cab and measure. Free if you want me to measure it while installed :)

    Do you not have a second one in the attic somewhere :pac:


  • Registered Users, Registered Users 2 Posts: 2,920 ✭✭✭TechnoFreek


    Spotted in the kids playroom in Druids Glen hotel today. Running icade. Joysticks in sh1te.

    IMAG1412_zpsnrdc8imv.jpg


  • Posts: 0 [Deleted User]


    Finally got a chance to make a start stripping the outrun cabaret I picked up a while back on adverts, good news is it still had an outrun pcb in there which is powering up but cant tell beyond that. Bad news is everything else! The cab is in a pretty bad state, lots of rung screws, rusted bolts, fag burns, lumps of plastic missing, chunks of wood missing, dirt, muck, piss, the full works!!. Soldered back on the video connector on the chassis as it had fallen off but no neck glow, checked voltages/fuses and all seems good so pulled the chassis out and its with Grant at the moment.

    Also sent the PCB to mark at retroclinic for a once over and the enhanced roms installed providing the board is good/repairable. I noticed when I picked it up that the wheel seemed to be upside down, after drilling out the ridiculously huge bolts someone had deemed an appropriate manner of mounting the dash I discovered the entire steering mech had been replaced at some stage with one from a taito cab, solonoid from the original was still in place but nothing for it to hit so no thumper. On the plus side the steering itself seems fine and springs back as it should so it'll probably be left as is only turned around the correct way.

    Gear stick was also missing the spring so that and a start button and a few other parts have been ordered from arcadefixit. In the meantime I've stripped and bleached the cab, and began reassembling the power tray and cleaning as I go along. This one is going to take some serious work and time but i'am almost finished my current project and have a shed going up soon so hopefully will get some work done on it. Cant touch the paint on the side without it coming off and its pretty bad so will have to be sorted. Contacted a guy in the states who reproduces vinyl sideart but at $250 that wont be happening, muddy says his working on it at the moment though so for now I've ordered matte black vinyl from thisoldgame and will overlay vinyl sideart when he gets it done or maybe try vector it myself.

    Currently it almost stripped and I'll be getting the metalwork sandblasted and powdercoated in a few weeks, in the meantime ill be filling and sanding the cabinet. Will try fiberglass and p-38/dolphin glaze to repair the dash plastics as much as possible, ive gotten the color code from a guy on J+ and will get a paint sorted for it. The marquee was just a supersprint one that had been chopped in half to replace the original... oh the marquee light works too :)

    Some pics as it currently stands:

    2yovcky.jpg

    2e5s485.jpg

    20t3voy.jpg

    Held in place with these...

    6z5xu1.jpg

    Cigarette burns :(

    25057hi.jpg

    But hey its Outrun :)

    zvwshj.jpg

    opmyqd.jpg


  • Registered Users, Registered Users 2 Posts: 5,783 ✭✭✭eddhorse


    Great stuff Mozie, gonna be a lot of work by the sounds of it !
    Look forward to seeing more.


  • Posts: 7,499 ✭✭✭ [Deleted User]


    Super jealous of that project.
    I'm going to express my interest if you ever want to sell it or loan it to me.......!!!!


  • Advertisement
  • Registered Users, Registered Users 2 Posts: 35,259 ✭✭✭✭o1s1n
    Master of the Universe


    Exciting to see a dedicated cab being refurbished like this, especially something with such a nice Sega seal on it :) - good luck!


  • Posts: 7,499 ✭✭✭ [Deleted User]


    whats that hiding behind the outrun Mozie ;)


  • Posts: 0 [Deleted User]


    whats that hiding behind the outrun Mozie ;)

    Haha well spotted, current project mate, waiting on a final couple of bits ;)


  • Registered Users, Registered Users 2 Posts: 1,835 ✭✭✭geotrig


    is it being left as Initial d or converting ? great game :cool:


  • Posts: 0 [Deleted User]


    Being left, too much gone into it and yes it is a great game, particularly suitable for a home game :)


  • Registered Users, Registered Users 2 Posts: 5,783 ✭✭✭eddhorse


    Good spot, Initial D?
    You cant hide anything with all the Sherlocks around.


  • Registered Users, Registered Users 2 Posts: 5,783 ✭✭✭eddhorse


    Astro playing blind, dammit.
    May get the multimeter out !!


  • Posts: 0 [Deleted User]


    Get ready....

    Spent the last few weeks with the outrun mini, lots of screws and bolt deliveries because not one bolt or screw taken out will be going back in. Metal plates at the bottom of the cab were horrendous, while some screws fell out others wouldn't budge, i ended up getting a set of screw extractors for these and finally the bottom plates popped off only to reveal that both corners didn't exist anymore and one of the side had broken off completely and was only being held in by the screws of the metal side piece. The wood here and at the bottom of the rear of the cab was in pretty poor shape overall and it was obvious it had stood in water at some stage. I grinded out and treated the rotted wood and used a combination of epoxy, gorilla glue and a recessed metal strap to reattach the broken piece and filled it out with p38/dolphin glaze.


    QosjbAvm.jpg

    The corners were also rebuilt using epoxy/p38 and knifing putty combo along with a multitude of other holes and missing chunks throughout the cab. Then came the sanding, as the weather hasnt been great it took a few days getting it done whenever a dry spell hit, I took the opportunity to sand and spray the power supply plate, the speaker and fan grills, the metal pcb holder on the back door and the service panel as I could do these in the house, these were caked in rust but eventually I got through them with the sander. I also repainted the rear of the cab and a few times with a matte black and cleaned the rear monitor cover.

    DfrNt51m.jpg

    YVS5kb0m.jpg

    tIqYpwkm.jpg

    The stenciled art is really nice of these but this one was pretty dinged up and beyond repair so I decided to apply a thick matte vinyl to the outside rather than spraying as I've used this before with success and it will make applying sideart easy should it turn up in future. The major problem with vinyl is it will pick up any tiny spec of dust underneath though so after extensive sanding I henried the cab, wiped it off with alcohol a few times, microfibre cloth and applied the vinyl. The finish turned out really well once the prep work is done, I could never have gotten a similar finish with paint without the proper tools and workspace, after cutting the grooves in the corners with a dremel, a little more sanding and some spraying the cab was ready for t-moulding. After the last cab I restored I swore I'd never be without a rubber mallet again and thought I'd finally get to use but as is always the case I didn't need to at all this time. The slot was a nice tight fit for the moulding and it went on with minimal fuss. I fitted the moulding first checking out any problem areas and nicked the tight corners where necessary and widened the slot in some parts before using the glue gun on areas where it was a bit loose.

    g6Kc6vum.jpg

    FJ18kAtm.jpg

    Kx1QNMHm.jpg

    Also noticed this months retrogamer was an outrun speacial so decided to pick it up, not sure the last time I bought a magazine?
    srsECS3m.jpg

    I also cut rubber matting I sourced locally for the footwell, I opted for the grey ribbed matting to match the flyer as I think it adds some color to the bottom of the cab, I used contact adhesive to stick it down and let it cure over night. The little wood block for the accelerator pedal was hanging off and held on with a long staple so I removed it and counter sunk a bolt and washer, filled, sanded, painted it. I used a holesaw on the bottom of the cab so I could put a nut and washer on the underside and this should prevent it from moving again. This will be covered with the bottom plate when it returns from powdercoating. I replaced the fan on the back which was no longer working but its probably not necessary, I also put a new led lighting strip in to replace the old fluorescent one.

    tMlTKU3m.jpg
    puDzhJil.jpg
    McOhxRBl.jpg
    iXW0gxwl.jpg
    nrY3OQml.jpg

    In the meantime the chassis had come back from repair as had the game board. Grant had replaced a load of caps, load resistor and bridge rectifier, Mark at retroclinic had repaired the audio on the board, fixed a math error in the road and installed the enhanced roms for me. These allow for attract mode to run in freeplay and music to be previewed in the music select screen, high scores to be saved to backup ram and a few other fixes. In the meantime I had pulled out a spare 19" monitor and done some work on it myself in case a spare was ever needed and I'd been putting it off for a while, I had the picture looking pretty good but couldn't get the screen to stop wobbling, I thought the problem was probably beyond me so I put it to one side and put the chassis I had repaired back on the tube. Picture was lovely here but again it was still wobbling? seemed to be a sync issue but I couldn't have the same issue with 2 monitors surely, one of which had just been repaired?!? After a few hours of hairpulling I finally determined it was down to a dodgy transformer on the power tray. I don;t know why but this transformer made the screen wobble even from a distance, I replaced the transformer with another sega one and the wobble was thankfully gone on both monitors! Least I now have a spare if ever needed.

    After replacing the transformer and cleaning the power tray I hooked up the pcb for test spin on the floor and was delighted to see the game boot up, but there was no sound, speakers were completely dead so I guessed the amp was at fault. The amp requires 12v so after checking voltages at the amp I discovered it was only getting a couple of volts from the big 22000uf capacitor. I cleaned the connections but still nothing, after poking around with the multimeter I discovered the connections of the cap were bad so I cleaned it off, resoldered the wires and bang the audio was back. I then played a couple of games on the floor and had a listen to magical sound shower!! unfortunately the problem reappeared the next day and the capacitor again only seemed to be received a couple of volts from the transformer. At this stage I decided to get rid of the worn old power supply and replace it with a new switcher, this had the added benefit of being able to wire up the 12v required by the amp directly from the switcher and bypass the capacitor entirely. The original power supply only outputs 5v. Sound was back! I replaced the speakers with ones suggested over on J+

    lm1esuXl.jpg


    Next up was the Shifter, it was in a pretty bad state, spring had gone so it was loose and hung in high gear, lots of rust on the stick and artwork damaged beyond repair. I dissasembled it entirely, dealing with a roll pin that would not shift and cleaned it up. I sanded the shaft and the metal shifter plate and drew up replacement artwork and got it printed and applied. The springs and ball bearings for the shifter had arrived in the meantime and made the stick snap back into place as it should and another job is done. Getting there now...

    4bvEzYtm.jpg

    Next up I'am going to start reassembling the cab while waiting for the metal work, accelerator pedal is also off being welded as the hinge was snapped off and I'am still on the lookout for a monitor shroud and an outrun wheel. I also need to start repairing the control panel cover and fill the holes.


  • Moderators, Computer Games Moderators Posts: 5,390 Mod ✭✭✭✭Optimus Prime


    This is some amazing restoration skills ! I can't believe that's the same cab from that guys garage !


  • Advertisement
  • Registered Users, Registered Users 2 Posts: 3,725 ✭✭✭The Last Bandit


    Top class work, looks fantastic !!


  • Registered Users, Registered Users 2 Posts: 5,783 ✭✭✭eddhorse


    Great work and a great read,

    I also have a rubber mallet i have only used once, super effort, shame about the power supply but what can you do.


  • Closed Accounts Posts: 33,733 ✭✭✭✭Myrddin


    Well done on this, fantastic work & top quality


  • Registered Users, Registered Users 2 Posts: 2,920 ✭✭✭TechnoFreek


    Top class work. Love seeing the results with this sort of effort


  • Registered Users, Registered Users 2 Posts: 2,920 ✭✭✭TechnoFreek


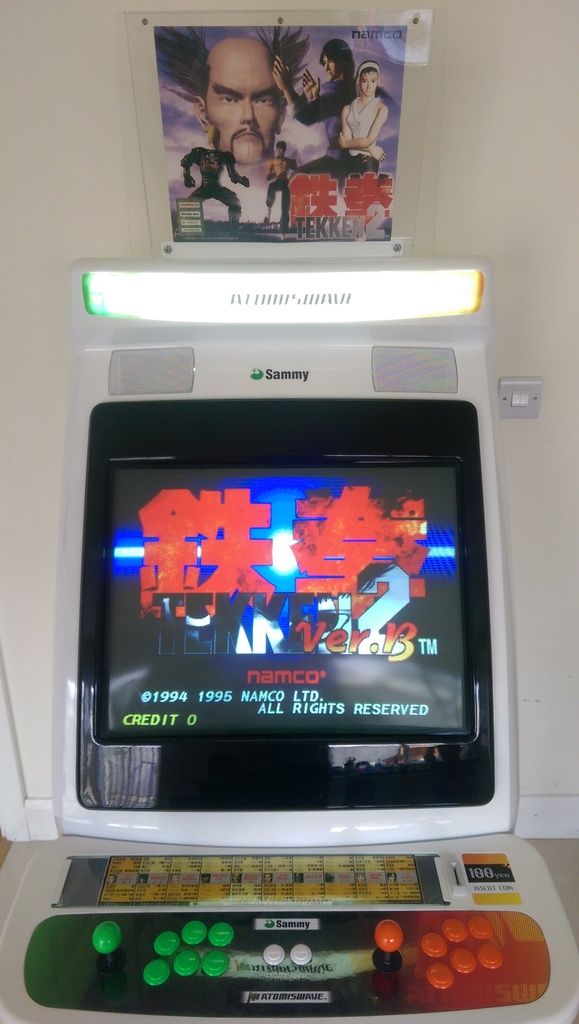
    Put up the tekken 2 marquee and instruction/move strip.

    Kind of neat of having them matching a game.
    Feels complete!

    IMG_20160704_184458_zpsajm8yvhe.jpg


  • Registered Users, Registered Users 2 Posts: 5,783 ✭✭✭eddhorse


    Minty fresh ! Looks great.


  • Advertisement
  • Posts: 0 [Deleted User]


    Still waiting on bits back from coating should be early next week, in the meantime I sanded, cleaned and sprayed the coin inserts metallic silver, keeping in line with the flyer. One of the inserts was silver but the rest were black strangely. Also sanded and painted the bolts for the pedal assembly as I couldnt find a suitable replacement online.

    Vexubf6m.jpg

    Then I moved onto the bottom section rubber retainer and the brake pedal, some people have gone as far as to get these chromed but its pretty expensive and unnecessary im my opinion. Once I got most of the powdercoating coating off (paintstripper is great for this!) I began sanding at 80 to get rid of any pitting and worked by way up to 2500 and finished it off with a polishing pad and autosol. Very time consuming but worth it to get it right. Other pedal will get the same treatment when I get it back from welder.

    5L9jWYqm.jpg

    20o4QAdm.jpg


  • Posts: 7,499 ✭✭✭ [Deleted User]


    Nice!
    This deserves its own thread.


  • Posts: 0 [Deleted User]


    Nice!
    This deserves its own thread.

    Thanks, coming along now. Most of innards back in the cab too, heres a quick video of it running.


  • Registered Users, Registered Users 2 Posts: 30,123 ✭✭✭✭Star Lord


    Dat ratchetting...


  • Posts: 0 [Deleted User]


    Star Lord wrote: »
    Dat ratchetting...

    Lol true. Thumper motor not hooked up yet but I may leave it disconnected, it's very loud...


  • Advertisement
  • Registered Users, Registered Users 2 Posts: 5,783 ✭✭✭eddhorse


    Looks great Mozie, super finish on those pedals!


  • Moderators, Computer Games Moderators Posts: 10,487 Mod ✭✭✭✭Andrew76


    Yeah looks and sounds great! Nice work indeed.


  • Registered Users, Registered Users 2 Posts: 4,146 ✭✭✭CathalDublin


    29p2ng8.jpg
    Moving house and started taking out my arcade boards to put into storage for a couple weeks, I've a lot more than I thought, my missus thinks I should be in one of those programmes about hoarding and that's not all of them either, I've a few more hidden around the apartment!

    I'm not selling any of them before ye ask!


  • Registered Users, Registered Users 2 Posts: 5,783 ✭✭✭eddhorse


    Maybe selling them would be a better idea. Your missus is right, hoarder.


  • Registered Users, Registered Users 2 Posts: 35,259 ✭✭✭✭o1s1n
    Master of the Universe


  • Posts: 7,499 ✭✭✭ [Deleted User]


    o1s1n wrote: »

    I think Dr Qurkies has one bitd


  • Registered Users, Registered Users 2 Posts: 5,783 ✭✭✭eddhorse


    o1s1n wrote: »

    Thats deadly, what games could you play on that?


  • Registered Users, Registered Users 2 Posts: 35,259 ✭✭✭✭o1s1n
    Master of the Universe


    Had a bit of a brainwave this evening with the RunDMD.

    I took the whole thing apart and reseated everything just in case, nope, definitely dead pixels.

    Cursing the fact that I got so unlucky in that the dead pixels are right in the bloody middle, I thought the only solution was to send it off to be fixed.

    'Wait a minute, what if I reverse the panels????'

    And it worked! The two lines of dead pixels are now no longer in the middle of the image, making it unusable, they're on the very edge on each side. Which pretty much makes them unnoticeable!


  • Registered Users, Registered Users 2 Posts: 8,885 ✭✭✭Steve X2


    o1s1n wrote: »
    Had a bit of a brainwave this evening with the RunDMD.

    I took the whole thing apart and reseated everything just in case, nope, definitely dead pixels.

    Cursing the fact that I got so unlucky in that the dead pixels are right in the bloody middle, I thought the only solution was to send it off to be fixed.

    'Wait a minute, what if I reverse the panels????'

    And it worked! The two lines of dead pixels are now no longer in the middle of the image, making it unusable, they're on the very edge on each side. Which pretty much makes them unnoticeable!

    Just got the final bits for my RunDMD the other day. Looks deadly I must say, but man I need a case for it.
    Decided I prefer the green colour rather than orange(my panels do red, green and orange).


  • Registered Users, Registered Users 2 Posts: 35,259 ✭✭✭✭o1s1n
    Master of the Universe


    Steve X2 wrote: »
    Just got the final bits for my RunDMD the other day. Looks deadly I must say, but man I need a case for it.
    Decided I prefer the green colour rather than orange(my panels do red, green and orange).

    Is FrancoB still doing those cases? Couldn't recommend it enough, top quality stuff.


  • Advertisement
  • Registered Users, Registered Users 2 Posts: 8,885 ✭✭✭Steve X2


    o1s1n wrote: »
    Is FrancoB still doing those cases? Couldn't recommend it enough, top quality stuff.

    No :(

    I have the plans for the new cases, but finding it hard to get someone to laser cut the acrylic for me.

    http://run-dmd.com/product/svg-files-for-the-updated-j_m_-frame


  • Posts: 7,499 ✭✭✭ [Deleted User]


    Steve X2 wrote: »
    No :(

    I have the plans for the new cases, but finding it hard to get someone to laser cut the acrylic for me.

    http://run-dmd.com/product/svg-files-for-the-updated-j_m_-frame

    Remind me tomorrow I'll do it for you.
    I've got 3mm clear acrylic


  • Registered Users, Registered Users 2 Posts: 8,885 ✭✭✭Steve X2


    Remind me tomorrow I'll do it for you.
    I've got 3mm clear acrylic

    Cool :)
    Can you laser cut the holes as well?


  • Registered Users, Registered Users 2 Posts: 4,146 ✭✭✭CathalDublin


    Remind me tomorrow I'll do it for you.
    I've got 3mm clear acrylic

    I need one of these in my life, if you are buying parts to build one count me in and cut me some acrylic too:eek:


  • Posts: 7,499 ✭✭✭ [Deleted User]


    Steve X2 wrote: »
    Cool :)
    Can you laser cut the holes as well?

    Just had a quick look at the drawing.
    Its a silly format.
    I converted to a .dxf but some of the drawing went missing.:confused:


  • Registered Users, Registered Users 2 Posts: 8,885 ✭✭✭Steve X2


    So, another option, I got a quote from someone who can do these. He’s based in Kilkenny and has gone over the files and given a basic price. He says as it’s a small run it will be about 60 euro total to get the front and back done. If I get two sets cut it will be less than 100 total and the more I add on the better the price.
    I was actually talking to him on the phone and he seems decent. There’s also the option to get a logo or some text etc engraved. He can do the back panel in black and the front in clear(no smoke option for the front unfortunetly).

    http://circlelasersigns.com/


    Now I just need to see what’s the best thickness for the acrylic, 3-4-5-8mm seem to be the options. I’m guessing 4 or 5mm is a decent thickness for the front and maybe the same for the back.

    o1s1n , how thick is the francob case/holder?


  • Posts: 7,499 ✭✭✭ [Deleted User]


    4 or 5mm is way too thick imo.
    Hang on,I'll take another look.
    I can do it for way cheaper!!!!
    and do the logo/text etc


  • Registered Users, Registered Users 2 Posts: 3,725 ✭✭✭The Last Bandit


    Any decent (cheap) PAL shmups/arcadey stuff for the Xbox 360 on disc ? I've a jammacon interface I want to test but no XBLA access for the digital stuff.


  • Registered Users, Registered Users 2 Posts: 8,885 ✭✭✭Steve X2


    4 or 5mm is way too thick imo.
    Hang on,I'll take another look.
    I can do it for way cheaper!!!!
    and do the logo/text etc

    Yeah check it out and see what you can do. I'm not sure what the thickness should be really. Maybe o1s1n can check his francob one as thats meant to be awesome.


  • Advertisement
  • Registered Users, Registered Users 2 Posts: 35,259 ✭✭✭✭o1s1n
    Master of the Universe


    The FrancoB one is pretty thick, I'd say it's about 4-5mm. It's so thick that I use it as a standing clock rather than a wall mounted one.

    Will check this evening when I get in from work :)


Advertisement