Advertisement
If you have a new account but are having problems posting or verifying your account, please email us on hello@boards.ie for help. Thanks :)
Hello all! Please ensure that you are posting a new thread or question in the appropriate forum. The Feedback forum is overwhelmed with questions that are having to be moved elsewhere. If you need help to verify your account contact hello@boards.ie

Enterprise Dinghy

  • 02-10-2012 08:52AM
    #1
    Registered Users, Registered Users 2 Posts: 1,313 ✭✭✭


    I had a thread up here looking for advice on buying a dinghy.....well I just bought a very cheap old wooden enterprise dinghy.
    It needs some work but it seems to be all there.

    I have a few questions I hope some of you can answer.

    Firstly it has been outdoors for some time and suffered slightly as a result. The ply on the bow where it meets either side is wet and a little soft, the same in a few patches where the gunwale meets the ply.
    The softness/wetness dosnt seem to go all the way through the ply, just maybe the outside layer of ply (I scraped off the soft bit)
    There also seems to be a soft patch on the floor about the size of a 10c coin.

    What the best way to treat this? Bearing in mind I'm not looking for a perfect boat, just something useable.

    The jib seems to just attach to the halyard and bow plate, there is no hanks on it, is that just another way to set it up? Or should I change it?

    Thanks


«13

Comments

  • Registered Users, Registered Users 2 Posts: 193 ✭✭ado100


    Hi Mr.Boots - congratulations on your purchase.

    I'm afraid I can't help you with the soft ply issue, I'll leave that to those on this forum with lots of experience in boatbuilding.

    On the jib issue, it isn't supposed to have hanks on it. When you hoist it, get your crew to put one foot on the bow and pull the forestay forward with all their weight while you tighten up the jib halyard. The jib in effect now becomes your forestay (while the actual forestay remains slack).

    Hope this helps.


  • Registered Users, Registered Users 2 Posts: 1,313 ✭✭✭Mr.Boots


    Ah I see.

    Another question for you....what exactly does the high field lever do?
    Thanks again


  • Moderators, Motoring & Transport Moderators, Sports Moderators Posts: 6,369 Mod ✭✭✭✭fergal.b


    It hard to tell how bad the damage is without seeing it or poking around with a screwdriver :D if it's just a small dingy I think I would replace all the ply on the boat and encapsulate it in epoxy to be on the safe side. If you want to patch it up you will have to sand away all the soft wood till you get a solid base and fill it with thickened epoxy or if it's soft right through you might have to replace a section of the ply.
    The thing with rot on boats is the more you dig the more you find so some times it's saves time and money just to replace all the ply instead of trying to patch it up and get it to look good it also gives you a chance to see what the timber is like underneath.
    If you post some photos it might give us more of an idea of how bad the damage is.
    Congrats on the boat and best of luck with her.


    .


  • Registered Users, Registered Users 2 Posts: 1,313 ✭✭✭Mr.Boots


    Can you put pics from your iPhone onto here? No idea how :)


  • Moderators, Motoring & Transport Moderators, Sports Moderators Posts: 6,369 Mod ✭✭✭✭fergal.b


    Mr.Boots wrote: »
    Can you put pics from your iPhone onto here? No idea how :)

    I think you have to upload to your computer first or to a photo site like https://www.dropbox.com/ or http://photobucket.com/


  • Advertisement
  • Registered Users, Registered Users 2 Posts: 1,313 ✭✭✭Mr.Boots


    Thanks fergal
    Is it a big job to replace lengths of ply?
    Or expencive?
    I'm reasonable at DIY but have never done anything like his before


  • Moderators, Motoring & Transport Moderators, Sports Moderators Posts: 6,369 Mod ✭✭✭✭fergal.b


    It's not too big a job:D if you can take them off in one piece and use them as a template to copy onto the new ply, I'd say your boat is 1/4 and for a sheet of 8x4 BS 1088 marine ply it would be about €30


  • Registered Users, Registered Users 2 Posts: 1,313 ✭✭✭Mr.Boots


    Ok, not to bad then. Probably just time consuming so. I have till next spring anyway......


  • Registered Users, Registered Users 2 Posts: 1,313 ✭✭✭Mr.Boots


    fergal.b wrote: »
    It's not too big a job:D if you can take them off in one piece and use them as a template to copy onto the new ply, I'd say your boat is 1/4 and for a sheet of 8x4 BS 1088 marine ply it would be about €30


    What do you mean by 1/4?


  • Moderators, Motoring & Transport Moderators, Sports Moderators Posts: 6,369 Mod ✭✭✭✭fergal.b


    Mr.Boots wrote: »
    Ok, not to bad then. Probably just time consuming so. I have till next spring anyway......

    Here is a very boring video that will bring you up to next spring :D 1/4" inch or 6mm thick plywood.


  • Advertisement
  • Registered Users, Registered Users 2 Posts: 1,313 ✭✭✭Mr.Boots


    Looks interesting.
    Where is a good source for marine ply and epoxy?
    Also if I need to replace any of the teak gunwale, where would I buy the timber?
    I'm in Wexford but Wicklow or south Dublin would suit also


  • Moderators, Motoring & Transport Moderators, Sports Moderators Posts: 6,369 Mod ✭✭✭✭fergal.b


    Mr.Boots wrote: »
    Looks interesting.
    Where is a good source for marine ply and epoxy?
    Also if I need to replace any of the teak gunwale, where would I buy the timber?
    I'm in Wexford but Wicklow or south Dublin would suit also

    I was able to get it from http://www.brooksgroup.ie/products/t...wood-products/ but i'm not sure of anywhere in Wexford. These also sell it but I'm sure you will find a place nearer to you.

    http://www.strahan.ie/tradeshop/view...p?productid=79


    http://www.chadwicks.ie/

    http://www.wallerwickham.ie/csd/index.php NOT too cheep but good stuff and they also sell epoxy but I get it cheeper from http://www.marineparts.ie/paint-and-maintenance/epoxy-repair-kits/

    http://woodworkers.ie/prices/p_sheet_plywood.shtml

    https://www.build4less.ie/index.php?cPath=397_398_687

    http://noyeks.ie/component/virtuemar...id=33&vmcchk=1


    Here is another bit of reading for you.
    http://homepage.ntlworld.com/julian.higgs/enterprise.html


  • Registered Users, Registered Users 2 Posts: 193 ✭✭ado100


    Mr.Boots wrote: »
    Ah I see.

    Another question for you....what exactly does the high field lever do?
    Thanks again

    The Highfield Lever is a mechanism for getting the last bit of tension on your jib halyard. With the hook lowered and your crew hanging out of the forestay, you should be able to pull the jib halyard through enough to see a loop which goes on to the Highfield Lever hook. Once that is done, get your crew to give one more pull on the forestay and you should be able to lock the lever up, your rigging is now bar tight (except for the forestay which is only there to support the mast when you're not sailing). The various slots on the Lever are to allow tension variations for different wind conditions - lighter wind = loser - heavier wind = tighter.


  • Closed Accounts Posts: 5,105 ✭✭✭pedroeibar1


    fergal.b wrote: »
    It hard to tell how bad the damage is without seeing it or poking around with a screwdriver :D if it's just a small dingy I think I would replace all the ply on the boat .

    Heheheh:D. A bit like 'Here's a button, can you sew a shirt around it?'
    If it is a winter project make sure that you have heatable space/workshop as the epoxy takes ages to set at cold temperatures. (Mrs. Boots might not like her dining room converted to a boatshed)


  • Registered Users, Registered Users 2 Posts: 1,313 ✭✭✭Mr.Boots


    fergal.b wrote: »
    It hard to tell how bad the damage is without seeing it or poking around with a screwdriver :D if it's just a small dingy I think I would replace all the ply on the boat .

    Heheheh:D. A bit like 'Here's a button, can you sew a shirt around it?'
    If it is a winter project make sure that you have heatable space/workshop as the epoxy takes ages to set at cold temperatures. (Mrs. Boots might not like her dining room converted to a boatshed)

    Yea it's a big garage with a space heater.
    Id say Mrs.Boots is happy to have Mr.Boots out from under her feet for a few hours each evening.


  • Registered Users, Registered Users 2 Posts: 158 ✭✭Talent


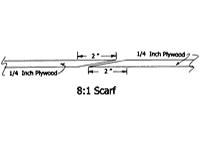
    In general Fergal is right about resheeting the boat if timber deterioration is extensive but in my experience newcomers tend to panic when they see a bit of rot or softness and they tend to think things are much worse than they are. You might probably get by with scarfing-in patches where there is softness of the plywood. I'll try to dig up a diagram showing how scarfing is done (I gave away most of my boatbuilding books but there might be something on the interweb).

    A word of warning if resheeting and that is not to strip off all the old plywood in one fell swoop. Unless you take precautions, the structure of frames and stringers will simply sag and you will be hard put to get it in shape again. The job will be done with the boat upside down and you should firmly attach all the main framework elements with softwood struts to a subframe (old two by fours, or of similar strength, screwed to the floor) to maintain the integrity of the boat.

    And let us see a photo or two with the soft patches ringed in chalk or tape.

    Also, if your gunwhale is really teak, don't panic. The stuff thrives on abuse. Mahogany, on the other hand, while quite resistant, does tend to deteriorate albeit extremely slowly and you again might get by with patching.


  • Registered Users, Registered Users 2 Posts: 158 ✭✭Talent


    chap-8-1-s.gif

    The following is a link to an item on scarfing but don't get too carried away with the technology. The late Peter Dunne of Rogerstown could pare a scarf with a sharp chisel, no jig needed, just a just good eye to get the angle right. And if the two sides don't match up perfectly like in the diagram, glue it with thickened epoxy (peanut butter consistency) and sand back when dry.


    http://www.duckworksmagazine.com/07/columns/nichols/index3.htm


  • Registered Users, Registered Users 2 Posts: 1,313 ✭✭✭Mr.Boots


    Ok so I'm going to start work on the boat.
    I've decided to reskin the whole hull. Patches would suffice but I'd rather do it properly and do the boat some justice.

    I'm not overly worried about carrying out the work even though I have never tackled anything like this before.
    My only worry is how to remove the old ply from the frame.
    I guess it's nailed and glued so what's the best way to remove it in one piece (so I can reuse it as a template)
    Heat gun?
    Hammer?
    Help!!!


  • Registered Users, Registered Users 2 Posts: 1,313 ✭✭✭Mr.Boots


    Pic of said boat....


  • Moderators, Motoring & Transport Moderators, Sports Moderators Posts: 6,369 Mod ✭✭✭✭fergal.b


    Looking at your photos the hull doesn't look too bad, I would start by removing all the hardware taking photos of where every goes then remove the rub rail and rubbing strakes and flip the boat over. before you decide to take off all the ply remove the paint by sanding,heat gun or paint stripper this will give you a good idea of the state of the hull and will also show where all the fixing points are.


  • Advertisement
  • Registered Users, Registered Users 2 Posts: 1,313 ✭✭✭Mr.Boots


    No, the hull is perfect in some places.
    Where it has gone soft is around the top under the rubrail and on the bottom where some water must have been sitting. Also one side of the bow.
    A screwdriver can go through these places


  • Moderators, Motoring & Transport Moderators, Sports Moderators Posts: 6,369 Mod ✭✭✭✭fergal.b


    I'm not sure how these boats are constructed so like Talent said above it might be best to do one panel at a time so the boat keeps it's shape, when you sand the bow, transom and at each frame you may find some fixing screws/nails covered with filler remove these and using a block of wood tap each side of the frame on the inside till it comes loose it might be best to start at the transom and work your way forward.


  • Registered Users, Registered Users 2 Posts: 1,313 ✭✭✭Mr.Boots


    So restoration started today.
    All fixture and fittings have been striped off and marked clearly.
    Plenty of photos also taken because I'm bound to forget where things go.
    Gorgeous day to be working on it anyway. 13degrees in November ain't bad!!
    So after stripping the fittings I turned it over to have a good luck at the hull. I'm still torn as whether to patch or replace panels of ply.
    When I strip the paint ill have a better idea and an easier decision.
    Rubbing strips taken off to reveal perfect teak gun whale.


    Ps: are my photos to big?


  • Posts: 9,954 ✭✭✭ [Deleted User]


    Mr.Boots wrote: »
    I'm still torn as whether to patch or replace panels of ply.


    I would only replace panels where they are bad and do a panel at a time. I have seen a number of boats where over enthusiastic restoration jobs were started and never finished.


  • Moderators, Motoring & Transport Moderators, Sports Moderators Posts: 6,369 Mod ✭✭✭✭fergal.b


    Looks like you have a lot of good wood to work with, like you say when the paint is gone you will know what to do. Do you plan on fiberglassing it.


  • Site Banned Posts: 638 ✭✭✭imurdaddy


    I also think if the wood is only bad in places you should patch instead of resheeting the whole boat, its a big job and not an easy one.

    Enterprise are a great dinghy and the less work the sooner you will be out on the water havin fun.


  • Registered Users, Registered Users 2 Posts: 1,313 ✭✭✭Mr.Boots


    Got a good heat gun today to strip the paint off tomorrow.
    Once the paint is gone ill have a good idea of how it was constructed.
    It's just under 14 feet long so each pannel dosnt go bow to stern anyway.
    I won't be fibreglassing it, just get the outside of the hull as smooth as posible and then paint (possibly red, white or orange)
    The interior of the hull will be varnished.
    Just another question for you guys..... The stainless steel fitting need a polish. What's the best way to do this? Like a polishing wheel on a drill???

    BTW.....this will be finished!!!!!


  • Moderators, Motoring & Transport Moderators, Sports Moderators Posts: 6,369 Mod ✭✭✭✭fergal.b


    In the post below on HMS portisham there is a link to the polishing wheel I got from halfords to do the light, that kit was for soft metal but they also do a kit for stainless steel that I have used and it worked very well.


    .


  • Registered Users, Registered Users 2 Posts: 1,313 ✭✭✭Mr.Boots


    Cool. Thanks


  • Advertisement
  • Registered Users, Registered Users 2 Posts: 1,313 ✭✭✭Mr.Boots


    Lots of paint stripping done today.
    A heat gun if deffo the way to go compared to messy paint stripper.
    Got a 1750w black and decker for €30 and it works a treat.
    So I have identified the rot damaged areas and removed the first panel.
    It's slow going, dig out filler covering screws, scrape screw heads and then unscrew........x 100

    What's the best way to get the brass nails out though?????
    At the moment I'm gouging the wood around them to get a needle nose pliers on them(wood being replaced anyway)

    It's also very hard to divide the scarf joints without breaking the wood as the glue is very strong....anything I should be doing here?????


Advertisement