Advertisement
If you have a new account but are having problems posting or verifying your account, please email us on hello@boards.ie for help. Thanks :)
Hello all! Please ensure that you are posting a new thread or question in the appropriate forum. The Feedback forum is overwhelmed with questions that are having to be moved elsewhere. If you need help to verify your account contact hello@boards.ie

Random Modding Thoughts...

1679111224

Comments

  • Registered Users, Registered Users 2 Posts: 1,582 ✭✭✭docentore


    Use thick wires for your RGH hack, at least 26AWG. Don't use kynar wire.


  • Registered Users, Registered Users 2 Posts: 8,582 ✭✭✭TouchingVirus


    docentore wrote: »
    Use thick wires for your RGH hack, at least 26AWG. Don't use kynar wire.

    How come?


  • Registered Users, Registered Users 2 Posts: 8,582 ✭✭✭TouchingVirus


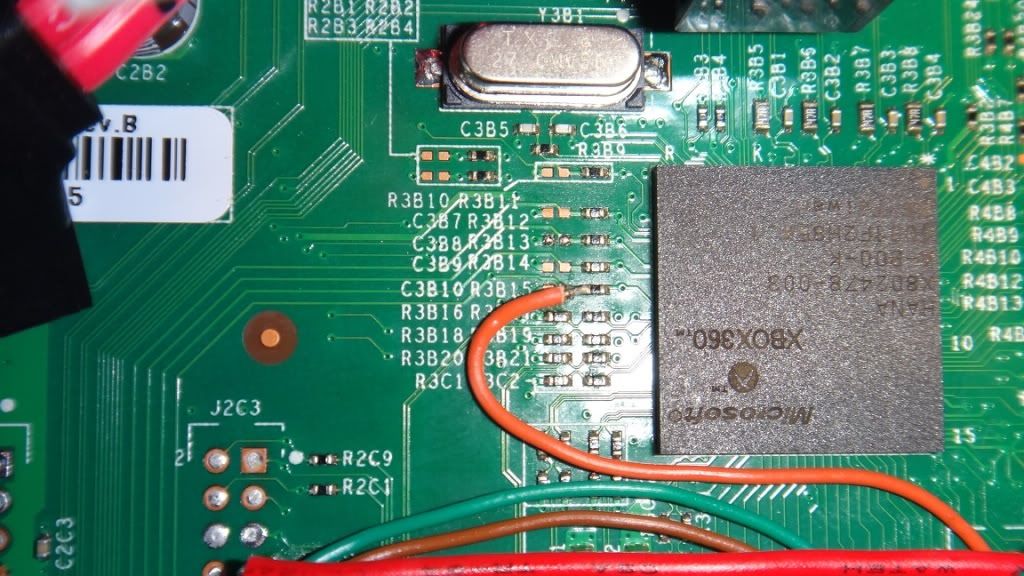
    First slim install complete. Thoughts?

    1) Damn, that HANA trace is small, and fragile :D
    2) Boot times are way better than the BB jaspers I've done, nice :)


  • Registered Users, Registered Users 2 Posts: 1,582 ✭✭✭docentore


    How come?

    Random modding thought. With Kynar wire I had problems with another jasper, changing wires for some thicker wires resolved the issue


  • Registered Users, Registered Users 2 Posts: 57 ✭✭stanleytli


    First slim install complete. Thoughts?

    1) Damn, that HANA trace is small, and fragile :D
    2) Boot times are way better than the BB jaspers I've done, nice :)

    For me the worst soldering point, needs big attention,
    but we can manage that:rolleyes:

    DSC00923.jpg


  • Advertisement
  • Closed Accounts Posts: 2,828 ✭✭✭Reamer Fanny


    stanleytli wrote: »
    First slim install complete. Thoughts?

    1) Damn, that HANA trace is small, and fragile :D
    2) Boot times are way better than the BB jaspers I've done, nice :)

    For me the worst soldering point, needs big attention,
    but we can manage that:rolleyes:

    DSC00923.jpg

    I see you've soldered to the resistor I used the copper pad to the left


  • Registered Users, Registered Users 2 Posts: 808 ✭✭✭Jimbobjoeyman


    justryan wrote: »
    I see you've soldered to the resistor I used the copper pad to the left
    Does it make a difference ?
    I was under the impression your not supposed to bridge that :confused:
    Ahh well the alternate points under the board are much easier to solder to and aren't as fragile so I'll be using them from now on.


  • Closed Accounts Posts: 2,828 ✭✭✭Reamer Fanny


    justryan wrote: »
    I see you've soldered to the resistor I used the copper pad to the left
    Does it make a difference ?
    I was under the impression your not supposed to bridge that :confused:
    Ahh well the alternate points under the board are much easier to solder to and aren't as fragile so I'll be using them from now on.

    I would say the copper pad is harder will try the resistor on my next Slim


  • Registered Users, Registered Users 2 Posts: 57 ✭✭stanleytli


    Does it make a difference ?
    I was under the impression your not supposed to bridge that :confused:
    Ahh well the alternate points under the board are much easier to solder to and aren't as fragile so I'll be using them from now on.
    It doesn't make any difference, but is safer and less possibility to bridge that pad or lift the pad (recently I had to fix two broken pads & CPU_RST). Some people notice better booting timings with alternate points, but it is really hard to say what is better. So far my slims boots quite well, but in my personal opinion coolrunner was issued to early & is causing too many problems (capasitors, the lenght of blue wire).
    I will try maximus stinger next time or XE improve their .jed files.


  • Registered Users, Registered Users 2 Posts: 808 ✭✭✭Jimbobjoeyman


    stanleytli wrote: »
    It doesn't make any difference, but is safer and less possibility to bridge that pad or lift the pad (recently I had to fix two broken pads & CPU_RST). Some people notice better booting timings with alternate points, but it is really hard to say what is better. So far my slims boots quite well, but in my personal opinion coolrunner was issued to early & is causing too many problems (capasitors, the lenght of blue wire).
    I will try maximus stinger next time or XE improve their .jed files.

    I can attest to faster boot times with alternate points.
    I'm using the alternate standby_clk under the board with my big block jasper and it boots instantly 95% of the time.
    The other times I have failed boots.
    I'm going to wire the 3.3v to the alternate 3.3v later on thats supposed to solve that problem.
    It only fails when I turn on and off my 360 a couple of times in a row in quick succession.


  • Advertisement
  • Closed Accounts Posts: 2,828 ✭✭✭Reamer Fanny


    Wow my Nand X is fast!


  • Closed Accounts Posts: 2,828 ✭✭✭Reamer Fanny


    Not so much a modding thought more a repair thought, just reballed my first Xbox 360 today!


  • Registered Users, Registered Users 2 Posts: 8,582 ✭✭✭TouchingVirus


    Nice!


  • Closed Accounts Posts: 2,828 ✭✭✭Reamer Fanny


    It's getting the stress-test right now :D


  • Registered Users, Registered Users 2 Posts: 14,309 ✭✭✭✭wotzgoingon


    justryan wrote: »
    Not so much a modding thought more a repair thought, just reballed my first Xbox 360 today!

    Fair play to you. I'd say it was hard enough. What equipment did you use and how much did they set you back??


  • Closed Accounts Posts: 2,828 ✭✭✭Reamer Fanny


    justryan wrote: »
    Not so much a modding thought more a repair thought, just reballed my first Xbox 360 today!

    Fair play to you. I'd say it was hard enough. What equipment did you use and how much did they set you back??

    I used my achi ir pro sc rework station it took lots of practice but it paid off! The machine cost me €950 I got it off a guy on Adverts.


  • Registered Users, Registered Users 2 Posts: 808 ✭✭✭Jimbobjoeyman


    justryan wrote: »
    I used my achi ir pro sc rework station it took lots of practice but it paid off! The machine cost me €950 I got it off a guy on Adverts.

    fair play :D
    I saw you running into a bit of a brick wall with the reattatch over on the cvx forums,
    glad you got over it
    What turned out to be the problem.
    I bet it was something small like flux application or the new GPU chips you were attaching were fluffed.
    Ive got a couple of boards that I'm planning to replace the gpu's on just havent got around to getting the new gpu chips yet.
    The chips are removed and the pads are cleaned all ready to go

    Hot air should be a little easier to manage than ir though.
    Just crank up the bottom heat :D
    my awnser to all things bga related


  • Closed Accounts Posts: 2,828 ✭✭✭Reamer Fanny


    justryan wrote: »
    I used my achi ir pro sc rework station it took lots of practice but it paid off! The machine cost me €950 I got it off a guy on Adverts.

    fair play :D
    I saw you running into a bit of a brick wall with the reattatch over on the cvx forums,
    glad you got over it
    What turned out to be the problem.
    I bet it was something small like flux application or the new GPU chips you were attaching were fluffed.
    Ive got a couple of boards that I'm planning to replace the gpu's on just havent got around to getting the new gpu chips yet.
    The chips are removed and the pads are cleaned all ready to go

    Hot air should be a little easier to manage than ir though.
    Just crank up the bottom heat :D
    my awnser to all things bga related

    Yeah the supplier sent me lead free GPUs where I needed lead GPUs but I was generously compensated.

    Just did my second reball today or rather GPU replacement it was touch and go as I lifted one pad when extracting the chip but I'd say it was just a ground pad as the Xbox boots up fine.


  • Closed Accounts Posts: 2,828 ✭✭✭Reamer Fanny


    Damn you south bridge, e73 on my third Xbox GPU replacement, time to reflow the SB


  • Registered Users, Registered Users 2 Posts: 808 ✭✭✭Jimbobjoeyman


    justryan wrote: »
    Damn you south bridge, e73 on my third Xbox GPU replacement, time to reflow the SB

    You sure its not a missing component near the southbridge before you go putting even more time into it ?


  • Advertisement
  • Closed Accounts Posts: 2,828 ✭✭✭Reamer Fanny


    justryan wrote: »
    Damn you south bridge, e73 on my third Xbox GPU replacement, time to reflow the SB

    You sure its not a missing component near the southbridge before you go putting even more time into it ?

    Can't be sure of anything but this Xbox was handled delicately so I doubt it's a missing component, it had the bolt mod on it so it could have warped the south bridge area GPU was replaced perfectly.


  • Registered Users, Registered Users 2 Posts: 808 ✭✭✭Jimbobjoeyman


    justryan wrote: »
    Can't be sure of anything but this Xbox was handled delicately so I doubt it's a missing component, it had the bolt mod on it so it could have warped the south bridge area GPU was replaced perfectly.

    Thats the thing with xboxs that have been worked on before by someone else.
    I know you handle them delicately but the person who put the bolt mod in more than likely didn't know the first thing about them and could have done anything to it.
    For me I only reflow ATM and if they dont work after the second gpu reflow depending on the error and condition of the board I might try the ram.
    There comes a time where you just have to call it a day when you have too much time put in to it.

    Generally I find I can get 99% of untouched boards working with a simple gpu reflow.
    Teched boards generally around the 70% mark.
    I find that if they dont work after the first attempt they are not going to work again with out having a big job replacing random components starting with the GPU untill it greens ups.
    Just too much hassle


  • Closed Accounts Posts: 2,828 ✭✭✭Reamer Fanny


    justryan wrote: »
    Can't be sure of anything but this Xbox was handled delicately so I doubt it's a missing component, it had the bolt mod on it so it could have warped the south bridge area GPU was replaced perfectly.

    Thats the thing with xboxs that have been worked on before by someone else.
    I know you handle them delicately but the person who put the bolt mod in more than likely didn't know the first thing about them and could have done anything to it.
    For me I only reflow ATM and if they dont work after the second gpu reflow depending on the error and condition of the board I might try the ram.
    There comes a time where you just have to call it a day when you have too much time put in to it.

    Generally I find I can get 99% of untouched boards working with a simple gpu reflow.
    Teched boards generally around the 70% mark.
    I find that if they dont work after the first attempt they are not going to work again with out having a big job replacing random components starting with the GPU untill it greens ups.
    Just too much hassle

    This gives me an excuse to work on the SB, the GPU isn't the only component that can fail due to poor solder.


  • Registered Users, Registered Users 2 Posts: 808 ✭✭✭Jimbobjoeyman


    justryan wrote: »
    This gives me an excuse to work on the SB, the GPU isn't the only component that can fail due to poor solder.

    true
    but myself, Its always been GPU failures so far for me.
    But I'd say your much more high volume than me being in Dublin and all,
    so you'd see more strange ones than I would
    Your working out of a shop aren't you ?

    I'm just tipping away at them at home :p


  • Registered Users, Registered Users 2 Posts: 8,582 ✭✭✭TouchingVirus


    I found myself on Capel St today so I took a quick walk around to Maplins and bought two 68nf ceramic capacitors (last two in stock) and put them on A->GND ...instant booting now :)


  • Registered Users, Registered Users 2 Posts: 808 ✭✭✭Jimbobjoeyman


    I found myself on Capel St today so I took a quick walk around to Maplins and bought two 68nf ceramic capacitors (last two in stock) and put them on A->GND ...instant booting now :)

    ...nice


  • Registered Users, Registered Users 2 Posts: 8,582 ✭✭✭TouchingVirus


    The alt 3.3v which is taken from the southbridge (J2B1.8 instead of the guide J2B1.7) does improve boot times on both Jaspers I was having difficulty with too. I'll stick with the capacitor, but even without it the boot times are sub-10 seconds and around 50% on the first glitch.

    The difference between the two points? When the console is turned off there's no voltage on J2B1.8, which means the coolrunner red LED is off because it has no power. Each power-on is a completely fresh start, and this seems to work better :)


  • Closed Accounts Posts: 2,828 ✭✭✭Reamer Fanny


    The alt 3.3v which is taken from the southbridge (J2B1.8 instead of the guide J2B1.7) does improve boot times on both Jaspers I was having difficulty with too. I'll stick with the capacitor, but even without it the boot times are sub-10 seconds and around 50% on the first glitch.

    The difference between the two points? When the console is turned off there's no voltage on J2B1.8, which means the coolrunner red LED is off because it has no power. Each power-on is a completely fresh start, and this seems to work better :)

    Some nice findings there, can the same be said for Slim models?


  • Registered Users, Registered Users 2 Posts: 57 ✭✭stanleytli


    The alt 3.3v which is taken from the southbridge (J2B1.8 instead of the guide J2B1.7) does improve boot times on both Jaspers I was having difficulty with too. I'll stick with the capacitor, but even without it the boot times are sub-10 seconds and around 50% on the first glitch.

    The difference between the two points? When the console is turned off there's no voltage on J2B1.8, which means the coolrunner red LED is off because it has no power. Each power-on is a completely fresh start, and this seems to work better :)
    Some SuperMod said, that it's not good idea,
    but you right, it does improve boot times.
    For starters pin 2 is the wrong choice.. its a serial line from the CPU for Kernel debug, it may have 3v3 on it, but it isnt a power line..
     
    Currently, the CR runs off Standby 3v3 at pin 7.. right next to that is a switched 3v3 on pin 8..
     
    However.... I would urge caution here. Trios and GliGli were both opposed to using a switches 3v3 supply for this.
    The reason being that all the 5 signals are active in standby. The fear is, that if the CPLD has no supply of its own it will leech power from these signals and could potentially damage your 360....
    You've been warned ... do as you may


  • Advertisement
  • Registered Users, Registered Users 2 Posts: 8,582 ✭✭✭TouchingVirus


    It's up on the page about Linux/Kernel debugging from J2B1 on Free60.org. They recommend powering a level shifter off standby J2B1.7, or better by using J2B1.8. Seems like the power there is solid enough for kernel debugging...:confused:


Advertisement