Advertisement
If you have a new account but are having problems posting or verifying your account, please email us on hello@boards.ie for help. Thanks :)
Hello all! Please ensure that you are posting a new thread or question in the appropriate forum. The Feedback forum is overwhelmed with questions that are having to be moved elsewhere. If you need help to verify your account contact hello@boards.ie
So you want to JTAG your xbox360? (POST 248 FOR xeBuild/16197 TUT)
Comments
-
Ya'll gonna get banned lads . Permanently0
-
Xbox_Employee wrote: »Ya'll gonna get banned lads . Permanently
Sure, If you bring it online only haha0 -
-
Can I just add in a note here about the Nand-X.
The nand-x is superfast - it dumps the first 1000 blocks (roughly 64mb) of the arcade in a shade under 9 minutes as opposed to 24 for my PIC reader. However, the Nand-x is using a different wiring method for the JTAG, taking a feed from the ROL (Ring of Light) on the wifi board. I do not suggest using the Nand-X QSBs for the JTAG part unless you have a Xenon.
So follow the Nand-X install instructions to the letter if you have a Xenon. If you do not have a Xenon, follow the Nand-X instructions and use QSBs for soldering J1D2 and J2B1, but use the transistor method outlined above for the JTAG part of the soldering.0 -
Whats the diff between JasperBB.xellous.smc and Jasper.xellous.smc please?0
-
Advertisement
-
JasperBB is for Big-Block jaspers - jasper's with onboard storage (256/512MB).
I'll tell you the version I went with to get Xellous on your console - this one. Use the Xellous.jasperbb by mana.bin file. And when building freeboot, use the SMC file from that ZIP too .
.
If you own a Big-Block Jasper, I always start off with that file and not the JasperBB from the archive with multiple files which can have issues with certain Jaspers 0
0 -
I am having a bit of trouble with my nand-x. I managed to do 3 full 60mb odd nand dumps, but between the 2nd and the 3rd I got a Could not detect a Flash controller error. I rebooted the PC (Win 7) and it went away, all 3 dumps match. I then dumped the Keyvault 3 times all matching but the error came back between the 2nd and the 3rd, I had lunch, came back and it was working again.
Anyways I then flashed the xellous.jasper.smc and my keyvault, but now I realise thanks to your reply thats the wrong file. Now all I get is the error, I also tried an XP laptop.
Any ideas please?
For context the only thing I have done since flashing the xellous.jasper.smc was put the mobo back in the case and connect the fan and light ring, and plug in the AV cable. I wouldnt think any of those would cause issues but I am no expert
Is it possible I cracked one of the nand dump QSB points when removing the cables from the QSB? The thing that makes me think this is not the case is that I initially experienced the issue in between successful dumps and writes.0 -
Sometimes something happens with nandpro or the reader that a reboot or a restarting of the command line console fixes. I have a batch file that dumps a nand 5 times, it's just 5 commands. But no matter what reader I run it with, nandpro will dump 1, 3 and 5 just fine and complain about no flash controller or incompatible ARM hardware on dumps 2 and 4 - it's a funny old thing but I wouldn't read too much into it.
You flashed the SMC file to the start of the nand? That shouldn't really break anything, it's just like flashing a bad dump
If you've got a multimeter handy you can multimeter from the J1D2 and J2B1 points on the underside of the board to the pin headers on the QSBs to test. If there are broken points then try to repair them. But definitely the first thing is a multimeter continuity test on all points 0
0 -
Ah continuity, the check of the gods
 I use it for nearly everything modding related. 0
 -
TouchingVirus wrote: »Sometimes something happens with nandpro or the reader that a reboot or a restarting of the command line console fixes. I have a batch file that dumps a nand 5 times, it's just 5 commands. But no matter what reader I run it with, nandpro will dump 1, 3 and 5 just fine and complain about no flash controller or incompatible ARM hardware on dumps 2 and 4 - it's a funny old thing but I wouldn't read too much into it.
You flashed the SMC file to the start of the nand? That shouldn't really break anything, it's just like flashing a bad dump
If you've got a multimeter handy you can multimeter from the J1D2 and J2B1 points on the underside of the board to the pin headers on the QSBs to test. If there are broken points then try to repair them. But definitely the first thing is a multimeter continuity test on all points
Thanks TouchingVirus, I'll nab a multimeter tomorrow and check them. I have tried many times since and am having no joy, I have abandoned proceedings for the evening. 0
0 -
Advertisement
-
Build Instructions:
For simplicity you need the following:
1) Your CPU Key
2) Your Freeboot v0.032 (Dash 9199) nand file and SMC
3) 12611.zip (xbins)
4) fbBuild v0.1 (xbins)
Getting ready
Download fbBuild and extract it to a folder - say C:\fbBuild
Download 12611.zip and extract the contents to C:\fbBuild\data
Edit C:\fbBuild\1blkey.txt. On the first line is a dummy key - replace it with DD88AD0C9ED669E7B56794FB68563EFA
Edit C:\fbBuild\mydata\cpukey.txt. On the first line is a dummy key - replace it with the CPU key of the console.
Extracting KV and SMC_CONFIG.bin
Open up 360 Flash Tool v0.97 and click Settings->Options. Tick the box that says "Extract ibuild compatible files". Then open your freeboot nand and click extract on the bottom. Tick the box for 'config blocks' and 'Keyvault' and click OK. Choose a folder for these files. When extraction is done, go to that folder and there'll be a folder called freeBOOT, click into it, then into data and you will find two files - kv.bin and smc_config.bin. Copy these two files to C:\fbBuild\mydata
Picking the right SMC (not for Xenon consoles)
This step is very important if your console is not a xenon - flashing the wrong SMC can end your JTAG When you built freeboot v0.032 you probably downloaded some pre-built Xellous files and SMC files from the guide:
Zephyr, Jasper, Falcon
Jasper Big Block Alternative
Well each of these files had an SMC in the archive and when building your custom freeBOOT using Bestpig's tool you renamed the file to smc.bin and copied it into data directory. This is the right SMC for your console, so once again rename it to smc.bin and copy it to C:\fbBuild\mydata
Build freeBOOT
Open a command prompt, go to C:\fbBuild and type the followingfbbuild -c <model> -d mydata updflash.bin
<model> is either xenon, falcon, zephyr, jasper, jasper256, jasper512
Freeboot v0.04 will build as updflash.bin - copy it to USB, boot to Xellous and flash it.
Post-Install
Download the full system update - http://download.microsoft.com/download/4/1/D/41D9A2BA-3B48-4BD5-B613-122E7C3A1390/SystemUpdate12611.zip
Extract to a USB stick (blank)
Insert USB stick into console
Power console on, accept the update, the console will apply and then reboot.
If you had modified the console fanspeed on the previous dash (I run at 60% on the Jaspers) then run FanSpeed_60.xex or whatever via XeXMenu 0
0 -
As reported by justryan in a separate thread, you no longer need to build freeBOOT v0.04 yourself with fbBuild - Bestpig has kindly updated his freeBOOT Toolbox so just follow the guide as it was originally in the first 3 posts and you're laughing again - all together now, MUAHAHAHAHAH
 0
0 -
Bestpig FTW!
 0
0 -
So I realise my third post-JTAG post was very short, I was tired of writing up, but here is a more detailed post about what to do after you have a JTAG. Keep in mind this is not exhaustive and doesn't touch on emulators, mainly because I have not tried emulation on my own JTAG

The Hard Drive
The first thing you'll need to properly take advantage is a hard drive, but because you have a JTAG it can be any hard drive you like as long as it's a 2.5" SATA hard drive. You can pick up a third-party enclosure on DealExtreme for $9.90 with free shipping, then just pop any hard drive into it, say this 250GB one from Amazon.co.uk. Total cost for the 250GB is less than you would pay in a shop for the same drive.
An advantage for picking the 250GB WD drive (WD2500BEVT) is that you can turn it into an "official" hard drive if you want by using the tool HDDHackr. The hard drive will then also work between JTAGs and official consoles, even though your JTAG-related programs won't. Personally, I bought a 500GB hard drive for the JTAG, and use a 120GB on my other, virgin console. My housemate swaps his 120GB from virgin to JTAG with ease though
XeXMenu
For this you don't need a hard drive as it's a small application but it is vital to get you up and running. XeXMenu is a filesystem manager that enables you to run .xex files, FTP stuff to your hard drive, copy files from USB hard drives/sticks (FAT32 only) and a few other things. It's the first step. You need to download the XeXMenu v1.1 file that can be found on xbins.org in /XBOX 360/Dashboards/XeXMenu and burn the ISO file in that archiveTo download from Xbins you can get an application called autoxbins, or open up mibbit.com or the IRC client of your choice, connect to EFNET as your username, join #xbins and type !list in the chatroom. You will be PM'd from the bot, who will tell you you can access the xbins FTP server and will give you the address, username and password. Then use an FTP client to connect and get your stuff. When you disconnect, type !list again to re-active your account. Do not spam !list, you'll get banned from the chatroom for 15 minutes.
Once you have burned XeXMenu, throw it into the console and play it. The objective here is to go to the DVD drive, and copy the C0DE9999 folder to your MemoryUnit or Hard Drive's /Content/0000000000000000/ folder. The first screen you land on is the "Games Discovery" page, use RB/LB to change to Configuration and change the skin to RetroNintendo (easiest screen to see what's going on, and it's awesome ). Then change to the Filesystem screen. To change device, press X and choose a device (DVD: is what you're looking for). Highligh C0DE9999 and press Y, and then A on copy. Then use X to change to HDD1: or MU: and hit A to go into the content folder, then A to go into the folder 0000000000000000 then hit Y and select paste. C0DE9999 should be copied into the hard drive or internal memory then.
Go back to the dashboard, go to Games Library -> Demos and XeXMenu v1.1 should be there. This is how you now launch XeXMenu, so you can remove the CD and keep it safe
Good Apps
NXE2GOD v1.1 - NXE to GOD converts games you have installed to the Hard Drive (a proper one, not a USB one with 16GB in use) to Games-on-Demand. So take your original, install to the hard drive, and run NXE2GOD and put your disc away. In order to change the game to a GOD, the whole thing becomes "unsigned". The essence of the JTAG is it doesn't care if content is signed or unsigned, but all other consoles do, so you won't be able to play the games on a non-JTAG console. You can download this from Xbins or MegaUpload or wherever. Once again, use XeXMenu to FTP it to your hard drive or copy the application from a USB stick and put it in the /Content/0000000000000000/C0DE9999/008000/ folder. There will already be an application in there starting with C0DE9999 - that's XeXMenu, so leave it alone You run NXE2GOD the same way you run XeXMenu - via the Game Demos in the Game Library of the Dashboard.
ISO2GOD - If you have game ISOs, this Windows program will attempt to convert them to GOD folders on your hard drive. After which you can FTP or copy to a USB stick (a big one >8GB to be safe, FAT32) or a USB hard drive (FAT32) using XeXMenu. Unlike the apps, you don't put these into the C0DE9999 folder, you drop them right into /Content/0000000000000000/ - There are some reports it isn't working with the latest AP2.5 games, if true then I expect a fix soon
FanSpeed - A set of XEX files that change the fanspeed of the 360 from Auto (which I think is too low) to a set percentage of MAXSPEED. I run the 60% one for best noise/cooling tradeoff, even on my jasper. You stick it on a USB stick, start XeXMenu, navigate to the USB stick, highlight FanSpeed_60.xex and press A to run it - you don't copy it to the hard drive, it isn't that type of application, you need to run it from XeXMenu. After the screen goes black and kicks you to the dashboard, reboot the console This is available on xbins and other filesharing sites. You only need to run it once unless you update your reflash the console or intend on changing the speed.
XM360 - So you have two consoles, one of which has all your purchased arcade titles. You can't play them on your JTAG, because then you need to sign in to Live, which we know is a big no-no on JTAGs. If you stick in your hard drive you'll see all the games are trial versions and you're disappointed. Well XM360 is for you. If you have XeXMenu installed on internal memory, stick the hard drive with the arcade games in and fire up XeXMenu. If you do not have XeXMenu on an internal memory unit, you can run it from the CD if it isn't on the hard drive with the arcade titles Put a big USB stick or hard drive into a USB slot too with XM360 on it.
Now you're in XeXMenu, copy the Arcade title folders from HDD:/Content/0000000000000000/<TITLEID> to the USB stick. There'll probably be a good few folders in there, some relating to full games, some relating to the arcade games. If you know what you want, you can look up that game's TitleID on Google - e.g. Splosion Man is 5841098F.
So now that they're copied to the USB Stick, turn off the console, remove the hard drive and put in your JTAG hard drive. Copy the folders back to /Content/0000000000000000/ and then copy the XM360 folder to anywhere on the hard drive you like, I put it in the root folder as /XM360/ because I hate having to navigate all the way down to C0DE9999 - there's no need to because you have to run XM360 through XeXMenu so make it easier for yourself Run XM360, and it will scan the hard drive for titles. You can then use it to unlock the titles, allowing you to play the full versions that you paid for on your JTAG without having to sign in to Xbox Live!
A comprehensive (I don't know if complete) TitleID list is available at http://360.kingla.com/
Freestyle Dash - The mother of replacement dashboards. It's an alternative dashboard to NXE, has many themes, it's own FTP server and is generally cool. I started this thread because I was taken aback at how pretty the skin I found was You can get it on Xbins, and put it anywhere on the hard drive you like. I put mine into the C0DE9999 folder but I made a folder in there called 0700 (there's another one in there 008000, but that's not it) so FSD shows up in the Games Library and I can launch it right from NXE without going through XeXMenu.
If you run the FSD Updater from your PC and connect to your console over FTP it will re-scan your hard drive, scrape websites for pictures and game information and is like XBMC for Games If you don't want to FTP, you can use a Transfer Cable to hook up your hard drive to the computer and FSD Updater will work that way too.
It has an emulator section, which I think searches for XEX files in /EMULATORS/ and other sections I never fully got to grips with. I know v2 of FSD is coming at some stage which is intended to be so much more awesome than the current version, but I think the current version deserves a look
Dashlaunch - Available on xbins, this is an xex file and an .ini file. Run the XEX from XeXMenu and when you start your console it will read the ini file (which you put in the root of your hard drive) and attempt to run the XeX file you specify in the INI file. I pointed my ini file to Freestyle Dashboard, so it auto-launched when I turned on my console
Quickboot - Have you got a pain in the face going into XeXMenu to run your XEX files? Quickboot creates "wrappers" for your XEX files so you can launch then straight from the NXE dashboard after you put the file it generates into C0DE9999/00800 like NXE2GOD. I'm not sure how it works, but I have been meaning to test it out
Edit: Mods - could I get this post linked to in my 3rd post at the start of the thread? Thanks0 -
Using Flash360, I dumped my existing freeBOOT 9199 nand image. Then using BestPig's latest image builder, I punched in my cpu key, selected the output as updflash.bin, opened the newly dumped 9199 bin file, & built the 12611 updflash from that.
Back again to flash360, I selected the updflash file & to discard the current config. KV mismatch error, & nand Zero Paired error, the consensus online is to generally ignore these errors, as I lip-bitingly did. Flash completed, power cycle, hello 12611 :cool:
Why anyone takes the hard way with this I don't understand. BestPig or No Pig! Heading off the MS now for the avatar updates etc.
Edit - Strangely enough, my fanspeed patched xex seems to have survived the flash process. I thought this part of the nand would be overwritten, requiring fan speed to be patched again but seemingly not in this case.0 -
No, it's not strange

Running the fanspeed patch modifies the config.bin - a lot of people are not taking "live" dumps of their current in-use nand, but are taking the config from the 9199 dashboard updflash.bin they generated the last time BestPig's tool was used - this would be unmodified by the Fanspeed patches so that's why they would have to re-run the patch to modify config.bin
On the other hand, you took your modified (live) config.bin and rammed it through bestpig's tool, no need for a patch :P0 -
TouchingVirus wrote: »No, it's not strange

Running the fanspeed patch modifies the config.bin - a lot of people are not taking "live" dumps of their current in-use nand, but are taking the config from the 9199 dashboard updflash.bin they generated the last time BestPig's tool was used - this would be unmodified by the Fanspeed patches so that's why they would have to re-run the patch to modify config.bin
On the other hand, you took your modified (live) config.bin and rammed it through bestpig's tool, no need for a patch :P
Yes, I am dumb :D 0
:D 0 -
If you get an e71 or e72 error after the avatar update that's normal just power cycle and you'll have avatars0
-
If you get an e71 or e72 error after the avatar update that's normal just power cycle and you'll have avatars
Avatar update ran fine, no eXX's. I've kept my 9199 updflash bin anyhow, suppose it could come in handy at some stage - hopefully not though. As of now, 12611 is doing everything 9199 was doing, 3.5" hdd/no dvd drive included so I'm a happy camper for the mo'.0 -
For some high resolution pictures of a JTAG install on a Jasper (the same for non-Xenon boards) see http://boards.ie/vbulletin/showthread.php?t=20561095590
-
Advertisement
-
The following pictures illustrate how not to attempt to solder a nand-reader to the motherboard. I suspect a nand-x was being used because I found a nand-x PCB on the JTAG header. Quicksolder boards are no excuse for the following, they're not hard to use - just make sure to add your own solder and use flux liberally. Seriously, if you're going to leave a board in this state give it to somebody else for the install and save us and yourself a headache

The board is a Falcon board, but the points are the same for all non-xenon boards I've also made a note of the alternative soldering/multimetering points (that are not traces) where appropriate - the only one which requires a trace solder is J1D2.3 which runs right into the southbridge
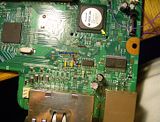
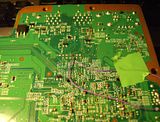
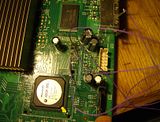
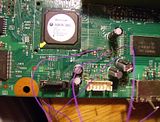
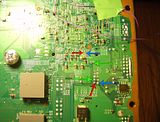
Edit: Don't mind about the tiny shards all over the place in the last picture, they're glass fibers from the fiber scratch pen 0
0 -
Ouch! Did this board have RROD? Wouldn't be surprised with the damage to the pads :eek:0
-
Flashing the wrong SMC
I encountered this issue the other day when I did numerous JTAGs, one of which was not a Xenon but a Falcon. 'Lo and behold I used the same Xellous file for the Falcon as the Xenons which was a bad move.
The SMC or System Management Controller is a vital piece of the console, held in the first block of the nand right before the keyvault. It regulates voltages, controls Input/Outputs and lots of other stuff. Having the wrong SMC is bad - the SPI lines (used for the nand reading/writing) can be burned out which means you'll have to use an Infectus to program the nand and set things right. Having the wrong SMC and applying power to the mainboard (as in turning the console on) is even worse and can result in a complete brick :eek:
An incorrect SMC can also turn the power supply LED red after a few minutes and will almost certainly result in Nandpro reporting it was unable to detect the flash controller. So what to do, how to resolve this problem?
There are two solutions, one of which is the Infectus or a non-SPI way to write/read the nand. The other is to try to "trick" the system into loading what I presume is a failsafe SMC either located elsewhere in the nand or on a ROM chip. To do this, short pins 44-47 of the nand to ground before plugging in the power to the console. So have your nand reader ready to go, no power to the motherboard, apply short, insert power, remove short and run nandpro
I found the best way to do this is to run a wire from the hard drive connector leg (ground) to the pins and strip back enough wire to cover all 4 legs of the nand. Hold it in place, insert power and remove the short.
The legs are in the picture below: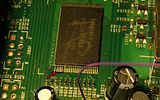 0
0 -
Ouch! Did this board have RROD? Wouldn't be surprised with the damage to the pads :eek:
It was an RROD when it arrived here for me to JTAG but that was fixed. The busted pads wouldn't really be an excuse for an RROD - the pads are termination points, so there's no difference if the signal terminates mid-trace because a pad is missing, or at the pad itself. It does make a difference in the difficult to solder a nand-reader though :P
The board is complete now, JTAG'd and up on the Kinect dash ready for the customer 0
0 -
TouchingVirus wrote: »Soldering the wrong SMC
(...)
There are two solutions, one of which is the Infectus or a non-SPI way to write/read the nand. The other is to try to "trick" the system into loading what I presume is a failsafe SMC either located elsewhere in the nand or on a ROM chip. To do this, short pins 44-47 of the nand to ground before plugging in the power to the console. So have your nand reader ready to go, no power to the motherboard, apply short, insert power, remove short and run nandpro
(..)
Why, oh why you didn't find it before TV? That reballed CPU that photographed some time ago came from undetectable Jasper I bricked.
hmm, but still have one Zephyr in the closet behaving the same way. I'm going to try this method on Monday and will post results.
thanks for the tips TV!0 -
Why, oh why you didn't find it before TV? That reballed CPU that photographed some time ago came from undetectable Jasper I bricked.
hmm, but still have one Zephyr in the closet behaving the same way. I'm going to try this method on Monday and will post results.
thanks for the tips TV!
Sorry docentore, I never had a need until I messed up a falcon last weekend. Hopefully that's your problem anyways and you'll get the Zephyr up and running :pac:0 -
TouchingVirus wrote: »Sorry docentore, I never had a need until I messed up a falcon last weekend. Hopefully that's your problem anyways and you'll get the Zephyr up and running :pac:
no probs mate. I used it as parts source for burned Jasper MoBo I had. Now I remember that I read about this long time ago and completely forgot. I think I need to start some kind of diary.0 -
TouchingVirus wrote: »Flashing the wrong SMC
I encountered this issue the other day when I did numerous JTAGs, one of which was not a Xenon but a Falcon. 'Lo and behold I used the same Xellous file for the Falcon as the Xenons which was a bad move.
The SMC or System Management Controller is a vital piece of the console, held in the first block of the nand right before the keyvault. It regulates voltages, controls Input/Outputs and lots of other stuff. Having the wrong SMC is bad - the SPI lines (used for the nand reading/writing) can be burned out which means you'll have to use an Infectus to program the nand and set things right. Having the wrong SMC and applying power to the mainboard (as in turning the console on) is even worse and can result in a complete brick :eek:
An incorrect SMC can also turn the power supply LED red after a few minutes and will almost certainly result in Nandpro reporting it was unable to detect the flash controller. So what to do, how to resolve this problem?
There are two solutions, one of which is the Infectus or a non-SPI way to write/read the nand. The other is to try to "trick" the system into loading what I presume is a failsafe SMC either located elsewhere in the nand or on a ROM chip. To do this, short pins 44-47 of the nand to ground before plugging in the power to the console. So have your nand reader ready to go, no power to the motherboard, apply short, insert power, remove short and run nandpro
I found the best way to do this is to run a wire from the hard drive connector leg (ground) to the pins and strip back enough wire to cover all 4 legs of the nand. Hold it in place, insert power and remove the short.
The legs are in the picture below:
Just a word of warning to anyone attempting this. Make sure u have only got those pins shorted, i accidently blew the nand on one of my xboxes
i found that connecting a stripped down usb cable to these points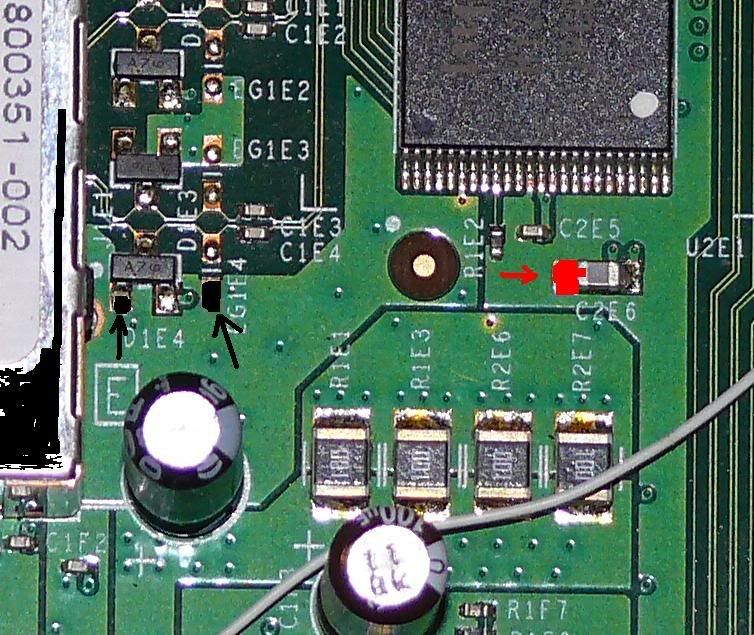
to power the nand to reflash it works better0 -
Are 120 Ω Carbon Resistors ok for JTAGing, or do you need 100 Ω Resistors?
Also what wire is recommended?
I read on another guide that 30 AWG Wire is recommended.
(AWG = American Wire Gauge) which would be equivalant to 33 SWG.
I found some 30 SWG (28 AWG) in Maplins, would this do?0 -
Advertisement
-
The gauge of the wire doesn't really matter unless you go very big. 30AWG is recommended but anything up to 20AWG will be grand, after that there may be too much resistance on the wire.
Some people use multistrand even though I think it's a very poor substitute for single-strand wire when you're soldering - it does have great uses for point to point connections with terminators on either end.
A resistor is a resistor, so as long as it doesn't fail it'll be fine. The extra 20Ω could become an issue, if they are cheap though what's the harm in getting a few to try them out before running around looking for 100Ω?0
Advertisement
