Advertisement
Help Keep Boards Alive. Support us by going ad free today. See here: https://subscriptions.boards.ie/.
If we do not hit our goal we will be forced to close the site.

Current status: https://keepboardsalive.com/

Annual subs are best for most impact. If you are still undecided on going Ad Free - you can also donate using the Paypal Donate option. All contribution helps. Thank you.
https://www.boards.ie/group/1878-subscribers-forum

Private Group for paid up members of Boards.ie. Join the club.
Hi all, please see this major site announcement: https://www.boards.ie/discussion/2058427594/boards-ie-2026

the 'there's no such thing as a stupid question' bike maintenance thread

1124125127129130218

Comments

  • Moderators, Sports Moderators Posts: 26,292 Mod ✭✭✭✭CramCycle


    Some of the thru axles have a little bit of a lip you have to push past before turning, I ruined my front one the same way as you did. Make sure its is fully in the next time, if its easy to take off, you will be fine, if it starts slipping, the damage is done, once you get it off, get a new thru axle.


  • Registered Users, Registered Users 2, Paid Member Posts: 8,044 ✭✭✭54and56


    Type 17 wrote: »
    H3, H4 are metric - H4 refers to Hex, 4mm (Hex is the term used, as Allen is (was?) a trademark of Allen Corporation).

    Trek's through axles are 5 or 6 mm Allen (H5 or H6).

    Check and see if there is any undamaged hex-section further in (the through-axles are hollow, but the hex goes in deeper than you might normally expect). If so, use a regular (L-shaped) Allen key to turn on the remaining good section (probably not reachable with a regular-length bit).
    If not, it's probably time to shell out for replacements from Trek (your Trek dealer can get them easily enough, if you quote your frame number).
    If you can't remove the damaged ones, hammer in an oversized Torx bit to create new splines in the aluminium and remove them (but this isn't a long-term solution).

    Thanks for the education Type 17. I think the damage is just to the very exterior as when I got the H6 (I think it was the H6 not the H5) in and properly seated it loosened and tightened without any wiggle or slippage. It was when I was initially trying it that I think I wasn't past the exterior "gate" for want of a better term that I experienced the slippage and caused the scuffing.


  • Registered Users, Registered Users 2, Paid Member Posts: 8,044 ✭✭✭54and56


    CramCycle wrote: »
    Some of the thru axles have a little bit of a lip you have to push past before turning, I ruined my front one the same way as you did. Make sure its is fully in the next time, if its easy to take off, you will be fine, if it starts slipping, the damage is done, once you get it off, get a new thru axle.

    Yes, this explains exactly the issue I had. In not wanting to be my usual forceful self and cause damage I ended up being a bit too hesitant and tried tightening without pushing past the lip hence the slippage and scuffing as it didn't have sufficient purchase.

    Apart from the aesthetic damage I think (hope) the interior of the thru axle isn't damaged and tightens and loosens as it should but I'll definitely keep an eye on it.

    Tanks again.

    Would have been useful to find this video before I went at the wheels with my torque wrench!


    This thread is a life (if not self inflicted embarrassment) saver!!


  • Posts: 413 ✭✭ [Deleted User]


    I have a question I didn't want to start a new thread for it so maybe it belongs here.

    After going for a ride outside for once I realised how terrible some of our country roads are and definitely need to lower my tyre pressures so I was thinking of getting a digital tyre pressure gauge. But having a look on Amazon I saw for the same price I could get a electronic tyre inflator that will inflate tyres to a selected PSI. Does anyone have any recommendations for one and are they generally safe to use on bike road bike inner tubes?

    This is what I'm on about.

    https://www.amazon.co.uk/dp/B08738QTGK/ref=cm_sw_r_cp_apa_glt_fabc_JQ7G1X23GH7G112BXXNY


  • Moderators, Category Moderators, Arts Moderators, Sports Moderators, Paid Member Posts: 54,390 CMod ✭✭✭✭magicbastarder


    what sort of pump do you have? a decent track pump will have a pressure gauge.


  • Advertisement
  • Posts: 413 ✭✭ [Deleted User]


    what sort of pump do you have? a decent track pump will have a pressure gauge.

    I have a Topeak joe blow 2, but it is a few years old plus I have always been doubtful of the accuracy of analogue gauges especially in fairly low cost consumer products.


  • Registered Users, Registered Users 2 Posts: 8,608 ✭✭✭cletus


    What pressure are you running at the moment, and what are you hoping to run?

    I'd imagine the pump you have would be accurate enough


  • Moderators, Category Moderators, Arts Moderators, Sports Moderators, Paid Member Posts: 54,390 CMod ✭✭✭✭magicbastarder


    there's no reason to believe a digital gauge is any more accurate than an analogue one, i'd have thought. it's just a different method of displaying the figure.


  • Registered Users, Registered Users 2 Posts: 2,731 ✭✭✭Type 17


    The best method for assessing a gauge you own is to pump a tyre to a given pressure and then check it with as many other pumps/gauges as you can access (friends, relatives, LBS, etc) to compare.

    Bear in mind that you will lose at least 2-4PSI each time you fit/remove the pump-head or gauge, so take that into account.

    Once you've seen that your own gauge isn't an outlier in the accuracy stakes, you can trust it (or if it is, you'll know whether it reads high or low, and will be able to choose a reading to aim for).


  • Posts: 413 ✭✭ [Deleted User]


    On Friday I'm taking delivery of a power metre but in order for it to work on the bike I have to say goodbye to my Shimano Ultegra Crank arms and attached spider.

    Was just wondering if anybody here would like them all I ask is that you pay the cost of shipping.


  • Advertisement
  • Registered Users, Registered Users 2 Posts: 194 ✭✭WOT


    On Friday I'm taking delivery of a power metre but in order for it to work on the bike I have to say goodbye to my Shimano Ultegra Crank arms and attached spider.

    Was just wondering if anybody here would like them all I ask is that you pay the cost of shipping.

    Definitely interested


  • Registered Users, Registered Users 2 Posts: 8,608 ✭✭✭cletus


    If WOT falls through, I'll take next in line, please


  • Posts: 413 ✭✭ [Deleted User]


    Thanks I'll give you an update on Saturday once I have the new power meter and cranks installed.

    Wouldn't suppose either of you would like a fake but really good quality and as far as I can tell indistinguishable visually from the real thing Specialized romin evo saddle in white? I'll be honest I've never ridden on it but the company I ordered it from on AliExpress had great reviews.

    Again not looking to profit just the cost of shipping.


  • Registered Users, Registered Users 2 Posts: 8,608 ✭✭✭cletus


    Thanks I'll give you an update on Saturday once I have the new power meter and cranks installed.

    Wouldn't suppose either of you would like a fake but really good quality and as far as I can tell indistinguishable visually from the real thing Specialized romin evo saddle in white? I'll be honest I've never ridden on it but the company I ordered it from on AliExpress had great reviews.

    Again not looking to profit just the cost of shipping.

    You had me until white :)

    Thanks for the offer, though


  • Registered Users, Registered Users 2 Posts: 194 ✭✭WOT


    Thanks I'll give you an update on Saturday once I have the new power meter and cranks installed.

    Wouldn't suppose either of you would like a fake but really good quality and as far as I can tell indistinguishable visually from the real thing Specialized romin evo saddle in white? I'll be honest I've never ridden on it but the company I ordered it from on AliExpress had great reviews.

    Again not looking to profit just the cost of shipping.

    See how you go with the new tech. Let me know the postage cost for both and how I can get it to you PayPal, revolut, carrier pigeon etc.

    I’ll pass the saddle on again if it doesn’t suit my upcoming shopping cart build.


  • Registered Users, Registered Users 2 Posts: 8,608 ✭✭✭cletus


    I guess that means WOT hasn't fallen through...


  • Registered Users, Registered Users 2 Posts: 12,340 ✭✭✭✭MadYaker


    Thanks I'll give you an update on Saturday once I have the new power meter and cranks installed.

    Wouldn't suppose either of you would like a fake but really good quality and as far as I can tell indistinguishable visually from the real thing Specialized romin evo saddle in white? I'll be honest I've never ridden on it but the company I ordered it from on AliExpress had great reviews.

    Again not looking to profit just the cost of shipping.

    I’d take that, pay you postage and make a €20 donation to a charity of your choice.


  • Registered Users, Registered Users 2 Posts: 138 ✭✭Nialler73


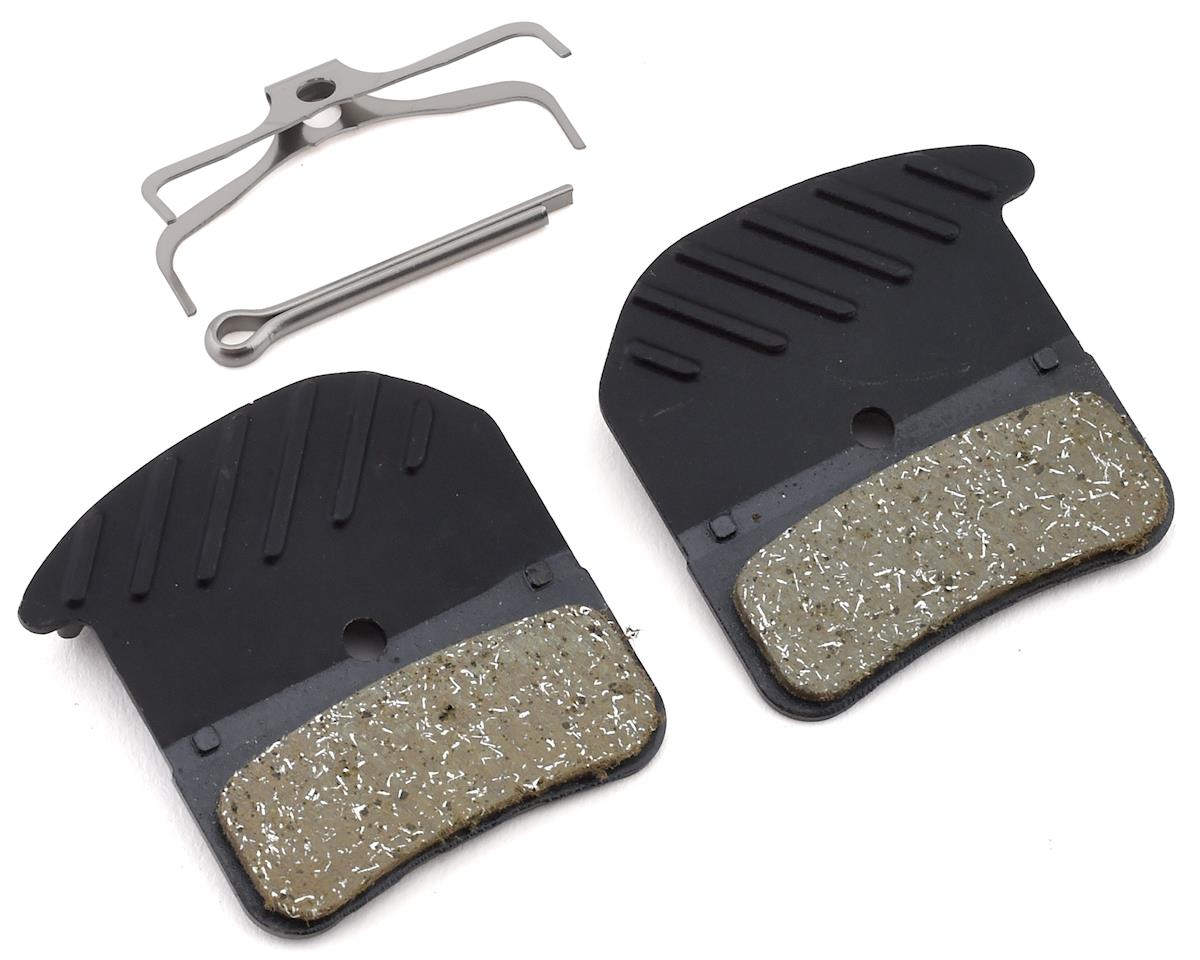
    20210512_230108.jpgHi. 1st time changing disc brake pads on a road bike. Got them on fine with the bolt tightened but the small clip that was on with the previous pair won't go back on. Should I be concerned?


  • Moderators, Category Moderators, Arts Moderators, Sports Moderators, Paid Member Posts: 54,390 CMod ✭✭✭✭magicbastarder


    should be very easy to attach that - in what way is it failing to go on?
    the large loop at the end is to facilitate removal/reattachment - it's not where the clip is actually meant to grip the bolt, it's the centre of the clip which does that.


  • Registered Users, Registered Users 2 Posts: 138 ✭✭Nialler73


    Ok, I was trying to connect it via the loop. I'll give that a blast. As an aside, are the 2 silver clips that came in the packet replacements for this clip also?


  • Advertisement
  • Registered Users, Registered Users 2 Posts: 138 ✭✭Nialler73


    Clip attached, ta very much for the tip.


  • Registered Users, Registered Users 2 Posts: 2,731 ✭✭✭Type 17


    Nialler73 wrote: »
    ...As an aside, are the 2 silver clips that came in the packet replacements for this clip also?

    If your brake callipers hold the pads with a screw and safety clip, then you should use that system.
    Some disc brake systems use split-pins (pic below), which work fine, but they shouldn't be re-used, hence the fresh pads come with new ones, but it sounds like you don't need them.

    y1xm98020.jpg


  • Registered Users, Registered Users 2 Posts: 3,254 ✭✭✭darragh o meara


    Changed the rear derailleur and ended up with one with a longer cage, as a result it’s almost impossible to get up to the biggest cog on the front and rear at the same time. I’ve bought a new chain and usually size it by wrapping around both large cogs and adding 2 links.

    Should I add more for a longer cage?


  • Moderators, Category Moderators, Arts Moderators, Sports Moderators, Paid Member Posts: 54,390 CMod ✭✭✭✭magicbastarder


    you shouldn't be going big-big anyway. but yes, your chain should be long enough to accomodate it to prevent damage to the RD if you do end up in that combination.


  • Registered Users, Registered Users 2 Posts: 2,731 ✭✭✭Type 17


    ...your chain should be long enough to accomodate it to prevent damage to the RD if you do end up in that combination.

    Very true, here's a pic showing what happens when the chain is too short and the rider puts it into big/big on a hill - not only was the RD ruined, the rear wheel was dragged out of the dropouts, but not before the chainstay failed (carbon frame destroyed).

    EcD2SK9.jpg


  • Registered Users, Registered Users 2 Posts: 1,117 ✭✭✭nicksnikita


    Type 17 wrote: »
    Very true, here's a pic showing what happens when the chain is too short and the rider puts it into big/big on a hill - not only was the RD ruined, the rear wheel was dragged out of the dropouts, but not before the chainstay failed (carbon frame destroyed).

    EcD2SK9.jpg

    But it’s all good - it’s still in big-big


  • Registered Users, Registered Users 2 Posts: 8,444 ✭✭✭07Lapierre


    Weepsie wrote: »
    Have taken delivery of s campagnolo groupset. Everything I have however is Shimano/sram tools and all.

    I know different cables are needed, what of the tool for the bottom bracket and chainsrt installation. I've stuff for Hollowtech/Gxp and square taper but nothing for an ultratorque one.

    Also, I'm righting in thinking an 11 speed Shimano cassette will work fine with a campy chain and chainset?


    Yes. You'll need a Campagnolo specific tool to tighten the Campagnolo BB cups.

    https://www.google.com/aclk?sa=l&ai=DChcSEwi6nrKknczwAhUK1O0KHTa8ACkYABAQGgJkZw&sig=AOD64_1S1iGb9YQ52KFScBw6Oqbl-Dg2eQ&ctype=5&q=&ved=2ahUKEwjilaaknczwAhXKTBUIHVqpCX0Qwg96BAgBEDQ&adurl=


  • Posts: 413 ✭✭ [Deleted User]


    Finally got round to installing the Power2max on the supplied Rotor cranks, it says to tighten them to 33Nm yet my torque wrench only goes to 24Nm but even getting that tight was a struggle and with my spaghetti arms I doubt even if I had a torque wrench that went to 33 I would even be able to turn it. I presume 24Nm will be good enough?


  • Registered Users, Registered Users 2 Posts: 8,608 ✭✭✭cletus


    There's a couple of factors at play here. First off, torque wrenches are most accurate when used in the middle of their range. Secondly, 33 nm is about 24ft lbs in old money, so while not a huge amount of torque, the length of your lever will directly affect your ability to apply torque. Cheater bars are often used for this application.

    If you got another torque wrench that covered 33 nm somewhere in the middle of the range, the handle would likely be longer, giving more leverage.

    Apart from all that, I wouldn't be overly worried about the torque spec unless in on carbon fibre. Just do the fasteners up good and tight


  • Advertisement
  • Registered Users, Registered Users 2 Posts: 2,731 ✭✭✭Type 17


    As cletus says, torque settings for most applications can be done by feel, based on the items being clean (no rusty threads or facing surfaces under the fastener head) and taking into account the springiness of the items being fastened.

    It's well understood these days that items made of non-springy materials can be damaged by over-torquing (carbon fibre, most grades of aluminium).

    However items where a lot of force goes through the fastened joint (bicycle cranks, pedals, car-engine parts*, etc) also need to be torqued correctly - too loose and the high forces will cause movement, leading to facing-surface wear/damage and the fastener may even be worked loose (not a great scenario with bike cranks!).

    TBH, I'd borrow a torque wrench that covers 33Nm before going out for a long/hard ride.

    *Bicycle torque settings are very low overall - most engine cylinder-head bolts get torqued to over 100Nm, and the bolt for the front crank pulley on some Audi engines is torqued to 250Nm (it wouldn't be worth making a torque wrench that can handle 250Nm, as it would be expensive and not used enough to justify buying it, so an Audi geared tool is used, which multiplies a specified lower torque (about 100Nm) up to 250Nm).


Advertisement