Advertisement
If you have a new account but are having problems posting or verifying your account, please email us on hello@boards.ie for help. Thanks :)
Hello all! Please ensure that you are posting a new thread or question in the appropriate forum. The Feedback forum is overwhelmed with questions that are having to be moved elsewhere. If you need help to verify your account contact hello@boards.ie
Hi all,
Vanilla are planning an update to the site on April 24th (next Wednesday). It is a major PHP8 update which is expected to boost performance across the site. The site will be down from 7pm and it is expected to take about an hour to complete. We appreciate your patience during the update.
Thanks all.

Build The Millennium Falcon

145679

Comments

  • Registered Users Posts: 5,965 ✭✭✭TheIrishGrover


    I'd love to see a completed base model versus something insane like this and see how they compare. I'd say it would be chalk and cheese.


  • Moderators, Computer Games Moderators Posts: 5,381 Mod ✭✭✭✭Optimus Prime


    I finished off the barrels the last couple of days, to give them some age and wear i covered them in oil paint, then wiped it off. the white ones i used "starship filth" oil paint, i loves this paint it makes everything look a hundred times better. I used a light rust oil paint on one black barrel and a dark rust one on the other. You basically plaster them with the stuff then used a cloth to rub it back off. it leaves it nice and weathered looking, i also scratched them in a few small places to reveal the silver underneath. i didnt do much of this though because i thought they looked well as is.

    barrels3.jpg

    The only other thing i did was get impatient, I finally put together a lot of the parts of the hold. Screwed the back wall in places, the bunk, the bench, the table. i placed the barrels in there, the removed grates, the Nav computer and chair. Temp hooked up most of the lights, i can defo get more light on the Nav computer i havent hooked up the led strips correctly in these photos.. and there is still a lot more i want to do with it.

    For comparison, here is the default Kit hold, with minor painting i think, some dry brushing here and there and a wash on the floor.

    stockhold1.jpg

    and here is some photos of mine together at last.. five years later..

    holdtest1.jpg

    holdtest2.jpg

    holdtest3.jpg


  • Registered Users Posts: 1,445 ✭✭✭ZV Yoda


    Incredible!


  • Moderators, Computer Games Moderators Posts: 5,381 Mod ✭✭✭✭Optimus Prime


    Not a very exciting update this week, but a lot of waiting for paint to dry essentially. Next part of the build i want to get done is the corridors, so made a start on them this week. They involve a LOT of cushion pieces for the walls archways etc. so a couple of hours was taken cutting some of them from the sprews and sanding where they where cut off. You can see some of them below.I still have loads more to do, these ones where just the arches for 1 corridor, side walls next.

    arch1.jpg

    After that I started on the floors. The ones in the kit are just solid plastic, but obviously thats not good enough! in the film there is light running up through grills along the side, so i picked up this PhotoEtch floor to use. It involves cutting the sides off the kit floors with a dremel, then sanding back and gluing the photoetch floor to the kit ones.

    You can see below using the curved floor as an example where i cut back the sides then glued the photoetch floor on top.

    The straight piece of floor in the last image below has a step in it, and the PhotoEtch included a small grill that goes on there, so i dremeled out a gap there too so light will come through the grill on the step when the floor is lit from underneath with a led strip.

    floors1.jpg

    After that i just sprayed them german grey, the cushions on the wall are going to cover most of this anyways, ill add some highlighting to the floors later.

    floors2.jpg

    Finally this week, these two pieces that lead to the gunner ports i think (ill have to check the book again). These two pieces again are just blank grey walls in the original kit, but the photoetch has three control panels and decals to go on there. So i want these to light up as usual, so i dremeled out holes here so i can light them from the back later, glued on the control panels, sprayed them german grey (also took the time here to spray a lot of the other corridor parts the same while i had the colour in the airbrush) i then used some clear paint on the back of the control panels so they light up colours later, red, blue, yellow just for some of the buttons etc. The decals went on finally and thats where i finished up today.

    Next week ill be adding all the cushions etc to the corridor walls and doing some extra details there. Stay safe!

    corridorpanels.jpg


  • Registered Users Posts: 1,445 ✭✭✭ZV Yoda


    After that I started on the floors. The ones in the kit are just solid plastic, but obviously thats not good enough! in the film there is light running up through grills along the side, so i picked up this PhotoEtch floor to use. It involves cutting the sides off the kit floors with a dremel, then sanding back and gluing the photoetch floor to the kit ones.
    [/img]

    This paragraph sums up your approach perfectly.

    I think I’m in awe of you, while also being slightly scared of you in equal measures. Anybody with this single mindedness could be either an excellent surgeon... or a clinical assassin!

    Either way, thanks for the update! Please keep them coming.


  • Advertisement
  • Registered Users Posts: 5,965 ✭✭✭TheIrishGrover


    Yeah, I have 10 thumbs and they are all broken.

    That was very interesting comparing the base central area with your own custom job. I mean at first glance it looks pretty decent. Especially since it's an inside section. But compared with the custom version it looks cheap and flat. Looks like a knock off of your custom one.

    But the patience involved? I only wish to apologise to your partner for my part in bumping this thread :D


  • Moderators, Computer Games Moderators Posts: 5,381 Mod ✭✭✭✭Optimus Prime


    Back again.. with more corridors !

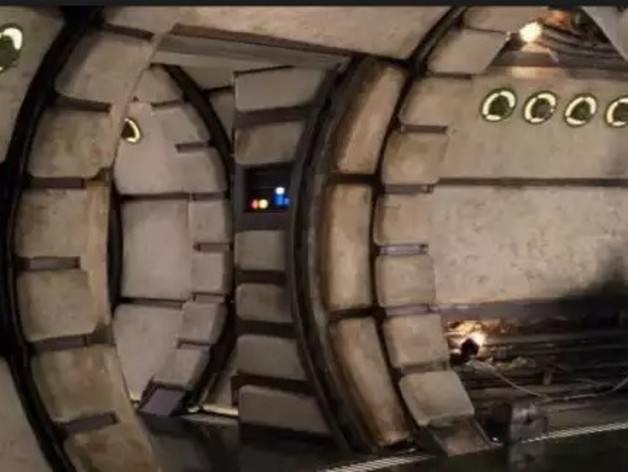
    So after last week I finished off the corridor ends by adding the cushions. I used some Tamiya weathering kits to add some soot, rust and oil stain to the cushions as they where too clean. all the cushions for the corridors will be getting this on them to make them look worn etc. Here they are finished.

    coridorend.jpg

    Next I put a coat of flat white on the underneath of each floor piece and the corridor itself, this is because im going to put light strips underneath to light up the sides of the floor grates and it will help the light bounce around better. especially as the led strips will be on the bottom of the floor pieces.

    Also the corridors in the Falcon in the films is missing a couple of cushions in certain parts, id imagine due to some "upgrades" or repairs Han and Chewie did. The kit doesnt account for these missing cushions, but I am going to. So i drilled out the Tube where these cushions are missing in screenshots from the films i checked out online, i painted the cut out parts white, then dry brushed with some flesh to make it look cut away.

    I then cut some styrene squares to cover the cut out holes, and sprayed them German grey. I glued these to backs of the tubes. Once in place i put some different colour wires etc in there and gave them a quick black wash to make them look dirty. They look out of place now but when that corridor piece has the cushions on it will make more sense.

    coridor1.jpg

    After this i concentrated on the straight piece of corridor first. I dont currently have enough LED strips to do the 3 Corridor pieces so ill have to wait for more to arrive.

    I started by soldering two of the Warm White LED strips together, then i stuck these to the underside of the floor piece.

    floorlights1.jpg

    Then i also ran two warm white normal lights up the middle of this. These are to light up the control panels i added last week to the two end corridor pieces. I have green arrows pointing to these in the first image below.

    I then slapped some white paint on the wires just to help the light bounce around a bit.

    A quick test of the lights to make sure they work in the second image below with the corridors added.

    and then you can see how the two bulbs light up the control panels and the LED strips light up the sides of the floors. I could probably due with adding some paper backing to the control panel there to difuse the light a bit, i also need to do some light blocking at the side of the corridors as there is some light leak currently. I also added all the wall cushions in that straight corridor after weathering again with Tamiya weather kits soot, rust and oil stain.

    coridor2.jpg

    Finally this week i needed to figure out what to do about the corridor lights. You can see them below on the right (You can also see one of the exposed sections in this image where a corridor cushion is missing).

    e343759c5f395f4a748cdc44923e7b31_preview_featured.jpg

    These dont come in the Kit at all, just blank cushions on the walls. You can buy 3D printed ones but the price is ridiculous i think for them, 40 quid delivered was the cheapest i could find and they dont arrive until mid June. So i decided to try make them myself. It will involve some drilling and lighting, but first i needed to figure out how to make the lights!

    The Paragrafix corridor photo-etch comes with these flat discs that make up the back part of each light, but they are not really right, so i had a black tube i found in one of the kids lego (shhhhh!) that i took and cut into tiny tube pieces. i then shoved these on the end of cocktail sticks, loads of em, and glued them.

    Once they dried I cut them all off and put them on some tape then sprayed them. Now, while i think they turned out OK, i wasn't fully happy with them, the tops could do with sanding flatter and i wasn't happy with the colour i sprayed them. So i sand the tops down more on all of them and re-sprayed them a Gun Metal colour. but i forgot to take a photo!

    coridorlights1.jpg

    Thats all for now, stay safe!


  • Registered Users Posts: 1,445 ✭✭✭ZV Yoda


    Amazing. Just amazing. The photos look like stills from the movie set.

    Thanks for keeping us all updated!


  • Moderators, Computer Games Moderators Posts: 5,381 Mod ✭✭✭✭Optimus Prime


    Quick update this week, took a while to figure out how to do this.

    Working on the corridor lights for the 1st corridor. First i used a spare corridor cushion from the box of parts i got off my brother when he gave up on it, i used this to make a template for where the light holes need to be drilled on the ones on my corridor. Once i was happy enough with the position of the small holes, i held this piece over the ones on my corridor and marked through this with a hand drill onto my own corridor cushions.

    Once i had the small holes drilled, i used a bigger drill piece to increase the size and ended up with the ones below.

    I have a bunch of warm white lights that come with these clip holders for the bulbs, so i removed the black bulb holders and glued them onto the back of the corridor where i drilled the holes. You can see that in the last image here.

    corridorlights3.jpg

    While the glue was drying there, i wired up all the bulbs for this corridor as best i could, im no expert at this stuff, i had these handy wire clip things you can see in the image that helped save time, you just clip the wires into them. handy.

    Once that was made, i stuck the bulbs back into their clips that i had glued to the corridor.

    corridorlights4.jpg

    Then i tested the lights.. I have included an image of what the stock corridor looks like first, just to compare to. The reason this corridor is "open" on one side is because a part of the hull of the falcon when complete will be removable to you can have a look in at this corridor.

    corridorlights5.jpg

    and finally i wasnt 100% happy with the underfloor lighting on the corridor, so i decided to try something different while i can. On the next two corridors instead of just painting the bottom white, i used some PVC glue and tin foil, and just stuck that down.

    I havent tried it yet but id imagine it will reflect the light better. I have since taken apart the corridor above and tin foiled the bottom of that one too.

    corridorlights6.jpg

    Thats all for now, thanks!


  • Registered Users Posts: 2,146 ✭✭✭dudeeile


    Truly amazing attention to detail, it will be specatacular once complete. What's your percentage complete on the build?


  • Advertisement
  • Registered Users Posts: 910 ✭✭✭Flying Abruptly


    How do you plan to power the all the leds when its complete?


  • Moderators, Computer Games Moderators Posts: 5,381 Mod ✭✭✭✭Optimus Prime


    dudeeile wrote: »
    Truly amazing attention to detail, it will be specatacular once complete. What's your percentage complete on the build?

    Thanks a lot , I’m not really sure to be honest , the interior has a lot of lighting etc and the outside a lot of painting. I don’t really know where I am overall with it , it’s hard to tell. All the fiddly bits are on the inside and I’ve only a couple of corridors and the gunner sections to do. I’m going to get delayed as well waiting on LED strips for the last of the three corridors. I’m sure there will be other parts to do while I’m waiting though.


  • Moderators, Computer Games Moderators Posts: 5,381 Mod ✭✭✭✭Optimus Prime


    How do you plan to power the all the leds when its complete?

    Good question! I don’t know haha

    There is a board that comes with it that the stock lights are powered from. That’s some of the cockpit , the main lights on the front , engine light . That also powers a servo motor that lifts the ramp up and down. You know where they get on and off the falcon.

    All of that can be powered by plug or battery it’s builders choice.

    I’ve seen people online try to piggy back all their lights onto that board and it blows and they are screwed.

    I’m not very good when it comes to figuring out how to power all this stuff to be honest. I’ve seen people with breadboards wiring stuff all over the place , resistors. But honestly I haven’t a clue with that. Right now im chancing my arm wiring it together and I’m testing all this off a 9v battery. I might end up with a bank of 9v battery’s powering different light sections haha!


  • Registered Users Posts: 1,445 ✭✭✭ZV Yoda


    Jesus, this just keeps getting better. Incredible

    “im no expert at this stuff”... Yeah, right. And my granny’s a paratrooper!


  • Registered Users Posts: 5,965 ✭✭✭TheIrishGrover


    corridorlights5.jpg

    Thats all for now, thanks!

    Get the f*ck out of here.... :) That's just porn. Plain and simple.

    Amazing


  • Moderators, Computer Games Moderators Posts: 5,381 Mod ✭✭✭✭Optimus Prime


    Hi Guys, this week i went to work on the other two corridors. First up the smaller one. Done the usual, used my last LED strips under the floor, put a dirt wash on the floor, added some soot and oil\rust etc to the cushions to make them look more worn, glued them on. then drilled the holes for the corridor lights and glued them on, then wired up the lights. Thats the quick version! Image below..

    corridor6.jpg

    You can see the corridor below, turned out ok. I was in Aldi and spotted this compact mirror in the second image, so i picked it up and took one of the mirrors out and stuck it to the end of the corridor, as you can see below, it gives the illusion of the corridor continuing on further than it does.. its not perfect but its better than looking at empty space beyond its end!

    corridor7.jpg

    Next the final corridor, this is the one i cut the sections out last week and added in the wires so it looks like some of the corridor cushions have been removed for access. I did the same here, weathered the cushions, glued them on, drilled the lights etc.. The only thing i cant do yet is the underfloor lighting as i used my last LED strips on the previous corridor above. so i cant complete it until i get more of these.

    This corridor has a cut out section as you can see, because when the model is finished the hull pieces come off so you can have a look at the corridor inside. thats why it looks like one side is missing. I also added the other half of the compact mirror to this corridor, you can see it in the last image.

    corridor8.jpg

    Next up the smaller corridor that leads to the gunner port, sprayed all wall\floor\roof parts german grey. Gave the cushions the usual weathering then glued them on. a wash on the floor. I then attached these two corridors temporarily to the straight one i made last week.

    corridor9.jpg

    and finally i test fit them together, added the light to the wall in the hold beside the small room i made. put a light above that too to light it up that room, lit up the corridor pieces and took some photos.

    corridor10.jpg


  • Moderators, Social & Fun Moderators Posts: 14,889 Mod ✭✭✭✭AndyBoBandy


    C'mon, you're just taking the pi$$ now!!!!


  • Moderators, Computer Games Moderators Posts: 5,381 Mod ✭✭✭✭Optimus Prime


    C'mon, you're just taking the pi$$ now!!!!

    So far so good, i havent messed it up yet! im dreading painting the hull though!


  • Registered Users Posts: 1,445 ✭✭✭ZV Yoda


    I’m running out of superlatives now. This is amazing.

    Thanks for posting!


  • Registered Users Posts: 2,146 ✭✭✭dudeeile


    Everything about your build is class, I'm loviong your paintwork and aging, have you much model buildong experience?


  • Advertisement
  • Closed Accounts Posts: 1,049 ✭✭✭GinSoaked


    Have you insured it :)


  • Moderators, Computer Games Moderators Posts: 5,381 Mod ✭✭✭✭Optimus Prime


    Thanks Guys
    dudeeile wrote: »
    Everything about your build is class, I'm loviong your paintwork and aging, have you much model buildong experience?

    Honestly before I signed up for this I never made a model. I bought two to practice on , an AT-ST from Star Wars and a Viper from Battlestar Galactica, you can see them earlier in the thread. Outside of that I spent A LOT of time looking at YouTube videos of painting, weathering , lighting etc.

    YouTube is really great for teaching you stuff.


  • Registered Users Posts: 1,445 ✭✭✭ZV Yoda


    Thanks Guys


    Honestly before I signed up for this I never made a model. I bought two to practice on , an AT-ST from Star Wars and a Viper from Battlestar Galactica, you can see them earlier in the thread. Outside of that I spent A LOT of time looking at YouTube videos of painting, weathering , lighting etc.

    YouTube is really great for teaching you stuff.

    It’s a real pleasure watching your Millennium Falcon come to life. As a kid, I wanted to be a model maker doing special effects for movies (I’m old enough to have seen the original Falcon fly on the big screen back in 1977).

    I remember seeing a Star Wars “behind the scenes” documentary at the time, and I was amazed at the attention to detail when the SFX team were constructing the models. Your Falcon looks as good as the movie original.


  • Moderators, Computer Games Moderators Posts: 5,381 Mod ✭✭✭✭Optimus Prime


    Thanks a lot i appreciate that, ill be happy if it turns out half decent. so far i havent done anything to wreck it. This one is a 1:1 scale with the Empire filming model so should look cool when finished. though i will have to make some sort of table for it as its huge.


  • Registered Users Posts: 1,800 ✭✭✭Relikk


    This one is a 1:1 scale with the Empire filming model so should look cool when finished. though i will have to make some sort of table for it as its huge.

    That's the main reason why I never even started mine after I saw the scale of it. There's just no room for it in my home. I have every issue in the binders but every part that came with them are still sealed in their packets.


  • Registered Users Posts: 1,445 ✭✭✭ZV Yoda


    What size will it be when it’s finished?


  • Closed Accounts Posts: 1,049 ✭✭✭GinSoaked


    Thanks a lot i appreciate that, ill be happy if it turns out half decent. so far i havent done anything to wreck it. This one is a 1:1 scale with the Empire filming model so should look cool when finished. though i will have to make some sort of table for it as its huge.

    Hang it?


  • Moderators, Computer Games Moderators Posts: 5,381 Mod ✭✭✭✭Optimus Prime


    You can hang it , in fact you get a fairly strong bracket with it that you could mount it on the wall. But it would be destroyed with dust etc. I think I’ll make a table for it with glass covering it. I’m not sure yet.


    When it’s finished it will be 808mm long, 596mm wide and 192mm high.

    This image below gives you an idea of size , this one actually looks like a stock one that is just built as is, no painting etc ..

    mf-1_r.jpg


  • Registered Users Posts: 5,965 ✭✭✭TheIrishGrover


    Of course ya also got to remember that the most that the real model had to show internally was shots of the cockpit from a distance. None of that crazy attention to detail Prime and others put in. :)


  • Advertisement
  • Closed Accounts Posts: 1,049 ✭✭✭GinSoaked


    You can hang it , in fact you get a fairly strong bracket with it that you could mount it on the wall. But it would be destroyed with dust etc. I think I’ll make a table for it with glass covering it. I’m not sure yet.


    ..

    Blow it off with the airline occasionally?


Advertisement