Advertisement
If you have a new account but are having problems posting or verifying your account, please email us on hello@boards.ie for help. Thanks :)
Hello all! Please ensure that you are posting a new thread or question in the appropriate forum. The Feedback forum is overwhelmed with questions that are having to be moved elsewhere. If you need help to verify your account contact hello@boards.ie
Help Keep Boards Alive. Support us by going ad free today. See here: https://subscriptions.boards.ie/.
If we do not hit our goal we will be forced to close the site.

Current status: https://keepboardsalive.com/

Annual subs are best for most impact. If you are still undecided on going Ad Free - you can also donate using the Paypal Donate option. All contribution helps. Thank you.

Shower questions

  • 12-08-2025 09:33AM
    #1
    Registered Users Posts: 291 ✭✭


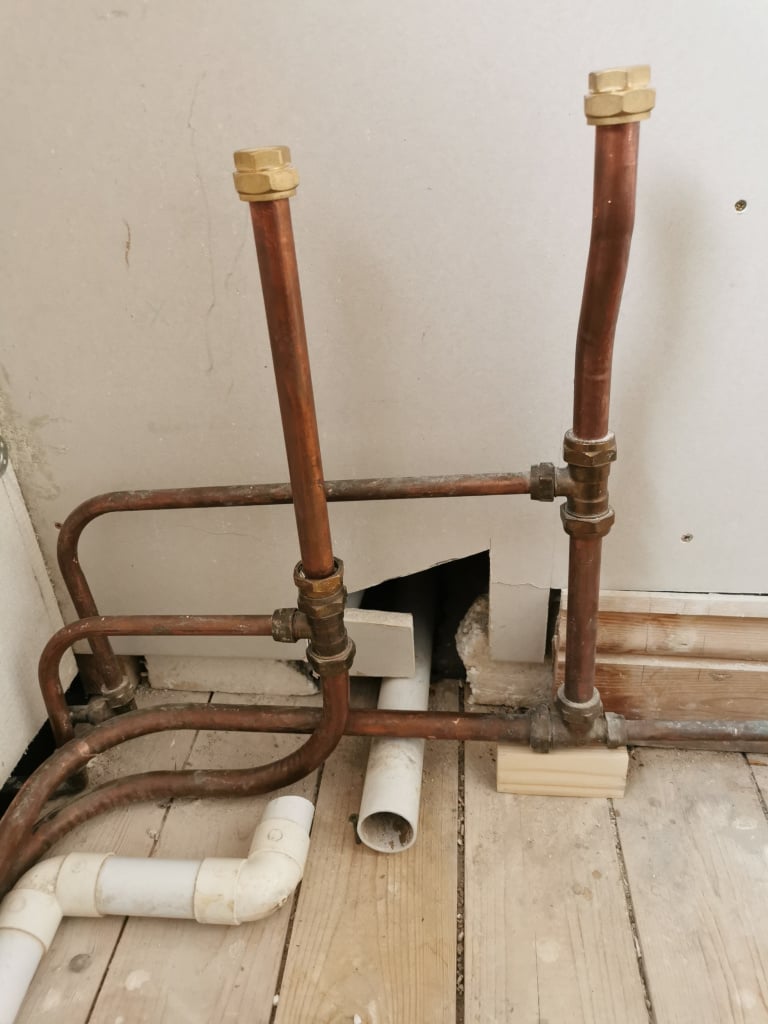
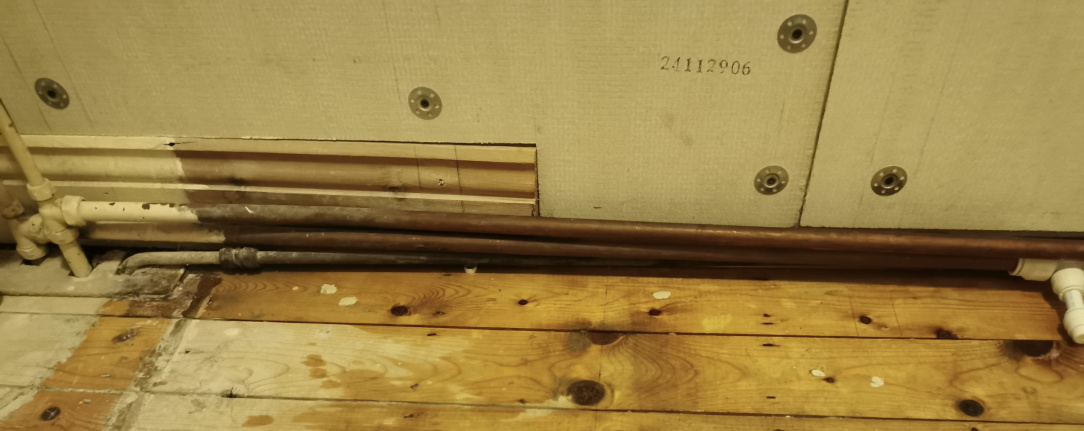
    I need to modify the copper pipe layout in the photo in order to accommodate both the shower tray which will be flush against that back wall and the pipe work to the shower on the same wall. So I will need to lower the short sections that feed those hot and cold pipes that enter the wall on the left and go downstairs. Then I am planning to chase the supply pipes to the shower into the stud wall behind the upright pipes (those will be gone). I've searched online and there are differing opinions on concealing shower pipes in a wall. Ideally, I don't want them boxed and therefore visible, nor do I want a false wall as we've little enough space already. So is it ok to chase them as planned? I was thinking of using pex rather than copper and having no joins etc. in the wall sections. All good, or do I need to reconsider anything? Also, is it ok to re-use those elbows and tees, presumably with new olives, or should I fit new ones?

    IMG_20250810_184704.jpg


«1

Comments

  • Registered Users, Registered Users 2, Paid Member Posts: 9,375 ✭✭✭10-10-20


    New olives? Always. Olives embed themselves in the copper or pex pipe, they don't (or shouldn't come off) unless you're doing it wrong.

    Make sure you install inserts into the pex. No joins is a great idea and it means that you have some flex.

    Make sure to put a strong piece of timber behind where the taps will mount too.

    Maintain as much of that bent radius as you can in lieu of an elbow bend as they have less loss overall.


  • Registered Users Posts: 291 ✭✭MarcusMaximus


    Thanks. So new olives for sure but I'll assume it's safe to re-use the old connectors. Yes I got inserts for the pex. The pipes will have push fit elbows at the top to affix to the shower inlets. I'll also be running them through pipe insulation.

    I should have said that there won't be any taps as we will only have the shower. Those 22mm uprights were the feeds to the old bath taps so I'll be removing them and putting everything low profile to accommodate the shower tray.

    So I should bend the pex where possible? It might be difficult to do that in the short runs between the pipes on the far left that go downstairs and the main ones without introducing strain on the joints. However I'll do my best.


  • Registered Users, Registered Users 2 Posts: 600 ✭✭✭TheSunIsShining


  • Registered Users Posts: 291 ✭✭MarcusMaximus


    Ok thanks. It’s 15mm, no doubt I can find that spec online.


  • Registered Users Posts: 291 ✭✭MarcusMaximus


    Right, the minimum bend radius is 5” (which seems to = the most I can safely bend it?). If I make the bend and then put one end of the pipe on the floor and the other against the wall, it should measure no more than 5” from the corner between the two surfaces and the centre point of the bend, is that right? It’s a bit complicated online..


  • Advertisement
  • Registered Users Posts: 291 ✭✭MarcusMaximus


    Actually I could only get plastic inserts, no copper to be found anywhere. Woodies do have 1/2"ones but I don't think they'll fit 15mm pipe properly. Screwfix do stainless steel ones but they seem to be mostly for drinking water applications. The shower instructions say not to use stainless steel fittings but maybe they only mean the pipes.

    Will the plastic ones be ok with the brass connectors or should I get the s. steel, or seek out copper?


  • Registered Users, Registered Users 2, Paid Member Posts: 9,375 ✭✭✭10-10-20


    Plastic (I think it's glass reinforced plastic) is fine. 👍️


  • Registered Users Posts: 291 ✭✭MarcusMaximus


    Great thanks! These are the ones (though it says they are to be used with plastic fittings):

    https://www.screwfix.ie/p/flomasta-plastic-push-fit-pipe-inserts-15mm-10-pack/878kr

    To go with the same brand of pipe:

    https://www.screwfix.ie/p/flomasta-pe-x-pipe-15mm-x-3m-white/83180


  • Registered Users, Registered Users 2, Paid Member Posts: 9,375 ✭✭✭10-10-20


    If you're using push-fittings then those are fine. If using compression fittings then these are required:

    https://mccannplumbingsupplies.ie/product/plastic-inserts-pex-pipe/

    "Used to support pex pipe inside any type of joint"


  • Registered Users, Registered Users 2 Posts: 50 ✭✭winklepicker2025


    perhaps tidy the pipe work up as it’s fairly bulky.

    Push fittings are ok just make sure there in 100% especially around pipe bends.

    Test pipe work before you put new shower tray in.


  • Advertisement
  • Registered Users Posts: 291 ✭✭MarcusMaximus


    Ah right. I’ll be using mostly compression so looks like I’ll need the stronger ones. The only problem with the ones you’ve linked to is being Irish they are imperial only. I know that 1/2” is very close to 15mm but probably not close enough for concealed shower plumbing, or for peace of mind! 🤔

    I’ll see if I can source similar metric inserts anywhere. As I said before Woodies do copper ones but again, imperial only.
    Alternatively Screwfix have these:

    https://www.screwfix.ie/p/hep2o-smartsleeve-stainless-steel-push-fit-pipe-inserts-15mm-10-pack/3158f#product_additional_details_container


  • Registered Users Posts: 291 ✭✭MarcusMaximus


    Sorry, missed your post before replying to @10-10-20.

    Oh yeah, that’s just what’s left after removing the old bath! I haven’t touched it yet, apart from putting those stop caps on. I’ll be getting rid of the 22mm uprights and moving everything down so as it’ll be under the tray. Hopefully will look neater. 🤞

    However that does raise the question of where to put isolation valves, given all the pipework will be either under the tray or in the wall and therefore inaccessible.

    I will be testing everything as thoroughly as I can before putting in the tray, or even before putting up the tile backer board over the chasing..


  • Registered Users Posts: 291 ✭✭MarcusMaximus


    I think on reflection I’m going to use plastic push fit connectors instead of the brass compression ones. Seems easier all round and I can also use the plastic inserts I already have.

    Edit: The inserts will reduce the bore size to 10mm and the isolation valves will reduce it to 9.4mm. Will that impact the shower pressure/flow significantly? I couldn’t get full bore valves in plastic push fit, not in Screwfix anyway.

    Post edited by MarcusMaximus on


  • Registered Users, Registered Users 2 Posts: 50 ✭✭winklepicker2025


    isolation could be made in the hotpress or wherever the pipes are coming from


  • Registered Users Posts: 291 ✭✭MarcusMaximus


    Well there already are valves in the hot press which shut off the hot and cold supply for the whole house. The problem is the old bath pipes which will feed the shower are on the same line as the sink and the downstairs supply afaik. So the only way to isolate the shower is to fit the valves after the pipes branch off that line, i.e. somewhere close to the shower itself.

    The hot press is in a separate room, not adjacent to the bathroom.

    However I don't mind having to turn off the whole supply (bar the mains) if I need to work on something, including the shower, so maybe I don't really need separate isolation valves. Just use the existing ones in the hot press?


  • Registered Users, Registered Users 2 Posts: 50 ✭✭winklepicker2025


    just using the existing one should be fine.

    You could always put an extra set of valves alone the line but it’s overkill


  • Registered Users Posts: 291 ✭✭MarcusMaximus


    That's great thanks. That's what I was thinking too, if I can already shut off the water supply when needed. The only consideration is if it's going to affect the shower warranty but hopefully not, as long as there is a means to turn off the water somewhere.


  • Registered Users Posts: 291 ✭✭MarcusMaximus


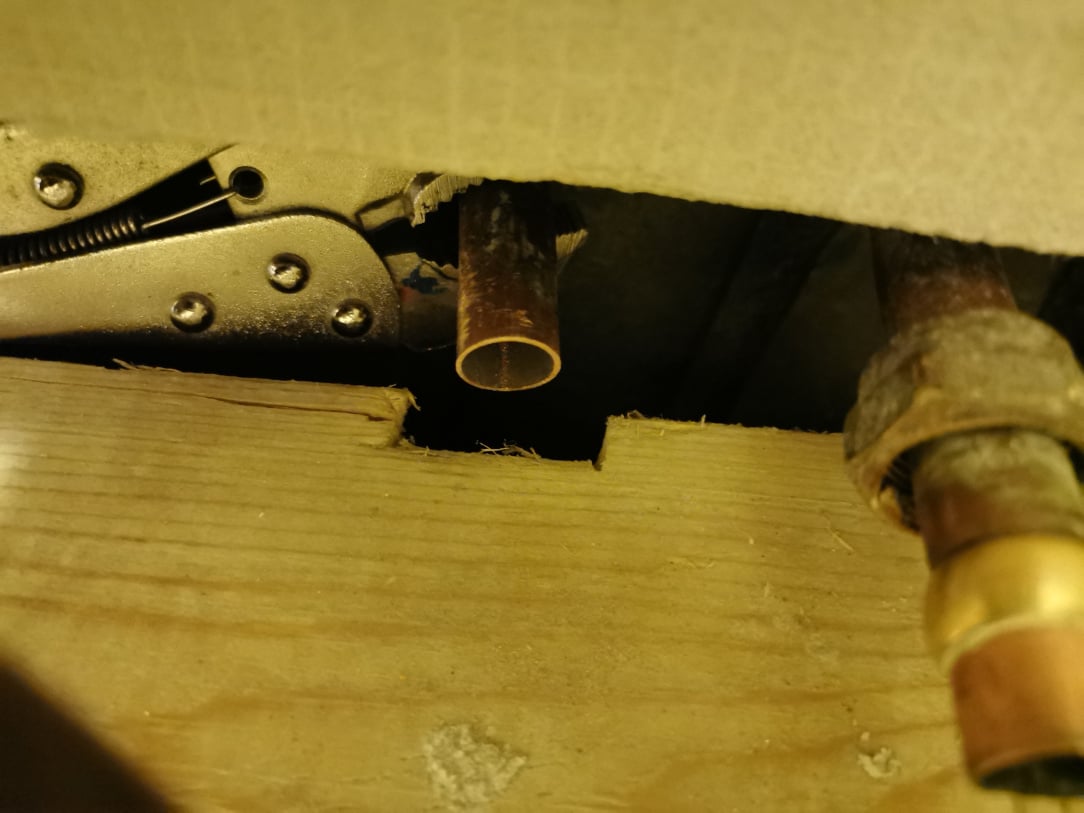
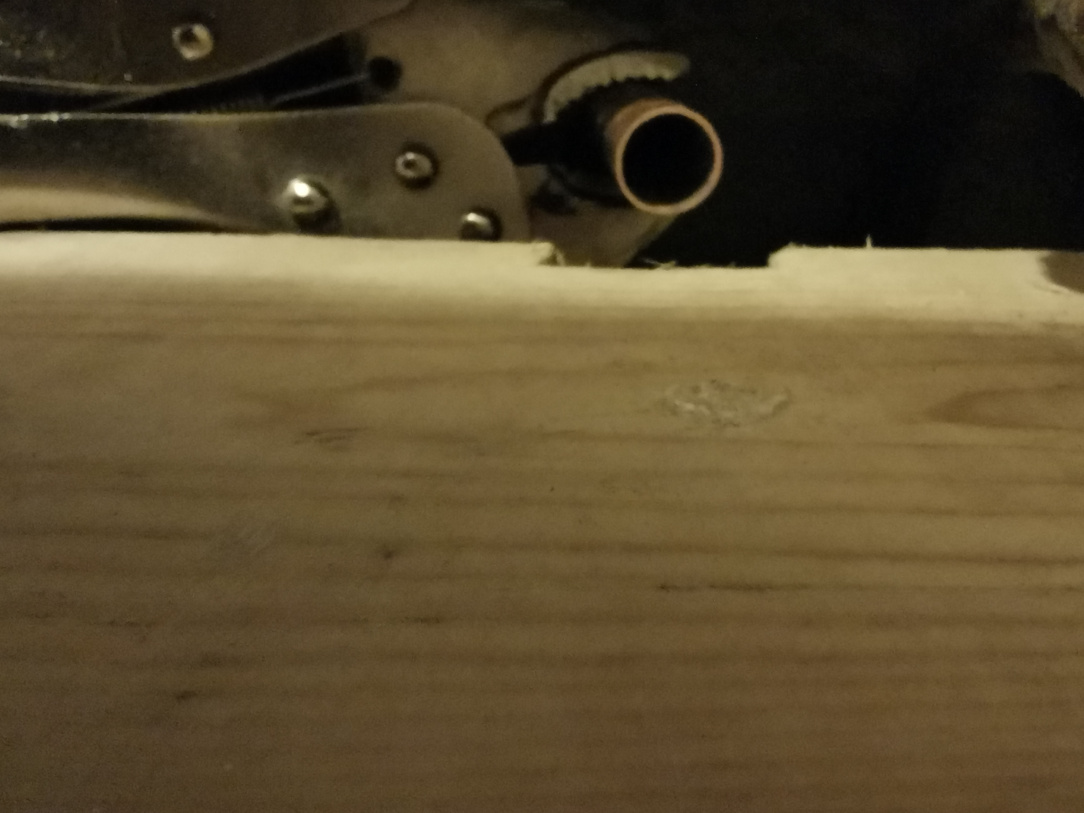
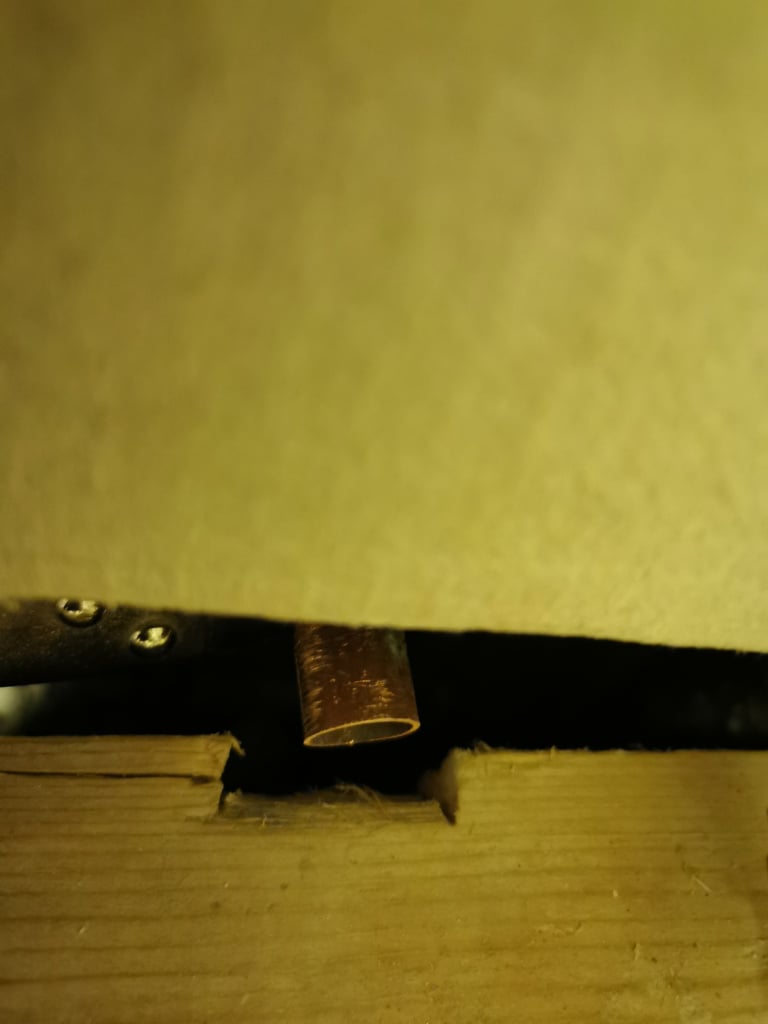
    I had to cut this pipe with a hacksaw as it is in a really tight place with no room to rotate my cutter. It was a bit scored after removal of the olive and the nut from the old compression elbow so I decided to cut it back.

    I used a new 32 tpi blade and only sawed in one direction (down). Still, it's not perfectly straight as it was very hard to cut in that location. So I'm wondering how best to check it for straightness, given it's so hard to get at and to see, so that I can file it down at the right angle. I've tried using a small right angled bracket, wrapping tape around it, putting a drill bit up the pipe and a few more things but nothing is giving me enough accuracy. Any other ideas welcome thanks.

    IMG_20250818_231644.jpg IMG_20250818_231719.jpg IMG_20250818_231803.jpg


  • Registered Users, Registered Users 2, Paid Member Posts: 9,375 ✭✭✭10-10-20


    Looks alright from here for a compression fitting. I wouldn't use a push-fitting on that.

    Rub fine sandpaper around the pipe-end so that it's sanding horizontally to the cut end (and not up and down the length of the pipe). Give the olive 6 good wraps of PTFE tape and then assemble it all. I can't imagine it will be an issue.


  • Registered Users Posts: 291 ✭✭MarcusMaximus


    Oh? Why not use a push fit if I can file the cut straight? I'm using them everywhere else but then those cuts will be done properly with a cutter. Perhaps you mean it'd be too risky, given it will be completely buried under the shower tray etc.

    Ok I have the old compression elbow that was attached there (should have left it on and just turned it!) and will get a new olive but I'll have to source a 15mm copper insert for the pex pipe that will be coming off it. Couldn't find one before but Woodies do a 1/2 inch one. Will that work? I know you posted a link to some other inserts but they are imperial as well.

    Thanks!


  • Advertisement
  • Registered Users Posts: 291 ✭✭MarcusMaximus


    Actually what I can do is attach a short length of copper pipe to that elbow and then I'll be able to cut that properly and use a push fit straight coupler onto the pex for the next run. One more joint than intended but that should be ok I think.


  • Registered Users, Registered Users 2 Posts: 50 ✭✭winklepicker2025


    just blank it off,if you use the elbow it’s another point of failure.

    Go compression if your worried about it.

    It looks ok tbh.


  • Registered Users Posts: 291 ✭✭MarcusMaximus


    If I understand you correctly, I can’t blank it off because it is the hot feed for the downstairs of the house! I’ve used that elbow at this stage anyway but that was what was on it before, so hopefully it will be ok. 🤞

    Post edited by MarcusMaximus on


  • Registered Users Posts: 291 ✭✭MarcusMaximus


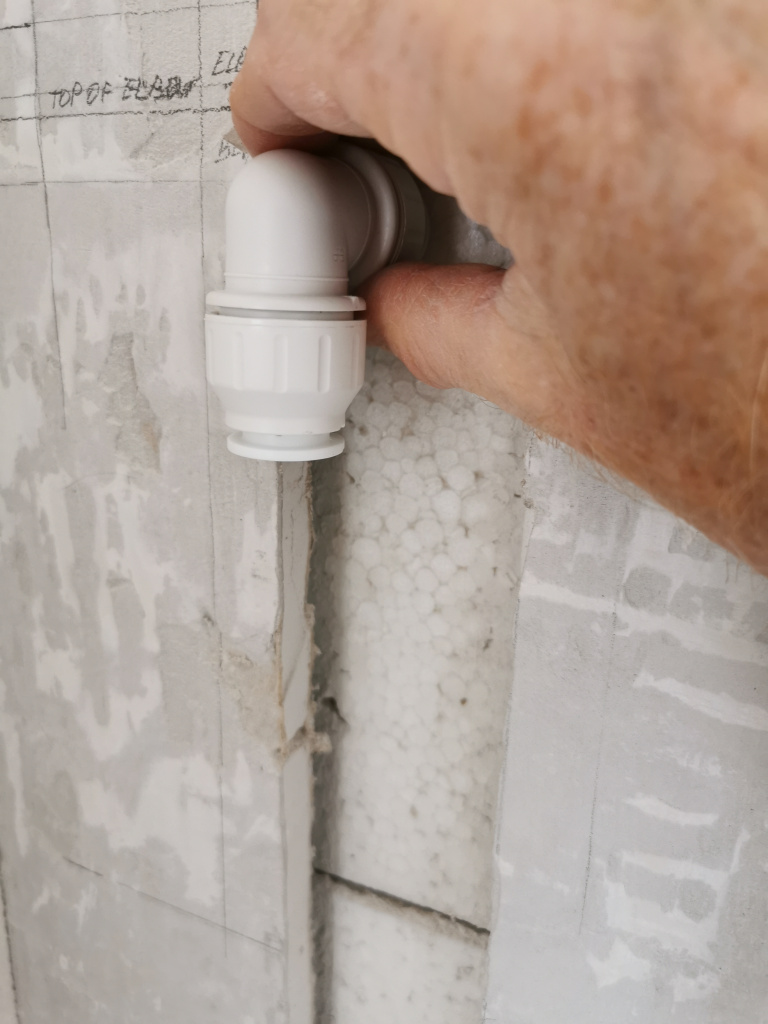
    Ok another issue. I have to bring the shower pipes out of the wall at right angles to meet these elbows which will go down into the inlets on the unit. I want the pipes to go up the wall in that chasing, so to meet the elbows I will need to connect the pipes to other elbows behind them in order to make the 180 degree turn.

    IMG_20250820_134758.jpg

    The problem is I would need 80 mm to accommodate both elbows end to end but the styrofoam insulation is only 50mm deep. So I would have to cut into the block behind it, which I'm reluctant to do because I don't want to compromise the integrity of the external wall. Also I'd rather not use so many fittings in case of failure, especially putting them inside the wall. I do have the option of feeding the pipes up into the bottom of the shower unit but that would mean they would be visible and the chase would be redundant.

    Any way around this that anyone can see?


  • Registered Users, Registered Users 2 Posts: 50 ✭✭winklepicker2025


    I’d solder 2 1/2 elbows with are about 30-35mm in size and pick the pipes up at a different location.

    That fitting in the picture looks bulky


  • Registered Users Posts: 291 ✭✭MarcusMaximus


    It’s a push fit as I’m intending to use pex all the way up. Yes it is bulky but even your two soldered elbows would come to 60-70mm, if you mean to put them back to back. I’ll consider it though.

    Can you explain what you mean by ‘pick the pipes up at a different location’? Thanks.

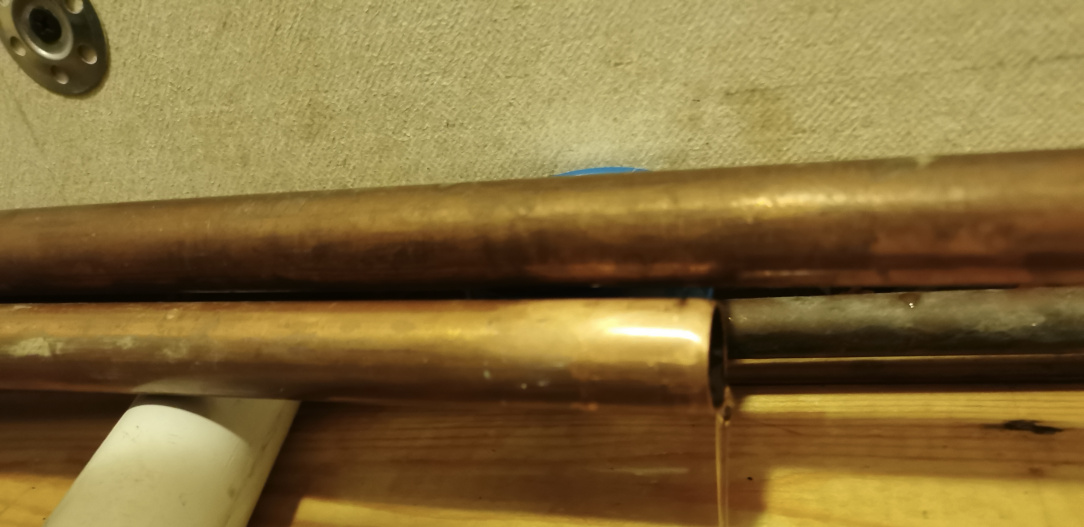
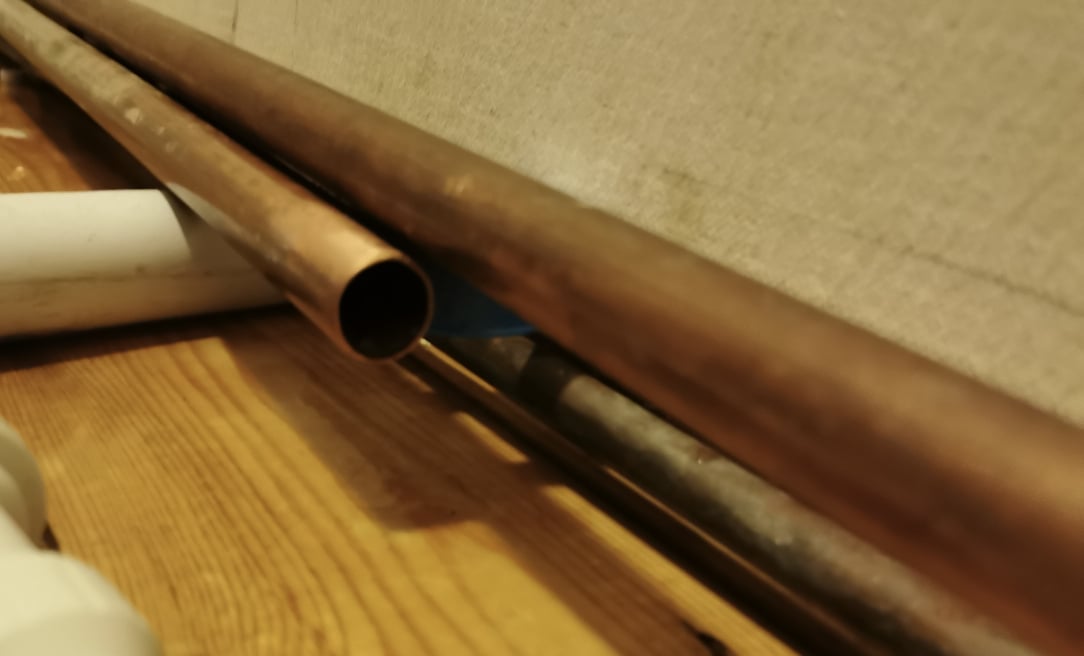
    On another topic, I have a leak in a 22mm copper pipe to a plastic jg speedfit tee in the hot circuit. All other connections ok, including both copper and pex, though another (cold) one with the same pairing except using a Flomasta tee failed earlier so I changed it to a speedfit and it seems ok now. Tried re-doing and tightening the joint but still no dice. Seemed to get worse when the water heated up.

    So what should I do? Use some tape/compound? Maybe the push fit don’t like 22mm copper pipe, though two other tees are ok. Am considering replacing the copper with pex for some of that section including the tee, it’s the middle pipe in the last photo.

    Some pics, disconnected so the pipe end is visible:

    IMG_20250820_224149.jpeg

    IMG_20250820_224129.jpeg

    IMG_20250820_225717.jpeg

    Edit: Actually as regards the connections to the shower unit, those two soldered elbows might well fit in the 50mm space where the insulation is. I forgot that the part that angles down on the outside one would stick out from the wall. I've never used solder before though..

    Post edited by MarcusMaximus on


  • Registered Users Posts: 291 ✭✭MarcusMaximus


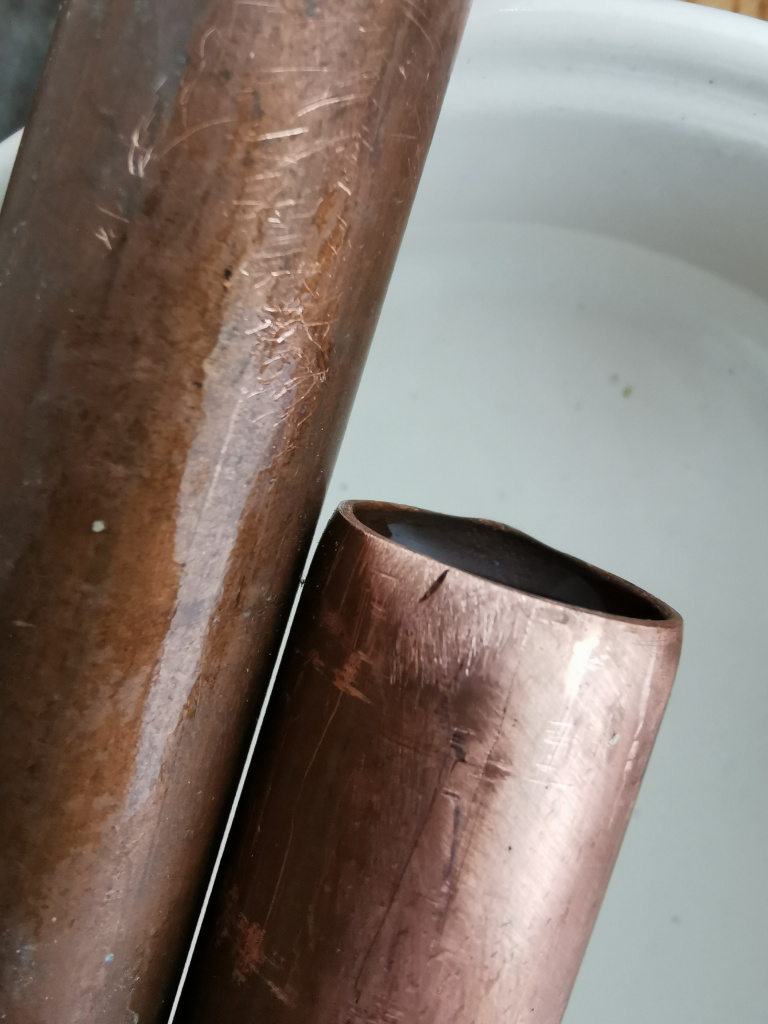
    Just took the leaking joint apart and found this. Tried sanding it but it's too deep, must have nicked it by deburring too forcefully! Will have to cut and re-do it. Fingers crossed that'll solve it.

    IMG_20250821_130636.jpg


  • Registered Users, Registered Users 2 Posts: 50 ✭✭winklepicker2025


    handy enough soldering

    Let the solder do its thing (eg run).

    You could go from the soldered elbows up into 310s & pick up the pex

    So 2 solder elbows followed by 2 310s would get you out.

    The copper looks warped on the small piece.


    (don’t forget too recycle the scrap as trumps tariffs drove prices upwards)


  • Registered Users Posts: 291 ✭✭MarcusMaximus


    Thanks for that. That’s actually a water drop on the lower edge of the rim on that pipe rather than a warp. The top part with the nick was sanded a bit so it looks uneven at that resolution. Anyway it’s moot now as I cut it back and re-assembled it really carefully but still got the leak! So I renewed the tee itself and so far it seems ok. 🤞

    I’ll try it with the hot water turned on in the morning if it holds overnight. Here’s hoping..


  • Advertisement
  • Registered Users Posts: 291 ✭✭MarcusMaximus


    Yeah I had a shower today in the downstairs bathroom that's also fed by those pipes and sure enough there was a slight leak in the same place as before. Just a bit of dripping/weeping but noticeable. I read somewhere that new fittings and joints can leak slightly for a while but then settle down. Is that true, particularly with pushfit fittings? 

    I don't think I'll do anything else with it yet except test and observe a bit more to see if it does settle. I tightened the 'nut' on that connection. I know that only secures the collet and shouldn't really affect the seal but a couple of people seem to have found it can help. I'm also going to try and get the collet locking clips for extra security, though they don't seem to be available in Ireland.

    Meant to say, yes I'll recycle all the bits when I'm finished. Good old Trumpelstiltskin.

    Post edited by MarcusMaximus on


Advertisement