Advertisement
If you have a new account but are having problems posting or verifying your account, please email us on hello@boards.ie for help. Thanks :)
Hello all! Please ensure that you are posting a new thread or question in the appropriate forum. The Feedback forum is overwhelmed with questions that are having to be moved elsewhere. If you need help to verify your account contact hello@boards.ie

Handheld Hijinks Vol 7 - The PC Engine GT

Options
  • 22-01-2024 4:48pm
    #1
    Registered Users Posts: 7,466 ✭✭✭


    An uncommon handheld, the PC Engine GT packs all of the power and might of the PC Engine into handheld form - complete with 90's (80's really) era LCD tech. A bit like what the Nomad is the Megadrive, the PC Engine GT lets you play full sized Hu Cards on the go. This unit unfortunately isn't mine, it belongs to @Quigs Snr who asked me to take a look at some issues it's having.

    1) First thing's first, any of these on original capacitors need them changed pretty urgently. They're very prone to leakage, so that's task number 1 here.

    2) The controls don't work. Well, buttons 1 & 2 don't work, along with the turbo fire sliders.

    3) There's no sound at all.

    Lets dive in & see what the story is so...

    ^^ Pretty minty unit it must be said. It's also quite a nice design, simple, but has a good quality to it.

    ^^ Quick power on test to verify the issues...

    ^^ Yep, no sound, no controls either.

    ^^ Ok these things aren't going to win any awards for resolution any time soon, but still, it works exactly how it should, and how it did when released. There's value in that alone!

    ^^ This thing would challenge any of the big hitters as battery killers. 6 AA's!

    ^^ Split the unit in half, and we're in. Need to remove the mainboard next.

    ^^ Tiny little thing, mad to think this is basically a full sized PC Engine (which in themselves are tiny.)

    ^^ Ok, looking at the caps that were in it....there's no leakage, which is good. They look a bit odd though, if I didn't know better I'd say one or two were changed before. They don't have a factory finish to the solder, but some of them look too good to be hand soldered either. It's obviously best to go on the basis that they're original, and replace them all as a complete set. At least this way, we know it's had a full and complete recap.

    ^^ Full set of replacement caps. Two problems jump out at me, which I'll go into below....

    ^^ The shielding on both sides has to be removed, which is a little tedious. Some of the solder points are hard to reach, and even sit under the opposite shield.

    ^^ New cap is a lot bigger than the one that's soldered into place here. It's not a problem, as the pads can accommodate the larger size.

    ^^ Hot air gun makes this fairly straight forward. With some patience, and even heating, the old cap slides right off.

    ^^ The pads are then wicked clean, and mopped with some IPA to make them new & shiny again.

    ^^ Same treatment for all existing caps, all pads wicked, and all cleaned with IPA. This gives a nice clean base to work from with the new caps.

    ^^ Problem #1 with the new cap kit. It wants me to fit an SMD type cap in place of a through hole one.....eh, no thanks.

    ^^ Looking through my spares, I find a 470uf cap that'll do nicely. It's rated for a higher voltage, but that's absolutely fine.

    ^^ I work my way around the board, and replace all the SMD caps. So that's the main unit fully recapped. Next is the controller board.

    ^^ Problem #2 with the new cap kit - it doesn't provide a cap for the controller board. Sloppy stuff! I'll have to go rooting in my spares again...

    ^^ I give the underside a thorough clean with IPA, in the hopes that sorts the controls. There's quite a bit of residue let on the q-tip.

    ^^ A quick reassembly, and time for testing....


    ...aaaannnnnnd......nothing. White screen. Balls. Remind me why I do this type of thing again?!

    ^^ After much fault finding, disassembly, desoldering, tracing with the multimeter, and head scratching (and I mean much!), I found the problem, this little bo**ox of a solder blob somehow made its way onto the legs of this chip and was pulling them to ground. I removed it with iron, and tried testing again....

    ^^ Ok, phew, it's working again...thank god. It's always more worrying when working on consoles belonging to other people! The bad news though, is that the sound, nor the controls are working. So it's obviously not a dirt or capacitor issue....more diagnosis required.

    ^^ At first I though it might be the turbo sliders not making contact properly, thus disabling the buttons. I straightened the pins in order to make better contact. No joy though, the problem remained.

    ^^ Then doing some digging, I put two and two together. This is a single sided PCB, so these black bands are conductive strips than run over the top of the pcb traces.Is it possible they've degraded over time? In the above image, you can see where I've exposed the trace on one side of the strip, and I've a test point on the other side....there SHOULD be continuity between the two points I've circled in white, but there isn't....that has to be the problem!

    ^^ I bypass the conductive strip with some enamel wire, and try testing....

    ^^ Nice! It now works, well enough for me to grab a quick Perfect on Ryu! Button 1 and II now work, but the Turbo slider buttons don't, so more diagnosis needed!

    ^^ Same test again here. I've exposed the trace at both ends, and I'll try a continuity test. This is a common trace for both sliders, so hopefully this is it! There's no continuity between the two points, so that's a good sign.... (You'll see here the eyelet for the replacement capacitor came away from the pcb when I was changing it. Standard enough fix, expose the pcb, and solder the capacitor leg to the pcb - continuity check shows that's perfect now.)

    ^^ Conductive band bypassed, time to test (again!)...

    ^^ It works! All buttons and turbo fire work perfectly now....this image proves it! (Ok it doesn't, but you'll have to take my word for it!)

    ^^ Next up was the sound issue. A safe bet is a faulty headphone jack disabling the on board audio, so I desoldered it and removed it for cleaning.

    ^^ I tried some electrical contact cleaner in the mechanism, and cleaned all of the pins. Unfortunately, this didn't work.

    I then tested anything else I could see, continuity testing the ribbon connector, double checked soldering of the capacitor etc. So I'll have to admit defeat for now on this one. I recommend a replacement headphone jack and go from there, because there are some erroneous readings from it.

    https://www.retrosix.wiki/audio-circuit-pc-engine-gt

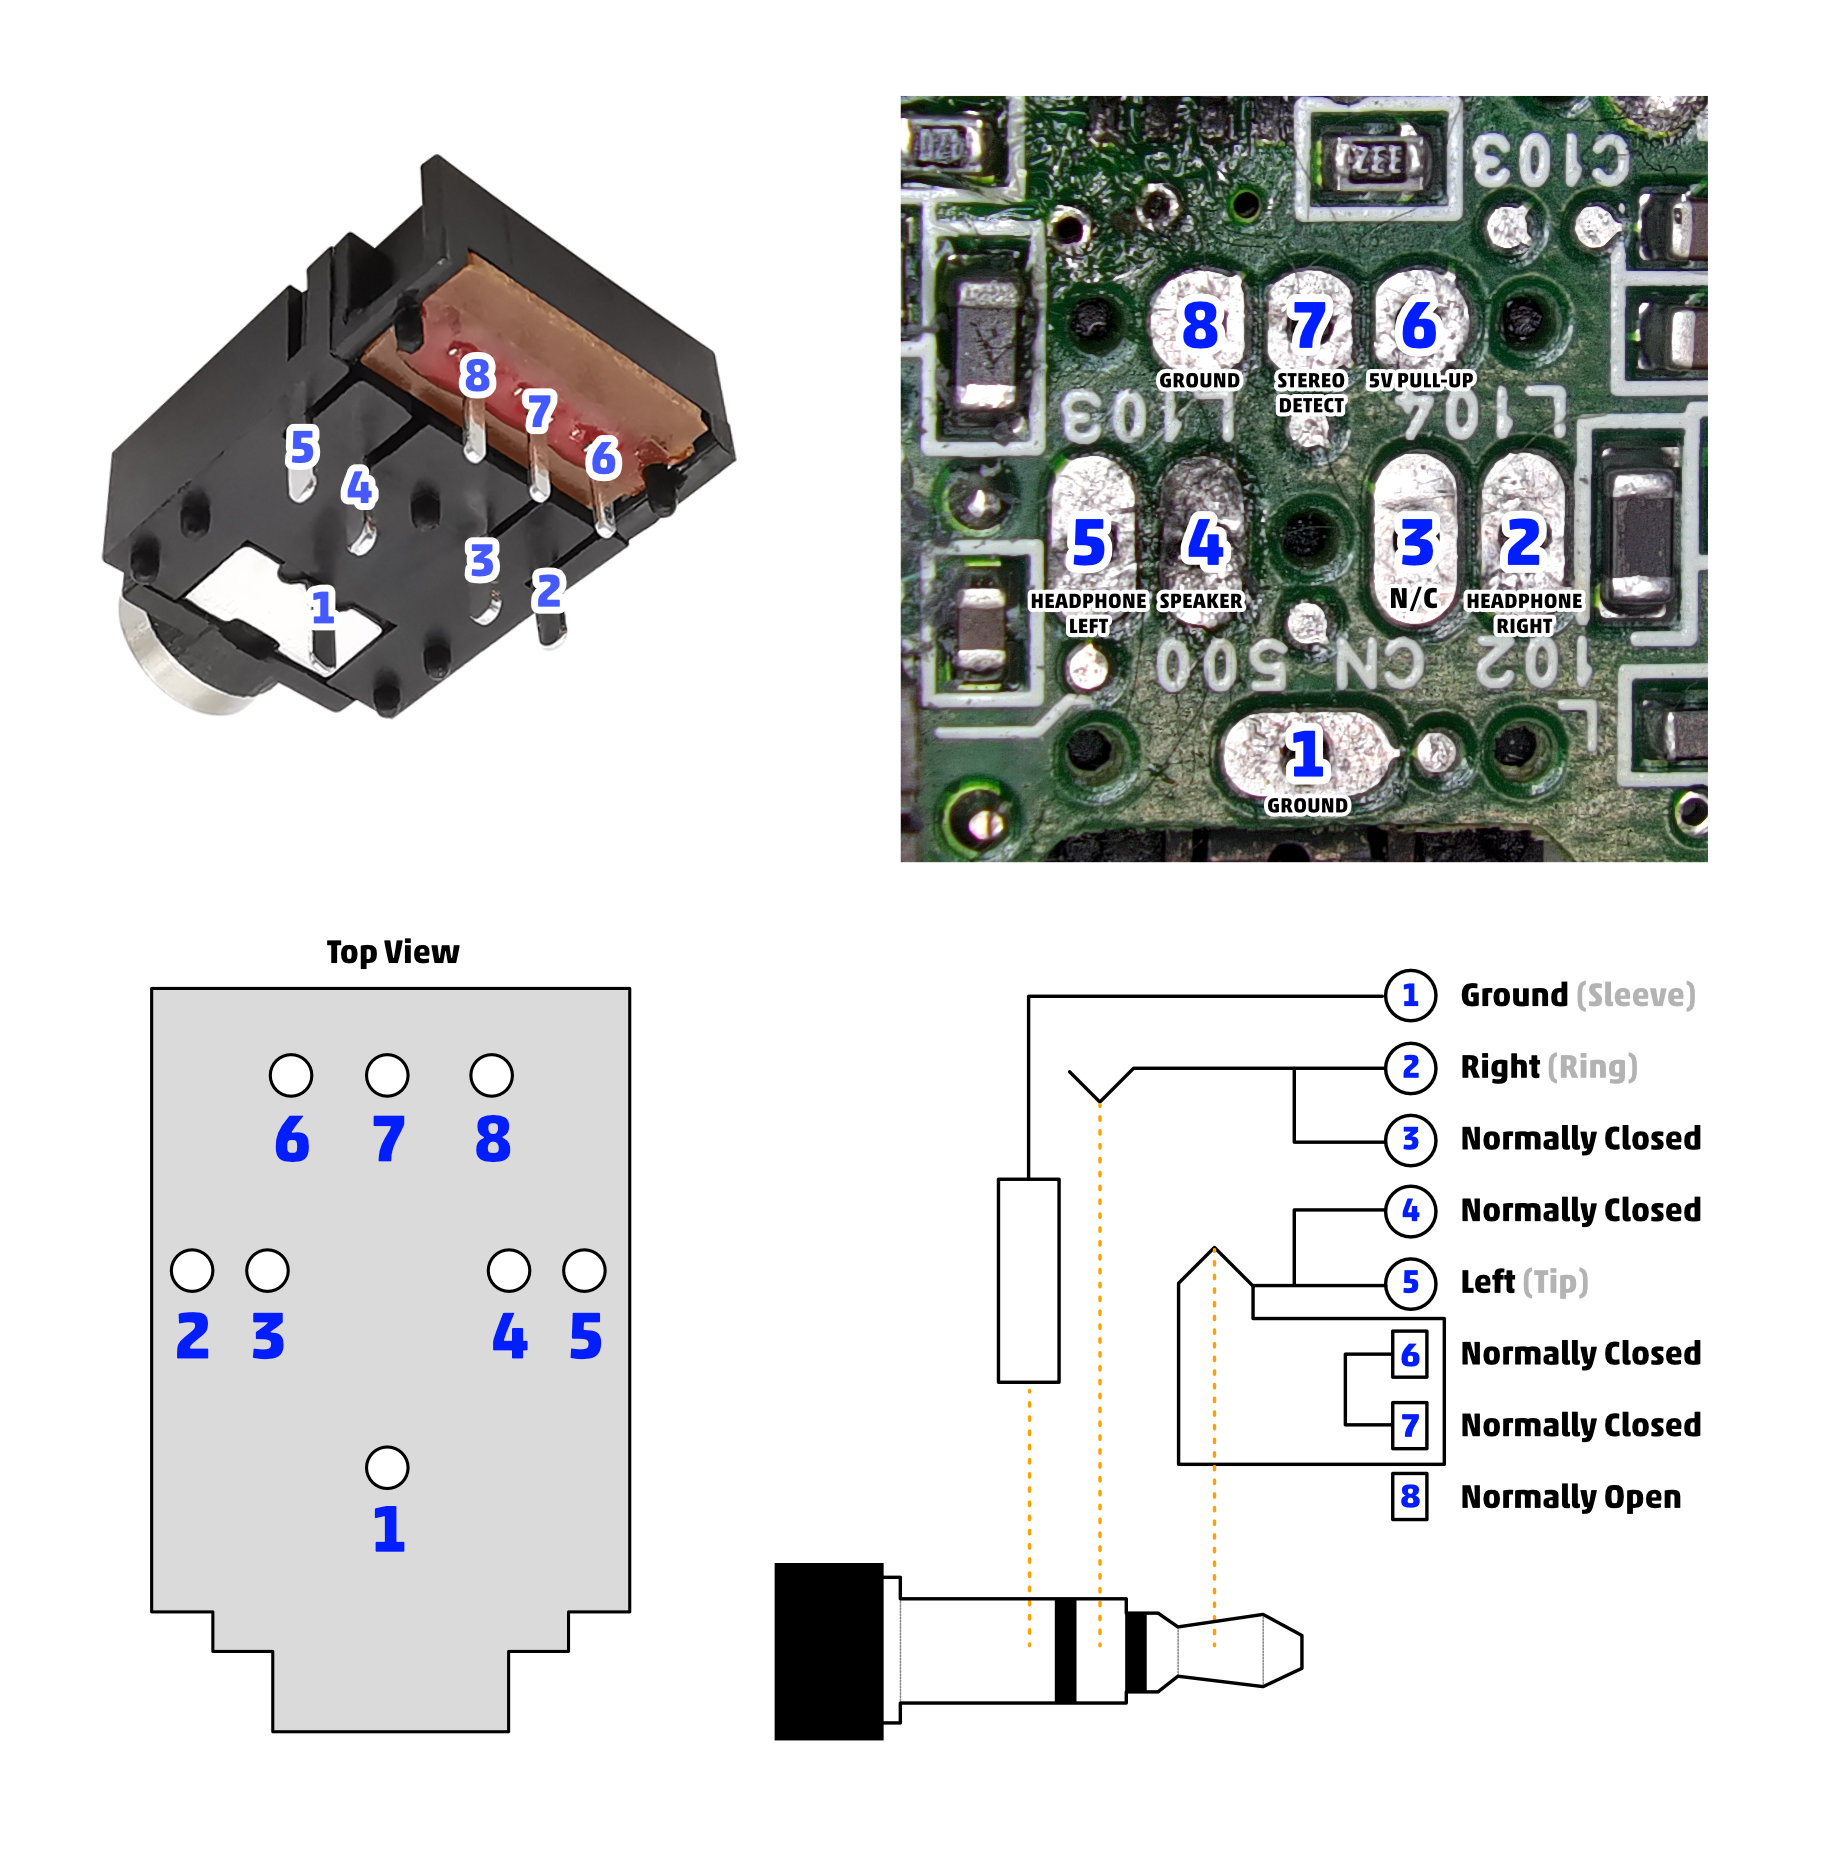
    According to this, with headphones disconnected, I should be getting continuity between pins 6 & 7, which I don't. When there's no connection between them, it's the signal to deactivate the speaker, and use headphone audio instead. I did try bypass this and connect them with a bridging wire, but it didn't help. There's also only audio from one side of the headphones, so at this point, I'm inclined to think it's the jack has broken down internally.

    So for now that's it, there may be a Part 2 in the future, hopefully one that shows an audio fix!


Comments

  • Registered Users Posts: 4,130 ✭✭✭Quigs Snr


    ... well now. My suspicion that my ham fists should not be let loose with a soldering iron inside this turned out to be completely justified. I have successfully fixed a few lesser issues with a soldering iron, but any time I get cocky I remind myself that I have also soldered some part of my skin to the circuit board on at least 50% of these occasions. In awe of your skills as usual.


  • Registered Users Posts: 7,466 ✭✭✭Inviere


    Cheers, though the right equipment/supplies really make things a lot easier.

    For the caps, a temperature controlled hot air gun, some flux, some wick, and good quality solder will allow you to remove and replace the smd ones.

    For the fault finding, a fibre glass pen to expose the traces, a multimeter for continuity testing, a needle tip on a good soldering iron, some flux, and good solder, will allow you to solder some enamel wire to bypass traces.

    The de-soldering gun is a godsend for removing components like the headphone jack etc.

    Apart from the equipment, time and practice is all that's needed. Perhaps some courage in places too 😁


  • Registered Users Posts: 7,466 ✭✭✭Inviere


    Just coming back to this yesterday morning, armed with some info I'd found online about bypassing the headphone jack.

    ^^ I desoldered the jack again, and bypassed it via the pads themselves. I'd done this previously, but with the jack still in place which is why it didn't work.

    And, yep, the sound burst into life. Not a bad sound from the unit at all, all things considered! Great, this confirms it's the jack itself then. I can either fit a replacement (which you can get, but a lot of info online suggests you've to file the shell ever so slightly to fit modern versions, which is far from ideal.) Or, I can try repair this original one, so let's try that.

    ^^ First up was a good old chipper bath (aka, salt & vinegar.) 30 mins in this solution will help break down and loosen any built up crud inside the mechanism.

    ^^ After 30 mins in the above, it takes another 10 mins inside an IPA solution. This will dissolve any vinegar left inside, and clean any final contaminants.

    This alone didn't work to fix the issue. I could still tell via the multimeter that the jack was not bridging the correct pins with nothing plugged into it.

    ^^ Opening the jack, you can see the lever arm from the front piece slides a slider on the rear piece, bridging the middle and top pins. This isn't correct for an empty jack, it's supposed to return to the middle, causing the slider to move down and bridge the middle and bottom pins on the end piece. This is how it should be WITH a headphone jack connected. There must be a spring missing.

    ^^ I can manually move it down myself, into the correct position for an empty jack. However, as soon as I plug headphones in, the slider moves back up (thus disconnecting the on board audio.) Without spring tension, it'll stay this way too.

    ^^ I found a small, non-conductive spring that I was able to cut down to size (thank you Mr. Pen)....which fits inside the housing, and keeps pressure on the slider arm. This way, the pressure will keep the arm in place when there's no jack in place (thus keeping the sound on.) It'll allow headphones to be fit too, and I get stereo audio from them also. The only thing it fails at now, is that it won't disconnect the internal audio when headphones are inserted.

    The owner is happy enough with that, as it means we don't have to risk filing the shell for a replacement jack. So yeah, that concludes the thread. A now fully working PC Engine GT, complete with controls and sound!


  • Registered Users Posts: 4,130 ✭✭✭Quigs Snr


    The owner is happy enough with that....

    MORE than happy... it was here when I got home from work. It is incredible that this thing came out in 1990, in my view it wasn't really topped in terms of power at least until the Gameboy Advance came out over a decade later.

    Although the fact that it consumes more battery power than the average Tesla remains a problem. R-Type here is great on it and the sound is deafening from it. If I ever find another one on the cheap with a screen on the way out I might try get a screen and battery mod done.

    Unbelievable work Inviere. Lets see if I can find another unusual project which will challenge you more.


  • Registered Users Posts: 7,466 ✭✭✭Inviere


    Sweet, glad you're happy with it. It made for a fun repair, and I'm always happy to bring things back from the brink. It's an impressive little thing, and much like the entire PC Engine lineage, it punches way above its weight!

    Now, grab a power supply for it and retire those batteries 😁


  • Advertisement
  • Moderators, Category Moderators, Computer Games Moderators, Society & Culture Moderators Posts: 34,528 CMod ✭✭✭✭CiDeRmAn


    I've a Turbo Express here at home, do you fancy giving it a tune up for me?

    Is there a reasonable battery mod/screen mod out there for the device?


  • Registered Users Posts: 7,466 ✭✭✭Inviere


    Yep, if you order the cap kit I can do the same on yours Cidey. Retro6 in the UK offer a cap kit, but it's the same kit as shown in this thread so I'd need to find x2 caps to complete it (x1 cap in this kit is SMD instead of through-hole, and the controller board isn't included in it.) There's also Console5 in the US which seem to ship the kit properly - https://console5.com/store/nec-turboexpress-pc-engine-gt-smd-cap-kit.html

    I know that with the screen mods, destructive/non-reversible cutting of the original case is required - so I'd really only advise that if the original screen is borked/failing. Set your wince defense to maximum @13:55 here - https://www.youtube.com/watch?v=jNcBxeBDZM8 But the mod looks do-able yeah.

    Battery mod is also do-able, you need a few bits like the Li-Po battery (3.7V 5000mAh size: 105080), Adafruit Powerboost 1000C, and an additional adjustable boost converter. You can do it in order to use the original DC barrel charge for charging too which is nice. There's a thread here about it https://www.pcenginefans.com/forum/index.php?topic=23504.0 (the original screen, dc barrel method is shown further down the screen.)


  • Moderators, Category Moderators, Computer Games Moderators, Society & Culture Moderators Posts: 34,528 CMod ✭✭✭✭CiDeRmAn


    I'll probably just use a power bank with an adaptor,

    https://www.ebay.ie/itm/165292463637


  • Moderators, Category Moderators, Computer Games Moderators, Society & Culture Moderators Posts: 34,528 CMod ✭✭✭✭CiDeRmAn


    But I'll give you a shout when the cap kit arrives!

    Thanks


  • Registered Users Posts: 34,430 ✭✭✭✭o1s1n
    Master of the Universe


    Should we all buy a Turbo Express now? What's the Church's position?


    Edit - damn it I was only messing but I really want one now!


  • Advertisement
  • Registered Users Posts: 2,016 ✭✭✭Colonel Panic


    Analogue Pocket adapters out soon (LOLOL).


  • Registered Users Posts: 7,466 ✭✭✭Inviere


  • Registered Users Posts: 4,130 ✭✭✭Quigs Snr


    Delighted to be a superspreader of this particular disease.

    But I will probably also buy the Analogue Pocket Adapter when its out.

    ... and defo getting one of those powerbank cables Ciderman linked just to try it out. They have a few for other consoles too.


  • Registered Users Posts: 34,430 ✭✭✭✭o1s1n
    Master of the Universe


    Oh yeah! Completely forgot I had those on order. (or that it even included a PCE adapter, I only had NGP on the brain when ordering it)


  • Moderators, Category Moderators, Computer Games Moderators, Society & Culture Moderators Posts: 34,528 CMod ✭✭✭✭CiDeRmAn


    My cable is on the way, I'll let you know how I get on with it.

    Thinking of velcro-ing a slim powerback to the back of the thing, see if it works


  • Moderators, Category Moderators, Computer Games Moderators, Society & Culture Moderators Posts: 34,528 CMod ✭✭✭✭CiDeRmAn


    The guy in France who sold me the cable says he's happy to do group sales, with discounts and savings on postage.

    So, if folk are interested, that's a thing

    As Quigs says, he's got cables for other handhelds too


  • Moderators, Category Moderators, Computer Games Moderators, Society & Culture Moderators Posts: 34,528 CMod ✭✭✭✭CiDeRmAn


    The adaptor cable arrived and seems to work just fine.

    Which more than can be said about my Turbo Express!

    Looks like it needs a cap kit before it can be used again :(

    I'll order one in and hope for the best


  • Registered Users Posts: 7,466 ✭✭✭Inviere


    Yeah most likely dead or dying caps, assuming it's not powering on at all? Hopefully they haven't leaked and caused board damage etc.

    It does make you worry though doesn't it, when you have a considerable hardware collection....just how much of it is sitting there dying due to cap leakage and we're not aware of it.

    Post edited by Inviere on


  • Registered Users Posts: 34,430 ✭✭✭✭o1s1n
    Master of the Universe


    I suppose we're all slowly dying of cap leakage if you really want to get existential about it :D

    Our consoles are no different. Entropy gets everything in the end!

    What I find particularly amazing is how long has passed since when I first started trying to get everything future proofed and now. A lot of my replacement snes cart batteries dying was a real eye opener to how quickly time passes as you get older.

    My Gamgear which had a complete cap kit done ten or so years ago stopped working again.

    It's interesting, I saw a lot of those cap kit replacements etc as 'forever fixed' in my mind but in all likelihood a lot of items will need to be looked at a few times over the years.

    Interestingly, I've still yet to have any game carts fail.


  • Registered Users Posts: 7,466 ✭✭✭Inviere


    I'm running ceramic caps, so I plan to live a lot longer than you electrolytic lads 😁


  • Advertisement
Advertisement