Advertisement
If you have a new account but are having problems posting or verifying your account, please email us on [email protected] for help. Thanks :)
Hello all! Please ensure that you are posting a new thread or question in the appropriate forum. The Feedback forum is overwhelmed with questions that are having to be moved elsewhere. If you need help to verify your account contact [email protected]

Self install solar pv

  • 07-03-2021 1:32pm
    #1
    Registered Users Posts: 3,062 ✭✭✭


    Finally finished my install this week and all up and running. I know a few here have asked for some detail and pictures of it when was finished. Plan was for a 2.5kw system but ended up with 3.65kwp. added to my 2.88 KW and now at 6.5kwp. if could get around the Esb 6kw limit I would add more

    9 X 360w longi all black split cell
    1 X 365w longi all black split cell
    3kw Solis inverter

    Had no previous idea on how to do it prior to starting but plenty of learning from online and was plain sailing. Enjoyed every bit of it and now need to decide what my next solar project is 😀

    Photos too large to upload here so put a selection throughout up on this link
    https://www.flickr.com/gp/185317792@N03/68qa7k


«1345

Comments

  • Moderators, Home & Garden Moderators Posts: 4,479 Mod ✭✭✭✭graememk


    the posts arent going anywhere! great foundation!

    Are the panels held on on the inside?


  • Registered Users Posts: 3,062 ✭✭✭irishchris


    graememk wrote: »
    the posts arent going anywhere! great foundation!

    Are the panels held on on the inside?

    Cheers, thought best be safe with the foundations as can be very gusty here.

    Yep the panels are held at the back in four places to spring nuts which sit in the unistrut.


  • Registered Users Posts: 11,848 ✭✭✭✭KCross


    irishchris wrote: »
    Finally finished my install this week and all up and running. I know a few here have asked for some detail and pictures of it when was finished. Plan was for a 2.5kw system but ended up with 3.65kwp. added to my 2.88 KW and now at 6.5kwp. if could get around the Esb 6kw limit I would add more

    9 X 360w longi all black split cell
    1 X 365w longi all black split cell
    3kw Solis inverter

    Had no previous idea on how to do it prior to starting but plenty of learning from online and was plain sailing. Enjoyed every bit of it and now need to decide what my next solar project is ��

    Photos too large to upload here so put a selection throughout up on this link
    https://www.flickr.com/gp/185317792@N03/68qa7k

    Cool!

    Another row in front of that now and you're sorted! :D

    A few questions...
    - What is the orientation of the panels?

    - Would it have been easy at all to have a tilt mechanism built in so that you could make them vertical as you head into winter months? Maybe multiple levels of bolts that allow you to tilt them up a few notches on the top edge?

    - Did you get a spark to do the electrical work? What did he charge you? Did you get a grant for it?


  • Registered Users Posts: 3,062 ✭✭✭irishchris


    KCross wrote: »
    Cool!

    Another row in front of that now and you're sorted! :D

    A few questions...
    - What is the orientation of the panels?

    - Would it have been easy at all to have a tilt mechanism built in so that you could make them vertical as you head into winter months? Maybe multiple levels of bolts that allow you to tilt them up a few notches on the top edge?

    - Did you get a spark to do the electrical work? Did you get a grant for it?

    Orientation is South-South West

    Was tempted to add mechanism for changing tilt angle but was halted by the fact the posts were directly beneath the panels in this setup and therefore not much room for manouvering as panels would be too close to posts

    Spark connected the AC switch to new 20amp rcbo in consumer unit for me for €50. No grant in this one as had a grant aided install for 2.88kwp at end of last year so not eligible. Grand total of install was about €1900 roughly without any grant.


  • Registered Users Posts: 11,848 ✭✭✭✭KCross


    irishchris wrote: »
    Spark connected the AC switch to new 20amp rcbo in consumer unit for me for €50.

    Hang on to that sparks friend you have! :)

    irishchris wrote: »
    Grand total of install was about €1900 roughly without any grant.

    Excluding your labour, of course!

    But well done. Great value and looks well put together. Enjoy!


  • Advertisement
  • Registered Users Posts: 3,062 ✭✭✭irishchris


    KCross wrote: »
    Hang on to that sparks friend you have! :)


    Excluding your labour, of course!

    But well done. Great value and looks well put together. Enjoy!

    Cheers, seemed good price for the spark alright but only took him 45 mins as was single cable fed by me that he had to hook to switch and then to consumer unit. I was happy with his costs though


  • Registered Users Posts: 676 ✭✭✭mun1


    Nice installation. I’m go into add another 7 panels onto my installation . I’d like to add them onto the shed wall as there is no shading .
    This will give me
    Need to find some steelwork for the shed wall. HD angle iron might do


  • Registered Users Posts: 3,062 ✭✭✭irishchris


    mun1 wrote: »
    Nice installation. I’m go into add another 7 panels onto my installation . I’d like to add them onto the shed wall as there is no shading .
    This will give me
    Need to find some steelwork for the shed wall. HD angle iron might do

    Definitely something you should consider as biggest mistake I made with my first array was not to add enough panels. Be aware though if adding to side of shed to allow enough clearance for the higher spec panels as most are longer in size. My 360w panels are 1.7m in length whereas the newer 450 longi panels for sale now are 2.1m!


  • Registered Users Posts: 676 ✭✭✭mun1


    So my latest plan was to move the 4 vertical 315W panels on to the south side of the shed onto the string with 8 315 panels on it.
    Then buy four 365W panels to put vertically onto west facing gable wall.

    Just measured up and 365W panels and they are 48mm wider than 315 panels and so cannot fit four of them onto the gable .:(

    3 x 365w panels on one string might not be enough for inverter to pick up :(


  • Registered Users Posts: 3,062 ✭✭✭irishchris


    mun1 wrote: »
    So my latest plan was to move the 4 vertical 315W panels on to the south side of the shed onto the string with 8 315 panels on it.
    Then buy four 365W panels to put vertically onto west facing gable wall.

    Just measured up and 365W panels and they are 48mm wider than 315 panels and so cannot fit four of them onto the gable .:(

    3 x 365w panels on one string might not be enough for inverter to pick up :(

    How are you attaching then to the gable wall? You could use unistrut attached to wall which could overhang the end of the wall to fit the 4 panels on it if not much overhang needed


  • Advertisement
  • Registered Users Posts: 676 ✭✭✭mun1


    Already have the overhang with unistrut and still short about 5 inches :(.

    Might look for slimmer panels


  • Registered Users Posts: 31,223 ✭✭✭✭listermint


    KCross wrote: »
    Hang on to that sparks friend you have! :)


    Excluding your labour, of course!

    But well done. Great value and looks well put together. Enjoy!

    Tbf thread title is self install. Who'd put their labour value into the cost.


    Nice work OP. Considering solar installation here massive roof space and serious south facing non shaded location


  • Posts: 7,499 ✭✭✭[Deleted User]


    Hi Chris,
    I hope to do something like this myself in the next while.
    I see from the my enrgy app you have the hot water set up.
    Do you need a second immersion element to do that ?

    I need to get a larger HW cylinder anyway so would like to future proof it as much as possible.


  • Registered Users Posts: 5,625 ✭✭✭SouthWesterly


    Nice job.
    You should put some preservative on your cut ends and non treated wood.

    Did you have to cut through any concrete to run the wires to the house?


  • Registered Users Posts: 3,062 ✭✭✭irishchris


    Hi Chris,
    I hope to do something like this myself in the next while.
    I see from the my enrgy app you have the hot water set up.
    Do you need a second immersion element to do that ?

    I need to get a larger HW cylinder anyway so would like to future proof it as much as possible.
    No just uses the existing immersion that is there in the hot tank. Detects Surplus solar power via clamp on grid live cable and diverts it to hot water when house isn't using it


  • Registered Users Posts: 3,062 ✭✭✭irishchris


    listermint wrote: »
    Tbf thread title is self install. Who'd put their labour value into the cost.


    Nice work OP. Considering solar installation here massive roof space and serious south facing non shaded location

    Yes wouldn't consider the labor value in overall cost as it was a nice hobby to read up on it and to do the install. You should definitely be looking at getting some solar up on that southerly roof if you can


  • Registered Users Posts: 3,062 ✭✭✭irishchris


    Nice job.
    You should put some preservative on your cut ends and non treated wood.

    Did you have to cut through any concrete to run the wires to the house?

    Cheers, yep treated the cut ends bar the last post as with wine approaching that day I got panel up and treated it since. All timber is treated with 2 coats of creosole and will be applying a fresh coat in summer to ensure full coverage

    I was able to run the cables via 2" Esb ducting under foundations of kerbs as went 3ft down but had to cut out a 3" wide section of pavement beside house


  • Registered Users Posts: 3,062 ✭✭✭irishchris


    Nice job.
    You should put some preservative on your cut ends and non treated wood.

    Did you have to cut through any concrete to run the wires to the house?

    Cheers, yep treated the cut ends bar the last post as with wind approaching that day I got panel up and treated it since. All timber is treated with 2 coats of creosole and will be applying a fresh coat in summer to ensure full coverage

    I was able to run the cables via 2" Esb ducting under foundations of kerbs as went 3ft down but had to cut out a 3" wide section of pavement beside house. Hired a consaw and it only took maybe ten minutes


  • Posts: 7,499 ✭✭✭[Deleted User]


    irishchris wrote: »
    No just uses the existing immersion that is there in the hot tank. Detects Surplus solar power via clamp on grid live cable and diverts it to hot water when house isn't using it

    Thanks,
    Another one for you.
    What about manual immersion control, have you kept your physical controls or do you do that via the eddi (app?).

    Also does the eddi know the temp of the tank or do you have a physical thermostat that breaks the circuit?

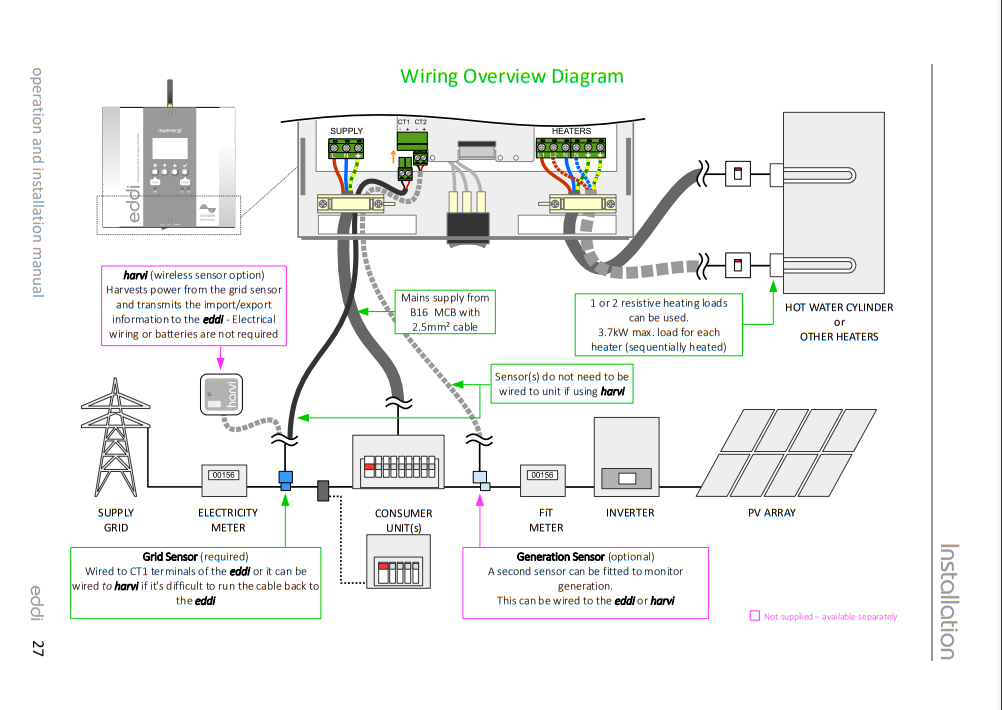
    Heres a wiring diagram for anyone interested !

    eddi.png

    Edit ,
    I should have read the manual more

    "The water in the cylinder (3) is heated with only surplus power until the thermostat has opened, the eddi will display Max
    Temp Reached and the surplus power will then be exported until the water cools, heating will then resume"


  • Registered Users Posts: 708 ✭✭✭buzz11


    Hi Chris,
    I hope to do something like this myself in the next while.
    I see from the my enrgy app you have the hot water set up.
    Do you need a second immersion element to do that ?

    I need to get a larger HW cylinder anyway so would like to future proof it as much as possible.


    I have a 500L Joule water cylinder with the added insulation, its fantastic at retaining the heat.

    500L is overkill and we only use the half tank immersion but I plan to connect my solar panels to both immersions, I was looking at the Apollo Gem diverter which can handle two immersions.

    https://www.apollosolarelectric.co.uk/Our_Products/GEM_System/


  • Advertisement
  • Moderators, Sports Moderators Posts: 17,888 Mod ✭✭✭✭slave1


    buzz11 wrote: »
    I have a 500L Joule water cylinder with the added insulation, its fantastic at retaining the heat.

    500L is overkill and we only use the half tank immersion but I plan to connect my solar panels to both immersions, I was looking at the Apollo Gem diverter which can handle two immersions.

    https://www.apollosolarelectric.co.uk/Our_Products/GEM_System/

    Just in case you don't realise the Eddi can handle two immersions also


  • Moderators, Home & Garden Moderators Posts: 4,479 Mod ✭✭✭✭graememk


    slave1 wrote: »
    Just in case you don't realise the Eddi can handle two immersions also

    Even the solar iboost can handle 2


  • Registered Users Posts: 5,896 ✭✭✭Ubbquittious


    Youd want a hot. Tub to make use of the 500L

    Few nice cocktails as well


  • Registered Users Posts: 3,062 ✭✭✭irishchris


    Thanks,
    Another one for you.
    What about manual immersion control, have you kept your physical controls or do you do that via the eddi (app?).

    Also does the eddi know the temp of the tank or do you have a physical thermostat that breaks the circuit?

    Heres a wiring diagram for anyone interested !

    eddi.png

    Edit ,
    I should have read the manual more

    "The water in the cylinder (3) is heated with only surplus power until the thermostat has opened, the eddi will display Max
    Temp Reached and the surplus power will then be exported until the water cools, heating will then resume"

    The eddi has a physical boost button on it and also can be done from within app


  • Registered Users Posts: 705 ✭✭✭SchrodingersCat


    Fantastic to see someone finish such an installation themselves. Looks like a great job. Well done 😊


    Ive done a self install with a solartricity 6 panel (2.16kw) kit on my shed too. I am at the stage where I am about to wire the AC switch up to the RCBO in the main panel in the house. You mentioned not being able to get the grant for this as you received the grant on a previous installation. I’ve never considered applying for the grant as I thought that non SEAI registered contractor installs were out of the question for it. If not, any pointers on how to go about doing it?

    Also, any recommendations on a good energy monitor? Il might look into getting a hot water diverter too, depending on what the monitor tells me.

    Post edited by SchrodingersCat on


  • Registered Users Posts: 3,062 ✭✭✭irishchris


    Cheers and added a bit since between 3 batteries and more panels so be careful as is an addictive hobby 😀

    Unfortunately you can't apply for grant for self install and does have to be an seai approved installer.

    I'm using the myenergi app for monitoring as have installed an eddi for bit water and clamps for grid and the two solar arrays.


  • Registered Users Posts: 5,625 ✭✭✭SouthWesterly


    Any chance of some more photos of the upgrade and materials used.

    Did you install the eddi yourself?


  • Registered Users Posts: 3,062 ✭✭✭irishchris


    Will take some photos tomorrow or over the weekend and update it. Moved all of the install out to new wooden shed beside panels over last couple weeks and just doing final touches now like surge protection etc

    Eddi really is a simple install and just needs to be fitted somewhere on the run between consumer unit and your immersion. In my case in utility not too far from consumer unit but easy access

    Post edited by irishchris on


  • Registered Users Posts: 5,625 ✭✭✭SouthWesterly


    Thanks.

    I've still not wrapped my head around the consumer unit.

    Is that the meter or the fuse board?


  • Advertisement
  • Moderators, Education Moderators, Home & Garden Moderators Posts: 7,831 Mod ✭✭✭✭Jonathan


    Fuseboard. However, you are better off installing the Eddi in the hotpress (or wherever your cylinder is located) as this gives you more options for the second output or to use the optional relay board to monitor the temperature in the cylinder.


Advertisement