Advertisement
If you have a new account but are having problems posting or verifying your account, please email us on hello@boards.ie for help. Thanks :)
Hello all! Please ensure that you are posting a new thread or question in the appropriate forum. The Feedback forum is overwhelmed with questions that are having to be moved elsewhere. If you need help to verify your account contact hello@boards.ie

Building a geodesic dome

Options
2»

Comments

  • Posts: 0 [Deleted User]


    Good to hear it's going well. Would love to see a few pictures when you get a chance. Did you make the frame to fit around the window or get a window to fit the frame?

    I'll have to sort out some more pics alright.

    I'll take out the equalateral triangle opposite where the door is going and make a window to fit that. I'll fit the window with some old pivot hinges I found.


  • Registered Users Posts: 379 ✭✭mobfromcork


    Hi Pappa Dolla, did you cover your Dome yet? Happy with the covering from Polyrope?
    Any pros/cons that you found for covering one triangle at a time? Still in the planning stage here but need to order timber for another project as well.
    I made up a polytunnel last week from two old trampoline frames so might get that covered while I get going on making the dome.
    Mark


  • Posts: 0 [Deleted User]


    Hi Pappa Dolla, did you cover your Dome yet? Happy with the covering from Polyrope?
    Any pros/cons that you found for covering one triangle at a time? Still in the planning stage here but need to order timber for another project as well.
    I made up a polytunnel last week from two old trampoline frames so might get that covered while I get going on making the dome.
    Mark


    Hey Mark,

    Yep, it's up! I'm very happy with the poly from polyrope. It's not as clear as I thought it would be, but it retains the heat well!

    Pros: it's beautifully stretched. I also applied it with heat, sing an old plug in flat radiator on its back.
    If something smashes through the plastic, I can just take out one triangle and recover it.

    Cons: I suppose the biggest is it takes more time. I think I got it down to about 8/9 minutes a triangle, something like that.
    There's also probably more waste as you can't really tessellate odd shaped triangles.

    We had a bit of a storm last weekend with gusts of 110km. To say my nerves were gone would be an understatement!

    I don't know if I mentioned it, but the MIL wanted this temporary, in case she didn't like it, so it's built on u levelled ground with no foundations!

    Hearing of the storm the previous Monday, I ordered 1 mtr lengths of 10mm threaded bar. They arrived Wednesday. I drilled a 12mm hole into the bottom planks, and pushed down the bars. I only did this on 3 of them, 2 by the door and one opposite. All was well the day of the storm, but when the wind died down, I rn in to see if there was any movement, and while I was in a huge gust blew open the door (minor fix required) and tried to lift it off the ground. That was terrifying!

    As I haven't made this to any plan, I'm still working (battling) with triangular windows, trying to source autovents that will work on a triangular window and figure out the door, which I'm not happy with at the moment.

    There's definitely worse ways to spend lockdown, and I have a couple of people interested in buying one if I make any more.

    I'm moving into a house with a workshop over the next few weeks, and will make up 2 (I think it'll take as long to make 2 as it does one when it comes to setting up jigs, beveling wood etc). One for us to grow in, and one for us to try and sell. The one I made here is in the front garden, and you can hear the cars slowing down to get a good look at it.

    98003275_10157044859977056_4409607218740068352_o.jpg?_nc_cat=103&_nc_sid=110474&efg=eyJpIjoidCJ9&_nc_oc=AQk3sjrSSaYRuqJk0Cr7vADT60rfTQFwEr3FyWJyZB4c2LrRJjlYMqpLtPt4NTKTww0&_nc_ht=scontent.fdub3-1.fna&_nc_tp=14&oh=90745dc2a7c3c86610bc2c39a75e70e7&oe=5EF0CB6B

    And in Party Mode:
    97591554_2931583416961971_809120981858648064_o.jpg?_nc_cat=109&_nc_sid=1480c5&efg=eyJpIjoidCJ9&_nc_oc=AQktNio-1bisulXaYjJXo8NVt9aMOvUnN9PZcJ36UVKGqQlusugsJ3p6VLHNYoQuQ9c&_nc_ht=scontent.fdub3-1.fna&_nc_tp=14&oh=eab633efef1877b1d67289770c872ae4&oe=5EF2707C


  • Registered Users Posts: 379 ✭✭mobfromcork


    Thanks very much for replying. It looks absolutely class!
    Good to hear the covering went ok. After you did each individual triangle how did you attach them to each other?
    Did you seal between each triangle externally? Any thoughts on the dimensions of the timber you used? Will you change anything for the next two do you reckon?
    Being inside as it's being lifted up by the wind doesn't sound like a barrel of laughs! I'll have to figure a way to secure mine(when I make it) to the ground quite securely. The idea of a bar sounds good, mine should be permanentish so might bury the end of it in concrete.

    Thanks again


  • Posts: 0 [Deleted User]


    Thanks very much for replying. It looks absolutely class!
    Good to hear the covering went ok. After you did each individual triangle how did you attach them to each other?
    Did you seal between each triangle externally? Any thoughts on the dimensions of the timber you used? Will you change anything for the next two do you reckon?
    Being inside as it's being lifted up by the wind doesn't sound like a barrel of laughs! I'll have to figure a way to secure mine(when I make it) to the ground quite securely. The idea of a bar sounds good, mine should be permanentish so might bury the end of it in concrete.

    Thanks again

    Cheers!

    Each triangle was screwed together (countersunk first) generally about 5 or 6 screws in each side.

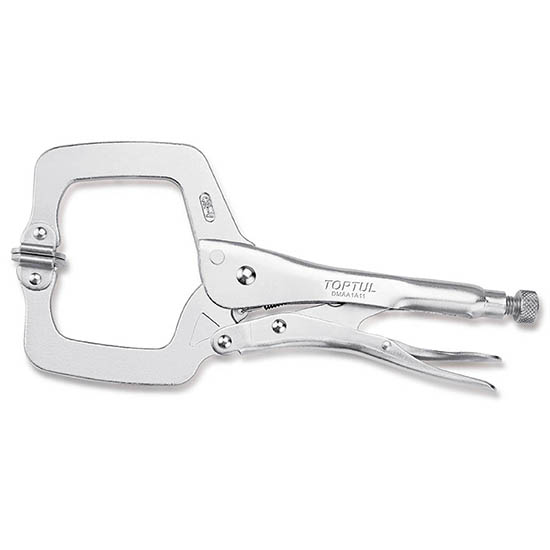
    As an aside do not even attempt it without clamps like these:

    p_161017_04573.jpg

    I started without them, and it was a massive pain in the hole.

    After it was assembled I used poly tape down the seams on the outside to stop water getting in.

    I used 2*1 and will use it again, I like the look and it's strong enough. I'd need a bigger table saw if I was to go bigger as well.

    My next plan is to move it, build a 6" deep trench, 9" wide, put threaded bar, into 3*2's and plant in the trench. Fill the trench with gravel, make a 10 sided shape from 2*2, with the metal bars going through that. Place the dome on top of that, and bolt it in place. Load of hassle tbh, and a mistake I won't make next time. Ground prep will be done before assembly.

    The loose gravel is for drainage. There's no way there won't be a marsh around the perimeter with rain and nowhere else for the water to go. Concrete may have you the same problem. Best of luck with it. This was a fun project, but I'm really looking forward to my next two.


  • Advertisement
  • Registered Users Posts: 6,482 ✭✭✭SouthWesterly


    Looks a great job. My wife is "encouraging" me, forcefully, to get one. :D

    Can you give us some idea of your materials list and cost?


  • Closed Accounts Posts: 1,049 ✭✭✭GinSoaked


    I've had this "kit" in my Amazon list for a long time https://www.amazon.co.uk/dp/B01KA2ASH2/ it might suit someone who doesn't have the same skill level as the OP. Full kit instructions here

    Kit seems a little expensive and getting a good cover on it isn't going to be as easy as the OP's design.


  • Posts: 0 [Deleted User]


    GinSoaked wrote: »
    I've had this "kit" in my Amazon list for a long time https://www.amazon.co.uk/dp/B01KA2ASH2/ it might suit someone who doesn't have the same skill level as the OP. Full kit instructions here

    Kit seems a little expensive and getting a good cover on it isn't going to be as easy as the OP's design.

    I saw that. The kit is just the hubs. It does seem expensive for what it is.

    As for covering it, the plastic could be put over and folded into shape, with a heat gun you could then "weld" the plastic together. It wouldn't look as neat mind you.


  • Posts: 0 [Deleted User]


    Looks a great job. My wife is "encouraging" me, forcefully, to get one. :D

    Can you give us some idea of your materials list and cost?

    As parts of it were cobbled together, I don't have an exhaustive list, but this was a 4mtr dome, with 60cm pony wall. Overall I would imagine it would come to about 400 quid. I'll know more next time, as I have to order everything.


  • Closed Accounts Posts: 1,049 ✭✭✭GinSoaked


    As parts of it were cobbled together, I don't have an exhaustive list, but this was a 4mtr dome, with 60cm pony wall. Overall I would imagine it would come to about 400 quid. I'll know more next time, as I have to order everything.

    Can you say how many feet of 2 x 1 you use then I'll see what the trade (cash) price is at the local timber yard.

    For the dome and not the upstand from the list for the kit that would be 30 short and 35 long lengths so really only need the lenghts of the short and the long section x2 because you are making up individual triangles . The timber yard does 2 x1 timber in 16 ft lengths (less the usual bit for nominal lengths) so I can work it out making max use of the timber.

    Edit - in italics


  • Advertisement
  • Posts: 0 [Deleted User]


    GinSoaked wrote: »
    Can you say how many feet of 2 x 1 you use then I'll see what the trade (cash) price is at the local timber yard.

    For the dome and not the upstand from the list for the kit that would be 30 short and 35 long lengths so really only need the lenghts of the short and the long section x2 because you are making up individual triangles . The timber yard does 2 x1 timber in 16 ft lengths (less the usual bit for nominal lengths) so I can work it out making max use of the timber.

    Edit - in italics

    I used the calculator at http://geo-dome.co.uk/2v_tool.asp. if you're using hub and strut, you'll use a lot less material than I did


Advertisement