Advertisement
Help Keep Boards Alive. Support us by going ad free today. See here: https://subscriptions.boards.ie/.
If we do not hit our goal we will be forced to close the site.

Current status: https://keepboardsalive.com/

Annual subs are best for most impact. If you are still undecided on going Ad Free - you can also donate using the Paypal Donate option. All contribution helps. Thank you.
https://www.boards.ie/group/1878-subscribers-forum

Private Group for paid up members of Boards.ie. Join the club.
Hi all, please see this major site announcement: https://www.boards.ie/discussion/2058427594/boards-ie-2026

My '72 Challenger project

191011121315»

Comments

  • Registered Users, Registered Users 2 Posts: 1,361 ✭✭✭Daved_XB


    Started the dynamat install, I knew I didn't have enough to finish it so I've more on order.

    257.jpg

    Installed the brake pedal assembly too

    258.jpg

    I found the new door strikers on a shelf when I was looking for some bolts so decided to whack them on now too before I lose them. 

    256.jpg

    Next up was the steering column install... I clearly hadn't paid enough attention to this when I took it off & put it away, but I'm really not happy with it's condition. I've been looking online now at aftermarket fully collapsible units that have a tilt function too.. so my plan is to order one of these to replace this one… adding all new firewall gaskets with it. 

    259.jpg 260.jpg 261.jpg 262.jpg


  • Registered Users, Registered Users 2 Posts: 1,361 ✭✭✭Daved_XB


    I have a mate popping past tomorrow so to make the most of a second set of hands, I think I'd like to get the boot lid & the doors mounted back on the car. This meant that I needed to go out to the shed tonight after work to glue on the boot rubber, I've even followed the destructions which said to clamp it down after gluing so hopefully it'll settle nicely over night now.

    263.jpg 264.jpg


  • Registered Users, Registered Users 2 Posts: 1,361 ✭✭✭Daved_XB


    The doors went on today, always nice when a five minute job makes such a huge change to the car

    266.jpg 267.jpg

    Then the boot lid went on... this is the boot lid open reflecting the contents of the shed like a mirror, this kinda blew my mind for a bit

    268.jpg 276.jpg

    Next up to go on was the bumper & the rear valance panel 

    269.jpg 270.jpg 271.jpg 272.jpg


  • Registered Users, Registered Users 2 Posts: 1,361 ✭✭✭Daved_XB


    Last thing for the day was to fit the flip top fuel cap... no real reason other than I think this is such a cool feature of the cars styling 

    274.jpg 275.jpg 277.jpg


  • Registered Users, Registered Users 2 Posts: 1,361 ✭✭✭Daved_XB


    Installed the new shiny door handles today, needed to clearance the door internals a little as the internals of these new handles are a little larger than the OE ones. I also adjusted the door strikers  correctly so the door sits right when closed.

    278.jpg 279.jpg 280.jpg

    Next I went to install the new billet bonnet hinges, sadly I've discovered that two of the 3 captive nuts on each side have damaged threads & you can't put a bolt through them... so I guess the next job is re-tapping them. 

    281.jpg 282.jpg 283.jpg


  • Advertisement
  • Registered Users, Registered Users 2 Posts: 1,361 ✭✭✭Daved_XB


    Got a bit more done on the Dodge, needed to remove the old key barrels from the old door handles.. these needed to then be metal polished as they had years of filth & grim on them before putting them back on the car.

    289.jpg 290.jpg

    The new fuel tank has the fuel pump built into it so I no longer need to run the mechanical style fuel pump on the side of the engine, so that has to come off

    295.jpg 296.jpg

    I have a shiny Moroso blanking plate to back on to cover the opening for the fuel pump arm.  

    297.jpg 298.jpg

    My new collapsible 9 way tilt steering column turned up, as did the new uni joint needed to mate it to the steering box.. I felt it odd that this much needed part didn't come in the kit... 

    291.jpg 292.jpg

    ​​​​​​​Press fitting that onto the steering box shaft was "fun"  with the steering box still in the car 

    299.jpg


  • Registered Users, Registered Users 2 Posts: 1,361 ✭✭✭Daved_XB


    The kit did come with a new firewall mount that is much nicer than the old OEM one it replaces & actually seals the hole up nicely 

    293.jpg 294.jpg

    Where the D shaft slides out of the bottom of the column is the first of 3 collapsible sections 

    300.jpg

    The other two are on the column in the car one before & one after the under dash mounting points... really happy with how this looks vers the old unit  

    301.jpg 302.jpg 303.jpg

    Also had my painter stop by for a coffee chat so we took that time to properly align the boot lid now, as I had only thrown it on roughly. The new rubber is making it sit a little higher than it should but the boot catch isn't adjusted fully down yet, we'll give the rubber a few weeks to settle at this clamping force for now & then adjust the boot fully down to it's final height then.

    285.jpg 284.jpg

    Went to re-tap the captive nuts that hold the bonnet hinges on & when applying the tiniest amount of pressure the captive nut snapped off.... not good

    286.jpg

    Thanks to the chassis strengthening bracing that I've installed access to these captive nuts is a huge issue now.... but I think I have a plan, as the captive nuts are in line I'll drill out the bottom one & make up a new plate with new nuts welded to it that I put in behind the bracing, for now I just have a normal nut & bolt in the top hole replacing the lost captive nut.. I'll not tackle that this weekend mind you this sounds like a perfect future Dave problem if I ever saw one... 

    287.jpg 288.jpg


  • Registered Users, Registered Users 2 Posts: 1,361 ✭✭✭Daved_XB


    Finished off the install of all of the sound deadening on the firewall & in the rear of the cab 

    304.jpg 305.jpg 306.jpg

    Whilst going through some boxes, I found a new reconditioned wiper motor that I don't remember ever buying... but I glad I did as the old one would have looked crap in the engine bay.

    310.jpg 311.jpg

    I think the next job I'll look to do is run the wiring, I have some new looms to go in. I might look at doing the same on the XB & get the wiring in for both at the same time. This is the dash loom.  

    308.jpg

    This is the engine loom 

    309.jpg

    I've now ordered a new front light loom & a rear light loom


  • Registered Users, Registered Users 2 Posts: 1,361 ✭✭✭Daved_XB


    I want to clean up the transmission before it goes back in, someone has painted it silver in the past & it's not held up great. I plan to clean all the paint off & repaint it I guess. I'm not sure if standard paint is the go here or if I should be looking at engine paint as it's better with heat maybe? What have people used that's good?

    312.jpg 313.jpg


  • Registered Users, Registered Users 2 Posts: 1,361 ✭✭✭Daved_XB


    The new custom 4 core radiator I ordered turned up, got it from the same company I got the XB one from & decided to go with the same twin electric fan set up that's on the XB. Looks like a nice bit of kit that should do the job.

    314.jpg 315.jpg 316.jpg


  • Advertisement
  • Registered Users, Registered Users 2 Posts: 1,361 ✭✭✭Daved_XB


    Went to put the radiator in on Sunday & found that the bracket sides don't line up with the sides of the opening for the rad on the car. 

    318.jpg

    You can see here each side that it's a little short & I'll have to make up some brackets to bolt between the car & the rads brackets now to make this fit

    319.jpg 320.jpg

    That had me wondering what went wrong as this is the larger big block rad size that I got. I still have the old front end of the car as garden art (I plan to make something cool like a BBQ maybe out of it)

    322.jpg

    Broke out the measuring tape & sure enough the opening in the new panel is 4 & 1/4"s wider... it never occurred to me to measure this prior to ordering the rad as I don't remember any doco around the front panels saying that they where uber wide because reasons... 

    321.jpg 323.jpg

    I spoke to the Rad shop & as they don't get a lot of asks for Big Block Challenger rads & as they did nothing wrong they're not keen on taking it back. I did think about trying to sell this & getting another custom size rad made up, but I think I'll just extend the wing brackets on the side of this rad out a bit & use this one as it's more than big enough to keep her cool


  • Registered Users, Registered Users 2 Posts: 1,361 ✭✭✭Daved_XB


    As I said in the XB thread I've being dying with a flu & a chest infection for the last month so it's been a way too long since I've been out in the shed, the fact that this is one of coldest winters we've had here in a while isn't helping either.

    But I really need to get on with these bloody cars, so as my mate was over decided to get the bonnet & the guards on the Challenger too. The Challenger bonnet is stupid heavy even for the two of us lifting it, so I worked out a way to balance it a few inches about where it sits on some foam & then I could tilt the hinge up & get the two front bolts in... really happy with how easy that install was.

    324.jpg 325.jpg 326.jpg

    Then bolted up the rear & installed the struts 

    327.jpg 329.jpg

    I have the guards on now too but they are just roughly bolted on, I'll organise for my painter to come round soon & we'll line up all the gaps then. He was very adamant that that wasn't something I should do without him & that suits me just fine. 

    333.jpg 334.jpg 335.jpg 336.jpg


  • Registered Users, Registered Users 2 Posts: 1,361 ✭✭✭Daved_XB


    It's been weeks since I've done anything in the shed, need to get moving again. To that end I want to get the trans back in the Challenger this weekend, it's finally stopped raining so I've been able to spend some time during the week cleaning & painting this.

    How it started

    337.jpg 338.jpg

    Then cleaned

    339.jpg 340.jpg

    Then primed

    341.jpg 342.jpg

    Then a couple of coats of high temp silver paint

    343.jpg 344.jpg

    Just need to paint the dipstick tube in Hemi Orange & replace the torque converter & then it's ready to go back in.


  • Registered Users, Registered Users 2 Posts: 1,361 ✭✭✭Daved_XB


    Bit more cleaning & painting was done, the dipstick tube & the shifter cable bracket are done & attached now.

    345.jpg 346.jpg

    Cleaned up the gearbox mount 

    351.jpg 353.jpg

    I couldn't find the flywheel for two days... another item I'd put into an uber safe place, well it's not really what you'd call a flywheel on a Dodge 

    347.jpg

    Here is the Dodge "flywheel" next to the flywheel for the XB. The starter motor engagement ring isn't on the Dodge flywheel at all so therefore they don't feel the need to have them be of any substance. 

    348.jpg

    The torque converter for the Dodge is bigger & heavier than that for the XB because it has the starter ring mounted to it & also the balancing weights too 

    350.jpg 349.jpg

    Now everything needed to bolt in the transmission is cleaned & repainted & ready to go.. 

    352.jpg


  • Registered Users, Registered Users 2 Posts: 1,361 ✭✭✭Daved_XB


    Sat was catching up with friends etc but I was able to spend all of Sunday in the shed, so stuff happened.

    Flywheel went in & even used the torque wrench & locktight as prescribed to do so... no ugga dugga here. 

    355.jpg

    Swapped over the torque converter for the new higher stall version. I did the install dry a few times as I'm always paranoid that I wouldn't get full engagement on the oil pump in the trans. If you've never installed one you push it on till it stops & then whilst slowly turning you push a little more & it will click in a notch & then you repeat that until it's clicked in 3 times & is fully home. Then you measure to ensure it's fully home & then you have a moment of self doubt & take it off & install it again... once you've done this a few times you then fill the converter with fluid & do the final install. Then every time you walk past it you give it a little twist & push.. you know to be sure to be sure. 

    354.jpg 356.jpg

    The new bigger trans jack is a beast, it feels so much better than the old cheaper one I had been using

    357.jpg

    ​​​​​​​Hung the trans crossmember on the back of the box

    358.jpg

    I was surprised how easily it went in in the end, I was expecting more of a fight... but the car gods where clearly happy with the blood sacrifice I made on the teeth of the torque converter earlier.

    359.jpg 360.jpg

    I was very happy that the trans just squeezed through the gap between the exhaust headers as I really didn't want to pull them off, looking ay the tiny gap where the starter needs to go I'm very glad that that is a future Dave's problem as that looks like no fun. Luckily I'd already ordered a tiny high output starter, no way the OEM one would fit in that gap.

    361.jpg

    I've pulled the Dodge off the hoist now as I need to change gears (crap pun intended) as the GT-Four engine should be done in a few weeks & as such I need to do a chunk of suspension work to it before then... note to self, one project at a time in future... one

    362.jpg


  • Registered Users, Registered Users 2 Posts: 1,361 ✭✭✭Daved_XB


    The Challenger & the XB are mostly at the same point in their journey so I'm thinking now that I might do jobs on them in parallel, the steering wheel adapter that wouldn't fit the wheel on the XB fits perfectly for the Challenger

    363.jpg 364.jpg

    The next job for both cars should be the wiring, I have all new wiring for both, the two looms at the top of this pic are for the fuel pump set up & the new steering wheel, the clocks have just shifted here so I'll have an extra hour of light in the evenings I can maybe take advantage off.  

    365.jpg

    I need to do some repair work to the dash of the Challenger, the new wiring loom will replace this old wiring loom obviously. But I also need to work out how to fix the ashtray door, I don't need it as an ashtray but I might look to put some gauges behind it or something like that but I need to sort the dodgy hinge repair that was done by a previous owner.

    366.jpg 367.jpg

    When I first got this car it had a very crappy plastic dash cover glued over the original dash pad... this was very common on old Challengers as the original dash pads tended to crack & the only replacements on offer where these crappy plastic ones  

    368.jpg

    One of the good things about me dragging my feet on this resto that they now do make full reproduction dash pads, so I can remove the original cracked pad & it's glued on plastic cover & put a good quality OEM style pad back on. 

    369.jpg 370.jpg


  • Registered Users, Registered Users 2 Posts: 1,361 ✭✭✭Daved_XB


    I'd made up a bracket to allow me to use a powered winch to drag non running cars up onto the hoist as that's a huge ball ache. Well I realised when dragging the Dodge up that there are no tow points on old muscle cars & I had to just wrap a strap around the diff.

    1d.jpg 1e.jpg 1f.jpg

    Now I'm thinking that I'd actually like a real tow point on the car, I have a spare one floating about & I'll buy a few more & look to fit front & rear two points to the Dodge & the XB. Looks like a simple bolt or weld to the chassis rail job back here would do the trick.

    371.jpg 372.jpg 373.jpg

    When I get the rest of the front of the car back on I can work out how & where to fit one up front, the K frame has two D loops on it but the instructions from QA1 had written in very large bold red print that these where NOT tow points & to be used as trailer tie downs only... so I'll assume they say that as they are known to fail as tow points. The welds don't look car tow strong to be fair.

    374.jpg


  • Registered Users, Registered Users 2 Posts: 1,361 ✭✭✭Daved_XB


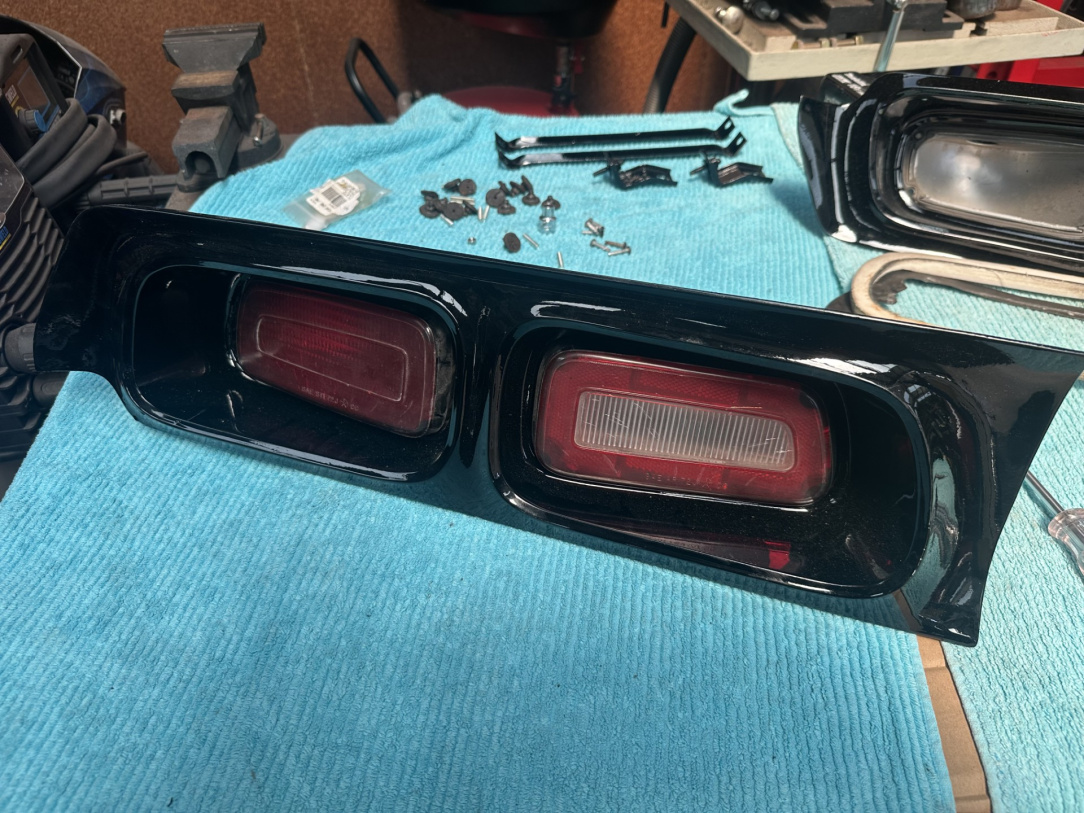
    The last of the bits that have just been taking up space & storing dust for my painter are now getting painted up for the Challenger, the last bits are things like front & rear light housings, side vents, bonnet vents, rear wing etc... 

    375.jpg 376.jpg 377.jpg

    I actually don't think now that I'm going to fit these side vents, yes I know they are not real vents but they where factory fitted to the front guards. I'll have them painted but as I say I'm really liking the look of the smooth sides in the garage & now I don't think I want to ruin that by fitting them & to fit them means drilling several holes in the guards for the pins so if they go on then they stay on. 

    378.jpg


  • Registered Users, Registered Users 2 Posts: 1,361 ✭✭✭Daved_XB


    As I'd just finished cleaning & installing the window winder mechanisms into the XB I figured I'd do the same job here as I had all the tools & correct grease etc out already... annoyingly in the box I was sure I'd put them I can only find two of the 4 winders... I've no idea where I put the other ones now.... 

    397.jpg

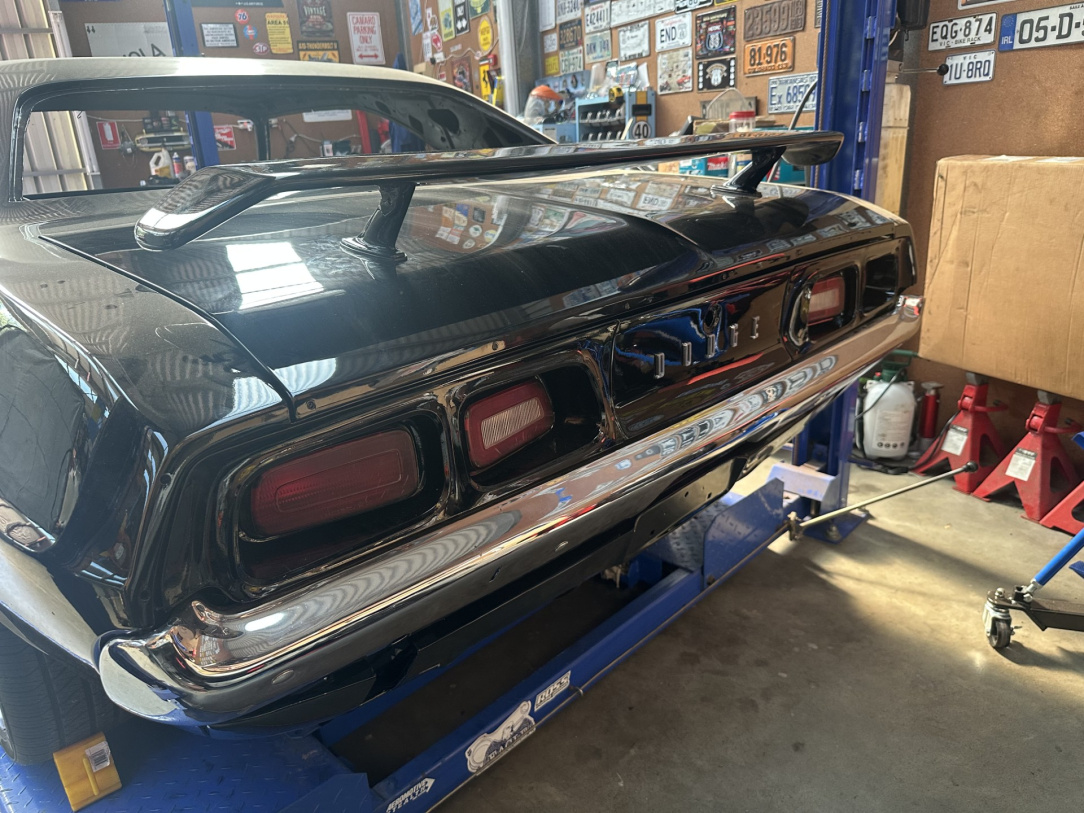
    I'll have to go through all the unmarked boxes on the shelves now till I find them... not what I needed. Anyway decided I should do something on the car anyway, so I have the last batch of painted bits back so I figured I could install some of them, lets start with the rear wing

    379.jpg 381.jpg 382.jpg 383.jpg

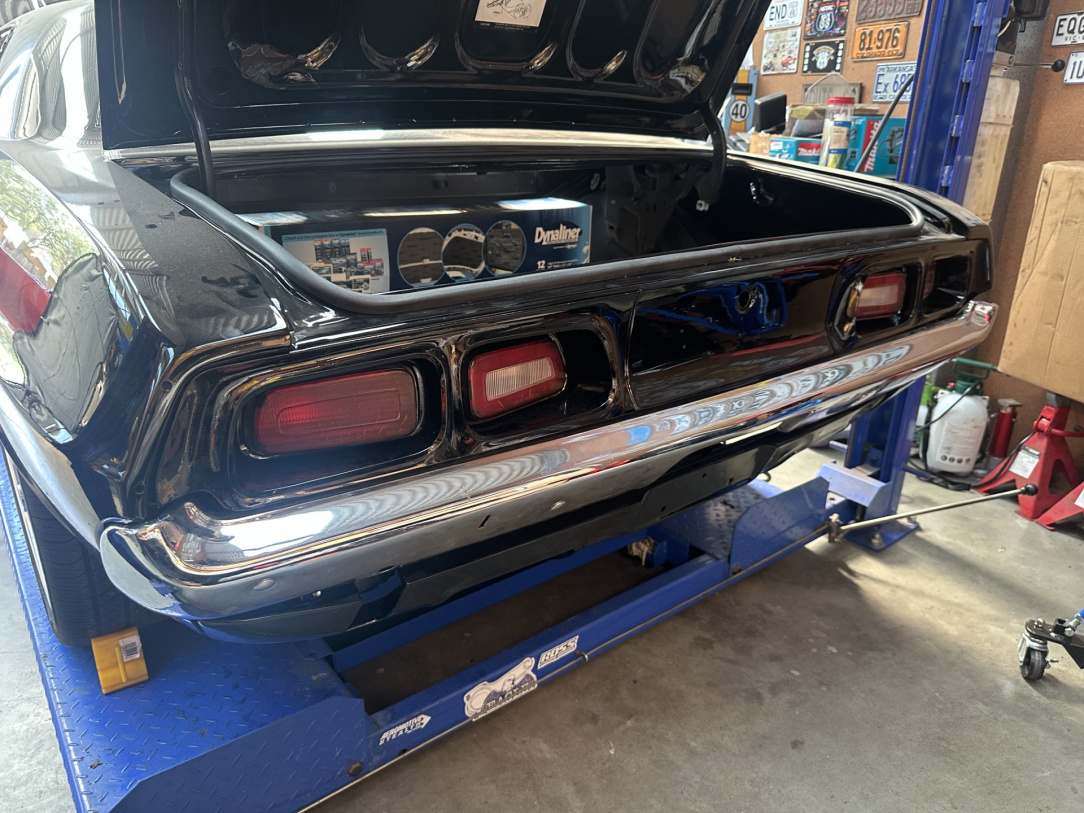
    Then I opted to put the rear lights back together & then install them, sadly they don't seem to make new lenses for them unless you buy the ones that are fully LED converted so I'm stuck with the old ones for now

    393.jpg 394.jpg

    Then I figured I'd put the new D O D G E letters on as the holes are already there, at some point I'll have to make a judgement call on do I drill 10 holes in the front of the new bonnet to put the same raised chrome letters up front too.... not sure

    395.jpg 396.jpg


  • Registered Users, Registered Users 2 Posts: 1,361 ✭✭✭Daved_XB


    I still need to put the chrome trim that runs across the boot lip & the bumper overriders on, but then the back of the car is finished.

    On the topic of drilling holes in the car, from the factory my car had these fake fender vents, I was always going to put them back on... but they need 8 holes drilled for the mounting pins & I think I've warmed too the smooth look of the lines of the side of the car without them 

    384.jpg 385.jpg 386.jpg 387.jpg

    One place I will have to drill holes is the doors, the new doors have no holes for mirrors drilled & due to a mix up in coms my painter didn't realise that I wanted them drilled before he painted the doors, so I'll have to take careful measurements off the old doors & very carefully drill the mounting holes for them

    380.jpg

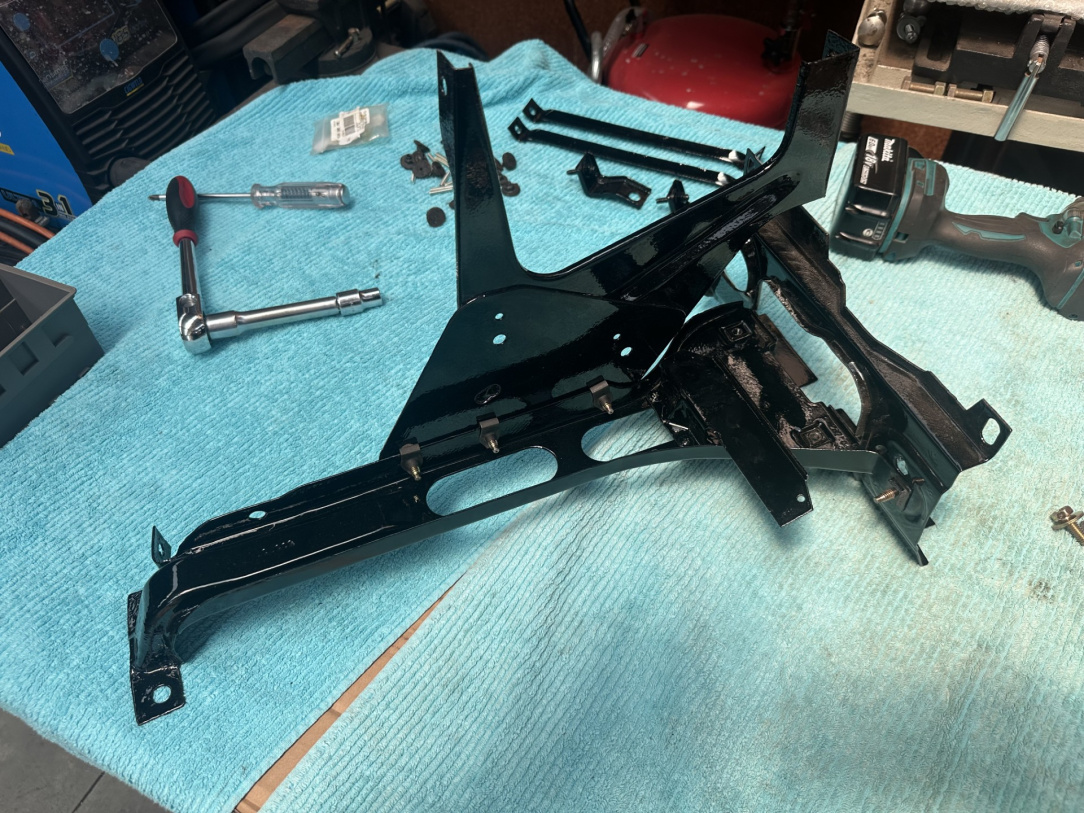
    The bonnet catch assembly was dissembled for painting & no good pics had been taken so a good 5 minutes was spent staring at these bits over a cup of tea to work out how it all goes back together

    388.jpg 389.jpg 390.jpg 391.jpg 392.jpg


  • Advertisement
  • Registered Users, Registered Users 2 Posts: 1,361 ✭✭✭Daved_XB


    I decided to spread the love around a few projects this Sunday & so rather than working on the XB I figured I'd move the needle if only a tiny bit on the Dodge. If for no other reason the painted nose cone for this car is sitting on the floor of my office in the house & I think I've been very lucky that it's not been kicked or damaged in any way yet so I really should pull my finger out & fit it on the bloody car.

    I'm fitting an aftermarket vintage air A/C system to the car & an aftermarket larger quad core radiator to the car too so I figured I'd make sure that all of these bits fit before I put the front of the car back on, so that was the afternoon job.

    The condenser for the A/C system is tiny compared to the OG units these cars ran in the 70's, reading the destructions looks like it's pretty easy, a left & right bracket to hold it into the car rad opening & separate bracket to hold the receiver/dryer  

    399.jpg 400.jpg

    ​​​​​​​With that done, slap it into the opening.. one of the bracket holes is out by half a hole from lining up with the mounting holes in the rad support panel of the car but that's a simple fix

    406.jpg 401.jpg 402.jpg

    However from the engine bay side there are a few issues, with the rad centred in the hole the bottom hose outlet was way too close to the suspension so I need to slide the rad more towards the drivers side to give better clearance as seen below, this means that the bracket on the passenger side of the rad no longer reaches the mounting holes on the car support panel so I'll need to extend that mounting bracket so the rad can be fitted in this location.

    410.jpg

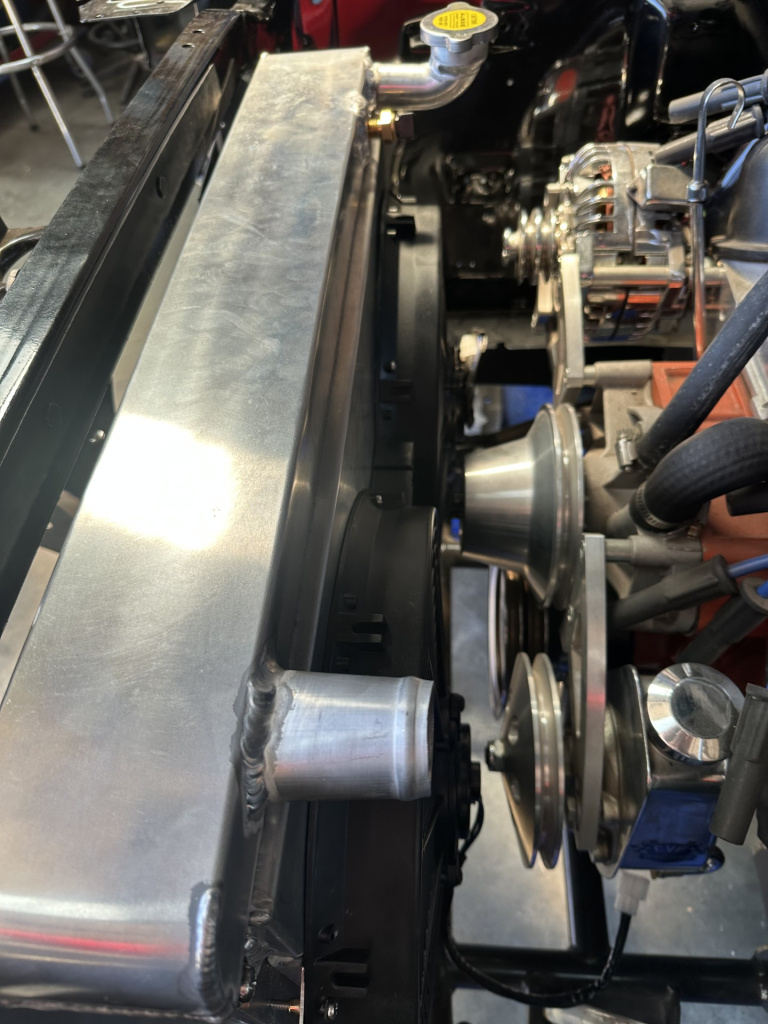
    The other issue installing the A/C condenser has given me now is that the two fans are now touching the accessories of the engine

    404.jpg 405.jpg

    There is no way to move the rad further forward but looking at the fan shroud that's mounted to the rad it's a lot deeper than I think it needs to be, so my plan is to cut down half of the depth of this shroud as that should move the fans back from the engines accessories by 10mm or so & whilst that's not a huge amount the engine should only rock side to side & shouldn't shift forwards at all. 

    411.jpg 412.jpg


  • Registered Users, Registered Users 2 Posts: 1,361 ✭✭✭Daved_XB


    Got the fan shroud cut down now, so this should solve my fan spacing issues when I get it all reassembled & in the car

    417.jpg 416.jpg 418.jpg

    ​​​​​​​I've extended the mounting bracket on the passenger side of the rad too as it no longer reaches the rad support panel since I need to offset it slightly so the bottom hose clears the suspension 

    420.jpg

    I've also added in a bung on the top just next to the filler neck for the temp sensor for the thermofan controller to read from

    419.jpg

    ​​​​​​​I'd love to say that this will all be assembled & installed on the weekend but the Bathurst 1000 is on this weekend so nothing will happen that doesn't involve me being in front of the TV 


  • Registered Users, Registered Users 2 Posts: 1,361 ✭✭✭Daved_XB


    Got the twin fans mounted back into their now shallower home 

    421.jpg 422.jpg

    Used the AC condenser to line up the new holes needed for mounting the rad 

    423.jpg

    Quick test fit to be sure to be sure that worked

    424.jpg

    Installed hopefully for the last time now... just need to work out how much room I have left to fit a trans cooler too up front 

    425.jpg 426.jpg

    ​​​​​​​Lots of clearance now between the fans & the engine 

    427.jpg 428.jpg

    I've pulled her off the hoist now as I need to do some repairs to the GTO... clearly I need a 3rd hoist now 

    429.jpg 430.jpg


  • Registered Users, Registered Users 2 Posts: 627 ✭✭✭mikehn


    Stunning.


Advertisement