Advertisement
If you have a new account but are having problems posting or verifying your account, please email us on hello@boards.ie for help. Thanks :)
Hello all! Please ensure that you are posting a new thread or question in the appropriate forum. The Feedback forum is overwhelmed with questions that are having to be moved elsewhere. If you need help to verify your account contact hello@boards.ie
Hi there,
There is an issue with role permissions that is being worked on at the moment.
If you are having trouble with access or permissions on regional forums please post here to get access: https://www.boards.ie/discussion/2058365403/you-do-not-have-permission-for-that#latest

Horse Trailer Renovation

  • 09-04-2012 10:12pm
    #1
    Registered Users, Registered Users 2 Posts: 158 ✭✭


    Hello Everyone,

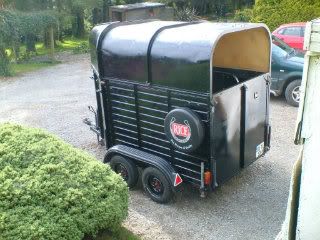
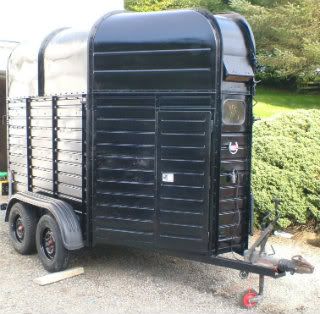
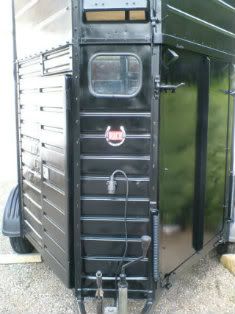
    well I bought a Rice Europa for 560 euros. Yes it was rotten, well the floor was. When I looked at it I was most interested in the frame, was it rusted through or solid. Well the frame was all solid so I bought it and towed it home. Then the work began. A search of the internet showed there was a complete lack of info (unlike stripping down and rebuilding a Jeep CJ7 that I'd previously done) and most importantly images! So If anyone is interested I'm going to post a few images and the like in the hope it'll help someone else!:)


«1

Comments

  • Closed Accounts Posts: 3,114 ✭✭✭doctor evil


    Love to hear updates!

    horse and hound online may be good for stories on restoring.


  • Registered Users, Registered Users 2 Posts: 408 ✭✭eorna


    Hi, we did the same last year and put in a new floor, but as yet haven't found the rubber matting for the front ramp. Would like to hear how you get on and if know where to get it. :)


  • Registered Users, Registered Users 2 Posts: 498 ✭✭FueledByAisling


    recommend going on horse&hound like another user mentioned. People are always renovating on that forum!


  • Registered Users, Registered Users 2 Posts: 158 ✭✭helibelly


    Well, the trailer's bought, and is back home. The frame is completely rot free, unlike the floor, the sides of which were similar in strength to paper mache, talk about rot! Thankfully this box hadn't been used for at least a year so no passengers were put at risk! Anyway, I ripped out the floor which was made up of two layers of wood, but there was nothing that was worth salvaging. Now to taking things apart...Enter the axle grinder....:D


  • Closed Accounts Posts: 11,299 ✭✭✭✭later12


    I renovated a Rice box about ten years back! Great fun, lots of late nights, lots of mistakes, but it looked great in the end and I had a brilliant time doing it. It was also hugely satisfying to stand back and look at the finished product, or to take to an event knowing it was all your own work.

    I presume it is a double box, what are you going to do about a partition?

    When I took out the floor of mine, I just abandoned the idea of putting in a new partition. So the box was essentially only used as a single, or as a mare & foal box.

    It's mostly used as a feed store these days:pac:


  • Advertisement
  • Registered Users, Registered Users 2 Posts: 158 ✭✭helibelly


    The partition was missing, so I started searching the internet to give me ideas as to what the missing parts looked like. I was going to get a local fabricator to make one from plans I would draw up, but then a casual look at donedeal turned up an Ifor Williams partition, the kind with the single pole and movable ends along with the four breaching bars. The center padding was fine with the odd rip, but thats' all been taken to bits and will be recovered with automotive grade leatherette (in black to match the boxes final colour). In the meanwhile, it's back to grinding away the surface rust, priming and painting with several coats of hammerite:rolleyes:


  • Registered Users, Registered Users 2 Posts: 158 ✭✭helibelly


    So, lots of parts have been ground off, I don't think a single bolt would have come off with out the aid of the grinder! Floor gone, side buffers out (the plastic had cracked and they were beyond repair), and the glavanized steel sheet sides that covered the bottom two feet of the inside walls, these infact were a great advert for always giving a quick hose out of your box after use, as the wee had rotted straight through the floor side edge. So with a garage floor full of rusted parts and frames the great 'de-rust and paint' begins:rolleyes:


  • Closed Accounts Posts: 11,299 ✭✭✭✭later12


    If you can post some photos they would be great to see.

    I remember my biggest regret when I did mine was that I didn't have any before & after pics.

    Well done on going to those lengths on the partition. As I said, I just ignored the partition in mine, as it was only for my own use and i would only be ever carrying one horse at a time out hunting.

    Any idea of what this is going to cost you?


  • Closed Accounts Posts: 444 ✭✭Minister


    My 15 year old boys have bought an old Rice Double box as a 'project'

    They hope to make money from it.

    Maybe the OP might allow me to post and compare notes as the box projects progress. If not I will move quietly - promise!


  • Moderators, Sports Moderators Posts: 7,268 Mod ✭✭✭✭charlieIRL


    I'm nearly finished restoring my mare and foal box at the moment, have all the outside done since Saturday gone. Just to paint the inside and put lights back on.


  • Advertisement
  • Registered Users, Registered Users 2 Posts: 158 ✭✭helibelly


    anyone who's doing a refurb could post here, that way we'll learn from each others mistakes! As for the cost, I'm actually keeping a note of all the parts and materials I'm buying, but I'll post up the costs at the end. I'll try to work out how to post pictures soon! Meanwhile the underframe has been de-rusted and a lovely green coat (well three coats) of hamerite applied. I've also removed the wheels and hubs to inspect the breaks. Oddly the left rear break housing was rusted to beyond salvation, so a new one's going to be put on, just have to learn how to weld! It was really nice to rivet the little plates back onto the axels after prising them off and getting to the thick rust that was behind them. :)


  • Registered Users, Registered Users 2 Posts: 158 ✭✭helibelly


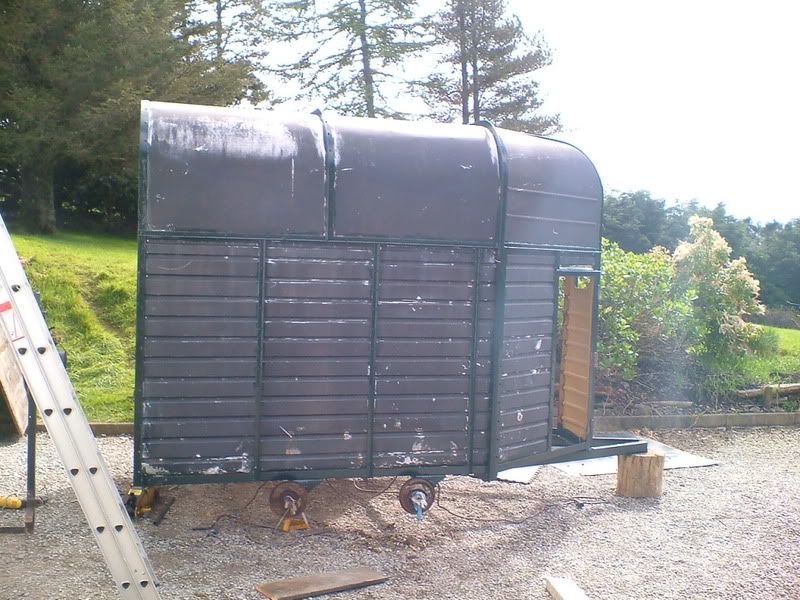
    Ah, worked out how to post images, so this is the box, minus it's wheels and well quite alot else!

    DSCF0142.jpg
    maybe I should make the images smaller, somehow!


  • Registered Users, Registered Users 2 Posts: 158 ✭✭helibelly


    It's a good job that all the 'parts' are now on the garage, what's with the weather!!! Still, bought the timber for the floor, good 1 inch thick plank, which is now respendent in a coat of dark brown timber preserver (from B & Q, the enviromental friendly stuff which is very low in volitiles etc). When I took the interior side panels off I found addtional timber placed in the corrigations of the sides of the box. All this timber was completely sodden. I night next to the boiler dried them out and they have been varnished to prevent moisture getting into them again. Talking of moisture, I've had the chance to watch the water pour through the gaps in the roof, these have now been sealed and the box is water tight again. In the corner of the garage is a small pile of re-conditioned parts that have been de-rusted (with wire brushes and a chemical dip), and then resprayed. Ah such fun to be had!!:D


  • Registered Users, Registered Users 2 Posts: 158 ✭✭helibelly


    Well I think I've passed the tipping point! Everything that can be taken off has been. Rust removed, repainted and put in the 'done' corner of the garage. A coat of grey primer now sits on the body of the box and the new break cables (from Marineline near Wexford). The black paint has also been bought, Black Tractor paint, which means it can be dilluted using thinners. I thought about more modern 2-pack paint, but for the DIY paint job there are some really nasty chemicals given off which need proper respirators and the like! So the wait for a run of sunny days is all that I need to do the spraying, so it maybe some time before I post images of a shiny horse box :rolleyes:


  • Closed Accounts Posts: 444 ✭✭Minister


    I think that the box my lads bought is a Europa judging on the pics. What kind of parts cost are you expecting and where do you hope to get parts?
    Thanks,
    M


  • Registered Users, Registered Users 2 Posts: 158 ✭✭helibelly


    How longs a piece of string. I've tried to keep the cost down by refurbishing as much as possible. So actual 'Rice' parts have been kept to a minimum, however I have bought a new break backing plate which comes complete with break shoes etc, and two new break cables. A rubber boot for the tow arm, and a new key barrel for the locking handle. Non-Rice specific parts have included, new tyres, flooring, partition (off Done deal), padding for the sides, hundreds of rivets, new steel inner-sides, wood for the ramps, rubber for the ramps, paint and primer, wood preservative and many more parts. The total cost adds up slowly and my unique way of funding (by selling stuff on ebay) has kept the actual cost down. The actual cost is going to be itimised at the end of restoration, but to do it properly you can't scrimp on stuff! :rolleyes:

    oh, put up some images for the before and after!


  • Registered Users, Registered Users 2 Posts: 158 ✭✭helibelly


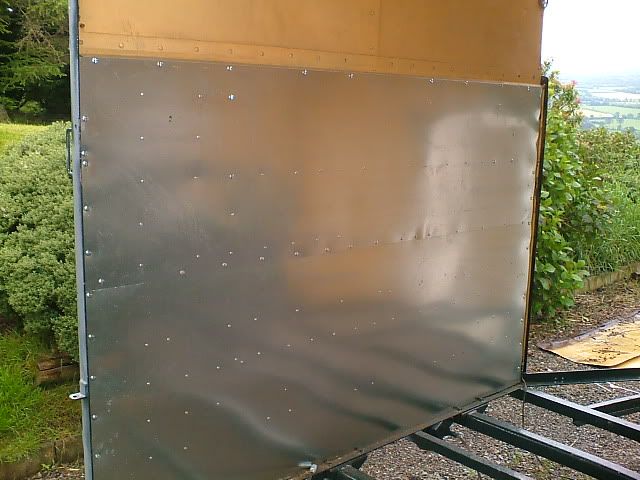
    Well the weather has finally improved, albeit for a day, more importantly the galvanized steel sheets for the inside have arrived, so begins the process of riveting them in. Photos to follow:)


  • Registered Users, Registered Users 2 Posts: 158 ✭✭helibelly


    Q. How many rivets does it take to put galvanized steel sheets in a horse box?
    A. Too bloody many!!!:D
    DSCF0226.jpg


  • Registered Users, Registered Users 2 Posts: 158 ✭✭helibelly


    Both sides are now replete with the new steel. The front clam-shell door has gone back on (after quite a lot of struggling on my own), and the grooms door, which I'm still tempted to replace the door handle on even though it works fine, has gone back on. Oddly I've found it impossible to get a sheet of marine ply for the rear ramp that is big enough. Sheets of ply come in 4ft widths and rear ramps are wider than this, still I have a cunning plan.....:cool:


  • Registered Users, Registered Users 2 Posts: 535 ✭✭✭elusiveguy


    helibelly wrote: »
    Oddly I've found it impossible to get a sheet of marine ply for the rear ramp that is big enough. Sheets of ply come in 4ft widths and rear ramps are wider than this, still I have a cunning plan.....:cool:

    Having the same issue with an Ifor atm... Did the floor in a weekend but can't get any thing but 'indoor' ply in the right size for the ramp


  • Advertisement
  • Registered Users, Registered Users 2 Posts: 158 ✭✭helibelly


    yes, I looked at maple ply but the cost was prohibitive. I'm just going to lash tons of preservative on the ply and expect to replace it every five years!


  • Registered Users, Registered Users 2 Posts: 158 ✭✭helibelly


    Will the rain never stop? Put the front ramp and clam-shell upper door back on. The ramp weighed a bloody ton! But the garage is starting to look a little less full of horse box parts. Rear ramp frame went on and the ply cut and stuck together.:)


  • Registered Users, Registered Users 2 Posts: 158 ✭✭helibelly


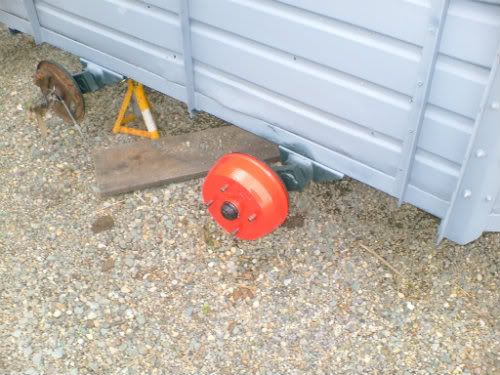
    Well I got fed up of waiting for the rain to stop, so today two of the wheel hubs have gone back on, resplendent in their coats of bright red (high temp) paint, must get the camera out to take some pictures!


  • Registered Users, Registered Users 2 Posts: 158 ✭✭helibelly


    shiny!:DDSCF0235.jpg


  • Registered Users, Registered Users 2 Posts: 158 ✭✭helibelly


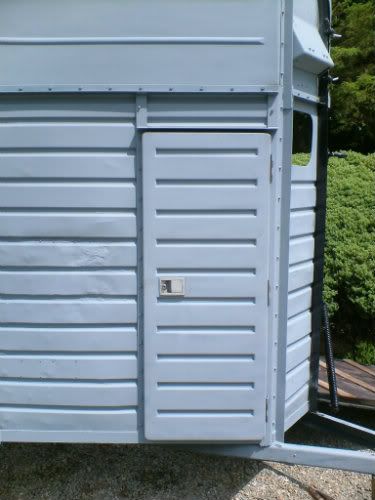
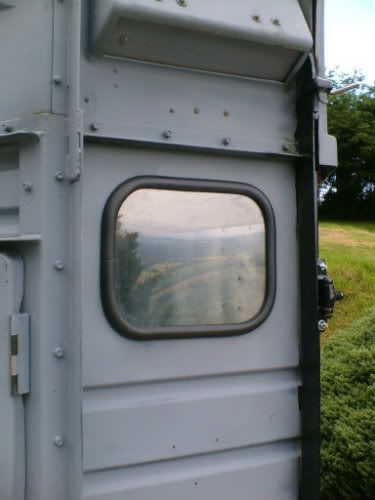
    Well with some better weather I've thrown on the grooms door and Dry fitted the front window (the original was cracked and badly yellowed) Cut from plexi I had sat in the back of the garage. I'll use black mastic on the inside of the seal to make it 100% weather tight. Who knows maybe I'll get this finished before the end of the summer?;)
    DSCF0231.jpgDSCF0236.jpg


  • Registered Users, Registered Users 2 Posts: 158 ✭✭helibelly


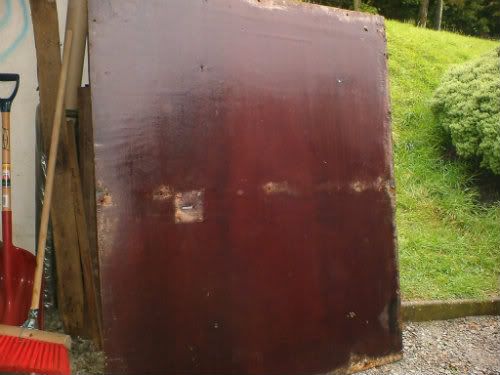
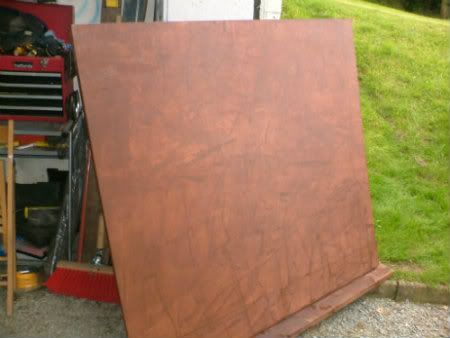
    more pictures, the rear ramp ply, with before (the old wood which was re-cut and used on the front ramp, note the square mark and slot, this was from the floor of an Ifor williams box previously, no doubt cut down for the ramp, great recycling!:)) The new ply, which is two sheets of half inch stuck together and the gap filled with more ply, and lashings of eco-frendly water based preservative.
    DSCF0163.jpgDSCF0233.jpg


  • Registered Users, Registered Users 2 Posts: 4,281 ✭✭✭Valentina


    Fantastic work, I am loving this thread! I'm very tempted now to buy an old box and do it up myself (not that I could!!)


  • Registered Users, Registered Users 2 Posts: 158 ✭✭helibelly


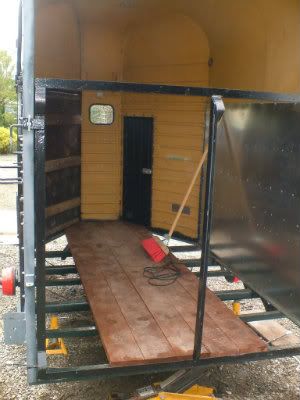
    Well I'm fed up with with the weather, so as it's my day off I'm cracking on with the flooring.you can see I've not completed the floor either side, this allows me to start putting the wiring loom on without crawling around under the box. I'm getting the rubber mats for the ramps tonight so hopefully as long as it's not pouring down tomorrow they'll get done:rolleyes:
    DSCF0245.jpg


  • Registered Users, Registered Users 2 Posts: 158 ✭✭helibelly


    man alive, will the rain never end!! Well after a bit of messing around the first layer of the floor is down, that being the 1 inch thick planks. Wood being wood there were little gaps in between the planks, these are going to be filled with mastic (the universal cure for nearly all consruction jobs). The next layer will be a rubber/fiber glass composite designed for flat roofs. On top of that will go the rubber mats the horse will stand on. My idea is to create a 'tub' that will prevent the wee getting to the wood and rotting it. Underneath the underside will be coated in Waxoyl (think about all the road spray and the like and it's effects on the underside of your car!). In the meantime I've put in the witring loom and re-hung the breaking rods and cables.


  • Advertisement
  • Registered Users, Registered Users 2 Posts: 498 ✭✭FueledByAisling


    My god your transformation has been great so far by the looks of it! Your work is paying off :) If you don't mind me asking, how much so far have you spent buying new materials for refurbishing?


  • Registered Users, Registered Users 2 Posts: 158 ✭✭helibelly


    I'm going to put up a grand total when it's finished, but to date including the actual box it's over a grand and a bit, hopefully it'll be equal to a box twice the value of the rebuild, and I'm not charging for labour;)


  • Registered Users, Registered Users 2 Posts: 88 ✭✭talullah


    This is brilliant...we just bought an old Rice Europa aswel and are in the middle of trying to renovate it. This will be a great help as there is pretty much nothing out there to help. :D


  • Registered Users, Registered Users 2 Posts: 158 ✭✭helibelly


    If you want any pics of anything for reference just ask! Oh and good luck;)


  • Registered Users, Registered Users 2 Posts: 3 Neverlearn


    Glad I found this, just bought a Rice trailer cheap as a 'project'. (New floor being the main thing!) Some great tips here, will post mine as I go along. Have done one before about 20 years ago, a Rice Farmer I believe. It must have been twenty when I got it! Had to sell it earlier this year to pay for colic surgery. It was a large and heavy beast but pretty indestructable. This one is slightly younger! Wish me luck!


  • Registered Users, Registered Users 2 Posts: 158 ✭✭helibelly


    Ok, number one recomendation, do your restoration in a barn!!! On the plus side, I'm getting used to rain trickling down my neck as I work on the trailer. In a burst of activity I've filled the gaps between the floorboards (in ships it's called caulking) put the rear ramp back together, although the rubber mats I'd been expecting never came :( so it looks like I'll have to buy the rubber, I'm going to call Westwood trailers, as despite them being the only real place to get horse trailer stuff in Ireland their prices are ok, so fingers crossed! The central partition has been shortend by about an inch and re-welded (by me, another new skill I've learnt whilst doing this:) ), the bottom plate screwed down and the holes where the old partition went filled with nuts and bolts. So at least when I'm inside the trailer, I'm dry, the quest continues, in the meantime thank goodness my livery yard has an indoor arena:D


  • Advertisement
  • Registered Users, Registered Users 2 Posts: 3 Neverlearn


    Thanks Helibelli, don't have a barn dry enough unfortunately, but have been cracking on in the drive, luckily the weather has been good! After having removed the floor (fantastic wood, a sort of purple colour inside, destined for my fire this winter - once it's dried out) we have exposed a few areas of the frame that require attention. Luckily I know a mechanic who is going to weld it for me, one side around the axle area needs a rebuild I think. I certainly admire your having a go at welding! I was tempted and may have a go at some of the smaller bits.

    WD40 has become my best friend. Had a bit of an issue when the tow hitch got stuck on my tow ball. I had visions of driving everywhere with a skeleton trailer on the back! A bit of thumping released it so I removed it and after digging out lots of old grease and soaking I'm hoping to be able to save it. It seems more robust that the newer ones. Another good product is something called - imaginatively - 'Repair metal for good' made by Unibond. I'm using it on the top front door lip and the end result is extremely solid. Oh and Kurust! I'm slapping it all over to be on the safe side.

    Having no partition I plan to make one. Have seen one I can copy, doesn't look that hard! ;) Going to tackle the wiring loom this weekend, get it ready for fitting after the welding is done (and the undersealing completed). I see you've used sheet metal on the sides, good idea! As is using the roofing material on the floor, my son is a roofer so that's handy!

    I'll try and put up some of my pics. Oh and we are having a problem with the spring on the rear ramp. It seems rusted and isn't moving as it should so if anyone has any tips on renovating one I'd be very grateful!

    Keep your pics coming Helibelli, I may need the inspiration!


  • Registered Users, Registered Users 2 Posts: 3 Neverlearn


    Oh, just had another thought, where possible replace the bolts, particularly those holding the ramp fastenings. Many of mine just sheared off when they were being undone and others were rusting badly which was not obvious until I undid them. I'm replacing them with galvanized bolts which are specifically designed for outdoor use as they resist the weather and tannic acids in the wood.


  • Registered Users, Registered Users 2 Posts: 158 ✭✭helibelly


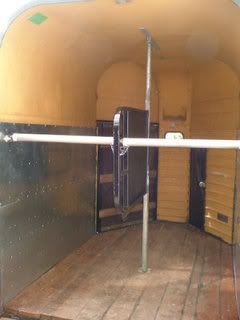
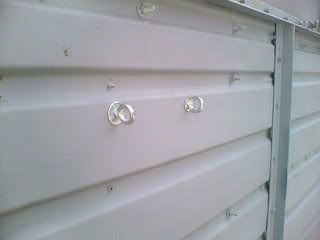
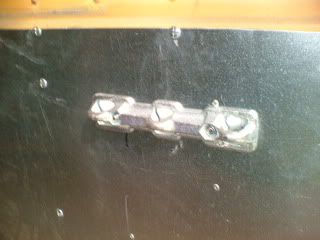
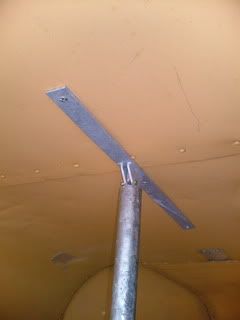
    Great stuff going on. Yes, replacing all the bolts that have been ground off with new stainless bolts is a must, in the back of my mind is the task of replacing stuff in the future and ease of removal. Meanwhile I've finished the rear ramp, albeit without rubber for now, work was being re-carpeted so I got given some of the old stuff (out of my bosses office!). It's the mega hard-waring type that will hopefully do a couple of seasons. the central partition has gone in (the one off done deal). I've re-done the padded bits in lovely black leather-look vinyl. The breech bars were cleaned up and brand new receivers bolted to the walls, I used eye bolts for this, so If the horse gets tangled in the bars (you know, front legs over the bar etc) a simple screw driver can undo the bolts form the out side and release the bar. It's actually looking like a horse box now, well at least on the inside:D


  • Registered Users, Registered Users 2 Posts: 158 ✭✭helibelly


    more pics :)
    DSCF0267.jpgDSCF0265.jpgDSCF0264.jpgDSCF0262.jpgDSCF0261.jpg


  • Registered Users, Registered Users 2 Posts: 191 ✭✭sweeney1971


    We have just got a 505 horse trailer with a steel floor in it, wants some work on it before putting the horse in but hubby will do that.

    Always make sure the floor is solid, lots of horror stories out there when horses have gone through the floor whilst in transit.


  • Advertisement
  • Registered Users, Registered Users 2 Posts: 158 ✭✭helibelly


    absolutely , worst tale I heard recently was of an owner being stopped by a friendly motorist who saw a hoof sticking through the bottom of the floor! Thankfully no one was hurt!, I'd love to have put an aluminum floor in but the cost was eye watering.


  • Registered Users, Registered Users 2 Posts: 158 ✭✭helibelly


    Ok, the kids are back at school, so a week of good weather has finally been forecast, and I'm off all week! So I'm going to borrow a compressor and finally paint the box:D watch this space!!!!


  • Registered Users, Registered Users 2 Posts: 158 ✭✭helibelly


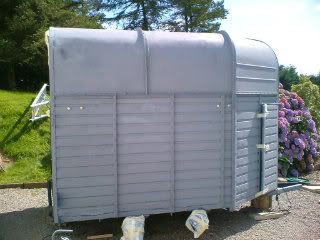
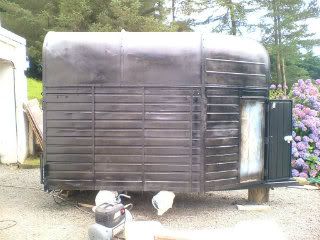
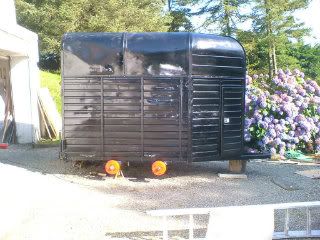
    So, great weather, spray gun bought, compressor borrowed.......before, during and after.:D
    DSCF0270.jpgDSCF0271.jpgDSCF0272.jpg;)


  • Registered Users, Registered Users 2 Posts: 158 ✭✭helibelly


    Well I'm gobsmacked!! With the paint dry and the weather turned, I started to put the lights and wheel arches on. All of a sudden there's almost nothing left to do. I waited until sunset to test the lights, and they all worked (well almost, the fog light hasn't got power so that'll be me doing a continuity test on my next day off). Even the light inside worked:D So only the wheels to refurbish (in black of course) and the breaks to set up and it's done.. Ah mobile, beach rides, competitions, clinics, the poor horse won't know what's hit him...if I can get him to load:P


  • Registered Users, Registered Users 2 Posts: 158 ✭✭helibelly


    It occurred to me that I've taken quite a few pictures, but didn't want to flood the board with them, so if you want to see more pics go to http://s1246.photobucket.com/albums/gg607/peter207/ :)


  • Registered Users, Registered Users 2 Posts: 158 ✭✭helibelly


    So checked the fog light, it's my car that's at fault!!!!:p


  • Registered Users, Registered Users 2 Posts: 158 ✭✭helibelly


    It's amazing that with the painting done the garage is nearly empty of trailer parts. I had to get someone to weld the new brake backing plate on the back left axle. So I've ordered a bloody big wheel clamp, I've got the serial number engraved onto the frame, TER registered (see http://www.ter-europe.org ), and a really clever thing that will, at the touch of a button ,show me where the trailer is with an accuracy of around five meters (I didn't show where this particular thing is welded but it's there ;) ), but any recommendations for insurance?


  • Registered Users, Registered Users 2 Posts: 158 ✭✭helibelly


    Well, I bought new tires (that cost a bit, but don't be cheap by putting normal car tires on your trailer, put reinforced ones on!), last few adjustments to the breaks (all explained on the avon ride web site, and with the handy leaflet that comes with all their products), and finally the two Rice Horse shoes, which were the first things I repainted a long, long time ago :D. DSCF0274_zps74af9f60.jpgDSCF0275_zps1f86de35.jpgDSCF0276_zps5e8e37ec.jpg


  • Registered Users, Registered Users 2 Posts: 3,919 ✭✭✭Odelay


    Why did you choose the Rice Europa? you not an ifor fan like everyone else? (I'm not btw).


    Did you replace the damper on the tow hitch? I'd recomend doing this as it reduces the jerking while towing.


    Super job, looks like new and will function better than any box two years old.
    Well done!


  • Registered Users, Registered Users 2 Posts: 158 ✭✭helibelly


    I went for the Rice because of the aluminum sides which don't go all soggy when covered in wee (how many Ifor boxes have you seen with rotten walls?), On the test drive there was a little jerkyness, but it lessened off with a few practice 'harsh' stops. also getting the grease gun out and giving the hitch a refill helped.:)


  • Advertisement
Advertisement