Advertisement
If you have a new account but are having problems posting or verifying your account, please email us on hello@boards.ie for help. Thanks :)
Hello all! Please ensure that you are posting a new thread or question in the appropriate forum. The Feedback forum is overwhelmed with questions that are having to be moved elsewhere. If you need help to verify your account contact hello@boards.ie
Hi all! We have been experiencing an issue on site where threads have been missing the latest postings. The platform host Vanilla are working on this issue. A workaround that has been used by some is to navigate back from 1 to 10+ pages to re-sync the thread and this will then show the latest posts. Thanks, Mike.
Hi there,
There is an issue with role permissions that is being worked on at the moment.
If you are having trouble with access or permissions on regional forums please post here to get access: https://www.boards.ie/discussion/2058365403/you-do-not-have-permission-for-that#latest

Build The Millennium Falcon

  • 02-01-2015 1:03am
    #1
    Moderators, Computer Games Moderators Posts: 5,390 Mod ✭✭✭✭


    Anyone see this?

    Saw the ad on tv earlier and signed up, looks amazing, 1:1 scale replica of the Falcon prop used in Empire. You build it yourself over the course of 100 magazines, its one of those subscription based things. works out fairly pricey but its broken up over 2 years and the final result looks brilliant. Im going to give it a go anyways, i was getting that lootcrate thing every month but im gonna cancel that and get this instead.

    http://www.buildmillenniumfalcon.com/


«13456

Comments

  • Registered Users Posts: 747 ✭✭✭littleredspot


    At over a thousand euro it would want to fly!


  • Closed Accounts Posts: 433 ✭✭MaggotBrain


    First mag 2.99 plus 8.99 multiplied by 100 magazines. Mental...


  • Moderators, Computer Games Moderators Posts: 5,390 Mod ✭✭✭✭Optimus Prime


    They reckon to buy a built 1:1 replica of the falcon prop from empire already would cost between 3 and 5grand, maybe i should have posted this in the model making forum instead haha..


  • Registered Users Posts: 747 ✭✭✭littleredspot


    First mag 2.99 plus 8.99 multiplied by 100 magazines. Mental...
    Sterling!


  • Registered Users Posts: 747 ✭✭✭littleredspot


    keithgeo wrote: »
    They reckon to buy a built 1:1 replica of the falcon prop from empire already would cost between 3 and 5grand, maybe i should have posted this in the model making forum instead haha..

    A 1:1 scale model of the ship would cost 3-5 grand :)


  • Advertisement
  • Closed Accounts Posts: 33,733 ✭✭✭✭Myrddin


    It's expensive for sure, but you're buying essentially a replica movie prop...it's going to look incredible. Such things don't come cheap!


  • Closed Accounts Posts: 9,463 ✭✭✭KTRIC


    No body posted the obvious, 1:1 is full scale !!

    And isn't the millenium falcon like 35 metres long or something ???


  • Closed Accounts Posts: 33,733 ✭✭✭✭Myrddin


    KTRIC wrote: »
    No body posted the obvious, 1:1 is full scale !!

    And isn't the millenium falcon like 35 metres long or something ???

    1:1 with the movie prop, as in the filming model (not the stage prop):

    guerre.jpg

    Though it would be funny if a 40ft truck pulled up at Keiths house with issue #1 :D


  • Moderators, Computer Games Moderators Posts: 5,390 Mod ✭✭✭✭Optimus Prime


    haha, yeh sorry 1:1 with the movie prop! would love a full size one.. could rent out the house and live in it!


  • Registered Users Posts: 626 ✭✭✭Wedwood


    Better off buying the updated version that houses the mini-figures for €150.

    It had the lights and makes the noises !!! - Plus it won't fall apart as the €1,000 Airfix kit no doubt will !!!

    Plus, if you really want to spend €1,000, you could use the change to get the At-At, Tie fighters, X-Wings and all the figures !!!


  • Advertisement
  • Closed Accounts Posts: 33,733 ✭✭✭✭Myrddin


    Wedwood wrote: »
    Better off buying the updated version that houses the mini-figures for €150.

    It had the lights and makes the noises !!! - Plus it won't fall apart as the €1,000 Airfix kit no doubt will !!!

    Plus, if you really want to spend €1,000, you could use the change to get the At-At, Tie fighters, X-Wings and all the figures !!!

    I could be wrong, but I'd imagine there would be a substantial difference in quality & detail between the toy you mention, & a replica of the filming model. If something makes sounds, it's for kids. While hugely expensive, over 2 years it won't feel so bad...& we'll all look like Greedo when Keith posts pics of it all finished & lit up :D

    greedo2.jpg


  • Closed Accounts Posts: 33,733 ✭✭✭✭Myrddin


    Just seen the ad for this on tv there, it looks incredible.


  • Moderators, Computer Games Moderators Posts: 5,390 Mod ✭✭✭✭Optimus Prime


    Well I'm signed up and all, I understand people think it is expensive but I think the finished model is worth it. To be honest it doesn't compare to lego star wars, it's a film accurate prop. I've got a lego Falcon myself but this is a different level altogether.


  • Moderators, Computer Games Moderators Posts: 5,390 Mod ✭✭✭✭Optimus Prime


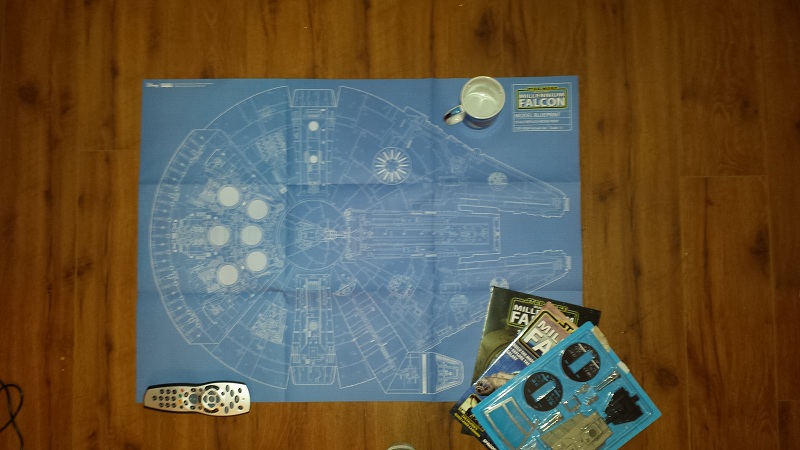
    Got the first issue, looks good so far, this blueprint is in scale to the finished model, i left a sky remote and mug in the picture to give you an idea of how big it is.

    20150111_155953.jpg

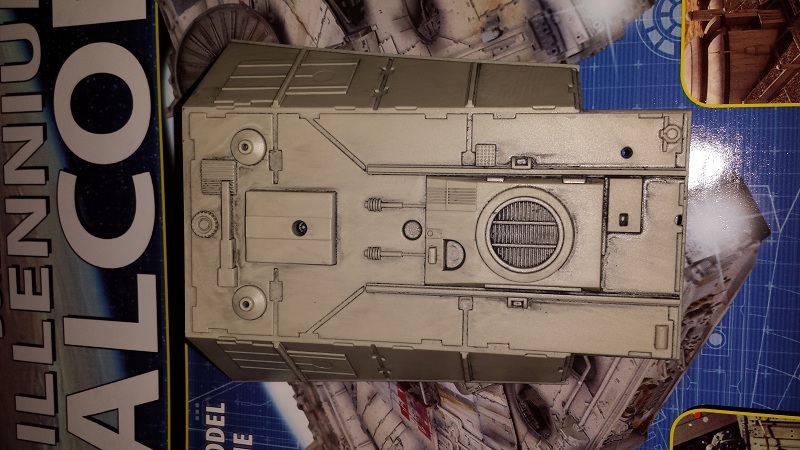
    Up close of the first hull piece..

    20150111_160546.jpg


  • Closed Accounts Posts: 33,733 ✭✭✭✭Myrddin


    Looks great Keith, I like the weathering on the hull section. The model is going to be massive :eek:


  • Moderators, Computer Games Moderators Posts: 5,390 Mod ✭✭✭✭Optimus Prime


    yeh looks big alright, the hull has some good detail on it but im going to use some dry brushing to make it look more weathered i think. hopefully i dont make a mess of it. the gun turret that comes with issue 1 is metallic silver too and needs painting, despite the fact it says you can do this without painting! it would look stupid i think just a silver gun turret on the model.


  • Registered Users, Registered Users 2 Posts: 9,081 ✭✭✭ziedth


    It'll be deadly when it's finished alright. I kinda regret not doing it but I have a little lad who is 3 this year so it wouldn't last long


  • Moderators, Computer Games Moderators Posts: 5,390 Mod ✭✭✭✭Optimus Prime


    Ive 2 boys 10 and 6 who are going to build it with me, so it will be something to do for the next two years.. my 4 month old girl might have a go at smashing it though in 2 years time haha. Im planning on getting my attic converted this year to hold all my stuff and hopefully get a projector\surround sound system up there so ill be mounting it on the wall with the bracket you get in the last issue. should look great in two years time..


  • Banned (with Prison Access) Posts: 7,611 ✭✭✭david75


    i really would love this, but its unreasonably expensive


  • Registered Users, Registered Users 2 Posts: 5,965 ✭✭✭GhostInTheRuins


    This isn't something I'd ever consider spending money on, but it actually looks surprisingly decent.

    I hope you keep updating this thread as you progress because I'd love to see it come together.


  • Advertisement
  • Registered Users, Registered Users 2 Posts: 11,205 ✭✭✭✭B.A._Baracus


    I see it as a pro / con thing.

    Pros:
    - it looks cool.
    - its 1:1 scale.
    - it's a project to build.

    Cons:
    - At a grand it's well too expensive.
    - 2 years is too long and it's likely you will miss issues. Be it your own fault or the shop you usually get it from didnt get that issue or simply stops selling them.
    - You'll end up having to order missing issues / and or potentially the remaining issues from the website at a higher cost.

    Personally the con's make it not for me :pac:
    But on the subject of these type of magazines. How many times do you see issue 46 of 100 in a shop? I think these things tank-off after time as they never can attract new buyers (well generally) So I think shops then stop selling them.


  • Moderators, Computer Games Moderators Posts: 5,390 Mod ✭✭✭✭Optimus Prime


    I dont think its too expensive, the replica model sell for 3 to 5 thousand these days.

    I subscribed online so get 4 issues delivered every month, dont miss any, it also costs the same as the shops, free delivery and 5 free gifts over the run.

    I will enjoy making it with my two kids, when its finished, at the end i can say i built it myself.

    for something i will enjoy doing over the space of 2 years with my kids and they can tell their friends they helped me build it.. i think its worth it.

    I will be enhancing it myself using some weathering and mods to the default parts i hope.. if i dont mess it up.. maybe some extra fibre optic lighting, nothing overkill just subtle changes.. i will update this thread every few months with some photos..

    BA your right shops do stop selling them after a few issues, the first issues in shops are only to get people on board with a subscription. which as i mentioned above, costs no more and has free delivery.


  • Closed Accounts Posts: 6,113 ✭✭✭shruikan2553


    I see it as a pro / con thing.

    Pros:
    - it looks cool.
    - its 1:1 scale.
    - it's a project to build.

    Cons:
    - At a grand it's well too expensive.
    - 2 years is too long and it's likely you will miss issues. Be it your own fault or the shop you usually get it from didnt get that issue or simply stops selling them.
    - You'll end up having to order missing issues / and or potentially the remaining issues from the website at a higher cost.

    Personally the con's make it not for me :pac:
    But on the subject of these type of magazines. How many times do you see issue 46 of 100 in a shop? I think these things tank-off after time as they never can attract new buyers (well generally) So I think shops then stop selling them.

    You really have to order them online if you want to keep them up.

    Would love to get it but a bit pricey and have nowhere to put it.


  • Closed Accounts Posts: 33,733 ✭✭✭✭Myrddin


    Lads it is expensive, but if you consider how much we all individually spend on alcohol, cigarettes, or other weekend crap over a year, then it's pittens.


  • Moderators, Computer Games Moderators Posts: 5,390 Mod ✭✭✭✭Optimus Prime


    A lot of hate for the falcon haha.. good point, you wouldnt get far with 44 Euro on a night out.


  • Registered Users Posts: 279 ✭✭turniphead


    Fair play to you keithgeo. You're clearly a Star Wars fan and you're doing this for all the right reasons; a family activity and a personal project. I've no doubt there'll be a huge sense of pride and satisfaction when you eventually complete it.

    I'll definitely be following this thread throughout and look forward to seeing your updates/progress.


  • Closed Accounts Posts: 33,733 ✭✭✭✭Myrddin


    keithgeo wrote: »
    A lot of hate for the falcon haha.. good point, you wouldnt get far with 44 Euro on a night out.

    You certainly wouldn't, & considering it's €40 a month, it's feck all in comparison.


  • Closed Accounts Posts: 433 ✭✭MaggotBrain


    I think you're mental but definitely hope you keep the thread alive! :D


  • Banned (with Prison Access) Posts: 7,611 ✭✭✭david75


    You could just do this with it. Keep meaning to get painting this one.


  • Advertisement
  • Moderators, Computer Games Moderators Posts: 5,390 Mod ✭✭✭✭Optimus Prime


    Thought id give a quick update on where i am with this as i finally took the plunge today and started on it as i had some free time. ive 14 issues so far, ive mainly been looking at what other people are doing with it, learning different painting techniques and slowly buying brushes, paint etc that i will need.

    Its obvious to me at this stage that if you just build this and put it together, that it wont look as good as the falcon from the films. It needs to be painted, weathered and modified in places, the gun turret is metal, no paint at all so that for one needs to be painted. So ive been doing a lot of research into model painting etc as i literally have never made or painted a model before.

    Here are the seats from the cockpit as you receive them in the mag (not my image) as you can see, the front seats are just red plastic, the back are black with 3 pieces of white painted on for the "cushions" on the chairs.

    before.jpg

    And below, after 3 hours of painting, weathering and frustration are my ones painted. they look better in person, especially the front seats.

    after.jpg

    Im happy with them, i think they look a million times better then the stock ones.

    I did prime the gun turret pieces but when i went to add a coat of spray paint that is close to the hull pieces colour, the spray can i had was broken or something and covered them with thick blobs of paint. so they currently sit in a tin of turps removing that. luckily they are metal so i can take the paint off. ill update again when i get some more stuff done on it.


  • Moderators, Computer Games Moderators Posts: 5,390 Mod ✭✭✭✭Optimus Prime


    Had a go at the gun turrets today. they come as basic metal with no paint! and they say you dont have to paint this!! anyways.. here is a before image of some of the turret pieces to give you an idea what they look like.

    before1.jpg

    Horrible and the finished model would look terrible with a big metal gun on it.

    So i had a crack at painting and here is the result. took me the day on and off doing bits here and there and waiting for paint to dry, again made some mistakes on it, but with the chairs above, its the first model ive painted.

    after1.jpg


  • Moderators, Computer Games Moderators Posts: 5,390 Mod ✭✭✭✭Optimus Prime


    May as well keep updating this thread, quick one this week.

    I painted and weathered the frame for the door in the cockpit, painted the middle control panel a bit, and added a custom floor since i didnt like the way the floor was just plastic.

    Ive decided im going to dirty those chairs a bit as they are too clean.

    I put a torch behind the back panel to give an idea of it lit up. im going to be modifying this by painting colours on the back of sticker to make the light different colours simulating buttons etc.. ive to wire up fibres to the front control panel before i put it in. and i think im going to put an led behind the door before i put that in, to make it look like the corridor is lit up.

    There is two side panels that go into the floor beside the chairs too ive yet to ad.


    falconcockpit1.jpg


  • Closed Accounts Posts: 33,733 ✭✭✭✭Myrddin


    That looks class! Keep updating the thread Keith it's very nice seeing it all come together & how you're learning skills as you go. I may have to get some painting/detailing/weathering lessons off you some day :o


  • Moderators, Computer Games Moderators Posts: 5,390 Mod ✭✭✭✭Optimus Prime


    Will do, its all new to me, youtube is great for this stuff plus its not as difficult as it seems once you have all the right paint etc.

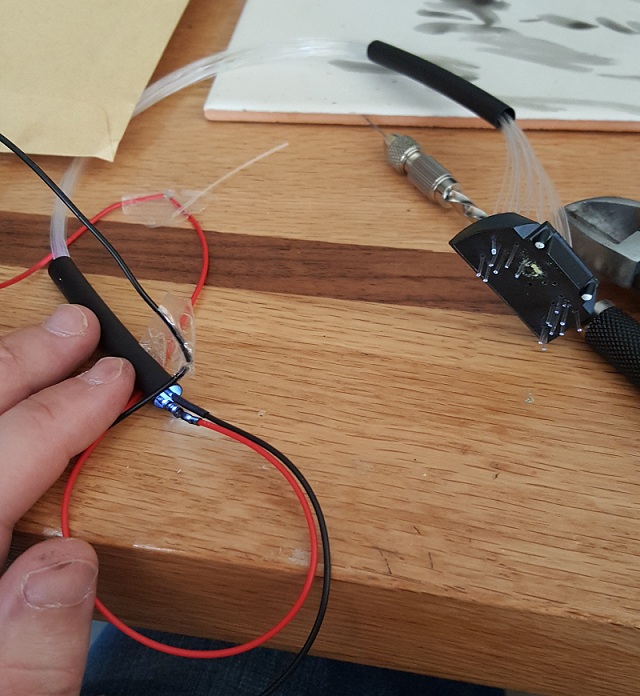
    The fibre optics is another area new to me, didnt just want to stick a sticker on the control panel in the cockpit, so ive drilled a load of tiny holes in it to put fibre in so the buttons light up. thats whats supposed to happen anyways, we will so how it goes!

    Ill keep updating when i make bits of progress on it.


  • Registered Users, Registered Users 2 Posts: 3,876 ✭✭✭ozmo


    so ive drilled a load of tiny holes in it to put fibre in so the buttons light up...


    I used thick optic fibre for one project years ago - touched one end briefly off a Clothes Iron to slightly melt the end - and it went into a nice conical shape with a flat end that lit brightly at any angle and held the fiber nicely in its drilled hole.
    Probably not bright enough to show through any sticker placed over it though...

    ps. nice painting there :)

    “Roll it back”


  • Advertisement
  • Moderators, Computer Games Moderators Posts: 5,390 Mod ✭✭✭✭Optimus Prime


    Thanks Ozmo, i was happy with it considering i never painted anything before that wasnt a wall or ceiling! ive since added some dirt to the chairs using nulin oil i think its called, a black wash because i thought they where TOO clean.

    Ill give the iron trick a go, im not convinced myself the light will come through the sticker, but one of the lads on the falcon build forum said his does so ill test it out first.

    Ive some "glass paint" on the way that im going to paint the on the back of the sticker at the back of the cockpit to give the light coming through some colour too.

    I didnt get anything done this weekend as i was away, but ill update again when i make some progress. here is a quick pic i took of the fibres ive put in the front control panel.

    fibres.jpg


  • Moderators, Computer Games Moderators Posts: 5,390 Mod ✭✭✭✭Optimus Prime


    Quick update, i got some glass paint and painted behind the back cockpit wall in the holes for the different buttons etc.

    I think it looks ok, but i have a spare back wall and sticker they sent me by mistake so i might have a go at it again and do something different.

    I also weathered the chairs a bit.

    cockpitlights.jpg


  • Registered Users, Registered Users 2 Posts: 540 ✭✭✭biketard


    Wow, that looks fantastic.


  • Closed Accounts Posts: 33,733 ✭✭✭✭Myrddin


    I think it looks ok

    Ok? Looks fecking class Keith, seriously well done.


  • Moderators, Computer Games Moderators Posts: 5,390 Mod ✭✭✭✭Optimus Prime


    Myrddin wrote: »
    Ok? Looks fecking class Keith, seriously well done.

    Yeh, if im being picky i think i put too much glass paint on the back of the sticker and its bled a bit so the light is illuminating too much around the buttons etc. ill give it another go with the other back panel and take it handy on the paint!

    Also its kinda frustrating because even though ive aligned the sticker perfectly to the back plate, the printed lights on the sticker are slightly below the holes in the backing plate so the light shining through isnt perfect either! dont know what i can do about that though unless i got a bad sticker in that one.


  • Advertisement
  • Moderators, Computer Games Moderators Posts: 5,390 Mod ✭✭✭✭Optimus Prime


    So my ocd kicked in about the colour bleed and the way those bar lights are not lined up right.

    So i used my spare cockpit panel and sticker and did it again. i lined it up correctly this time to holes in the back panel for the light bars on each side, but when you do this the sticker is not positioned correctly, so i had to trim one side with a blade and trim the top of the sticker where it meets the door.

    I then painted in the glass paint using a tooth pick! it meant paint wasnt bleeding every where like with the brush and could pick out the buttons more accurately. i think it looks better, but the photo here isnt great. ill be adding the door next but im going to stick an led behind it so a couple of bits light up on it.

    20150429_215350.jpg


  • Closed Accounts Posts: 5,361 ✭✭✭Boskowski


    If you keep going in this fashion I'm sure it'll be worth that grand in the end if not more. Nice work Sir.


  • Moderators, Computer Games Moderators Posts: 5,390 Mod ✭✭✭✭Optimus Prime


    Cheers, im actually enjoying doing it, to be honest this stuff like the glass lighting paint, fibres, painting the seats, the floor i added, none of that is in the instructions or provided as parts, most if it ive just seen other lads doing themselves and had a go at it. may as well do it as best i can.


  • Moderators, Computer Games Moderators Posts: 5,390 Mod ✭✭✭✭Optimus Prime


    Quick update, didn't get much done over the weekend

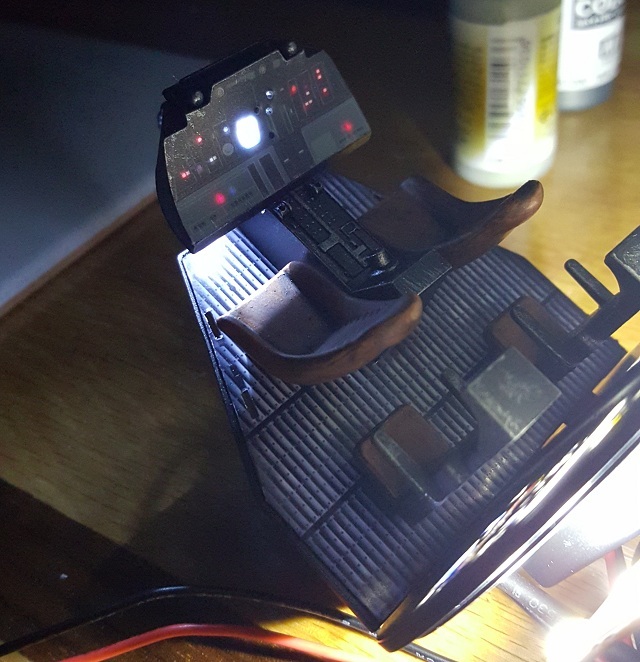
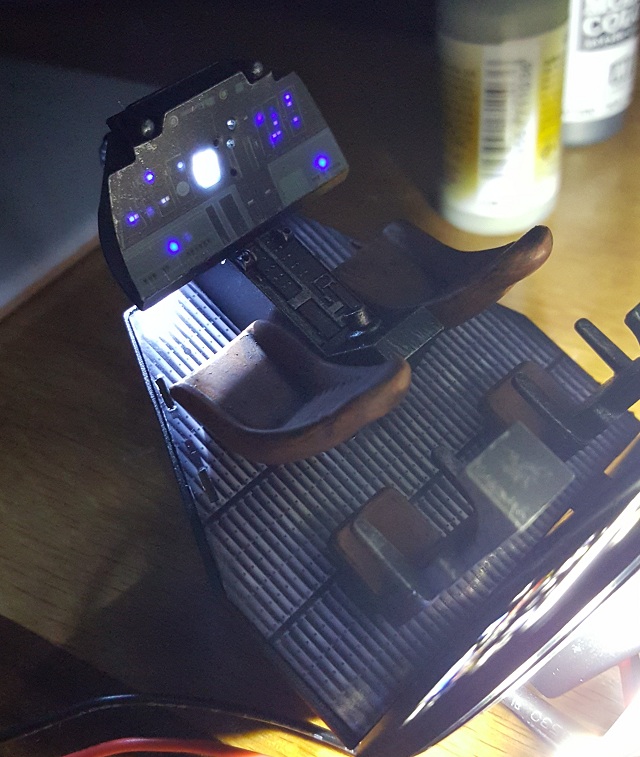
    I trimmed the fibers to the control panel and put the supplied sticker over it. I first cut a hole in the control panel plastic behind the sticker and stuck a white led in there to light up the screen on the sticker. I will also be covering under the control panel with something so the led doesn't shine out underneath as much.

    The fibers are flashing red\blue in these images as i only had a red\blue flashing led to hand but they will be mostly white with probably 2 flashing red\blue when im finished. ive to order some more leds.

    The Fiber light comes through the sticker anyways so happy days! I was thinking id have to cut tiny holes in the sticker.

    The holes in the control panel are for the levers ive yet to stick into it.

    cpo1.jpg

    cpo2.jpg

    I also added the door sticker, but instead of putting it into the door like the magazine describes. i used pieces of Styrofoam cut to size so the door is flush with the boarder around it as opposed to inset into it, which isnt the way it is in the films anyways, i then cut a piece of card the same size as the door but made 2 square holes in it to match the white lights on the door and one small hole to match the red button on the door. I stuck the door sticker to this card, glued the Styrofoam in the door section around the edges then put in a white led in there too through a hole i drilled in the back of the door section and finally glued the door\card onto the Styrofoam. so now the light from the LED shines through the holes in the card and lights up the lights and red button on the door sticker.

    door.jpg

    Ill add the levers to the control panel next, and paint and add the side pieces. there is also an archway that goes over the top at the door\back section that has a sticker on it and im thinking of drilling it out in 2 sections to add the long white light to the sides. ill update the thread again when ive done some more on it.


  • Moderators, Computer Games Moderators Posts: 5,390 Mod ✭✭✭✭Optimus Prime


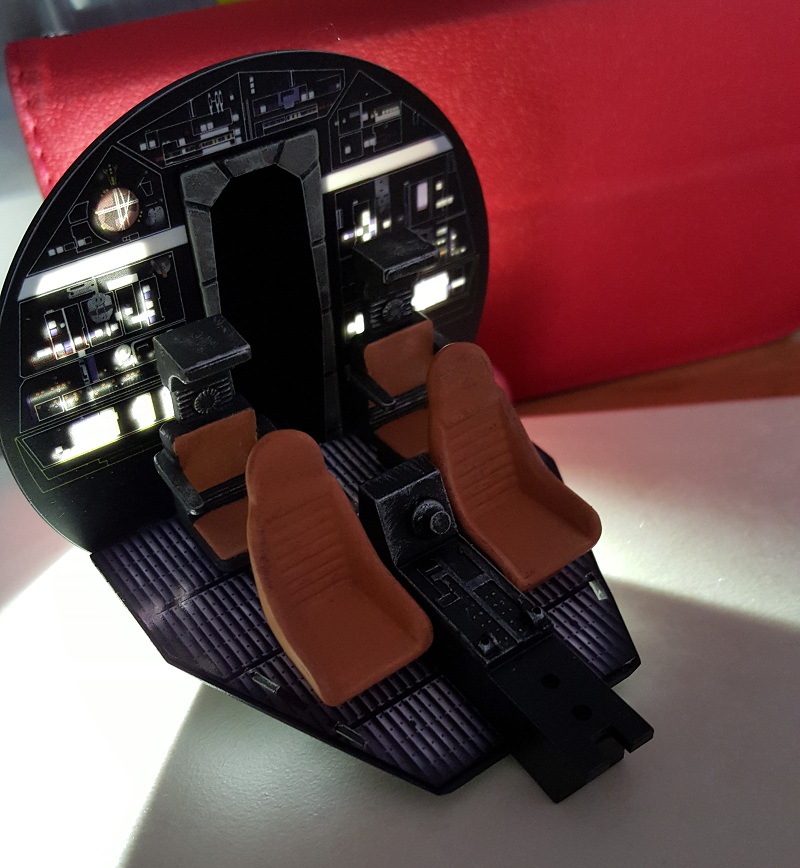
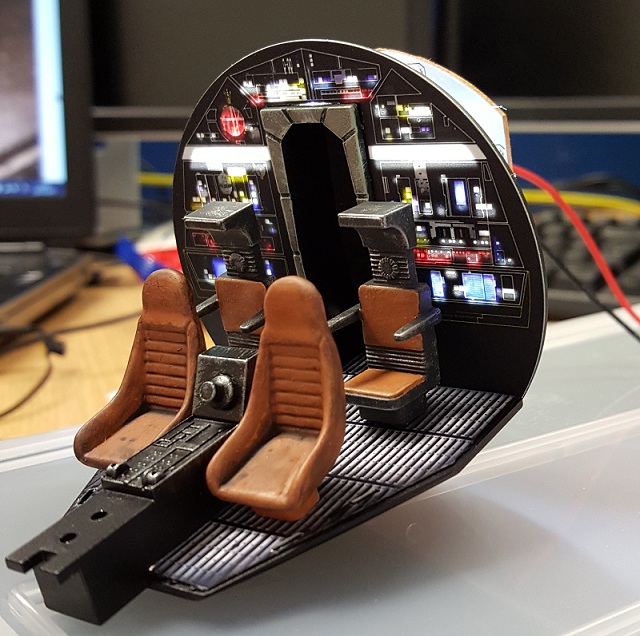
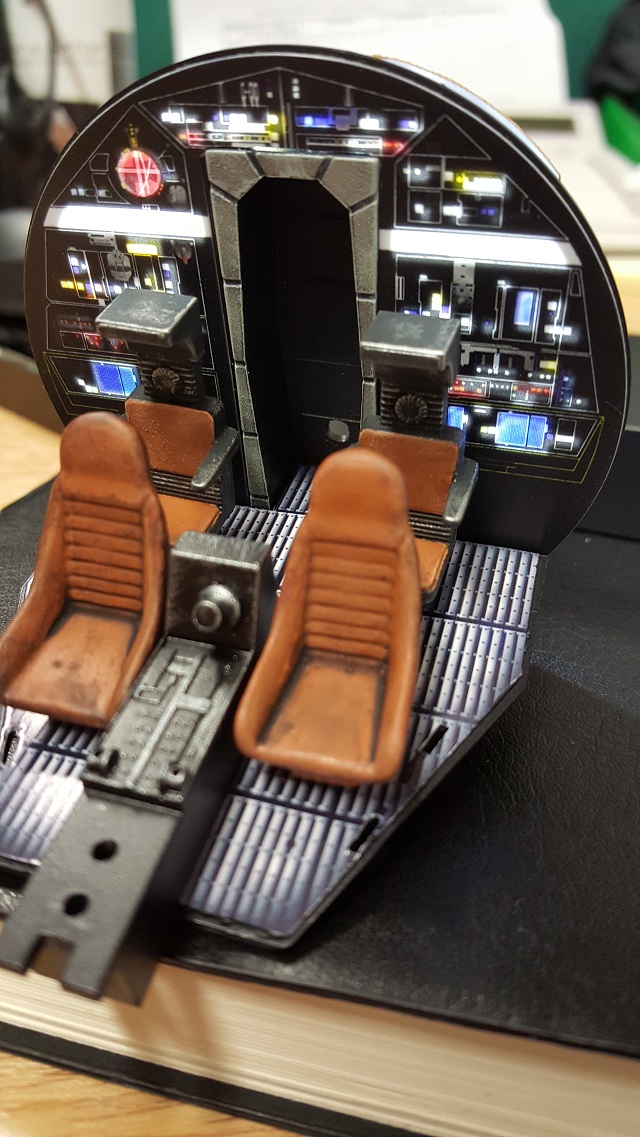
    Nearly finished the cockpit insides now.

    Today i added fibres to the side panels and installed them, painted them too. Installed panel that goes in front of the control panel. glued everything together. and sorted out all the fibre optic cables as best i could! added a bit of rust here and there to the side panels and front panel too.

    Also added all the controls and levers as well. 4 levers on the control panel, two in the middle thing and the controls in front of each seat. (after i weathered them a bit to make them look old and used)

    Randon lights flash red blue and the white ones are just constant white.

    1.jpg

    2.jpg

    3.jpg

    4.jpg

    This is what it would look like if you just built it without painting or adding lights\fibres etc.

    original.jpg


  • Closed Accounts Posts: 33,733 ✭✭✭✭Myrddin


    Looks amazing Keith. This thing will be the envy of the forum when done


  • Registered Users, Registered Users 2 Posts: 5,965 ✭✭✭GhostInTheRuins


    That's a massive improvement with all that texturing. Fair play. It looks class.


  • Moderators, Computer Games Moderators Posts: 5,390 Mod ✭✭✭✭Optimus Prime


    Thanks guys, im happy with how its turned out so far. i couldnt resist temporarily adding the tunnel hull pieces to get a better idea of how it will look..

    5.jpg

    With the cockpit i just have to put two stickers on the archway above the back chairs, but first im gonna drill through the plastic arch and put a light in behind the sticker so the long white light continues across the back wall and around the side.

    After that, the big job, priming and re-painting every hull piece. ill weather it at the end when its all together.


  • Closed Accounts Posts: 16,391 ✭✭✭✭mikom


    Great thread so far.
    The improvements you've made are excellent, OP.


  • Registered Users, Registered Users 2 Posts: 540 ✭✭✭biketard


    How are you getting on, OP?


  • Advertisement
Advertisement