Advertisement
If you have a new account but are having problems posting or verifying your account, please email us on hello@boards.ie for help. Thanks :)
Hello all! Please ensure that you are posting a new thread or question in the appropriate forum. The Feedback forum is overwhelmed with questions that are having to be moved elsewhere. If you need help to verify your account contact hello@boards.ie
Hi all! We have been experiencing an issue on site where threads have been missing the latest postings. The platform host Vanilla are working on this issue. A workaround that has been used by some is to navigate back from 1 to 10+ pages to re-sync the thread and this will then show the latest posts. Thanks, Mike.
Hi there,
There is an issue with role permissions that is being worked on at the moment.
If you are having trouble with access or permissions on regional forums please post here to get access: https://www.boards.ie/discussion/2058365403/you-do-not-have-permission-for-that#latest

Labour Saving and General Guntering

24567172

Comments

  • Registered Users, Registered Users 2 Posts: 760 ✭✭✭bk1991


    does anyone know where i can get spikes/tines and rolers /panled like these for makeing a bale handler http://www.cashels.net/HydBaleHandler.htm

    http://www.cashels.net/Handlers.htm

    which would be better the hydralic one for loader of make one with ducks foot padles for loader ??????????


  • Registered Users, Registered Users 2 Posts: 1,202 ✭✭✭Bitten & Hisses


    I'd imagine you'd be able to get them all as spares from a place selling the new handlers. That said, I have seen replacement rollers made from galv pipe, which worked a treat. The tines should be available in any co-op.


  • Registered Users, Registered Users 2 Posts: 760 ✭✭✭bk1991


    I'd imagine you'd be able to get them all as spares from a place selling the new handlers. That said, I have seen replacement rollers made from galv pipe, which worked a treat. The tines should be available in any co-op.


    how were they made from galvo pipe


  • Registered Users, Registered Users 2 Posts: 6,202 ✭✭✭emaherx


    pakalasa wrote: »
    Thought I'd show this. I made it about 20 years ago and it's still going strong. It's basically a barrell of concrete that can be picked up / dropped without getting off the tractor, no pins, hydraulics or moving parts.

    The 'Nine hole Bar' is left on the arms when using and the lower plate swings in against the drawbar. It saves me having to have an extra tractor when loading slurry, gravel etc....
    Thats a gate hanging iron on top, in case it falls over and has to be lifted.

    Thats brilliant in it simplicity. Now that exactly what this thread is about.


  • Moderators, Society & Culture Moderators Posts: 12,696 Mod ✭✭✭✭blue5000


    I heard of a man making one with the stub axles of an old 2 wd tractor. He welded the pipes on to the wheel hubs and used a double acting ram at the top end of the stub axle. Said he got them from a david brown. The pipes were able to spin using the wheel bearings. I never saw it but I think it worked.

    If the seat's wet, sit on yer hat, a cool head is better than a wet ar5e.


  • Registered Users, Registered Users 2 Posts: 1,202 ✭✭✭Bitten & Hisses


    bk1991 wrote: »
    how were they made from galvo pipe

    Hard to describe without being in person, but if you look at a pair of sleeves you'd be able to figure it out. If you could weld, it wouldn't be the hardest job in the world. Just remember to weld a cap on the open end of the sleeve, or it will become a sh1t trap/field digger-upper.


  • Registered Users, Registered Users 2 Posts: 760 ✭✭✭bk1991


    hey guys pics of our weight for back of tractor which has cage on top so that more weight can be carried plus hitch on back for pulling implments
    with Q/ATTACH from 9 hole bar

    4815AA9935234871A8D8836F26EB5EEA-800.jpg


    22ACCACDF05A4EBF910E92F37F40747F-800.jpg

    966C4DF799D64F909A6F9E7672A9E19D-800.jpg


    1DAC534AB3C74B4D9B57C6E2A92F96E2-800.jpg


    SOFTDRIVE FOR LOADER

    5C78A33CF27C4955B5F2390AB6193369-800.jpg


  • Registered Users, Registered Users 2 Posts: 12,313 ✭✭✭✭Sam Kade


    3740096041_dd69a2fd99.jpg?v=0

    3740877936_11c05ed434.jpg?v=0

    3740865498_204f688fd4.jpg?v=0


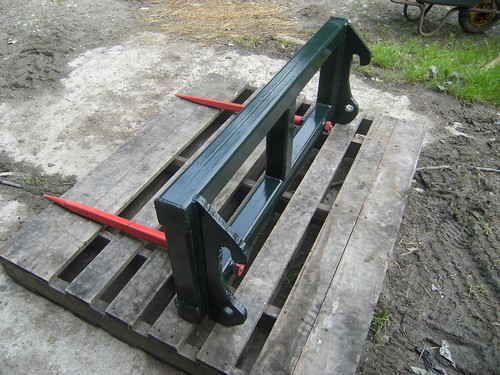
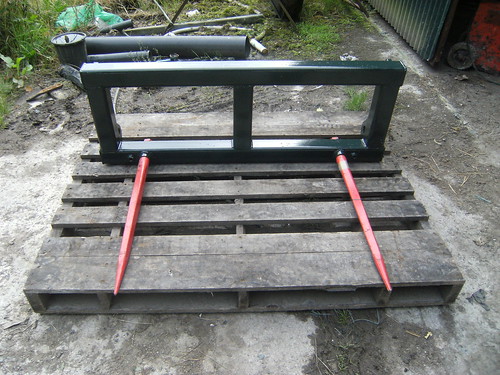
    This is a bale handler that I made last week. I also have old paddles to fit it, for stacking wrapped bales.


  • Closed Accounts Posts: 4,552 ✭✭✭pakalasa


    Hey bk1991 have a look again, I think yours might be an '11 hole bar'.:D


  • Advertisement
  • Registered Users, Registered Users 2 Posts: 760 ✭✭✭bk1991


    pakalasa wrote: »
    Hey bk1991 have a look again, I think yours might be an '11 hole bar'.:D


    well spotted what ya think of it anyway ?????????


  • Registered Users, Registered Users 2 Posts: 760 ✭✭✭bk1991


    Sam Kade wrote: »
    3740096041_dd69a2fd99.jpg?v=0

    3740877936_11c05ed434.jpg?v=0

    3740865498_204f688fd4.jpg?v=0


    This is a bale handler that I made last week. I also have old paddles to fit it, for stacking wrapped bales.


    great idea i had to move three bales for neigbout today which were wraped and had to mess with lengerth of tubler bar over dung fork
    what are the measurements for ur bale spike id love make one save time moveing bales and the like plus i have make spike for straw why not make one for both wraped and standard bales
    what are width ,height,distance between spikes
    its just 5 sections of box section steel ???? what size 4x4inch ?5mm thick
    roughly what cost is it over new one ???


  • Registered Users, Registered Users 2 Posts: 12,313 ✭✭✭✭Sam Kade


    bk1991 wrote: »
    great idea i had to move three bales for neigbout today which were wraped and had to mess with lengerth of tubler bar over dung fork
    what are the measurements for ur bale spike id love make one save time moveing bales and the like plus i have make spike for straw why not make one for both wraped and standard bales
    what are width ,height,distance between spikes
    its just 5 sections of box section steel ???? what size 4x4inch ?5mm thick
    roughly what cost is it over new one ???
    It's 3x3inchx6mm box, height is 18 inches top to bottom width is roughly 50 inches. 3 sections cut 1 foot long and 2 sections cut 50 inches long, flat plate welded on ends to finish it off. Width between tines is 34.5 inches from centre to centre, which is a little too close for bales that have been left out for a while it would be better to have them 3-4 inches wider. I made it for welger rp12 bales, which are smaller than standard bales. I got the hooks made to fit my loader by the local engineer, I got a mechanic to burn out holes for tines the rest I did myself. The metal cost €66, hooks cost €50, tines cost €108, bushes for tines cost €15.8, half box of welding rods €11, burn holes €10, hamerite paint €5. Total cost was roughly €266 not including paddles. You could also pick up a second-hand bale squeezer for around that price, I don't have a 3rd valve on my loader so that was the reason I made this one.


  • Registered Users, Registered Users 2 Posts: 1,202 ✭✭✭Bitten & Hisses


    Tidy job there Sam. Well done.


  • Registered Users, Registered Users 2 Posts: 760 ✭✭✭bk1991


    Sam Kade wrote: »
    It's 3x3inchx6mm box, height is 18 inches top to bottom width is roughly 50 inches. 3 sections cut 1 foot long and 2 sections cut 50 inches long, flat plate welded on ends to finish it off. Width between tines is 34.5 inches from centre to centre, which is a little too close for bales that have been left out for a while it would be better to have them 3-4 inches wider. I made it for welger rp12 bales, which are smaller than standard bales. I got the hooks made to fit my loader by the local engineer, I got a mechanic to burn out holes for tines the rest I did myself. The metal cost €66, hooks cost €50, tines cost €108, bushes for tines cost €15.8, half box of welding rods €11, burn holes €10, hamerite paint €5. Total cost was roughly €266 not including paddles. You could also pick up a second-hand bale squeezer for around that price, I don't have a 3rd valve on my loader so that was the reason I made this one.


    cheers for info


  • Registered Users, Registered Users 2 Posts: 12,313 ✭✭✭✭Sam Kade


    Thanks

    The cost of a new one is around €500 so you are saving about half that.


  • Advertisement
  • Registered Users, Registered Users 2 Posts: 760 ✭✭✭bk1991


    Sam Kade wrote: »
    Thanks

    The cost of a new one is around €500 so you are saving about half that.


    wheres the flat plat for the brackets is it ?????
    i was toying with idea of makeing hydralic one but the one u made there looks good plus i am only starting wedling so dont want anything too compliciated where did u get the paddles for urs what length the tines .u have two little bits welder to hold on the paddles aswell havent u ????
    have u used it for wraped bales yet ?
    i move up to 900bales a year with just back bale handler so would save some time and deisel if i had one on front aswell

    have u much welding experience ???????


  • Registered Users, Registered Users 2 Posts: 12,313 ✭✭✭✭Sam Kade


    3747251236_0c06ee0cef.jpg?v=0

    I made the paddles 10 years ago for another handler.

    http://farm4.static.flickr.com/3439/3747127018_bd7c877bdf.jpg?v=0

    I have a big washer welded onto the paddle and a nut welded to the handler it fits inside the washer on the bolt. The reason the big nut is on the bolt is because the smallest bolt I could get was 1 inch. The reason I made the paddles tapered was to make it easier to stack bales 3 high with them.

    I drew in 80 bales on Saturday with it; the bales had been in the field for a while so I had to turn the bales upside down to get the handler under them. The tines are 28" from the frame to the tip. The plate for the brackets is 3/4" thick.

    I learned basic welding in secondary school.


  • Registered Users, Registered Users 2 Posts: 760 ✭✭✭bk1991


    Sam Kade wrote: »
    3747251236_0c06ee0cef.jpg?v=0

    I made the paddles 10 years ago for another handler.

    http://farm4.static.flickr.com/3439/3747127018_bd7c877bdf.jpg?v=0

    I have a big washer welded onto the paddle and a nut welded to the handler it fits inside the washer on the bolt. The reason the big nut is on the bolt is because the smallest bolt I could get was 1 inch. The reason I made the paddles tapered was to make it easier to stack bales 3 high with them.

    I drew in 80 bales on Saturday with it; the bales had been in the field for a while so I had to turn the bales upside down to get the handler under them. The tines are 28" from the frame to the tip. The plate for the brackets is 3/4" thick.

    I learned basic welding in secondary school.


    nice job overall the padles would be hard to make bending the steal does the nushes extend more foward that normal to let the padles roll on them ?...does anyone else make padle bale handlers inireland apart from
    this one from cashels http://www.cashels.net/Handlers.htm
    i could try get spikes and padles from them but prob expensive save makeing them
    would be hard to rip bales with paddles compared to normal bale lifter
    that could also be used for moveing palets

    bk1991


  • Registered Users, Registered Users 2 Posts: 12,313 ✭✭✭✭Sam Kade


    bk1991 wrote: »
    nice job overall the padles would be hard to make bending the steal does the nushes extend more foward that normal to let the padles roll on them ?...does anyone else make padle bale handlers inireland apart from
    this one from cashels http://www.cashels.net/Handlers.htm
    i could try get spikes and padles from them but prob expensive save makeing them
    would be hard to rip bales with paddles compared to normal bale lifter
    that could also be used for moveing palets

    bk1991
    Yes I left the bushes extend out as far as possible so the paddles could swivel on them.

    I priced paddles 10 years ago from an engineering company that made them; he wanted £120 for 2 paddles like these back then. When I heard the price I decided to make them myself. I hired out a hydraulic pipe bender from a local plant hire which cost £14/day and I bought 2" galv blueband pipe (it has to be blueband for bending) for £6, I already had the pipe to go over the tines which is the next biggest pipe after 2". The big pipe is in the centre of the paddle that goes over the tine. I had to cut a V out of the front bend to make a point. I made it in an evening after milking total cost £20. You could get a local engineer to make them up for you. The engineer I went to 10 years ago thought I was desperate for them so he gave a price to suit him at least that was the impression I got from him.


  • Registered Users, Registered Users 2 Posts: 760 ✭✭✭bk1991


    Sam Kade wrote: »
    Yes I left the bushes extend out as far as possible so the paddles could swivel on them.

    I priced paddles 10 years ago from an engineering company that made them; he wanted £120 for 2 paddles like these back then. When I heard the price I decided to make them myself. I hired out a hydraulic pipe bender from a local plant hire which cost £14/day and I bought 2" galv blueband pipe (it has to be blueband for bending) for £6, I already had the pipe to go over the tines which is the next biggest pipe after 2". The big pipe is in the centre of the paddle that goes over the tine. I had to cut a V out of the front bend to make a point. I made it in an evening after milking total cost £20. You could get a local engineer to make them up for you. The engineer I went to 10 years ago thought I was desperate for them so he gave a price to suit him at least that was the impression I got from him.


    yea was thinking of getting an engineer to make em looking at cashels ones there diped which would ad more on to them roughly what is the measurements of urs 2inch pipe in middle 5 or 6 mm thick and the 2 inch for sides would u recomend tapered like urs or the ones on cashels which arnt tapered
    i am going make a start on it this week anyway mad to get some practice with the new welder :Dthe barckets would be cheeper from engineer than dealer aswell


  • Advertisement
  • Registered Users, Registered Users 2 Posts: 12,313 ✭✭✭✭Sam Kade


    The full length of them is 43" the width at the widest part is 15". The middle pipe is 2 1/4" outside diameter the bent pipes are 2" outside diameter. The thickness of the pipes is the standard thickness. Tapered would be best for stacking bales but then again I don't know the width of cashels paddles, if they were less than 10" wide they might work for stacking as well.


  • Registered Users, Registered Users 2 Posts: 760 ✭✭✭bk1991


    Sam Kade wrote: »
    The full length of them is 43" the width at the widest part is 15". The middle pipe is 2 1/4" outside diameter the bent pipes are 2" outside diameter. The thickness of the pipes is the standard thickness. Tapered would be best for stacking bales but then again I don't know the width of cashels paddles, if they were less than 10" wide they might work for stacking as well.

    cheers for the information better put it to use now will get a few quotes on paddles from cashels and majior


  • Closed Accounts Posts: 3,087 ✭✭✭vanderbadger


    not as handy at the welding unfortunately but put my own calving camera system in place, bought the wireless gear pretty cheap on the internet, basically 3 wireless bridges, one on my brothers house, one on my house and one on the slatted shed, On the brothers house im connecting back into his broadband so that where I get my internet, on the slated shed Im connecting to an IP camera and then on my own house I just connect back into a wireless access point to provide me with wireless inside the house, basically I can take the laptop up to the room if i want to keep an eye on a cow, just open up a webpage with the IP address of the camera and take a look. Got qouted massive money by some of the guys in the journal to link slatted shed to house with camera, with my system i was able to incorporate brothers house also and get rid of that fcuking 3G broadband piece of sh1t. The wireless stuff i bought from a crowd in Greece, I think they were about 60 to 70 euro each, very easy to set up, antenna is build into device so you can actully cable tie them to downpipes or anything, the IP camera was about 200 euro, might cost more actually as I got it thru work, the only other thing I had to do was make long patch leads with cat5 cable to run from wireless bride to camer etc, again easy and cheap to do


  • Registered Users, Registered Users 2 Posts: 760 ✭✭✭bk1991


    got quote for the paddles 120 inc carraige
    i was also told to use stone fork tines which are 39 inches long with heavy duty stone fork bushes

    bk1991


  • Registered Users, Registered Users 2 Posts: 12,313 ✭✭✭✭Sam Kade


    bk1991 wrote: »
    got quote for the paddles 120 inc carraige
    i was also told to use stone fork tines which are 39 inches long with heavy duty stone fork bushes

    bk1991
    The tines I used are stone fork tines, which are the standard ones for round bales. The handler I made 10 years ago had lighter stone fork tines and that handler stacked 5000 bales for me and never failed. I was estimating that if I had to make new paddles now they would cost approx €60. Did you ask an engineer about making the paddles?


  • Registered Users, Registered Users 2 Posts: 760 ✭✭✭bk1991


    Sam Kade wrote: »
    The tines I used are stone fork tines, which are the standard ones for round bales. The handler I made 10 years ago had lighter stone fork tines and that handler stacked 5000 bales for me and never failed. I was estimating that if I had to make new paddles now they would cost approx €60. Did you ask an engineer about making the paddles?

    pricies so far
    :39inch stone fork tines somewhere between 50 and 60 euro
    :bushes 15 euro
    brackets will be roughly 50
    the paddles from rohan engerring in limrick are 120 inc vat and i think carrage will be 20 more


    il make the frame and get the holes drilled for bushes and make up that for start then get the brackets on the sort paddles after

    if i could get paddles made 42 inches long and 12 inches wide would that work if i got the holes bored and brackets made plus paddles made in same place it might not big as big a bill hopefully :D
    but il need some design on paper or something

    new bale handler is 500 €uro
    but this is a bale handler for wraped bales ,wraped bale stacker,hay/straw bale handler ,stacker
    pallett forks

    thats 5 uses plus many more so if i could make it for under 320 which will be tight have loads of galvinised pipes lieing around anyway


    bk1991


  • Registered Users, Registered Users 2 Posts: 12,313 ✭✭✭✭Sam Kade


    Yes it should work out cheaper to get all the work done with the same engineering company. Paddles 42" long and 12" wide should work fine.


  • Registered Users, Registered Users 2 Posts: 760 ✭✭✭bk1991


    Sam Kade wrote: »
    Yes it should work out cheaper to get all the work done with the same engineering company. Paddles 42" long and 12" wide should work fine.


    yea il have make a drawing of them for him to make them
    am getting steel ,tines,bushes in morning and make a start on it

    what loader is it on the brackets a far apart mine only 36in apart
    have u used it much

    bk1991


  • Registered Users, Registered Users 2 Posts: 12,313 ✭✭✭✭Sam Kade


    bk1991 wrote: »
    yea il have make a drawing of them for him to make them
    am getting steel ,tines,bushes in morning and make a start on it

    what loader is it on the brackets a far apart mine only 36in apart
    have u used it much

    bk1991
    I have a bomford 3510 loader the brackets are 46" apart. I only drew in and stacked 80 bales with it as the weather has silage making stopped.


  • Registered Users, Registered Users 2 Posts: 760 ✭✭✭bk1991


    Sam Kade wrote: »
    I have a bomford 3510 loader the brackets are 46" apart. I only drew in and stacked 80 bales with it as the weather has silage making stopped.

    yea bad weather alright

    this is what my design is
    BD9DEE38462F4D3D9CA4D26F404BFCF7-800.jpg

    A9D52C264DEE497492BC8BE9FB9AFD78-800.jpg

    C08376E6B603432CA4E504FF9D9B9BC1-800.jpg


    E0D63BEB2A054571BDDCD8115FFA27F3-800.jpg


    top +bottom is 3x3 6mm thick 50 inchs long
    sides are 3x3 6mm 12 inches

    uprights in middle are 12 in long and 2 1/2inch box


    so far costs

    steel is 68€uro
    tines +bushes is 141€uro

    have get holes bored now tomorrow and see about brackets and paddles


    bk1991


  • Advertisement
  • Registered Users, Registered Users 2 Posts: 12,313 ✭✭✭✭Sam Kade


    You cut the box good and square did you cut it yourself? When you are welding them together you need to give them 2 or 3 runs to fill the gap. Don't forget to keep the tines more than 35 inches apart as mine are too close together at 34.5 inches.


  • Registered Users, Registered Users 2 Posts: 760 ✭✭✭bk1991


    Sam Kade wrote: »
    You cut the box good and square did you cut it yourself? When you are welding them together you need to give them 2 or 3 runs to fill the gap. Don't forget to keep the tines more than 35 inches apart as mine are too close together at 34.5 inches.


    wish i did cut them na got them cut when buying it ..would i need to grind a chanfer on the box as it is 6mm to get weld to penatrate ????

    i was thinking of putting tines at 38" centers would that be too much
    il make a start mabey tomorrow eveing as it is soposed to be raining asusual have more ideas for this apart from just bales more to come in future
    cheers for the advice anyway

    bk1991


  • Registered Users, Registered Users 2 Posts: 12,313 ✭✭✭✭Sam Kade


    Theres no need to cut a chamfer in the box for welding. 37 or 38 inch centers would be about right.


  • Registered Users, Registered Users 2 Posts: 760 ✭✭✭bk1991


    Sam Kade wrote: »
    Theres no need to cut a chamfer in the box for welding. 37 or 38 inch centers would be about right.


    got a 51mm hole saw so will bore the holes meself
    will get pics of progress later


  • Moderators, Society & Culture Moderators Posts: 12,696 Mod ✭✭✭✭blue5000


    blue5000 wrote: »
    that is neat, I've made a few things myself probably the best one is a woodburning stove from the back end of a fordson major. The wood goes in where the lift cover was, air goes in where the brakes were, and smoke goes out where the pto was. It took a year from getting the idea to having it in the lounge! All the photos of making it are before I got a digital camera, I'll scan them and put them up.

    hope this works, photo of stove from major backend using pix.ie
    7CDEDAD01C92448683D4081FA94BDAD0-500.jpg

    If the seat's wet, sit on yer hat, a cool head is better than a wet ar5e.


  • Closed Accounts Posts: 4,552 ✭✭✭pakalasa


    How 'bout this;
    Found it while browsing tru youtube
    http://www.youtube.com/watch?v=fYTjLLo_8p4&feature=related


  • Registered Users, Registered Users 2 Posts: 760 ✭✭✭bk1991


    blue5000 wrote: »
    hope this works, photo of stove from major backend using pix.ie
    7CDEDAD01C92448683D4081FA94BDAD0-500.jpg


    now that loks well u woulnt even know it was backend of tractor what excatly did u have do to make that


  • Closed Accounts Posts: 4,552 ✭✭✭pakalasa


    blue5000 wrote: »
    hope this works, photo of stove from major backend using pix.ie
    7CDEDAD01C92448683D4081FA94BDAD0-500.jpg


    Be careful with something like that - you could unwillingly create a lot of carbon monoxide - lethal........:eek:

    Make sure that there are permanent inlets for air that can't be closed even with ashes etc..


  • Moderators, Society & Culture Moderators Posts: 12,696 Mod ✭✭✭✭blue5000


    I have to confess I bought the door (went into a stove shop with a tape measure). I had a flat cast iron panel from an old water tank and used it for the front and fire bed. CO problem is solved by leaving gearstick hole and brake pedal shaft holes open. At the bottom of the chimney(cast iron water pipe) there is a damper which can't be seen in photo. Hardest part was drilling and tapping cast iron for extra bolts. Anymore questions send me a PM

    If the seat's wet, sit on yer hat, a cool head is better than a wet ar5e.


  • Advertisement
  • Registered Users, Registered Users 2 Posts: 1,428 ✭✭✭quietsailor


    I'm sick of tripping over the strimmer when i go into the shed and it never seems to balance carefully in the corner - one tip and it's on the ground tangled in your legs. So I made a shelf that holds the strimmer motor as well as the oil and mixing cans used for the strimmer - that's on the left hand side of the photograph. I then used an old rain gutter bracket attached to a wall at right angles to the original shelf to support the strimming head end.

    Sorry for the quality - it was taken with a camera phone, the yellow is a face guard hanging off the same bracket


  • Registered Users, Registered Users 2 Posts: 760 ✭✭✭bk1991


    hey guys these are some pics of my bale handler that is finialy finished will take better pics tomorrow have paint it and grind down some edges

    in front is international 885xl with bale front and rear and behind is caseih 4230lp with bale on back we brought 56 bales in one 1hr and 15 mins this evening not bad going :D


    C81F9230E19F46F9871E3ED86581B4DF-800.jpg
    055E9C44E68E4A9DBC6838857A886DA4-800.jpg
    393C4497DA4C46578BABD1F25D559215-800.jpg


  • Registered Users, Registered Users 2 Posts: 12,313 ✭✭✭✭Sam Kade


    Well done, what was the total cost?


  • Registered Users, Registered Users 2 Posts: 6,202 ✭✭✭emaherx


    bk1991 wrote: »
    hey guys these are some pics of my bale handler that is finialy finished will take better pics tomorrow have paint it and grind down some edges

    in front is international 885xl with bale front and rear and behind is caseih 4230lp with bale on back we brought 56 bales in one 1hr and 15 mins this evening not bad going :D

    Thats pretty nice for a guy who was so concerned about his welding skills.
    Finally finished my wrapped bale trailer.

    1F0CB79DBA6B487E8B8898DE6865F293-500.jpg

    0819E384CE904A839BDECEBB95E175DB-500.jpg

    042FD6D0802446A591A760EB3491F79F-500.jpg

    We can now draw in six at a time when we use the two tractors.
    Four bales on that trailer and one front and back on the tractor with the loader.

    Trailer is loaded with the bale lifter I that showed at the beginning of the thread.
    Here it is below again.
    56627060512E43D6AA987A3C1D5C3D69-500.jpg

    pipes on trailer are narrower than bale lifter so they fit between, allowing bale lifter to clear trailer without damaging bales.

    I acquired all of the steel for free including one very sorry looking muck spreader for the chassis.
    The only money spent so far was on grinder disks and welding rods.
    and the only things that I am going to buy are domed caps to further protect bales from tearing.


  • Registered Users, Registered Users 2 Posts: 760 ✭✭✭bk1991


    emaherx wrote: »
    Thats pretty nice for a guy who was so concerned about his welding skills.
    Finally finished my wrapped bale trailer.

    1F0CB79DBA6B487E8B8898DE6865F293-500.jpg

    0819E384CE904A839BDECEBB95E175DB-500.jpg

    042FD6D0802446A591A760EB3491F79F-500.jpg

    We can now draw in six at a time when we use the two tractors.
    Four bales on that trailer and one front and back on the tractor with the loader.

    Trailer is loaded with the bale lifter I that showed at the beginning of the thread.
    Here it is below again.
    56627060512E43D6AA987A3C1D5C3D69-500.jpg

    pipes on trailer are narrower than bale lifter so they fit between, allowing bale lifter to clear trailer without damaging bales.

    I acquired all of the steel for free including one very sorry looking muck spreader for the chassis.
    The only money spent so far was on grinder disks and welding rods.
    and the only things that I am going to buy are domed caps to further protect bales from tearing.


    thats a great job trailer is nice and compact did ya get the wireless lights sorted yet ?

    my bale handler for loader is an ok attempt for first welding experience without any training probly too much welding on it i spent about 20 hrs makeing it from start to finish i doen everything apart from make the paddles i cut holes for bushes an all
    costs are as follows excludeing paint

    ________________________160526C66D224DF69564D2818BF6D811-800.jpg
    F5E2090982144AB18AED6404CDC57226-800.jpg
    3547BB7857964D91AF4D60CB01B1C6F3-800.jpgACD5A3A1FE5642D8A4E1F7B225CAEB95-500.jpgB6F305EE8C254E0F9A68B48B786D08EE-500.jpg9F2E881F56564103B1986CCD3D283568-240.jpg

    ___________________________________
    steel €68euro
    Q/A hooks for loader was 78€
    Tines +bushes 141€
    paddles+washers+bolts 140€
    hole saw 20€ but can be used again

    so total 427euro was quoted new was around 550 excludeing brackets
    but shur i saved some money and got some enjoyment from makeing it :D:D:D:D


  • Registered Users, Registered Users 2 Posts: 6,202 ✭✭✭emaherx


    bk1991 wrote: »
    thats a great job trailer is nice and compact did ya get the wireless lights sorted yet ?

    my bale handler for loader is an ok attempt for first welding experience without any training probly too much welding on it i spent about 20 hrs makeing it from start to finish i doen everything apart from make the paddles i cut holes for bushes an all
    costs are as follows excludeing paint
    ___________________________________
    steel €68euro
    Q/A hooks for loader was 78€
    Tines +bushes 141€
    paddles+washers+bolts 140€
    hole saw 20€ but can be used again

    so total 427euro was quoted new was around 550 excludeing brackets
    but shur i saved some money and got some enjoyment from makeing it :D:D:D:D

    Its a nice job, welds look good to me. Now we both need to get to painting.

    I haven't gotten too far on wireless lights they will probably be for next season at this stage. Wife just had twins and will kill me if I spend too much more time tinkering on the farm.

    I did find an old battery backup from an alarm system which I will be using for the power/charging end of that project. I have a radio transmitter receiver pair also. but I need to figure out the easiest/cheapest way to produce PCB board. So I have a lot of the components necessary but not the time.


  • Advertisement
  • Registered Users, Registered Users 2 Posts: 760 ✭✭✭bk1991


    emaherx wrote: »
    Its a nice job, welds look good to me. Now we both need to get to painting.

    I haven't gotten too far on wireless lights they will probably be for next season at this stage. Wife just had twins and will kill me if I spend too much more time tinkering on the farm.

    I did find an old battery backup from an alarm system which I will be using for the power/charging end of that project. I have a radio transmitter receiver pair also. but I need to figure out the easiest/cheapest way to produce PCB board. So I have a lot of the components necessary but not the time.


    congrats ........
    yea have finish some wear plates on bottom 1 and block up end of box
    and wife brush and paint


  • Registered Users, Registered Users 2 Posts: 155 ✭✭Sisu200


    Very Tastey bit of work lads, this is a great thread;)


  • Closed Accounts Posts: 2,296 ✭✭✭leg wax


    emaherx wrote: »
    Its a nice job, welds look good to me. Now we both need to get to painting.

    I haven't gotten too far on wireless lights they will probably be for next season at this stage. Wife just had twins and will kill me if I spend too much more time tinkering on the farm.

    I did find an old battery backup from an alarm system which I will be using for the power/charging end of that project. I have a radio transmitter receiver pair also. but I need to figure out the easiest/cheapest way to produce PCB board. So I have a lot of the components necessary but not the time.
    congrats on the twins , start working on extra seats in the tractor and makeing room, are they your first kids.


  • Registered Users, Registered Users 2 Posts: 6,202 ✭✭✭emaherx


    yea, they are our first. Two boy's. Sat them down in front of scrap heap challange yesterday, they will be able to add their own seats in no time.


  • Registered Users Posts: 500 ✭✭✭dryan


    Ok, here are the results of my general guntering around the farm.

    When the silage is baled, i normally bring all the bales to an area around the silage slab before wrapping. For half of my baled silage, there is a 2 mile draw so this saves savage time and is even handier to have the bales around the sheds in the winter.
    last year, i bought a 6-bale trailer from a neighbour. Up till that i had a 5-bale trailer that i made myself from the remains of a truck chassais and an old axel that my neighbour sponsored to the project.

    So, this year, i came up with the idea of welding a hitch to the back of the new trailer and attaching the old trailer to it.
    This way, i can transport 11 unwrapped bales:
    50547C57B7A44D5D8E0494597F38C806-800.jpg

    As a part time farmer this has no doubt been the simplest and my best time saving invention to date.


    Here are pics of the light gates that i use when putting in silage to the old shed with the narrow feeding passage - it basically keeps the cattles heads back while i am putting in silage:

    300145B1AC7E4D0D8F889BE3EB2AB855-800.jpg

    C4DF1425180A41BB824424B79796EC3D-800.jpg

    5B449374F01E43D6AC0F38AA1CFD8C77-800.jpg


  • Advertisement
Advertisement