Advertisement
If you have a new account but are having problems posting or verifying your account, please email us on hello@boards.ie for help. Thanks :)
Hello all! Please ensure that you are posting a new thread or question in the appropriate forum. The Feedback forum is overwhelmed with questions that are having to be moved elsewhere. If you need help to verify your account contact hello@boards.ie
Hi all! We have been experiencing an issue on site where threads have been missing the latest postings. The platform host Vanilla are working on this issue. A workaround that has been used by some is to navigate back from 1 to 10+ pages to re-sync the thread and this will then show the latest posts. Thanks, Mike.
Hi there,
There is an issue with role permissions that is being worked on at the moment.
If you are having trouble with access or permissions on regional forums please post here to get access: https://www.boards.ie/discussion/2058365403/you-do-not-have-permission-for-that#latest

The continuing story of DeVore's descent into woodcraft madness...

  • 02-09-2014 4:13pm
    #1
    Business & Finance Moderators, Entertainment Moderators Posts: 32,387 Mod ✭✭✭✭


    I posted a while back about getting into woodcraft and buying a lathe etc.

    I wanted to let people know how things have gone and see some of the stuff I've made.

    Now, i'm not naturally gifted at arts and crafts, far from it I'm a major computer nerd :) ... but I've really been surprised and happy with how much you can achieve quite quickly!

    I've been taking instruction from a lovely gent by the name of Charlie Ryan and he got me up and running very fast on the lathe and producing items almost immediately (despite my fear of killing myself with machinery)

    I pretty quickly produced stuff like this:

    15094881346_511b37374b_t.jpg20140621_172648 by devoresphotos, on Flickr


    And you can see the rest of the fruits of my last 6 months labours here: https://www.flickr.com/photos/devoresphotos/sets/72157647141738582/

    I've probably paid out about 1,000 in costs at this point but I've a pretty well equipped workshop now and I've really enjoyed getting out there and making stuff.
    If you are thinking about it, I would recommend it... its not as hard as I expected and I definitely didn't think I would be making stuff like this after only a few months at it!


«1

Comments

  • Registered Users, Registered Users 2 Posts: 6,253 ✭✭✭bonzodog2


    Nice work Tom.


  • Registered Users Posts: 62 ✭✭Stanirish


    Well done lad, good to hear you are enjoying the workshop, and making some nice things. If you want more inspiration, travel to sligo for a day/weekend for the Irish Wood Turners Guild Symposium, on the 26th to the 28th of September - look up their website for more info. Always loads and loads of woodturned items, which will keeping you thinking, on how they made them !!

    Have fun

    Stan


  • Business & Finance Moderators, Entertainment Moderators Posts: 32,387 Mod ✭✭✭✭DeVore


    Already booked in for the weekend!


  • Moderators, Motoring & Transport Moderators, Sports Moderators Posts: 6,337 Mod ✭✭✭✭fergal.b


    Nice work. I might have a little project for you if your interested :)


    .


  • Registered Users, Registered Users 2 Posts: 7,810 ✭✭✭Calibos


    Inspirational!

    Start combining your woodworking/turning with your electronics and IT knowledge and you can call yourself a Maker. When I have a bit more legacy debt cleared and start acquiring tools I've all sorts of plans in my head ready to go combining multple disciplines. Beds with built in DIY TV lifts combining wooden furniture with some mechatronics and home cinema gear etc. Nice Computer desks with built in PC's etc With a bit of knowledge from multiple disciplines you can start designing and building custom furniture yourself that you either couldn't buy in the shops or if you could would cost an absolute fortune. Something like my Bed plan with the built in TV lift would cost 6 or 7 grand to buy. I'll probably be able to build something better for a grand which includes the price of the TV :D


  • Advertisement
  • Business & Finance Moderators, Entertainment Moderators Posts: 32,387 Mod ✭✭✭✭DeVore


    Calibos wrote: »
    Inspirational!

    Start combining your woodworking/turning with your electronics and IT knowledge and you can call yourself a Maker. When I have a bit more legacy debt cleared and start acquiring tools I've all sorts of plans in my head ready to go combining multple disciplines. Beds with built in DIY TV lifts combining wooden furniture with some mechatronics and home cinema gear etc. Nice Computer desks with built in PC's etc With a bit of knowledge from multiple disciplines you can start designing and building custom furniture yourself that you either couldn't buy in the shops or if you could would cost an absolute fortune. Something like my Bed plan with the built in TV lift would cost 6 or 7 grand to buy. I'll probably be able to build something better for a grand which includes the price of the TV :D
    Way ahead of you there!

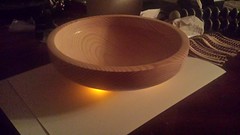
    This piece here has micro LED's embedded in a groove in the underside and there is a battery pack hidden in the foot of the bowl!

    15117503812_4b3c0c4556_m.jpg20140522_013733_LLS by devoresphotos, on Flickr

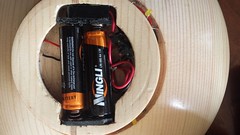
    You can see a close up of the base of the bowl here (upside down for the photo :) )
    15114279666_015b46fc0c_m.jpg20140522_141428 by devoresphotos, on Flickr


    The effect isn't what I was really looking for (its too local when what I wanted was a more diffused light) but success is a process, failure is a component as I always say!


    As for your bed idea, I have been thinking about that myself but without the motors ... something like an arm attached to the bed with a tablet in it for watching youtube...


  • Business & Finance Moderators, Entertainment Moderators Posts: 32,387 Mod ✭✭✭✭DeVore


    Always interested in projects.... its getting the time for them that's the problem! But shoot, I'm listening :)


  • Moderators, Motoring & Transport Moderators, Sports Moderators Posts: 6,337 Mod ✭✭✭✭fergal.b


    No hurry on it by next summer will do :) It's just one of those little things that bugs me, on the back of my steering wheel there is a black plastic covering that does not belong on a wooden boat :D I would like to replace it with some type of bowl.

    ferg07_zpsc9b0a9cb.jpg

    20140904_155442.jpg

    This is sort of what it looks like but it doesn't have to be shaped like this curved would nice.

    20140903_192219.jpg


    I don't need the screw holes but do need the centre one and the sides can be a bit thicker. What do you think :)


    20140903_192032.jpg


  • Business & Finance Moderators, Entertainment Moderators Posts: 32,387 Mod ✭✭✭✭DeVore


    That looks like a doddle!

    I need the dimensions of the piece:
    1. Diameter
    2. Height
    3. Diameter of the hole in the middle
    4. Diameter of the screw holes to either side.
    5. The distance between the screw holes


    I'll have a look out in the workshop for something of those rough dimensions when I know them but I have plenty of stuff like that. Do you know what kind of wood that is on the dash? (looks like some kind of mahogany or teak from the pics?).
    I have a few pieces that would be perfect for it I think.


  • Moderators, Motoring & Transport Moderators, Sports Moderators Posts: 6,337 Mod ✭✭✭✭fergal.b


    I used mahogany to make the dash but what ever you have handy will do :)

    Diameter at the bace is 5" x 1" then it tapers down to 3" behind the wheel.

    Height is 2"

    Hole 3/4"

    I won't need the screw holes.

    Cheers.


    .


  • Advertisement
  • Business & Finance Moderators, Entertainment Moderators Posts: 32,387 Mod ✭✭✭✭DeVore


    Ok, it will be next weekend when I get a chance to get back into the shop so I'll sort it out then but it really looks like a pretty easy piece. Pretty sure I have a piece of mahogany out there that is about the right size.
    Does it serve any other purpose than to cover the mechanism of the drivey-bit? .... (that's a technical term for the rest of yis!)


    In other news had an 11 inch wide, 10 inch deep bowl *explode* on the lathe tonight at 1400 revs. Half shot across the shop, half turned into a Death-By-Lathe device in the faceplate. Fun times... don't let anyone tell you wood turning is for boring old farts! My hearts still pounding!


  • Registered Users, Registered Users 2 Posts: 7,810 ✭✭✭Calibos


    DeVore wrote: »


    As for your bed idea, I have been thinking about that myself but without the motors ... something like an arm attached to the bed with a tablet in it for watching youtube...

    Way ahead of you there :D

    321089.jpg

    No woodwork involved though. Something non permanent thrown together with bits and bobs and nuts and bolts. Frame is actually an old sweet stand from our shop, Top heavy but sweet stand feet held under Divan Bed keep it upright, TV arm from Powercity. Mini ITX PC I made affixed to an old laptop tray. Some black baize I found in a cupboard to hide frame. Re-purposed Telescope eyepiece tray and Telescope focuser drawtube spacer for little tray cupholder thingy. I made it before I even knew about the 'Maker' Culture. In this iteration I guess one could call it 'Upcycling' :D

    BTW. Sketchup is a great tool for planning and designing and visualising. Only took me a few days to learn enough to model and render in a render package. While I didn't model most of the individual parts in the following examples and simply put them together or mod them slightly I could actually model a lot more now a few weeks later. Sketchup is very easy to learn and get to grips with. Its quick to get good at but obviously slower to get great at.

    13883124191_9094300458.jpg
    13883124391_5947253ded.jpg
    13706502833_db9797833a.jpg

    My bedroom is effectively a box-room for the forseeable so I need to cram in as much functionality into the limited space as possible. Think Deep alcove with wardrobe at one end and Murphy Bed at the other that lifts up out of the way exposing a simulator rig with steering wheel and HOTAS joystick for Oculus Rift VR sims thats usually hidden under the bed. Beside the bed a computer desk with PC built into the table under a glass top with a dual monitor setup but where one monitor can swing around on its articulating arm into a position over the bed not unlike version one of the 'Bedstation' pictured above. (From the other side though) Feck it. may as well use this post as an excuse to start the modelling. :D


  • Registered Users, Registered Users 2 Posts: 21,487 ✭✭✭✭Alun


    DeVore wrote: »
    In other news had an 11 inch wide, 10 inch deep bowl *explode* on the lathe tonight at 1400 revs. Half shot across the shop, half turned into a Death-By-Lathe device in the faceplate. Fun times... don't let anyone tell you wood turning is for boring old farts! My hearts still pounding!
    Be very, very careful! You might joke about it, but at those speeds a piece of flying wood can cause serious damage, by my rough calculations the outside rim is travelling at 20m/s at those revs.

    With a largeish piece like that, especially a deep one where the chance of a catch is higher when hollowing, I'd say 850 - 1000 rpm would be my maximum and only once I'd got it more or less shaped, and would probably go a good lower than that when initially roughing out.

    Here's a table that came with my lathe giving recommended speeds for different diameter pieces. Note I have a lathe with fixed speeds governed by changing a belt, hence the odd figures on the speed axis.

    15yyumc.png


  • Moderators, Motoring & Transport Moderators, Sports Moderators Posts: 6,337 Mod ✭✭✭✭fergal.b


    DeVore wrote: »
    Ok,
    Does it serve any other purpose than to cover the mechanism of the drivey-bit? .... (that's a technical term for the rest of yis!)


    No it's only purpose is to cover up the fixings, steering column and to annoy me :) Again no hurry whenever you get a chance. Thanks.


    .


  • Business & Finance Moderators, Entertainment Moderators Posts: 32,387 Mod ✭✭✭✭DeVore


    You're quite correct Alun and for the vast majority of it I was running about 750 (and under the watchful eye of my tutor, Mr Ryan!)... we had gotten past the danger area and were working on the very bottom on the inside so we upped the revs to improve the cut there. Turned out to be a mistake but definitely I take your point about safety. In fact I'm kinda mad about my safety gear. I use a full face plate and a respirator always (or sometimes even an Airshield if its dusty work with exotics). I never stand in the line of fire and have learned a safety routine before turning the lathe on (like checking where the chuck key is, spinning the wood by hand, tightening up the banjo and the tail-stock etc).

    The first bowl that ever shattered on me was a tiny bowl about 3 inches in diameter made from pine. I got a catch working on the outside and somehow about a third of the bowl broke off and shot straight at my face and bounced off my faceplate. It made a really good old-college-try to stab me in the face. I put the rest of that bowl up on my shelf beside the lathe to remind myself to always wear a face plate!

    That's a very handy chart though, thanks for that!


  • Business & Finance Moderators, Entertainment Moderators Posts: 32,387 Mod ✭✭✭✭DeVore


    Calibos, that looks awesome! (glad to see Boards on the monitor :) )... The fan is just for staying chilled during long Counterstrike sessions?? :)


    I've been meaning to try Sketchup for a while so I'll give it a go and maybe try something simple like Fergal's Boatbowl as I'm going to call it, to start with. :)


  • Registered Users, Registered Users 2 Posts: 7,810 ✭✭✭Calibos


    Built my wardrobe in sketchup yesterday. Will do my PC in a Desk and monitor arm later today hopefully.

    [edit] added some Venetian blinds from the warehouse. Real room has venetians. Positioned virtual camera on top of wardrobe looking back at bed.

    I've Tuesday and Wednesday off so hopefully will have time to do what I actually use sketchup and rendering package for. i.e. Pre-Visualisation. Virtually build my future 'PC in a Desk' and monitor arm setup. Might throw a bit of artwork on the walls too while I'm at it. New lick of paint maybe? :D


  • Registered Users, Registered Users 2 Posts: 3,695 ✭✭✭galwaydude18


    Jesus calibos that's a really good rendering. Did it take you long to learn sketchup to be that good at it?


  • Registered Users, Registered Users 2 Posts: 7,810 ✭✭✭Calibos


    Thats the thing really. I'm still not good at it. I watched about half of these Tutorials so far and spent a few hours a night messing around for a fortnight or so. I reached a point though where I knew pretty much all I needed to know for my own personal purposes and only research more tutorials now if I am stuck on something.

    Most of the contents of a scene can be downloaded from the Sketchup 3D warehouse. In the above picture, I downloaded the radiator and the mattress and bed clothes. (Sash Windows not visible) I wouldn't know where to start modelling them myself. I just needed to be proficient in the move and scale tool to position them in my room model. I simply pulled up the walls, applied a carpet texture to the floor, downloaded a set of wood trim/skirting board 2D profiles from the warehouse and used the easier than it sounds foll0w me tool to extrude the skirting around the room and trim around the top of the wardrobe.

    For me, all my future DIY and woodworking projects happen to be things that are easy to model and within my current skillset so I haven't felt the need to progress any further really. Built-in bookcases, built in wardrobes, bed bases, wainscoting, skirting, coving/cornicework etc ie. the things specific to my house or custom things that one wouldn't find in the Warehouse are the things I can actually do myself anyway. The things I couldn't model myself but one would want to put in your model to fill it out and make it look like a real lived in room are luckily the things that one can find on the warehouse like sanitary ware, appliances, chandoliers, ornaments, sofas, bed clothes, curtains etc

    The only thing in that image I built from scratch myself was the wardrobe which is also deceptively simple. Rectangle tool to draw a rectangle the height and width of the wardrobe. Push/Pull tool to pull it out into a 3D shape with the depth of the wardrobe. Draw little triangles on the sides and use push/pull tool to push triangles out to make the beveled edges of the planks on the side. Draw the drawers with the rectangle tool, Pull them out with the push pull tool. Draw the door face frames and inset panels with the rectangle tool. Pull them out to different depths. Follow me tool to add profile to top. Downloaded handles from warehouse.

    Sketchup renders these in a simple almost cartoon like style for speed. If it rendered them with the graphical quality of a game engine for instance it would slow to the point that it would be painful to manipulate the model while modelling. The magic happens when you import your finished model into a rendering package. You can add more realistic materials here. You are basically telling the program, right this surface is gloss white paint, this is leather, this is varnished wood etc It then calculates how the light bounces around the room and reflects off the different materials/surfaces which is what gives the rendering its realistic look.


  • Moderators, Motoring & Transport Moderators, Sports Moderators Posts: 6,337 Mod ✭✭✭✭fergal.b


    I might have a little project for you too :D


    .


  • Advertisement
  • Registered Users, Registered Users 2 Posts: 7,810 ✭✭✭Calibos


    Was so close. Arrrgggghhhh!!! Sketchup Bugsplat and lost hours of work. :mad: :mad: :mad:

    The only thing I'd done pre the last save point was redid the wardrobe with openable doors and drawers and hinges. Might as well post it.

    [edit] Took a Xanex ;) calmed down and started again. Added images below to wardrobe image

    Theres some small screw ups in the second two images linked. I forgot to apply the white paint material to the Murphy Bed casing on the left of the images and to a bit of the skirtingboard down by the legs of the computer chair. I left a pretty obvious easter egg in the images which should bring a smile to your faces :D


  • Moderators, Motoring & Transport Moderators, Sports Moderators Posts: 6,337 Mod ✭✭✭✭fergal.b


    I'm a happy chappy now :D Thanks a million DeVore it looks the business.

    20140922_125953.jpg

    As with mahogany it looks different depending on what way you look at it and the way the light hits it, all in all it's spot on.

    20140922_125939.jpg


  • Business & Finance Moderators, Entertainment Moderators Posts: 32,387 Mod ✭✭✭✭DeVore


    Ah, I'm delighted...working to measurements is a lot tougher than the laissez-faire approach of "let the wood take you were it wants to go" hahah... so I was sweating that one a bit. I'm glad you like it, I had fun doing it!


  • Registered Users, Registered Users 2 Posts: 21,487 ✭✭✭✭Alun


    DeVore wrote: »
    Ah, I'm delighted...working to measurements is a lot tougher than the laissez-faire approach of "let the wood take you were it wants to go" hahah... so I was sweating that one a bit.
    Wait until someone asks you to make a matching pair, or worse still, set of something like candle sticks, goblets or egg cups. :D


  • Business & Finance Moderators, Entertainment Moderators Posts: 32,387 Mod ✭✭✭✭DeVore


    I'm about to embark on a pair of pepper canisters made from Zebrano and trimmed with Bloodwood... so yeah... not looking forward to that hahah (actually I'm really looking forward to it, but I just don't want to feck it up :) )

    Zebrano is going to make it a tough one because the lovely straight lines I'm after come with the price of being excellent guides to show were the form of a piece might be off :)

    I'll post some pics when I get it done in a few weeks... first there is an Irish Woodturners Guild convention this weekend and me and my credit card are coming out to play! :)


  • Registered Users, Registered Users 2 Posts: 21,487 ✭✭✭✭Alun


    One piece of advice I'd give in this regard is to realise that the customer rarely sees all those tiny, eensy-weensy differences or 'faults' that you as the producer of the item sees. I'm ultra critical of my own work, sometimes to my own detriment, as I'll sometimes throw away things that don't turn out as well as I wanted in a huff that to anyone else look perfect. That's not to say you shouldn't always try to do your best, but just to realise that perfection is something that is in the eye of the beholder, as it were.


  • Business & Finance Moderators, Entertainment Moderators Posts: 32,387 Mod ✭✭✭✭DeVore


    That's definitely true... I've given a few of my bowls away as gifts and thought "pleeeeease don't notice that bit of tear out down at the base" and as you say, people just don't notice it ... I've even pointed out a couple of flaws to my folks and they looked at me like I was mad :)

    I'm still very much learning at the moment but I'm gearing up to try a few more adventurous and exotic stuff. I got an air-brush and I'm buying a band saw (probably this weekend!) and I got a box of very nice exotic woods which I'm keen to start working with (soon as I get the band saw) so I'm heading towards segmented stuff and possibly some inked/painted stuff too! (maybe a bit of both... now *there's* an idea!)


  • Registered Users Posts: 699 ✭✭✭Zebrano


    Some nice work there fair play it's highly addictive hobby and charlie is a great teacher. Might see you at the seminar


  • Business & Finance Moderators, Entertainment Moderators Posts: 32,387 Mod ✭✭✭✭DeVore


    Charlie is a gas man all together! Great teacher alright, I was lucky to find him. Cant believe your username is Zebrano when I have a block of it waiting to be turned to round out in the lathe hahah.
    I'll be hanging out with Charlie at the seminar, probably somewhere near a bar most likely... come up and say hello!


  • Advertisement
  • Business & Finance Moderators, Entertainment Moderators Posts: 32,387 Mod ✭✭✭✭DeVore


    So, what a few months its been!

    I have, as Charlie would say, gotten right out of my box and tried a bunch of somewhat crazy ideas... to varying levels of success it must be said! My kitchen now looks like suicide bombers workshop with wires, resin pumps, electronics, tools and kits. (I'm trying to involve micro electronics into wood turning ... for the laugh!).

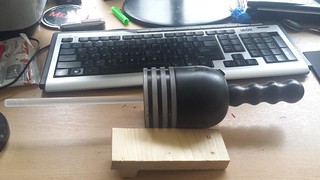
    probably the craziest thing I've made is the Blake Seven Liberator gun from the series for a buddy of mine who is *mad* about it. The gun lights up like it does in the show when you push the button. :)
    16035034340_5e789096b1_n.jpgBlakes Seven Liberator Gun by devoresphotos, on Flickr

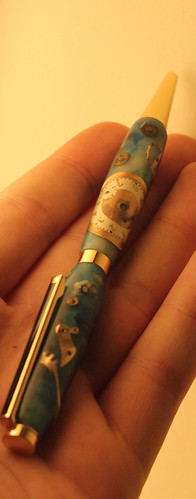
    I also made a Doctor Who pen for another mate who is Dr Who mad :)
    16191249976_8ff20822ef.jpgdrwho3 by devoresphotos, on Flickr

    I made the core of the pens with resin and glow-in-the-dark pigment, turned them down to thin cores and stuck real watch parts to them. Then did a second resin pour of clear resin (I've found Gedeo Crystal Resin to be the best for that!)...and turned the pen out of it. Some watch parts were bent to shape and those were fine, some were stuck on flat and their edges were carved by the turning... I kinda like the effect. I also printed out a small pic of the TARDIS and stuck it to the cores. It was a complicated but fun build!

    16191192036_50540c8dfd.jpgDrWho by devoresphotos, on Flickr

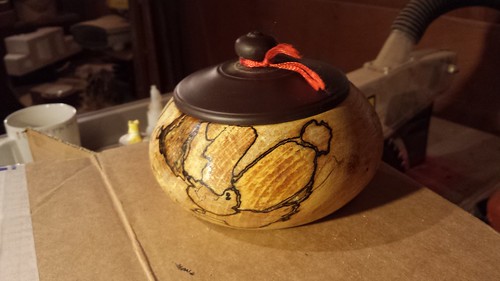
    In the more traditional wood line, I made a spalted bowl/box with a clay top from an old Chinese clay mug which broke and left me with the top!
    16083974255_7a15407916.jpgSpalted beech bowl with china lid. by devoresphotos, on Flickr

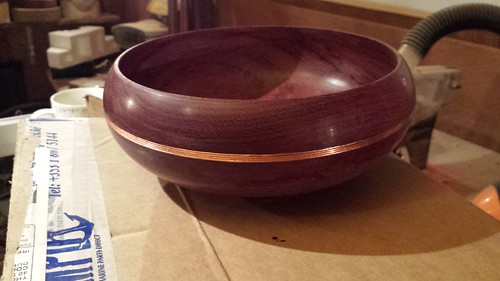
    A Purpleheart bowl with copper inlay which was as hard as the hobs of hell!!
    16058174956_857a2e822e.jpgSpalted beech bowl with china lid. by devoresphotos, on Flickr
    (quick note, I didn't let the bowl dry well enough and put the inlay on too soon and the bowl has since split... its barely noticeable but still, just to warn anyone thinking of doing this.


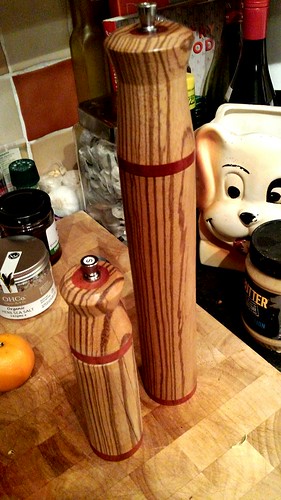
    I made the Zebrano and Bloodwood pepper/salt grinders I was talking about... they came out ok, but its one of those things where I'm not wild about the quality of my work while no one else would notice anything wrong! Keeping the lines lined up was a TOTAL pains in the doodahs btw, I will avoid that in future :)
    15825747029_b47ab5bc01.jpgSalt and Pepper grinders by devoresphotos, on Flickr

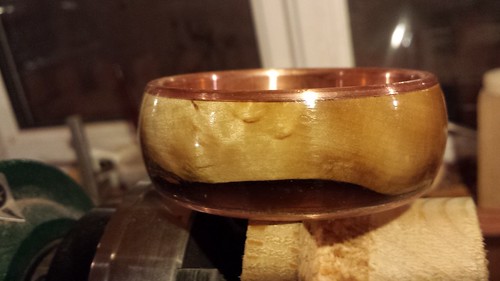
    Tried my hand at a bangle with a copper core... really like these and I'll be doing more of them!!
    15898206427_1dd29c59d6.jpgSpalted beech bowl with china lid. by devoresphotos, on Flickr


    And finally, my dad asked me to make him a snowman for xmas... and I designed this, probably the worlds most overwrought tealight holder!! It was fun to make and remarkably simple really...

    15824508510_3801efe114.jpgwood turned snowman by devoresphotos, on Flickr


    So, suffice it to say that I've had a productive 3 months... I'm journaling this so that other people who might be thinking about getting into the hobby can track my progress and the ups and downs (I've had a couple of disasters along the way... but given that I'm not exactly doing standard turnings sometimes, that's to be expected! :) ).

    So I'm what, 7... 8 months turning now and I feel sufficiently skilled to stop doing "brown and round" and start mixing things up. I mean, what can go wrong? Right? :):)


  • Registered Users Posts: 699 ✭✭✭Zebrano


    Fair play some nice stuff there no matter what level u get to you will still find fault with ur work but to be honest it a good thing it will ensure u keep improving. How goes the coffe mug.


  • Registered Users, Registered Users 2 Posts: 370 ✭✭genuine leather


    Beautiful work Devore. Did you recycle copper for the pieces?
    It looks so well as an inlay against the wood.


  • Business & Finance Moderators, Entertainment Moderators Posts: 32,387 Mod ✭✭✭✭DeVore


    Oh sh*t, I forgot the coffee mug...

    In the end Charlie told me he would disown me if I used that Elm burr for the coffee mug because its just too nice and I have now got a plan to carve it up for some segment rings from the outer inch or two, some bangles from the middle inches and a nice single flower vase from the core! So its going to be put to maximum effect. Instead he gave me a lovely piece of elm (?) wood and we made the coffee mug sleeve from it. Unfortunately I didn't resin it in immediately and now the wood has shrunk! (maybe that's a good thing, it might have crushed the cup)... so I need to do some more work on the inside to get it back into shape. This is what it used to look like!

    B3e1_x-IgAAP9zh.jpg


  • Business & Finance Moderators, Entertainment Moderators Posts: 32,387 Mod ✭✭✭✭DeVore


    Beautiful work Devore. Did you recycle copper for the pieces?
    It looks so well as an inlay against the wood.
    Nah, I should (and will in future) but I had it from a previous project and so used that... It looks terrific against the purpleheart and honestly, it broke my heart when I came down a few days before xmas and found it had split (my own stupid fault for bringing it into the house and keeping the heating on full blast over xmas).

    I put it back out in the shed in the hope it would some how revert and amazingly it has!! The cracks are very hard to spot now and I might just try to hide them with some CA glue and sawdust from the remaining sanding...

    This wood lark requires a lot of patience that I don't got. :)


  • Business & Finance Moderators, Entertainment Moderators Posts: 32,387 Mod ✭✭✭✭DeVore


    DeVore wrote: »
    Nah, I should (and will in future) but I had it from a previous project and so used that... It looks terrific against the purpleheart and honestly, it broke my heart when I came down a few days before xmas and found it had split (my own stupid fault for bringing it into the house and keeping the heating on full blast over xmas).

    I put it back out in the shed in the hope it would some how revert and amazingly it has!! The cracks are very hard to spot now and I might just try to hide them with some CA glue and sawdust from the remaining sanding...

    This wood lark requires a lot of patience that I don't got. :)
    Btw Zebrano, next up is that large platter you very kindly gave me... I'm going to make a finger food platter from it and try my hand at some airbrushing (because ya'know, I couldn't just make things easy on myself :rolleyes: :) )

    I'm gonna try some kind of big sun flower design on it, something bright and colourful, on the inside.


  • Advertisement
  • Registered Users, Registered Users 2 Posts: 431 ✭✭delaney001


    Hi Devore.

    Excellent work, you have found a real talent in what you are doing.
    I bought a lathe about 2 weeks ago after getting sick of being jealous reading the woodcraft forum and watching YouTube videos!!! One of the biggest issues I have so far is sourcing timber. Can you give any advise on where best to source timber (I'm located in kilkenny, but wouldn't mind travelling a bit every now and again)


  • Business & Finance Moderators, Entertainment Moderators Posts: 32,387 Mod ✭✭✭✭DeVore


    I've gotten some nice stuff from McQuillans but they don't have anything really on their website... I have also bought a Starter Box from this guy: http://www.exotichardwoodsukltd.com/page72/rapidcart-55/
    and it was excellent... the only issue is you don't know what you are going to get, but you do get 10kg of it and shipping wasn't crippling either. I was very happy with mine... but not much in the way of bowl blanks. He does sell a LOT of other stuff though, but its always going to be a bit costly to ship from England if you are buying a lot. not too bad mind you.

    Also you can try: http://shop.strahan.ie/Woodturning-Supplies-s/1514.htm

    I've bought blanks from woodturner's meetings and from seminars, been gifted quite a bit (woodturners are genuinely lovely people I've found!) and quite frankly haven't had to buy much. I've scavenged some from local tree falls too, mind you that stuff has to be dried which takes time... this might be a good source for you in Kilkenny though!


  • Registered Users Posts: 699 ✭✭✭Zebrano


    Yea i have to agree that turners are genuinley nice people and are particularly helpful to newbies.
    Also wood comes from the strangesy places. Just last night i was in my wifes friends house and she appeared from one of the other rooms woth 2 big off cuts from the newel posts from when she got the house redecorated 4 years ago and just wanted rid.


  • Business & Finance Moderators, Entertainment Moderators Posts: 32,387 Mod ✭✭✭✭DeVore


    Yeah, I have some pens and lamps from a solid mahogany door someone was throwing out and Charlie grabbed and cut up. Been dumpster diving too and have also just asked people for wood in their skip/front garden etc.


  • Registered Users, Registered Users 2 Posts: 7,810 ✭✭✭Calibos


    Wow!!


  • Advertisement
  • Business & Finance Moderators, Entertainment Moderators Posts: 32,387 Mod ✭✭✭✭DeVore


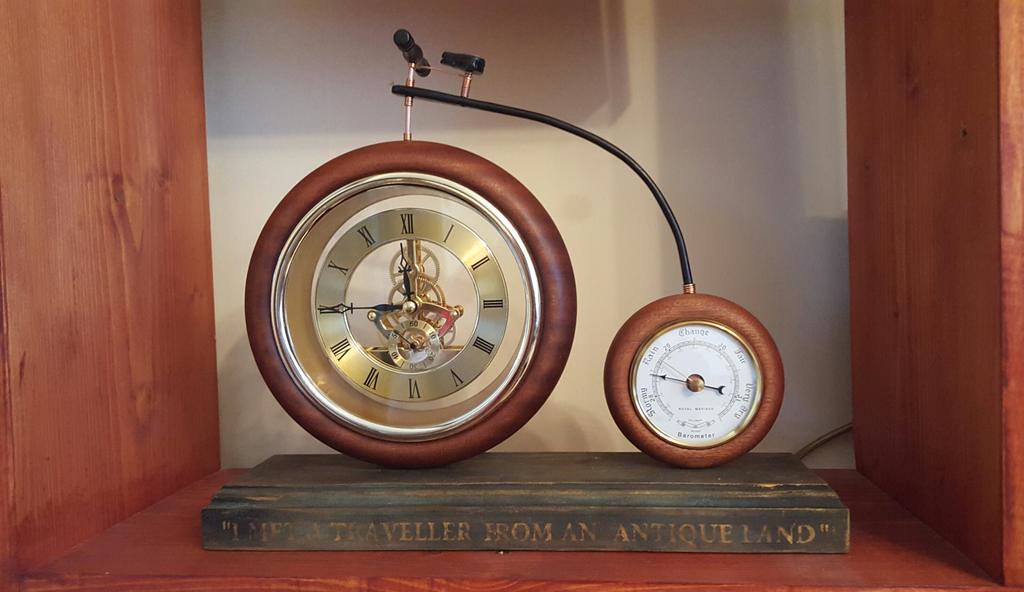
    So, um... humble-brag... I took first place in the Novice section of the Nationals yesterday with this piece :)

    19558667854_50983412dc_b.jpg
    I Met A Traveller From An Antique Land by Tom Murphy, on Flickr


    Miiiight be a little pleased with myself :)


  • Registered Users, Registered Users 2 Posts: 431 ✭✭delaney001


    DeVore wrote: »
    So, um... humble-brag... I took first place in the Novice section of the Nationals yesterday with this piece :)

    19558667854_50983412dc_b.jpg
    I Met A Traveller From An Antique Land by Tom Murphy, on Flickr


    Miiiight be a little pleased with myself :)


    Gloat away, well deserved. That's excellent work


  • Registered Users, Registered Users 2 Posts: 431 ✭✭delaney001


    Would you mind giving a quick run down on your finishing process devore? What products you use and steps?


  • Business & Finance Moderators, Entertainment Moderators Posts: 32,387 Mod ✭✭✭✭DeVore


    delaney001 wrote: »
    Would you mind giving a quick run down on your finishing process devore? What products you use and steps?
    Sure, happy to!

    I use a few different processes depending on what I'm looking for. I have 3:
    1. Standard finish for spindle work (matt and gloss)
    2. Foodsafe for salad bowls
    3. The most complex ... pens.

    1... For standard work I either use mineral oil for matt finish or I use carnauba wax on a Chestnut buffing wheel for gloss finishes. Oil is really easy and gives a nice matt finish, simple to apply and to reapply. Carnauba is very easy to get to a high shine finish BUT any amount of handling will wear that away. Its not a good idea to use for pens or even bowls. I use it for candlestick holders and lamps etc.
    I've also used some spray on laquer lately for quick and dirty finishes but not for anything competition level.


    2. For foodsafe I've been using mineral oil or lately I've started playing with beeswax mixed with mineral oil. I put the beeswax in the microwave and melted it completely liquid. Then added about 20% mineral oil (I could probably have done less but it works with this mixure). Let it all cool and harden in something plastic (to make it easier to get out) and when it does, pop it out and apply it directly to the piece on the lathe. YOU DONT NEED MUCH... this is quite like carnauba, a little goes a long way and it needs friction to heat up and nicely melt into the piece and then buffs to a nice shine.
    Carnauba is food safe too btw but I prefer this finish. I cant speak for its longevity yet tho...


    3. I use CA glue for pens. Sand up to 400 (600 if I'm feeling like it :) ) and then put a coat of CA on top.
    Put a folded up tissue under the piece, lightly pressing against the pen. Pour a liberal amount of CA and move from left to right in one slow steady motion. Don't go back and forth. Let it dry until its dry to the touch (about 2-5 minutes).
    Sand at 400 again until its smooth (no shiny valleys in the finish.. when you do it you'll see what I mean). Then glue again, and sand again. Do this 4-5 times.
    The trick is after the last sanding... use Mylands Buffing Cream (I hear you can use Jif or any sort of scouring cream but I haven't tried it). The cream will bring up the glass like finish and will probably take two decent applications and buffings to really do the trick but its a terrific finish for pens as they are going to get a LOT of handling.

    Two warnings about CA:
    A. Its nasty stuff for eyes and lungs. Use a respirator if you have one or ventilate VERY WELL.

    B. It reacts chemically to form the bond and it does so exo-thermically... meaning it gives out heat (and lots of it!) when it bonds. If you pour CA glue onto a ball of twine, it will go on fire. It will smoke when poured into a tissue. Just be careful about it around the workshop.


    I've only just bought myself a Chestnut buffing wheel system and already I really like it! They run about 50 quid and are well worth it.


    Finally a word about sanding. For a great finish, you have to really do a good sanding prep. A couple of things I've learned the hard way.

    1. the most important sanding grit is 120. don't move on from it until its really well done... spend time and effort here and you will save 10 times as much later.

    2. Slooooow the lathe down. I sand at 350rpm... I use to turn the lathe up to 2000 to try and get it done quicker!

    3. After 240 or 320 put on a coat of sanding sealer (I've cut my sanding sealer down 50% with sanding sealer thinners btw.. ). This brings us any of the imperfections and you get to see them then rather than later! This is where having done a good job at 120 will pay dividends!

    4. Power sanding is GOOOD. Get a nice handy portable drill. A Simon Hope power sanding set and a few bags of sanding disks. Its a little expensive but it makes sanding SO MUCH LESS A CHORE! The finish is also better as you avoid the nasty circular sanding lines from hand sanding.

    So, there you have it. Any questions, just ask!


  • Moderators, Category Moderators, Arts Moderators, Sports Moderators Posts: 50,239 CMod ✭✭✭✭magicbastarder


    DeVore wrote: »
    2. Slooooow the lathe down. I sand at 350rpm... I use to turn the lathe up to 2000 to try and get it done quicker!
    interesting; the only reason i'd usually slowed down is to prevent heat buildup.


  • Business & Finance Moderators, Entertainment Moderators Posts: 32,387 Mod ✭✭✭✭DeVore


    Heat kills sandpaper (and fingertips! OW!).... the faster the lathe is going the less you can press the sandpaper to it because of heat, and sandpaper needs to be pressed to the wood to work :)

    I wasn't a convert until I started using slower speeds and it works much better for me (and much less painful! :) )
    I still power sand though, because life is just too freakin' short to hand sand every sanding ring out :)


  • Moderators, Category Moderators, Arts Moderators, Sports Moderators Posts: 50,239 CMod ✭✭✭✭magicbastarder


    so, try some CA, or bin? as you can see, i've not invested an awful lot of time into it so far; it's maybe 7" in diameter and was just going to be a simple bowl. it's not obvious in the second shot, but the crack runs right the way across.

    367534.jpg
    367535.jpg


  • Business & Finance Moderators, Entertainment Moderators Posts: 32,387 Mod ✭✭✭✭DeVore


    ok...

    1. You haven't invested much time in it and its not exactly expensive timber. It wouldn't be a sin to bin it.

    2. If you cant fix it, flaunt it. Drill 4 holes either side of the crack and lace it up with leather (I have some you can use if you like) or even cut a segment out of it when you are done and then stick lines of copper across the gap or any other sort of artistic affectation!


  • Moderators, Category Moderators, Arts Moderators, Sports Moderators Posts: 50,239 CMod ✭✭✭✭magicbastarder


    cheers, my main impetus for binning would have been personal safety, obviously. it's not a colossal chunk, but the crack runs far enough through it that there wouldn't be much holding it on by the time i hollowed out the bowl. i suspect it is going to become expensive firewood.

    unfortunately i missed out on collecting the entire spoils of a 40 foot beech tree recently felled. the owner said to a workman at his house to 'take some if he wanted' and within half an hour it was all gone, a week before i was able to make it up there.


  • Business & Finance Moderators, Entertainment Moderators Posts: 32,387 Mod ✭✭✭✭DeVore


    Yes, safety is a factor.. What I've done before was to wrap it in a couple of wraps of duct tape, good and tight, just to give it that extra bit of stability and support. This has worked for me but your mileage may vary! Do it at your own risk and wear a face shield :)


  • Advertisement
Advertisement