Advertisement
If you have a new account but are having problems posting or verifying your account, please email us on hello@boards.ie for help. Thanks :)
Hello all! Please ensure that you are posting a new thread or question in the appropriate forum. The Feedback forum is overwhelmed with questions that are having to be moved elsewhere. If you need help to verify your account contact hello@boards.ie
Hi all! We have been experiencing an issue on site where threads have been missing the latest postings. The platform host Vanilla are working on this issue. A workaround that has been used by some is to navigate back from 1 to 10+ pages to re-sync the thread and this will then show the latest posts. Thanks, Mike.
Hi there,
There is an issue with role permissions that is being worked on at the moment.
If you are having trouble with access or permissions on regional forums please post here to get access: https://www.boards.ie/discussion/2058365403/you-do-not-have-permission-for-that#latest

Building a geodesic dome

  • 29-03-2020 3:20pm
    #1
    Posts: 0


    Hi all,

    What with everything going on, I have decided to build a geodesic dome out the garden, for use as a greenhouse/sheltered outdoor space.

    I'm not exactly a skilled carpenter, but I am proficient as I have built many sets for theatre over the years.

    My big question is, is white deal good enough for something like this? I plan on using rough untreated 2" x 1"s, which I'll stain before assembly. They will be covered with polythene on the outside.

    I've had a Google, but can't really find anything to tell me yay or nay.

    Budget is a big concern, I need to make this as cheaply as possible. If I had the budget for cedar, that's what I'd use.

    Mods, if this is in the incorrect forum, please move.

    Thanks all


Comments

  • Registered Users, Registered Users 2 Posts: 507 ✭✭✭Tedious Bore


    dunno about the wood sorry! can I ask what kind of connectors you're using though, or made any progress yet?


  • Registered Users, Registered Users 2 Posts: 1,464 ✭✭✭Double Barrel


    On a budget or not , why not consider a wood preserver such as Protim E, Barrettine Premier, Cuprinol Ducksback, Osmo, Sika and/or Ronseal Total etc.
    Solvent based or Water based your choice.
    Apply to framing members before assembly and let it dry and off gas and you will be ready to frame.


  • Registered Users, Registered Users 2 Posts: 162 ✭✭daedal


    I built one using varnished cardboard tubes and cnc'ed plywood interlinks. See http://domenico.cc/

    11224233_10153148530504071_5348804087743500494_o.jpg?_nc_cat=106&_nc_sid=da1649&_nc_oc=AQmaIRrKNIGNKJ1lLQpWHbtHx_8G2jllJSIoL-xi1HTQwOzej6umV8C6i-BJhhG-K2Y&_nc_ht=scontent-dub4-1.xx&oh=ed10d15b1bbb538c5c77356a83d58964&oe=5EB6D54A


  • Registered Users, Registered Users 2 Posts: 8,051 ✭✭✭cletus


    ^^^^That's just showing off^^^^

    My question was asked above, what do you intend to use at the joints. I figure they need to be pretty accurate in order to maintain the frame dimensions. If you're buying them (can you buy them?), I presume that will dictate what material you can use for the frame


  • Registered Users, Registered Users 2 Posts: 162 ✭✭daedal


    cletus wrote: »
    ^^^^That's just showing off^^^^

    My question was asked above, what do you intend to use at the joints. I figure they need to be pretty accurate in order to maintain the frame dimensions. If you're buying them (can you buy them?), I presume that will dictate what material you can use for the frame

    I designed them, I’m willing to give the machine code to this person free of charge, and help in whatever capacity I can. I don’t want money or to show off, I just want to say “I’ve built one before, if you need any advice (free of charge) consult me” Because I’ve built one and I can offer the files for free, but they need to build it to the spec I give them, I’m not willing to adjust it.


  • Advertisement
  • Registered Users, Registered Users 2 Posts: 162 ✭✭daedal


    cletus wrote: »
    ^^^^That's just showing off^^^^

    My question was asked above, what do you intend to use at the joints. I figure they need to be pretty accurate in order to maintain the frame dimensions. If you're buying them (can you buy them?), I presume that will dictate what material you can use for the frame


    Yes you are correct, these joints need to be accurate


  • Registered Users, Registered Users 2 Posts: 8,051 ✭✭✭cletus


    daedal wrote: »
    I designed them, I’m willing to give the machine code to this person free of charge, and help in whatever capacity I can. I don’t want money or to show off, I just want to say “I’ve built one before, if you need any advice (free of charge) consult me” Because I’ve built one and I can offer the files for free, but they need to build it to the spec I give them, I’m not willing to adjust it.

    Sorry, wasn't making a dig, should have put a smiley face there.

    I think it's very impressive, my comment was meant in good faith


  • Registered Users, Registered Users 2 Posts: 162 ✭✭daedal


    cletus wrote: »
    Sorry, wasn't making a dig, should have put a smiley face there.

    I think it's very impressive, my comment was meant in good faith


    Sorry man, I possibly misread the tone in your comment. If OP is willing to communicate I will help as much as I can. I don’t want any financial gain.


  • Posts: 0 [Deleted User]


    Hi all!

    Apologies for radio silence! Internet is awful in East Mayo.

    So I made the plans, figured out the bevel degree I needed and am going at a very slow and steady pace (I want this to last for the shutdown!

    I'm using 2x1 timber, and it should have a diameter of just under 4 metres.

    I made one prototype pentagon, and am not 100% happy with it as the wood was so wet, the screws that went into the grain didn't hold.

    One of the problems I had was the 2" edge of the timber, as my table saw wouldn't cut through all the way along the bevel, so I trimmed them down to 45mm and it was fine.

    I decided to cut down the 4.8mtr lengths down to near enough size (leaving at least an inch over for shrinkage) as they would be easier to stack and air.

    I know it'll take a long time to dry them properly (especially in Mayo weather!) but with them being treated already, I hope they'll be good enough to hold a screw in in about a weeks time!

    I ordered a digital inclinometer which should arrive next week, so I can fine tune the angles on my table saw and chop saw for the cutting angles I need.

    As for now, I'm learning sketchup, as I would love to get into 3D design and this is a pretty easy (but advanced for a beginner) project to design. I tried doing it last week, but the rotate tool was the devil and I couldn't get it to piece together properly.

    Thanks for all the input, love the cardboard dome!


  • Posts: 0 [Deleted User]


    dunno about the wood sorry! can I ask what kind of connectors you're using though, or made any progress yet?

    Hi! I'm not planning on using connectors, I'm planning to construct them with bevelled edges


  • Advertisement
  • Posts: 0 [Deleted User]


    On a budget or not , why not consider a wood preserver such as Protim E, Barrettine Premier, Cuprinol Ducksback, Osmo, Sika and/or Ronseal Total etc.
    Solvent based or Water based your choice.
    Apply to framing members before assembly and let it dry and off gas and you will be ready to frame.


    Yep. I am definitely going to stick some wood preserver on, once all the wood is cut


  • Registered Users, Registered Users 2 Posts: 8,051 ✭✭✭cletus


    daedal wrote: »
    Sorry man, I possibly misread the tone in your comment. If OP is willing to communicate I will help as much as I can. I don’t want any financial gain.

    No problem, tone can be hard to communicate via text.

    The second part of my post was directed at the OP. I'm not even sure you could buy the joints even if you wanted to.

    As an aside, could your design be altered to allow for 2x1 to be attached instead of the cardboard tubes


  • Posts: 0 [Deleted User]


    cletus wrote: »
    No problem, tone can be hard to communicate via text.

    The second part of my post was directed at the OP. I'm not even sure you could buy the joints even if you wanted to.

    As an aside, could your design be altered to allow for 2x1 to be attached instead of the cardboard tubes


    I'm constructing without hubs or struts, so should look like this:Po_dgZQQ3YT9DzD9rnnwNhiagd7BmZLRlxG60Ko6z18yOE-FxuMiNUSCQlbN8nIddLAhl6WxZOdNp1syJHQ0EnICE1kpgS-zEucTAZip6e5PeW18h6R2lXOFLKbvDOp_MoQlhTvC6wwk=w5000-h5000


  • Posts: 0 [Deleted User]


    While I'm waiting on the inclinometer to arrive, I restacked the wood to dry. I have no workshop here, so have to take advantage of the weather when I can.

    I'll leave that now for a week or so, and hopefully start trimming down wood next weekend.


  • Registered Users, Registered Users 2 Posts: 4,035 ✭✭✭tabby aspreme


    Where did you get the wood, was it direct from a sawmill


  • Posts: 0 [Deleted User]


    Where did you get the wood, was it direct from a sawmill

    Local building supplier. Awful stuff.


  • Registered Users Posts: 62 ✭✭Stanirish


    the sligo woodturners chapter made one of those last year, in the back garden of Danny Mc Geever house I think, in sligo town, in case you nee any help or advise from them - I think their contacts are public on the irish woodturners website


  • Registered Users, Registered Users 2 Posts: 2,804 ✭✭✭recipio


    What about pressure treated softwood. ? They have removed the nasty chemicals and the stuff is suitable for use in gardens. A hardwood like Iroko would be ideal - but its pricey and you need a planer thicknesser.;)


  • Posts: 0 [Deleted User]


    Have to say, the wood is drying nicely. Not doing anything more until the inclinometer arrives.

    So today, made the daughter a swing. She's only delighted with it.

    93223422_10156926756002056_5470567129872859136_o.jpg?_nc_cat=102&_nc_sid=110474&efg=eyJpIjoidCJ9&_nc_oc=AQk9Mxp0eMw7Kd4zEGV2lxkX3c9zVZGpM1b-tj3ALP6LEVd3Q1o_1BckztpwdwDdB_Q&_nc_ht=scontent.fdub3-1.fna&_nc_tp=14&oh=75a74eded1e0b38045d813dd7255d285&oe=5EBADB37


  • Registered Users, Registered Users 2 Posts: 1,464 ✭✭✭Double Barrel


    Proof is in the pudding the young lady is enjoying the fruits of your labor. :D:):):D:)


  • Advertisement
  • Registered Users, Registered Users 2 Posts: 379 ✭✭mobfromcork


    Hi all!

    Apologies for radio silence! Internet is awful in East Mayo.

    So I made the plans, figured out the bevel degree I needed and am going at a very slow and steady pace (I want this to last for the shutdown!

    I'm using 2x1 timber, and it should have a diameter of just under 4 metres.

    I made one prototype pentagon, and am not 100% happy with it as the wood was so wet, the screws that went into the grain didn't hold.

    One of the problems I had was the 2" edge of the timber, as my table saw wouldn't cut through all the way along the bevel, so I trimmed them down to 45mm and it was fine.

    I decided to cut down the 4.8mtr lengths down to near enough size (leaving at least an inch over for shrinkage) as they would be easier to stack and air.

    I know it'll take a long time to dry them properly (especially in Mayo weather!) but with them being treated already, I hope they'll be good enough to hold a screw in in about a weeks time!

    I ordered a digital inclinometer which should arrive next week, so I can fine tune the angles on my table saw and chop saw for the cutting angles I need.

    As for now, I'm learning sketchup, as I would love to get into 3D design and this is a pretty easy (but advanced for a beginner) project to design. I tried doing it last week, but the rotate tool was the devil and I couldn't get it to piece together properly.

    Thanks for all the input, love the cardboard dome!

    Hiya,
    Following this with interest. Was toying with the idea of trying to make a geodesic greenhouse for the last while but not quite ready to put it in yet. Have to finish off another few bits first.
    You mentioned in this post that your saw wouldn't cut through the 2 inch wide pieces when it was bevelled. Was it not reaching the bottom of the piece or what?
    Did you use the acidome.ru website for the calculations for the lengths and angles etc? They have a Facebook group where members post build of various geodomes - lots in South America, some in Spain which are amazing but all mainly in warmer climates than ours. Have you a plan for covering it when it's built?
    Your swing looks great.


  • Posts: 0 [Deleted User]


    Hiya,
    Following this with interest. Was toying with the idea of trying to make a geodesic greenhouse for the last while but not quite ready to put it in yet. Have to finish off another few bits first.
    You mentioned in this post that your saw wouldn't cut through the 2 inch wide pieces when it was bevelled. Was it not reaching the bottom of the piece or what?
    Did you use the acidome.ru website for the calculations for the lengths and angles etc? They have a Facebook group where members post build of various geodomes - lots in South America, some in Spain which are amazing but all mainly in warmer climates than ours. Have you a plan for covering it when it's built?
    Your swing looks great.

    The saw wouldn't cut through the 2 inch high rough timber cleanly, as some lengths are naturally longer than 2 inches.

    I spoke to someone who has made a few geodesic domes to help me figure out the qangles. I'm using a 10 degree cut for the bevels.

    I'm covering it in good quality polythene when it's ready. I'll be covering each triangle of wood individually, as opposed to a full pentagon, as I think it'll be cleaner and tighter. I also like the fact if 1 gets damaged, I can take out that triangle and the recover it. It'll take longer, but time is the one thing I have more than enough of!

    Thanks,


  • Registered Users, Registered Users 2 Posts: 49 BackInTown


    Intrigued by this thread - I have an allotment and have been considering a tunnel for a while (it's on the list, but it's a long list :) ). Something like this would certainly "stand out" from the rest of the home made glass houses and standard tunnels at the allotments. Please keep us up-to-date.

    A couple of questions to the thread generally:

    Is there a perceived advantage over a tunnel or traditional glass house design? For growing in? Aside from, for example, the footprint suiting a space better, aesthetics etc.

    And @pappa dolla if you individually wrap each triangle of your dome, will you, and how will you seal between the triangles?


  • Registered Users, Registered Users 2 Posts: 379 ✭✭mobfromcork


    This is a good place to start if you're considering it I think
    https://northernhomestead.com/how-to-build-a-geodome-greenhouse/

    I have been thinking / reading about it for a good while but haven't done anything yet. They cover a few triangles at a time. They have done it two different ways (look at the other articles below to see). There so another guy based in the UK who has a lot of info online as well. He has a website which sells components etc but a lot of the designs and covering are ok it to see as well - http://geo-dome.co.uk/
    Also, there is a great free calculator on www.acidome.ru where you put in your dimensions, wood you are using and type of joints/connectors and it gives you the cuts/measurements.
    I'm thinking if trying a small chicken coop first and if it works ok then going for the greenhouse dome. People do seem to have trouble keeping them waterproof when doing each triangle separately - in the first video above, they overlap the plastic covering and put on a thin external lat to secure it.
    I've seen other methods where they use sealant between each piece of wood but in our climate I'd be hesitant to do that.
    I'm still reading/researching so am very interested in any other feedback that the OP or others have on their experiences. In a lot of ways, it's probably easier and as cost effective to buy a half decent polytunnel but I like the idea of the dome and we are in what can be quite a windswept area and the domes are meant to be pretty decent for that.


  • Posts: 0 [Deleted User]


    I'll be honest, the aesthetic was first for me. They look awfully pretty. After that the wind resistance is pretty good, it'll be in an exposed area, and the wind buffeting off a solid wall wasn't something I liked the sound of.

    The individually wrapped triangles has a better aesthetic, it's apparently easier to apply heated plastic over it. As for leaks, I purchased poly weather proof tape, so will be putting that on the outside.
    I'm taking a lot of inspiration came from geodome.co.uk who was kind enough to send me old plans that I altered.
    And the triangles being individually wrapped came from: https://astriddegroot.wordpress.com/2011/01/16/dome-greenhouse/

    I really hate baggy plastic in greenhouses...

    All my wood has now been trimmed down to 44mm thickness, so even though the sun is shining, I have some real work to do, so will leave the bevelling until tomorrow.

    My inclinometer arrived today, and it is great. I have no idea how you would make one of these without one.

    Link here: https://www.amazon.co.uk/gp/aw/d/B07D8TJF4P?psc=1&ref=ppx_pop_mob_b_asin_title


  • Registered Users, Registered Users 2 Posts: 379 ✭✭mobfromcork


    That's looks like a good set up. Where did you get the Polly tape please Pappa Dolla? It would be easier to assemble everything like that on the ground for sure and I agree that it would be neater wrapping each one individually.
    How will you use the inclinometer please? Is it for getting the angles of the triangles right when they are being screwed in


  • Posts: 0 [Deleted User]


    That's looks like a good set up. Where did you get the Polly tape please Pappa Dolla? It would be easier to assemble everything like that on the ground for sure and I agree that it would be neater wrapping each one individually.
    How will you use the inclinometer please? Is it for getting the angles of the triangles right when they are being screwed in

    Plastic and tape from polyrope.ie

    The inclinometer measures the blade on the table saw and chop saw, so you use it for cutting precise angles.


  • Posts: 0 [Deleted User]


    Sorry for lack of updates, had some real work and family stuff...

    Anyway, basic structure complete. Just have to make the door, frame and put a window in and then cover each triangle with plastic.

    I covered it with black plastic tonight, as there's rain due soon. Glad to say it's sturdy enough for me to swing out of those tiny beams!
    94978925_10156980959692056_3653779118803124224_o.jpg?_nc_cat=106&_nc_sid=110474&efg=eyJpIjoidCJ9&_nc_oc=AQlCnRVysCdZl86rea_a-oV3YkY6BNN2hO2AkdkmeyvOLdBSMfggj-x2gVD8DpxYkoA&_nc_ht=scontent.fdub3-1.fna&_nc_tp=14&oh=1ceb89a0fb2817c6f1fa0402d90f53b0&oe=5ECDEDB6


  • Advertisement
  • Registered Users, Registered Users 2 Posts: 379 ✭✭mobfromcork


    Good to hear it's going well. Would love to see a few pictures when you get a chance. Did you make the frame to fit around the window or get a window to fit the frame?


  • Posts: 0 [Deleted User]


    Good to hear it's going well. Would love to see a few pictures when you get a chance. Did you make the frame to fit around the window or get a window to fit the frame?

    I'll have to sort out some more pics alright.

    I'll take out the equalateral triangle opposite where the door is going and make a window to fit that. I'll fit the window with some old pivot hinges I found.


  • Registered Users, Registered Users 2 Posts: 379 ✭✭mobfromcork


    Hi Pappa Dolla, did you cover your Dome yet? Happy with the covering from Polyrope?
    Any pros/cons that you found for covering one triangle at a time? Still in the planning stage here but need to order timber for another project as well.
    I made up a polytunnel last week from two old trampoline frames so might get that covered while I get going on making the dome.
    Mark


  • Posts: 0 [Deleted User]


    Hi Pappa Dolla, did you cover your Dome yet? Happy with the covering from Polyrope?
    Any pros/cons that you found for covering one triangle at a time? Still in the planning stage here but need to order timber for another project as well.
    I made up a polytunnel last week from two old trampoline frames so might get that covered while I get going on making the dome.
    Mark


    Hey Mark,

    Yep, it's up! I'm very happy with the poly from polyrope. It's not as clear as I thought it would be, but it retains the heat well!

    Pros: it's beautifully stretched. I also applied it with heat, sing an old plug in flat radiator on its back.
    If something smashes through the plastic, I can just take out one triangle and recover it.

    Cons: I suppose the biggest is it takes more time. I think I got it down to about 8/9 minutes a triangle, something like that.
    There's also probably more waste as you can't really tessellate odd shaped triangles.

    We had a bit of a storm last weekend with gusts of 110km. To say my nerves were gone would be an understatement!

    I don't know if I mentioned it, but the MIL wanted this temporary, in case she didn't like it, so it's built on u levelled ground with no foundations!

    Hearing of the storm the previous Monday, I ordered 1 mtr lengths of 10mm threaded bar. They arrived Wednesday. I drilled a 12mm hole into the bottom planks, and pushed down the bars. I only did this on 3 of them, 2 by the door and one opposite. All was well the day of the storm, but when the wind died down, I rn in to see if there was any movement, and while I was in a huge gust blew open the door (minor fix required) and tried to lift it off the ground. That was terrifying!

    As I haven't made this to any plan, I'm still working (battling) with triangular windows, trying to source autovents that will work on a triangular window and figure out the door, which I'm not happy with at the moment.

    There's definitely worse ways to spend lockdown, and I have a couple of people interested in buying one if I make any more.

    I'm moving into a house with a workshop over the next few weeks, and will make up 2 (I think it'll take as long to make 2 as it does one when it comes to setting up jigs, beveling wood etc). One for us to grow in, and one for us to try and sell. The one I made here is in the front garden, and you can hear the cars slowing down to get a good look at it.

    98003275_10157044859977056_4409607218740068352_o.jpg?_nc_cat=103&_nc_sid=110474&efg=eyJpIjoidCJ9&_nc_oc=AQk3sjrSSaYRuqJk0Cr7vADT60rfTQFwEr3FyWJyZB4c2LrRJjlYMqpLtPt4NTKTww0&_nc_ht=scontent.fdub3-1.fna&_nc_tp=14&oh=90745dc2a7c3c86610bc2c39a75e70e7&oe=5EF0CB6B

    And in Party Mode:
    97591554_2931583416961971_809120981858648064_o.jpg?_nc_cat=109&_nc_sid=1480c5&efg=eyJpIjoidCJ9&_nc_oc=AQktNio-1bisulXaYjJXo8NVt9aMOvUnN9PZcJ36UVKGqQlusugsJ3p6VLHNYoQuQ9c&_nc_ht=scontent.fdub3-1.fna&_nc_tp=14&oh=eab633efef1877b1d67289770c872ae4&oe=5EF2707C


  • Registered Users, Registered Users 2 Posts: 379 ✭✭mobfromcork


    Thanks very much for replying. It looks absolutely class!
    Good to hear the covering went ok. After you did each individual triangle how did you attach them to each other?
    Did you seal between each triangle externally? Any thoughts on the dimensions of the timber you used? Will you change anything for the next two do you reckon?
    Being inside as it's being lifted up by the wind doesn't sound like a barrel of laughs! I'll have to figure a way to secure mine(when I make it) to the ground quite securely. The idea of a bar sounds good, mine should be permanentish so might bury the end of it in concrete.

    Thanks again


  • Posts: 0 [Deleted User]


    Thanks very much for replying. It looks absolutely class!
    Good to hear the covering went ok. After you did each individual triangle how did you attach them to each other?
    Did you seal between each triangle externally? Any thoughts on the dimensions of the timber you used? Will you change anything for the next two do you reckon?
    Being inside as it's being lifted up by the wind doesn't sound like a barrel of laughs! I'll have to figure a way to secure mine(when I make it) to the ground quite securely. The idea of a bar sounds good, mine should be permanentish so might bury the end of it in concrete.

    Thanks again

    Cheers!

    Each triangle was screwed together (countersunk first) generally about 5 or 6 screws in each side.

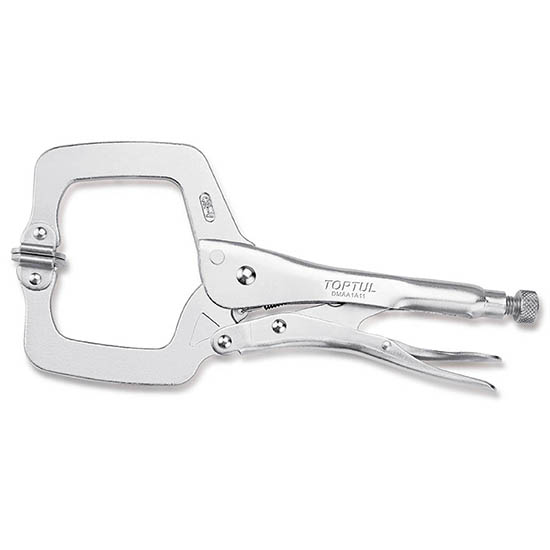
    As an aside do not even attempt it without clamps like these:

    p_161017_04573.jpg

    I started without them, and it was a massive pain in the hole.

    After it was assembled I used poly tape down the seams on the outside to stop water getting in.

    I used 2*1 and will use it again, I like the look and it's strong enough. I'd need a bigger table saw if I was to go bigger as well.

    My next plan is to move it, build a 6" deep trench, 9" wide, put threaded bar, into 3*2's and plant in the trench. Fill the trench with gravel, make a 10 sided shape from 2*2, with the metal bars going through that. Place the dome on top of that, and bolt it in place. Load of hassle tbh, and a mistake I won't make next time. Ground prep will be done before assembly.

    The loose gravel is for drainage. There's no way there won't be a marsh around the perimeter with rain and nowhere else for the water to go. Concrete may have you the same problem. Best of luck with it. This was a fun project, but I'm really looking forward to my next two.


  • Advertisement
  • Registered Users, Registered Users 2 Posts: 6,932 ✭✭✭SouthWesterly


    Looks a great job. My wife is "encouraging" me, forcefully, to get one. :D

    Can you give us some idea of your materials list and cost?


  • Closed Accounts Posts: 1,049 ✭✭✭GinSoaked


    I've had this "kit" in my Amazon list for a long time https://www.amazon.co.uk/dp/B01KA2ASH2/ it might suit someone who doesn't have the same skill level as the OP. Full kit instructions here

    Kit seems a little expensive and getting a good cover on it isn't going to be as easy as the OP's design.


  • Posts: 0 [Deleted User]


    GinSoaked wrote: »
    I've had this "kit" in my Amazon list for a long time https://www.amazon.co.uk/dp/B01KA2ASH2/ it might suit someone who doesn't have the same skill level as the OP. Full kit instructions here

    Kit seems a little expensive and getting a good cover on it isn't going to be as easy as the OP's design.

    I saw that. The kit is just the hubs. It does seem expensive for what it is.

    As for covering it, the plastic could be put over and folded into shape, with a heat gun you could then "weld" the plastic together. It wouldn't look as neat mind you.


  • Posts: 0 [Deleted User]


    Looks a great job. My wife is "encouraging" me, forcefully, to get one. :D

    Can you give us some idea of your materials list and cost?

    As parts of it were cobbled together, I don't have an exhaustive list, but this was a 4mtr dome, with 60cm pony wall. Overall I would imagine it would come to about 400 quid. I'll know more next time, as I have to order everything.


  • Closed Accounts Posts: 1,049 ✭✭✭GinSoaked


    As parts of it were cobbled together, I don't have an exhaustive list, but this was a 4mtr dome, with 60cm pony wall. Overall I would imagine it would come to about 400 quid. I'll know more next time, as I have to order everything.

    Can you say how many feet of 2 x 1 you use then I'll see what the trade (cash) price is at the local timber yard.

    For the dome and not the upstand from the list for the kit that would be 30 short and 35 long lengths so really only need the lenghts of the short and the long section x2 because you are making up individual triangles . The timber yard does 2 x1 timber in 16 ft lengths (less the usual bit for nominal lengths) so I can work it out making max use of the timber.

    Edit - in italics


  • Advertisement
  • Posts: 0 [Deleted User]


    GinSoaked wrote: »
    Can you say how many feet of 2 x 1 you use then I'll see what the trade (cash) price is at the local timber yard.

    For the dome and not the upstand from the list for the kit that would be 30 short and 35 long lengths so really only need the lenghts of the short and the long section x2 because you are making up individual triangles . The timber yard does 2 x1 timber in 16 ft lengths (less the usual bit for nominal lengths) so I can work it out making max use of the timber.

    Edit - in italics

    I used the calculator at http://geo-dome.co.uk/2v_tool.asp. if you're using hub and strut, you'll use a lot less material than I did


Advertisement