Advertisement
If you have a new account but are having problems posting or verifying your account, please email us on hello@boards.ie for help. Thanks :)
Hello all! Please ensure that you are posting a new thread or question in the appropriate forum. The Feedback forum is overwhelmed with questions that are having to be moved elsewhere. If you need help to verify your account contact hello@boards.ie

Painting MDF

Options
  • 05-10-2009 10:45pm
    #1
    Registered Users Posts: 4,504 ✭✭✭


    Ok guys, hopefully some of ye can help me with this one.

    Basically I have no idea what so ever on how to apply a 'proper' paint finish to raw MDF.

    What I have is two ends of a childs rocking crib, both 18mm plain MDF (I know, maybe not the best material to use, but its for a child from 0 to 6 or 7 months, so they wont be chawing on it).

    Today I picked up a can of MDF sealer, I assumed that the first stage was to seal the MDF so that it wouldnt absorb the paint. So, I apply the sealer (I'll probably spray this on, I assume it can be sprayed?). It says on the tin (its Ronseal) that the sealer can be painted over directly with a top and final coat, or varnished over. But the thing is, what sort of paint should I be looking for? I want something that I can pick up in a hardwares and something thats child safe, non toxic, etc.

    Can I apply any paint over the sealer? ie paint suitable for application to metal and wood. The instructions on the Sealer also say that water based paints can be used, are these the same type paints that you'd paint your walls at home with?

    See, told you I knew nothing about this area of painting! :D


Comments

  • Registered Users Posts: 471 ✭✭aerosol


    Hi Coppy, I've used sealer and not,both with pretty much the same result(sh*te,but thats just me with finishing:D) Seriously though,the last few times I've painted mdf I've not bothered with a sealer but used a normal undercoat.

    Got good results from Japlac gloss paint,both using sealer and not,its child safe.Think I got it in woodies somewhere.

    Surprised your using Mdf mind;):eek::D


  • Registered Users Posts: 4,504 ✭✭✭SpitfireIV


    I read a good 'how to' on finishing MDF, where a guy swears by using exterior PVA adhesive watered down to 30% PVA 70% water, this is then brushed on, left to dry, sanded with 600 grit sandpaper then a top (final) coat applied! He reckons the PVA/water mix gives perfect ashesion to oil and water based paints! Having had a look at the tin of sealer I got, it looks very like watered down PVA and smells like it too!

    I dont particularly like using MDF, but if I want to start making a bit of money I have to be knocking things out fast and cheap......well, relatively cheap! :p. To balance off the nasty MDF though I am using 12mm Birch ply for the side panels! ;)


  • Registered Users Posts: 471 ✭✭aerosol


    Yep,I say the pva would work well,lots cheaper than the sealers too:)


  • Registered Users Posts: 226 ✭✭ennisa


    Croppy, made some MDF radiator cabinets recently and I just painted them with regular interior satin finish paint, white in this case, same as you would use on an interior door. Two coats, no sealer and it was fine. I would say though for darker colours that you might want to seal as and 'end grain' or edges, or areas that you have profile with a router will absorb the paint at a different rate and will come out darker than the flat sides. Not noticable in the white but my sister painted hers a wood effect brown and the edges and routed profiles are waaay darker. PVA sealer sounds like it would be good and save you spending a wedge on the same thing in a fancy tin with a different name!

    Correct me if I am wrong but I have read that nearly all paint or finishes sold for use in the home are non-toxic once they are fully cured. I could be wrong though so might be best to check out the manufacturers product info for anything you decide to use.

    I just noticed aerosols comment about you using MDF and I have to agree with him. I have made 4 radiator cabinets from 1/2" and 3/4" MDF, 3 small 1 large and I am not making any more for anybody unless they are solid timber. Even if it is white pine and then painted. The dust is awful, the cleanup is awful, you can't really plane it or shape it or cut joints with it, aggh it drives me mad. I know it's stable and it is flat but I don't have the money for the proper dust extraction (that I really should be using ) and I would rather work with real wood and be able to cut actual joints rather than glue and screw everything ( although the kregg pocket hole kit that I picked up to do them has been well worth the find ) so flat and stable be damned i'll glue up pine panels before I go down the MDF route again!

    hth


  • Registered Users Posts: 4,504 ✭✭✭SpitfireIV


    I gave the Satinwood a go, white, only thing though is it takes so long to dry, must look and see if there is a quick drying version availible. The Aldi sprayer seemed to do the job fine.

    Yeah the mdf is nasty, dirty stuff alright, but its cheap and quick and the most appropriate material for the current project. I'll throw up a few pics later......actually, no I wont, I wont be able to assemble the crib due to the wet paint, darn! Its a 'knock together' crib, held together by wedges, so it can be easily taken apart and stored, or transported easy.


  • Advertisement
  • Banned (with Prison Access) Posts: 6,869 ✭✭✭Mahatma coat


    I've done a bit with MDF meself, an mate of mine makes those VJ wall lining sheets, he has a curtain primer which is cool.

    aaanyway, last time I used MDF was to make some blackboards, I had the same problem of how to get a decent finish, I tried undercoats and primers etc but the product I found best was 'Car Primer' in aerosol cans, ya know the stuff thats a sort of spray on putty, gave a beautiful finish, only a light sand required for the finished product


  • Closed Accounts Posts: 2,045 ✭✭✭ttm


    Picked up a leaflet in a hardware store today when I saw the tag line "Makes Paint Stick to Shiney Surfaces ... Without Sanding". The product is E.S.P (Easy Surface Prep) seems you just wipe it on with a cloth leave for 2hrs then paint.

    OK so not used it but I can recommend several other products in the Owatrol (www.igoe.ie) stable, so would expect it to live up to the claims.

    HOWEVER ;) on further reading the same leaflet had details of E-B another Owatrol product which is a paint additive which is supposed to do away with the need for a stabalising coat on Dodgy Surfaces. Examples of use included MDF so perhaps another product worth checking out, only works with water based paints.


  • Registered Users Posts: 124 ✭✭dg647


    I painted MDF, used Bullseye Primer and it done the job. It's expensive but worked a treat.


  • Registered Users Posts: 2,367 ✭✭✭jack of all


    I've made a couple of bookshelves for my daughters' bedrooms, using MDF almost exclusively. True, it's pretty horrible to work with but budget and ease of finishing made this the only choice for me. I sealed all the cut and worked edges (routed or planed) with a watered down PVA solution, maybe a couple of coats in all. I found this strengthened the vulnerable corners and edges, and gave a good finish which would allow further sanding. I then followed this up with a coat of oil based undercoat and two full coats of oil based eggshell finish, lightly denibbing between coats. The eggshell has slightly more sheen than satinwood, is oil based and I found it easy enough to get a good finish. It's supposed to be more hard wearing than satinwood. Personally I find that any of the water based finishes available to the non- trade are pretty awful! Although the finish is definitely hand applied (how much would it cost to get something like this sprayed?) I was very happy with the result. In short I'm a fan of using watered down PVA as a sealer.


  • Registered Users Posts: 4,504 ✭✭✭SpitfireIV


    Looks like a nice unit Jack, well done!

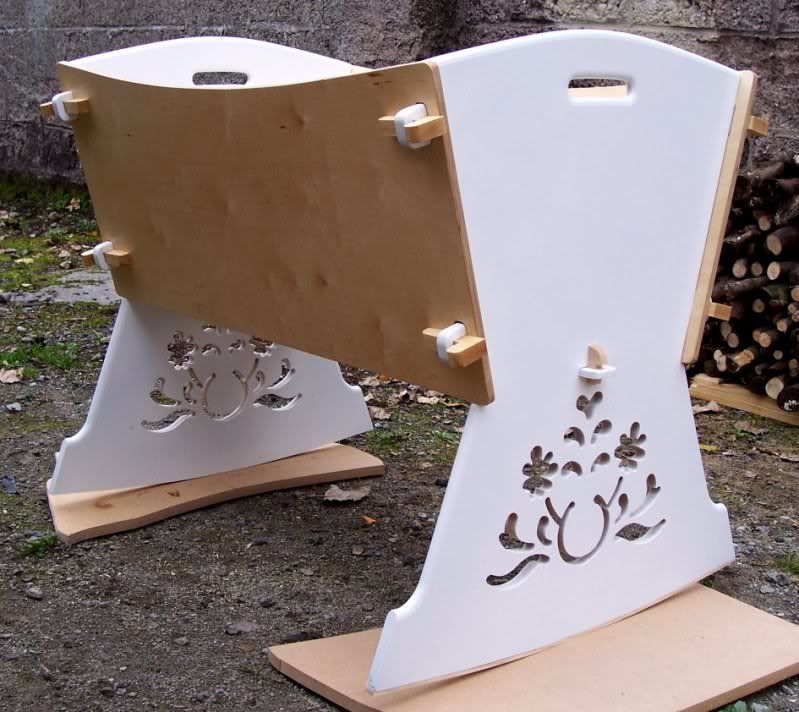
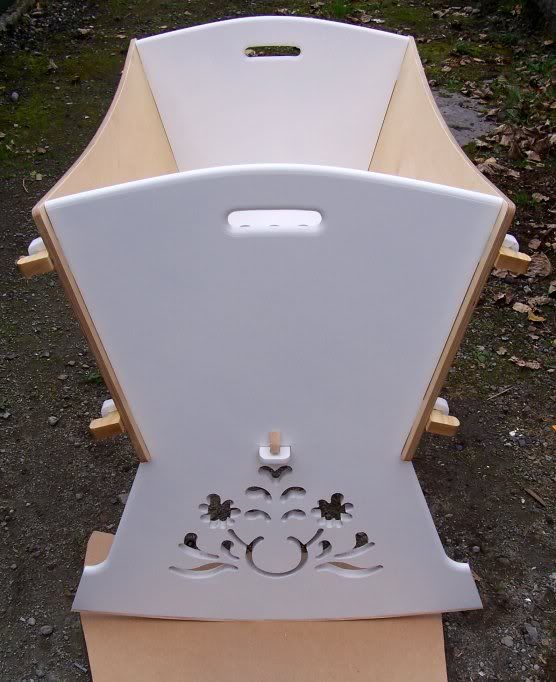
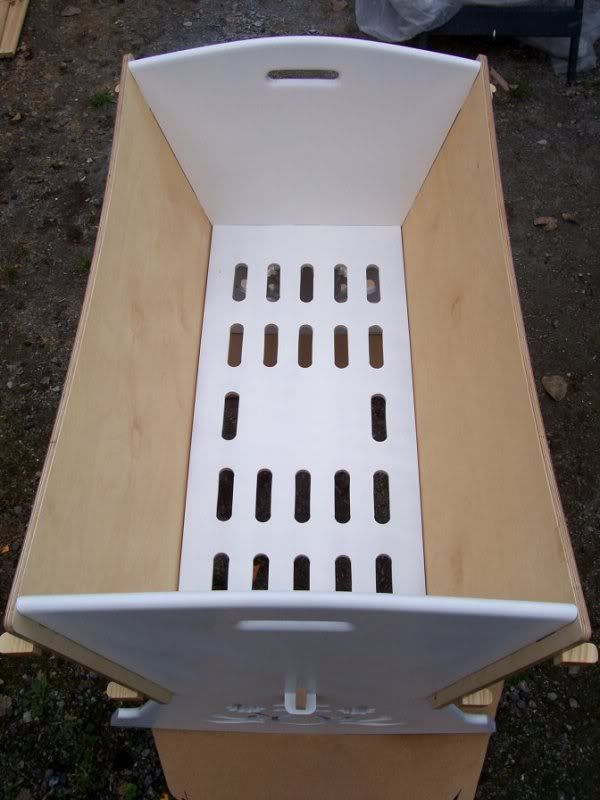
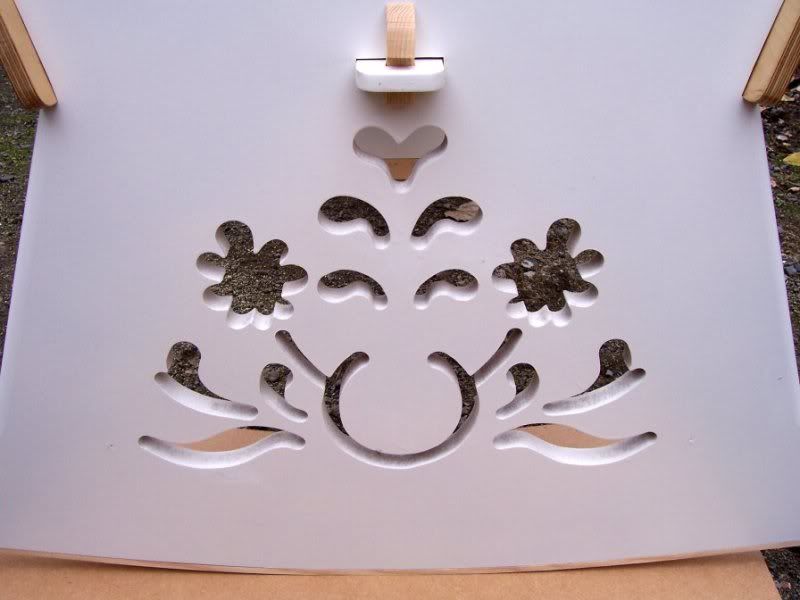
    Well I went with the MDF sealer and over that water based, ivory, satinwood. It worked out fine, its just my spraying technique that needs a little more work, also, if you take a look at the images below, the design didnt help as it tended to gather paint and then run! Better design and forward planning was needed here, also, the design was too small to get in and sand.

    Anyway, a few pics below for your viewing pleasure! Its a knock together crib and can be assembled/disassembled in a minute or less. The wedges, made of ash, hold the side panels secure and once knocked well in provide a good tight grip and can only be taken back out with a mallet. The side panels are 12mm birch ash and came out really well after 3 coats of Danish oil. Unfortunately the inside face of the ply has a few plugs in it, but it was the only Birch ply that I could get locally and easily.

    crib1.jpg

    crib3.jpg

    crib4.jpg

    crib2.jpg


    I'll see if there are any takers and maybe get another few together, I have templates so its just a matter or chopping out the parts and routing them down to size. Maybe do a few different end panel design, colors etc.


  • Advertisement
  • Registered Users Posts: 2,367 ✭✭✭jack of all


    That's a lovely crib CroppyBoy, is the design your own? I could imagine there would be a ready market for these, it looks beautiful! Do I see a hardwood lipping on the bottom of the rockers? If so, great idea.


  • Registered Users Posts: 4,504 ✭✭✭SpitfireIV


    Cheers JOA, the design isnt 'entirely' my own, I seen the wedge idea on another crib, and they were fairly popular on antique cribs, when families were having lots of children, small houses and so they needed something that could be put together and taken apart when needs be. But apart from that there is only so much you can do with a rocking crib. I think there is some scope with this one and I'm going to try develop it further, and incorporate more features or give it a longer life than just the 7/8months. The only reason I made this one was to sell locally and get a bit of dosh, so watch out for MkII someday :p

    Yep, thats an ash lipping on the base, I only noticed in the picture that I only have it on one end, I must have took the other one off prior to the phot been taken.


  • Registered Users Posts: 471 ✭✭aerosol


    Looks really good Croppy,I think the oiled birch ply contrasts well with the coloured end panels.

    A real bonus being quick n easy to knock up/down.What did you cut out your design with?

    I was hoping using a sprayer would help my finishing:( I need loads more practice!


  • Registered Users Posts: 4,504 ✭✭✭SpitfireIV


    aerosol wrote: »
    Looks really good Croppy,I think the oiled birch ply contrasts well with the coloured end panels.

    A real bonus being quick n easy to knock up/down.What did you cut out your design with?

    I was hoping using a sprayer would help my finishing:( I need loads more practice!


    Thanks! The design was cut with a 10mm straight cutter with a roller bearing. The design is cut into the master template, so, I fix this to the 18mm end panel, drill a few holes and route out the design. Quick and easy, although, for the next one I'm going to go with a simpler, bigger design, I cant get the design painted, or sanded properly! It'd nearly want to be dipped to get it covered properly.


  • Closed Accounts Posts: 2,045 ✭✭✭ttm


    Thanks! The design was cut with a 10mm straight cutter with a roller bearing. The design is cut into the master template, so, I fix this to the 18mm end panel, drill a few holes and route out the design. Quick and easy, although, for the next one I'm going to go with a simpler, bigger design, I cant get the design painted, or sanded properly! It'd nearly want to be dipped to get it covered properly.


    Design painted? Guess you mean the routed detail but if not why not make a stensil design for the ends?

    Smart arse comment about the design - if you have 4 wedges each side which is as good as having a diagonal brace why do you need the wedge on the base. Better still from a design point of view (rather than asthetics) the sides could be keyed to the ends so all you needed were the wedges on the base.

    But however smart my comments great job and better than I could manage :)


  • Registered Users Posts: 2,367 ✭✭✭jack of all


    Really nice "honest" design and lots of scope for playing around with it too; it's a deceptively simple in appearance but that's the trick with a good design. Fair play to you, I'd love to try something like that myself!


  • Registered Users Posts: 4,504 ✭✭✭SpitfireIV


    ttm wrote: »
    Design painted? Guess you mean the routed detail but if not why not make a stensil design for the ends?

    Smart arse comment about the design - if you have 4 wedges each side which is as good as having a diagonal brace why do you need the wedge on the base. Better still from a design point of view (rather than asthetics) the sides could be keyed to the ends so all you needed were the wedges on the base.

    But however smart my comments great job and better than I could manage :)

    Yeah, its hard to get a good coating of paint around the routed design. Its all about learning, and from making this I leaned never to make such a small detailed routed design, it just doesnt work! :P

    The base wedges I guess arent needes, but, they help with assembly and makes it easy as a one person job, it makes it pretty stable and secure even without the sides. Sounds like an interesting point you raise there though, I'll take it into consideration, thanks! ;)
    Really nice "honest" design and lots of scope for playing around with it too; it's a deceptively simple in appearance but that's the trick with a good design. Fair play to you, I'd love to try something like that myself!

    Thanks, I'll let you know how and if this develops.


  • Registered Users Posts: 471 ✭✭aerosol


    Maybes a tiny round over within the pattern might help with spraying,also 'soften' the design a wee bit

    For sanding,a bobbin sander would get into a slightly larger design and do the job in no time,maybes;)


  • Registered Users Posts: 4,504 ✭✭✭SpitfireIV


    I hear ye Aerosol! ;) A few good ideas there, cheers. One of those little sanding drums on a dremel might do the trick, it'd want to be a fairly fine grade, or well wore down of course.


  • Registered Users Posts: 226 ✭✭ennisa


    Lovely, as usual :o)

    You made another Crib a while ago for a wedding present for your sister, the ash and walnut one ( the crib not your sister :D ) how did they like that?


  • Advertisement
  • Registered Users Posts: 4,504 ✭✭✭SpitfireIV


    Cheers Ennisa, yeah thats right, I made the Ash and Walnut one back in May (feels so long ago now!) for the brother and sister in law. The baby arrived last Saturday, so, has taken up residence in it :p. They loved it, particularly the sis-in-law whom is a crafty type person and loves hand made items and has an appreciation of the time and effort gone into it.

    4566_210867780590_776365590_7259258_3730681_n.jpg


  • Registered Users Posts: 533 ✭✭✭S.L.F


    Cheers Ennisa, yeah thats right, I made the Ash and Walnut one back in May (feels so long ago now!) for the brother and sister in law. The baby arrived last Saturday, so, has taken up residence in it :p. They loved it, particularly the sis-in-law whom is a crafty type person and loves hand made items and has an appreciation of the time and effort gone into it.

    4566_210867780590_776365590_7259258_3730681_n.jpg

    Croppy that is really beautiful.

    A lovely piece of work.

    If I was to make a comment about it I would say I feel the 2 bases should be a bit thicker.


  • Registered Users Posts: 4,504 ✭✭✭SpitfireIV


    S.L.F wrote: »
    Croppy that is really beautiful.

    A lovely piece of work.

    If I was to make a comment about it I would say I feel the 2 bases should be a bit thicker.

    Cheers SLF, yeah the rockers were raised by someone else also, a little bit more substancial wouldnt have done any harm.


Advertisement