Advertisement
If you have a new account but are having problems posting or verifying your account, please email us on hello@boards.ie for help. Thanks :)
Hello all! Please ensure that you are posting a new thread or question in the appropriate forum. The Feedback forum is overwhelmed with questions that are having to be moved elsewhere. If you need help to verify your account contact hello@boards.ie
Hi all,
Vanilla are planning an update to the site on April 24th (next Wednesday). It is a major PHP8 update which is expected to boost performance across the site. The site will be down from 7pm and it is expected to take about an hour to complete. We appreciate your patience during the update.
Thanks all.

Best 2 player button layout for cabinet build

Options
  • 03-12-2019 7:09pm
    #1
    Registered Users Posts: 696 ✭✭✭


    Hi all

    I'm hoping ye can help.

    Long story short I've got roped into building an arcade cabinet for a family member for Christmas.

    I should have probably come here first for advice but I've allready made a start.

    So far I've gotten

    Bitcade minataur case
    Raspberry pi running retropie
    Screen /speakers /power supply.
    Button and joystick kit from arcade world.

    Cabinet is built and looking good with space invader decals .
    Retropie is also up and running.

    My question is what is the best button layout? To be honest I haven't a clue, pacman was advanced as I got with arcade games back in the day.

    I've attached a picture of the build so far.

    6 holes per player
    Then 2 holes above each set of player buttons.
    Giving 8 total per side.

    In the kit I have
    3 green
    3 red
    3 yellow
    5 xblack
    3 X white
    1 X 1 player
    1 X 2 player

    I'm looking for advice on the button layout and also what to program each button to be.

    Thanks in advance


Comments

  • Registered Users Posts: 696 ✭✭✭Alfagtamini


    Pics of build so far

    And here's a link to the button and joystick kit I got


    https://www.arcadeworlduk.com/products/classic-arcade-joysticks-buttons-and-arcade-controller-kit-no2.html


  • Registered Users Posts: 5,780 ✭✭✭eddhorse


    This website helped me a lot:

    https://www.slagcoin.com/joystick/layout.html


  • Registered Users Posts: 696 ✭✭✭Alfagtamini


    eddhorse wrote: »

    Thank you, I found that site last night. Loads of great info on there .


  • Registered Users Posts: 34,426 ✭✭✭✭o1s1n
    Master of the Universe


    There's usually a bit of a wince in preparedness when someone makes a post like this with a home built cabinet, you'd be surprised how many of them go way over the top.

    Fair play for keeping it simple and clean. Less really is more when it comes to these things. Especially when it comes to buttons.

    A six button layout like you have is generally the best setup for a multi game cabinet.

    As a matter of interest, is there a reason you have two start buttons for each player? Usually only one is needed per person. (again, stick to that 'less is more mantra!')

    Just one thing to note, it's generally recommended to have the mounting screws for the joysticks hidden under the overlay so you can't see them. As they are now, they've potential to hurt someones hand and just get in the way.

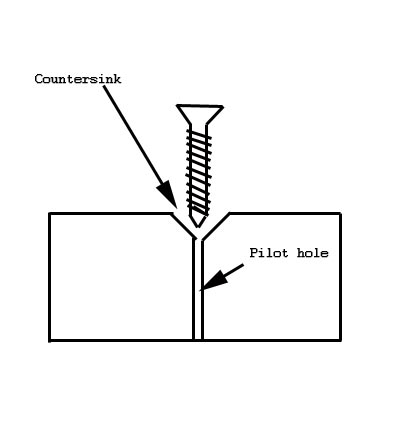
    You could countersink holes into the control panel, screw the joysticks in with countersunk screws so they sit flush and put the overlay on that, so you've a seamless control panel with no screws sticking out.


  • Registered Users Posts: 696 ✭✭✭Alfagtamini


    o1s1n wrote: »
    There's usually a bit of a wince in preparedness when someone makes a post like this with a home built cabinet, you'd be surprised how many of them go way over the top.

    Fair play for keeping it simple and clean. Less really is more when it comes to these things. Especially when it comes to buttons.

    A six button layout like you have is generally the best setup for a multi game cabinet.

    As a matter of interest, is there a reason you have two start buttons for each player? Usually only one is needed per person. (again, stick to that 'less is more mantra!')

    Just one thing to note, it's generally recommended to have the mounting screws for the joysticks hidden under the overlay so you can't see them. As they are now, they've potential to hurt someones hand and just get in the way.

    You could countersink holes into the control panel, screw the joysticks in with countersunk screws so they sit flush and put the overlay on that, so you've a seamless control panel with no screws sticking out.


    Thanks for your reply.

    I brought the cabinet from arcadeworld UK as a flat pack made by bitcade.

    The 6 button holes and the 2 Start buttons were allready pre drilled.

    As was the 4 holes for the joysticks. The current mounting screws are temporary. I've ordered some nice stainless steel dome head allen bolts to make it more appealing on the eye.

    Do you think the colour combo I've randomly picked for the buttons works ?

    Then in relation to programming what should each button do ?

    It's been an enjoyable build so far.


  • Advertisement
  • Registered Users Posts: 7,466 ✭✭✭Inviere


    o1s1n wrote: »
    As a matter of interest, is there a reason you have two start buttons for each player? Usually only one is needed per person. (again, stick to that 'less is more mantra!')

    Coin button I'd say. If the OP is using an JPAC/IPAC, you can use shifted functions, ie, start and button 1 together can be set as a coin function.


  • Registered Users Posts: 34,426 ✭✭✭✭o1s1n
    Master of the Universe


    Thanks for your reply.

    I brought the cabinet from arcadeworld UK as a flat pack made by bitcade.

    The 6 button holes and the 2 Start buttons were allready pre drilled.

    As was the 4 holes for the joysticks. The current mounting screws are temporary. I've ordered some nice stainless steel dome head allen bolts to make it more appealing on the eye.

    Do you think the colour combo I've randomly picked for the buttons works ?

    Then in relation to programming what should each button do ?

    It's been an enjoyable build so far.

    Ah I see! thought you'd put it together from scratch.

    I'd still go for the countersunk option for the joystick mounting screws if you can over anything dome headed. Flush is always better.

    You can easily do it with what you have. Would just mean drilling slightly into the top of the existing holes to make a countersink and then put the screws in as normal, like this;

    Countersink__pilot_hole.jpg

    You'll then have a lovely clean flush control panel.

    Colour wise it's personal preference really, but for me cabinets look better when you've got a solid colour for each player or a solid colour for all player buttons (and then a different colour for the start buttons)

    For yours, I'd stick to a colour palette in line with your artwork as you've got some really strong colours there. The yellow buttons really pop in your photo, might be worth considering that colour as one of them.

    Inviere wrote: »
    Coin button I'd say. If the OP is using an JPAC/IPAC, you can use shifted functions, ie, start and button 1 together can be set as a coin function.

    Ah yes, of course!


  • Moderators, Category Moderators, Computer Games Moderators, Society & Culture Moderators Posts: 34,528 CMod ✭✭✭✭CiDeRmAn


    My Atomiswave has those carriage bolts fastening down the control panel to the body of the cabinet.
    It means there are no slots on the surface, just a gentle dome per screw.
    Not sure how it might work in an MDF context, as in the hole it goes through would have to engage with the shape above the thread in order to allow it to be fastened tightly.
    51vL5lOm2SL._SX425_.jpg

    A minipac is a great buy as a keyboard encoder.
    Affordable too.
    https://www.arcadeworlduk.com/products/Mini-PAC-Keyboard-Encoder-Kit.html


  • Registered Users Posts: 696 ✭✭✭Alfagtamini


    o1s1n wrote: »
    Ah I see! thought you'd put it together from scratch.

    I'd still go for the countersunk option for the joystick mounting screws if you can over anything dome headed. Flush is always better.

    You can easily do it with what you have. Would just mean drilling slightly into the top of the existing holes to make a countersink and then put the screws in as normal, like this;

    Countersink__pilot_hole.jpg

    You'll then have a lovely clean flush control panel.

    Colour wise it's personal preference really, but for me cabinets look better when you've got a solid colour for each player or a solid colour for all player buttons (and then a different colour for the start buttons)

    For yours, I'd stick to a colour palette in line with your artwork as you've got some really strong colours there. The yellow buttons really pop in your photo, might be worth considering that colour as one of them.


    Ah yes, of course!


    Ah yes , countersinking is a easy option and I actually have some nice flat head stainless counter sunk screw head bolts allready.
    Good idea.

    Perfect, I'll play around with the colours and find a nice combo. I was more concerned that there was a correct colour combo and the recipient of the cabinet would scoff at my colour choice :-)


  • Registered Users Posts: 696 ✭✭✭Alfagtamini


    CiDeRmAn wrote: »
    My Atomiswave has those carriage bolts fastening down the control panel to the body of the cabinet.
    It means there are no slots on the surface, just a gentle dome per screw.
    Not sure how it might work in an MDF context, as in the hole it goes through would have to engage with the shape above the thread in order to allow it to be fastened tightly.
    51vL5lOm2SL._SX425_.jpg

    A minipac is a great buy as a keyboard encoder.
    Affordable too.
    https://www.arcadeworlduk.com/products/Mini-PAC-Keyboard-Encoder-Kit.html

    Thanks for the reply.

    I'm leaning now more towards the counter sinking route so I don't have to remove the artwork.

    I was looking at the mini PAC board and actually ordered a "control block " from pi hut but ended up using a xinmotek as it came with the button/joystick kit.

    If anyone is looking for a cheap control block let me know.


  • Advertisement
  • Registered Users Posts: 34,426 ✭✭✭✭o1s1n
    Master of the Universe


    Might be more hassle then it's worth, but if you managed to lift the artwork just up until the point of the joystick screws on each side, you could countersink the screw holes with the artwork lifted, drill in your joystick and screws in and then lay the artwork back down on top, so the screw heads would be hiding under the artwork.

    All depends how the adhesive is on that artwork though (and you might damage it in the process of lifting it)

    The more I look at your cabinet (and the real deal) the more I'm going towards white buttons and joystick ball tops (with yellow start buttons)

    Best of luck with it anyway, stick up a photo when you're done :)


  • Registered Users Posts: 696 ✭✭✭Alfagtamini


    o1s1n wrote: »
    Might be more hassle then it's worth, but if you managed to lift the artwork just up until the point of the joystick screws on each side, you could countersink the screw holes with the artwork lifted, drill in your joystick and screws in and then lay the artwork back down on top, so the screw heads would be hiding under the artwork.

    All depends how the adhesive is on that artwork though (and you might damage it in the process of lifting it)

    The more I look at your cabinet (and the real deal) the more I'm going towards white buttons and joystick ball tops (with yellow start buttons)

    Best of luck with it anyway, stick up a photo when you're done :)

    Thanks. I've actually emailed bitcade to get a price on a new piece of artwork for the joystick/button board.
    I scratched it last night and it's bugging me. So I could kill 2 birds with one stone there.

    I ordered a custom screen bezel from rockstarprint.co.uk. so will need to take the cabinet apart to fit this when it arrives.

    Once it's built I'll upload a picture if ye all promise not to laugh :-)


  • Registered Users Posts: 7,466 ✭✭✭Inviere


    CiDeRmAn wrote: »
    A minipac is a great buy as a keyboard encoder.
    Affordable too.
    https://www.arcadeworlduk.com/products/Mini-PAC-Keyboard-Encoder-Kit.html

    I think the general consensus online is if it's just a joystick/buttons cab, then an IPAC is the way to go. The Minipac comes with a wiring harness which is looooong, and creates a bit of a mess under the cp. The IPAC doesn't come with a harness, as you do your own wiring with it (and as such, the wiring should be made to fit). They're both essentially the same though for the OP's case.


  • Registered Users Posts: 696 ✭✭✭Alfagtamini


    Cabinet is done.

    Just need to change out the bolts holding on the joysticks.


  • Registered Users Posts: 5,780 ✭✭✭eddhorse


    Cabinet is done.

    Just need to change out the bolts holding on the joysticks.

    Nice work, and now to play lots of games :)


  • Registered Users Posts: 696 ✭✭✭Alfagtamini


    eddhorse wrote: »
    Nice work, and now to play lots of games :)

    Exactly, I've got to test it before it's given as a Christmas gift :)


Advertisement