Advertisement
If you have a new account but are having problems posting or verifying your account, please email us on hello@boards.ie for help. Thanks :)
Hello all! Please ensure that you are posting a new thread or question in the appropriate forum. The Feedback forum is overwhelmed with questions that are having to be moved elsewhere. If you need help to verify your account contact hello@boards.ie
Hi all! We have been experiencing an issue on site where threads have been missing the latest postings. The platform host Vanilla are working on this issue. A workaround that has been used by some is to navigate back from 1 to 10+ pages to re-sync the thread and this will then show the latest posts. Thanks, Mike.
Hi there,
There is an issue with role permissions that is being worked on at the moment.
If you are having trouble with access or permissions on regional forums please post here to get access: https://www.boards.ie/discussion/2058365403/you-do-not-have-permission-for-that#latest

Project noraut !

  • 21-04-2015 9:03am
    #1
    Posts: 7,499 ✭✭✭


    So its been a long time since Ive had a new cab.
    A year has passed since I finished donkey kong!
    So when this little poker conversion came up for 100e I said I'd take a stab at it.
    When its finished its going to be a dedicated neogeo cab!

    A bit rough around the edges but it has potential.
    2015-04-16%2B18.35.04.jpg

    First job was to get the gold tmould off and strip it down for a clean.
    looks like the CP has gone through a few revisions over the years!
    Swiss cheese!
    2015-04-16%2B18.54.01.jpg

    Got it stripped down to the wood pretty much,
    The whole front section is getting new timber in a better more traditional configuration .
    2015-04-16%2B21.44.30.jpg

    There was two large dome headed carriage bolts on each side I had to bust out.They were rusty and wont go well with the finish I plan on putting on this.They left massive holes in the sides :eek:

    2015-04-17%2B07.19.26.jpg

    All the metal work needs to be stripped and repainted.
    ANy one got any good ideas for stripping them ?
    2015-04-17%2B08.04.08.jpg

    getting it prepped for paint.
    I've filled all the holes/gouges with isopon,
    ready to be sanded back.I think I might have to skim the lot to get the finish I want.
    Going to be a custom (but simple and tasteful ;) ) paint job.
    maybe Destiny???
    2015-04-19%2B13.58.29.jpg

    The monitors that came with it all had screen burn (joker poker)
    So I decided to use a 14" TV.
    I've never done it before but I have to say Im very happy with the result!
    The TV comes on with power,switches to AV and the image is very,very nice.
    Hard to snap a good pic of it
    2015-04-20%2B22.22.43.jpg

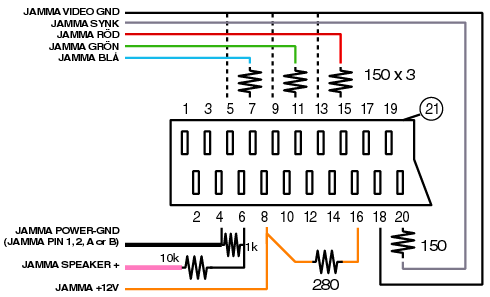
    Made this Jamma to scart adapter
    unnamed.jpg

    using this and a few tips from the last bandit!
    Supergun_SCART_02.gif


    watch this space!


«1

Comments

  • Moderators, Computer Games Moderators Posts: 10,495 Mod ✭✭✭✭Andrew76


    Nice work so far Stinky Finger!


  • Registered Users, Registered Users 2 Posts: 4,147 ✭✭✭CathalDublin


    Looks nice, I've used a TV before a couple of times myself, the hardest part is decasing them.
    I've a load of duplicate neo carts here BTW;), I'll hook up with you with the paint and joysticks this weekend if you are around, expecting paint any day now, man US shipping is slow :(


  • Posts: 7,499 ✭✭✭ [Deleted User]


    Thanks for the offer Cathal,
    For me the multicart covers most bases.I have a few others tho.
    the mobo is going to be accessible from the front and storage area for carts.


  • Registered Users, Registered Users 2 Posts: 5,783 ✭✭✭eddhorse


    So thats what you needed the chassis for. I thought it was a cocktail table.

    You made short work of it as well.
    Thats where the experience comes in.
    Gut it, Take it apart completely and start from there.

    Nice job on the scart to jamma too.

    Best of luck.


  • Registered Users, Registered Users 2 Posts: 35,259 ✭✭✭✭o1s1n
    Master of the Universe


    Dedicated mini Neo cab? Excellent! :cool:

    How about a mini Lordsvale?

    4801255719_cf11ef932b.jpg


  • Advertisement
  • Posts: 7,499 ✭✭✭ [Deleted User]


    originally I was going to make it into a mini tribute cab but I think I'll just go freestyle.
    If I wanted a loardsvale I could make one so might as well do something different !


  • Registered Users, Registered Users 2 Posts: 3,725 ✭✭✭The Last Bandit


    Any chance of increasing the screen size ?


  • Posts: 7,499 ✭✭✭ [Deleted User]


    Any chance of increasing the screen size ?

    Eh maybe,
    The cab is very shallow so the 14" tube is almost toughing the back.
    I might drop the screen angle :cool:


  • Registered Users, Registered Users 2 Posts: 3,725 ✭✭✭The Last Bandit


    Ah ya see it now, its fairly shallow alright. Reducing the angle a bit and going vertical you might squeeze in a bigger one although 14" should be grand for older stuff though, Dig Dug, Bombjack era games.


  • Posts: 7,499 ✭✭✭ [Deleted User]


    Ah should be ok,
    Just talking to my uncle there.
    he said I'll have to skim the whole lot with isopon to stop the grain showing through the paint.
    Also I wont be able to lacquer it if I paint it white as it will yellow.even with non yellowing lacquer!
    Its still going to be white tho :)


  • Advertisement
  • Registered Users, Registered Users 2 Posts: 3,725 ✭✭✭The Last Bandit


    Its still going to be white tho :)

    Just buy a fridge and safe yourself the hassle :D


  • Moderators, Computer Games Moderators Posts: 5,390 Mod ✭✭✭✭Optimus Prime


    with the metal pieces i usually just scrub them with metal wool stuff and use a heat gun with a scraper to get the paint off.

    Ive a cab that size and instead of painting it i just got full size side art printed out and stuck it on. covers the holes when they are filled in.

    Im hoping to do a bubble bobble cab later in the year and thats what ill be doing, will be looking for a similar cab size to that.


  • Registered Users, Registered Users 2 Posts: 4,147 ✭✭✭CathalDublin


    I seen your other thread, you're getting there
    IMG_0133_zps05ef380a.jpg


  • Registered Users, Registered Users 2 Posts: 9,242 ✭✭✭MrVestek


    o1s1n wrote: »
    Dedicated mini Neo cab? Excellent! :cool:

    How about a mini Lordsvale?

    4801255719_cf11ef932b.jpg

    How does that work with Street Fighter II? The NeoGeo layout is missing two buttons...


  • Registered Users, Registered Users 2 Posts: 30,123 ✭✭✭✭Star Lord


    Perhaps it works like the MegaDrive port did, where you had to switch between punches and kicks...?


  • Registered Users, Registered Users 2 Posts: 4,147 ✭✭✭CathalDublin


    MrVestek wrote: »
    How does that work with Street Fighter II? The NeoGeo layout is missing two buttons...

    Simple that's not SF2


  • Registered Users, Registered Users 2 Posts: 9,242 ✭✭✭MrVestek


    Simple that's not SF2

    Sorry kinda hard to tell. What game is it then? KOF?


  • Registered Users, Registered Users 2 Posts: 4,147 ✭✭✭CathalDublin


    MrVestek wrote: »
    Sorry kinda hard to tell. What game is it then? KOF?

    I'm not a neo geo fan but looks like Art of Fighting, much more zoomed in than SF2

    edit, it is AOF
    art_of_fighting.gif


  • Registered Users, Registered Users 2 Posts: 35,259 ✭✭✭✭o1s1n
    Master of the Universe


    Its still going to be white tho :)

    Sure get an Egret marquee and nobody will know the difference :pac:

    Any ideas for the Cp design yet?


  • Posts: 7,499 ✭✭✭ [Deleted User]


    o1s1n wrote: »
    Sure get an Egret marquee and nobody will know the difference :pac:

    Any ideas for the Cp design yet?

    Kinda,
    Its going to be a standard neogeo layout.2 player
    Laser etched acrylic :D


  • Advertisement
  • Registered Users, Registered Users 2 Posts: 5,790 ✭✭✭Jack burton


    I have a CP design lying around somwhere, i'll take a look.

    Going to be nice anyway!


  • Posts: 7,499 ✭✭✭ [Deleted User]


    got one side filled.
    Needs the bag sanded out of it now.
    2015-04-21%2B20.39.47.jpg


  • Moderators, Computer Games Moderators Posts: 3,184 Mod ✭✭✭✭Dr Bob


    with the metal pieces i usually just scrub them with metal wool stuff and use a heat gun with a scraper to get the paint off.

    Ive a cab that size and instead of painting it i just got full size side art printed out and stuck it on. covers the holes when they are filled in.

    Im hoping to do a bubble bobble cab later in the year and thats what ill be doing, will be looking for a similar cab size to that.
    Ill probably stick the taito mini up on market place soon so you might want to look out for that.


  • Moderators, Computer Games Moderators Posts: 5,390 Mod ✭✭✭✭Optimus Prime


    Cheers but it was me who got rid of those ones! ill be looking for something more like brownfingers one to match a donkey kong themed cab i done a couple of years back.


  • Registered Users, Registered Users 2 Posts: 677 ✭✭✭Mitchomagic


    I have another cab the same as brownfingers if your interested


  • Moderators, Computer Games Moderators Posts: 5,390 Mod ✭✭✭✭Optimus Prime


    Ah id love to but im trying to get a few quid together to get my attic converted and a big shed out the back for more room, ive far too much stuff and with the new kid ive no games room! id say it will be later in the year before ill be able to get a cab. Thanks though.


  • Posts: 7,499 ✭✭✭ [Deleted User]


    Made a small bit of progress last night.
    got the TV deceased and mounted into an arcade frame.
    fitted nicely.
    The picture is slightly to the left,but a nice picture.
    Hopefully I'll be able to get into the setup menu when i get the original remote.
    2015-04-23%2B21.45.44.jpg

    Excuse my camera,its busted


  • Registered Users, Registered Users 2 Posts: 4,147 ✭✭✭CathalDublin


    That looks sweet, I think the Philips TVs are easy to get into the service menu, I've only ever done it with Mitsubishi and Panasonic TVs before though. Its great to see people bringing cabs back to life with CRTs, there is so many CRTs getting dumped daily around the country.
    This is going to be an awesome build.


  • Registered Users, Registered Users 2 Posts: 5,783 ✭✭✭eddhorse


    Nice decasing, i have a 25" inch Phillips also that i have been tweaking in the service menu. Its tricky.


  • Advertisement
  • Posts: 7,499 ✭✭✭ [Deleted User]


    So,
    I was down in my Granddads place today.
    He died in Jan and they were clearing out his house.
    I spotted his old TV in the skip!It was in it a week and it hadnt been rained on.
    A 20" philips vcr combo.Looks like it will fit in the cab with some modifications.
    only thing is tho it doesnt switch on with power like the other one and again no remote so haven't been able to access the engineers menu.

    Also got a few bits from arcade world.
    2015-04-24%2B21.46.47.jpg

    Getting these sticks off Cathal too.
    http://www.boards.ie/vbulletin/showthread.php?t=2057390202

    Sanwa buttons and Seimitsu sticks on a poker cab!
    With bat tops!
    This thing is going to be insane I think.
    Buttons are going off Monday to the paint supplier to be colour matched exactly ;)
    Got the new tmolding too.
    Before I can go any further tho I have to get the coin door.


  • Posts: 7,499 ✭✭✭ [Deleted User]


    ****e.
    The 3/4 tmould is 18mm and the cab is 20mm.
    It's gonna be poxy.
    Looks like it's 18mm partial with 1mm laminate each side.
    Going to have to think about this one 😯


  • Registered Users, Registered Users 2 Posts: 677 ✭✭✭Mitchomagic


    If you are getting full side art on it get it made larger than what's needed. Then fold it over the sides and under the tmolding .... sorted


  • Posts: 7,499 ✭✭✭ [Deleted User]


    If you are getting full side art on it get it made larger than what's needed. Then fold it over the sides and under the tmolding .... sorted

    TBH I couldnt live with that.
    found a tmould from tmolding.com that should suit.

    I got the remote for the 20" monitor.
    cant get into the engineer's mode on it and I cant control the brightness :confused: and its too high by loads.

    I can control everthing else,sharpness,contrast colour but the slider for brightness just does not move.
    Very anoying.
    might be able to do something with the screen pot on the flyback tho but I havent decased it yet.


  • Registered Users, Registered Users 2 Posts: 30,123 ✭✭✭✭Star Lord


    Could there be some kind of picture mode setting that's enabled that could prevent you from changing the brightness?


  • Posts: 7,499 ✭✭✭ [Deleted User]


    Star Lord wrote: »
    Could there be some kind of picture mode setting that's enabled that could prevent you from changing the brightness?

    good thinking,I didnt see anything to suggest there is video modes.
    the options are very basic .


  • Advertisement
  • Registered Users, Registered Users 2 Posts: 3,725 ✭✭✭The Last Bandit


    TBH I couldnt live with that.
    found a tmould from tmolding.com that should suit.

    I got the remote for the 20" monitor.
    cant get into the engineer's mode on it and I cant control the brightness :confused: and its too high by loads.

    I can control everthing else,sharpness,contrast colour but the slider for brightness just does not move.
    Very anoying.
    might be able to do something with the screen pot on the flyback tho but I havent decased it yet.

    Brightness adjust not working with the remote ? Did you try stripping it down and cleaning the contacts on it?


  • Posts: 7,499 ✭✭✭ [Deleted User]


    The tvs responding allright.
    its just the volume up down that does it.a load of me hole.
    it just seems to be locked!
    might have another monitor coming my way in the next day or 2 so We'll see what happens.
    no rush now anyway as I've loads to be getting on with .


  • Registered Users, Registered Users 2 Posts: 3,725 ✭✭✭The Last Bandit


    Can you just wear sunglasses ?


  • Posts: 7,499 ✭✭✭ [Deleted User]


    Can you just wear sunglasses ?

    I could tint the glass :cool:


  • Registered Users, Registered Users 2 Posts: 4,147 ✭✭✭CathalDublin


    Usually you can adjust the brightness from the flyback anyway.
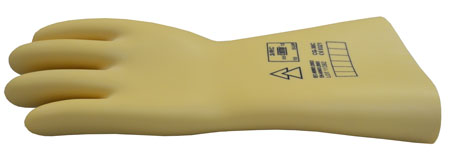
    Break out the 1387377403_CATU-Rubber-Latex-Insulating-Gloves.jpg


  • Advertisement
  • Registered Users, Registered Users 2 Posts: 9,242 ✭✭✭MrVestek


    Brownfinger I'm looking to declutter (and will be selling off the majority of my collection soon enough).

    I have a Beko TV that I got for free from adverts a while ago, you could have that if you want?


  • Posts: 7,499 ✭✭✭ [Deleted User]


    So turns out you can only adjust the brighness when the TVs on AV


  • Registered Users, Registered Users 2 Posts: 5,783 ✭✭✭eddhorse


    So turns out you can only adjust the brighness when the TVs on AV

    So its working?
    For the Philips tv i have, its 0 6 2 5 9 6 followed by the i button.


  • Registered Users, Registered Users 2 Posts: 195 ✭✭Damien King


    Hi, I had a similar issue on a build last year, cabinet was built in 18mm sheet material with vinyl artwork mounted on 2mm foamex leaving me with a 20mm to trim.

    Was originally going to get wider T molding but then figured I'd try it with a flat chrome trim first.

    I removed the 3M tape from the back as its ****e, then applied contact adhesive to both surfaces. While waiting 20 mins or so for it to cure I got loads of strips of masking tape sorted out.

    I stuck the trim on, taping it in place as I went. after a few hours the adhesive had completely bonded the chrome to the edge so I removed the masking tape and peeled back the chrome trims protective layer. The results were great. I was chatting to the customer recently and its still looking good as new almost a year later.

    Could be worth a try, just make sure its good contact adhesive and not the bargain shop rubbish. If you don't start hallucinating while using it indoors then it's no good.

    Get a LOT of masking tape strips ready, theres time to do this while waiting for the contact adhesive on both surfaces to be ready, you'll be taping every couple of inches on straight sections and pretty much covering it on the curves. If the cabinet edges are porus then apply a layer of adhesive first, let that completely dry to seal it and then carry out above steps (including re applying contact adhesive to cabinet.

    Heres a few pics of the end result, you can see how well it went round corners.

    6034073

    6034073

    Attachment not found.

    Attachment not found.


  • Posts: 7,499 ✭✭✭ [Deleted User]


    Thanks but I'll be using a slot cutter.
    20.6mm tmould ordered


  • Posts: 7,499 ✭✭✭ [Deleted User]


    Finally got around to the metal work.
    After lashing them with a rough wire wheel on a pillar drill I decided to give the sandblaster another go.
    Took a while but very pleased with the results!
    2015-04-30%2B10.28.28.jpg

    now to get some paint on them!


  • Posts: 7,499 ✭✭✭ [Deleted User]


    So it turns out you can fit a 20" tube in a poker cab!
    Had to drop the monitor angle a bit .
    Because of this I'll have to drop the glass too
    2015-05-07%2B20.34.57.jpg

    One thing I've discovered is the angle of the CP is insanely uncomfortable :(
    You could probably play for 20 seconds before requiring wrist surgery.
    So Im going to have to flatten the CP.
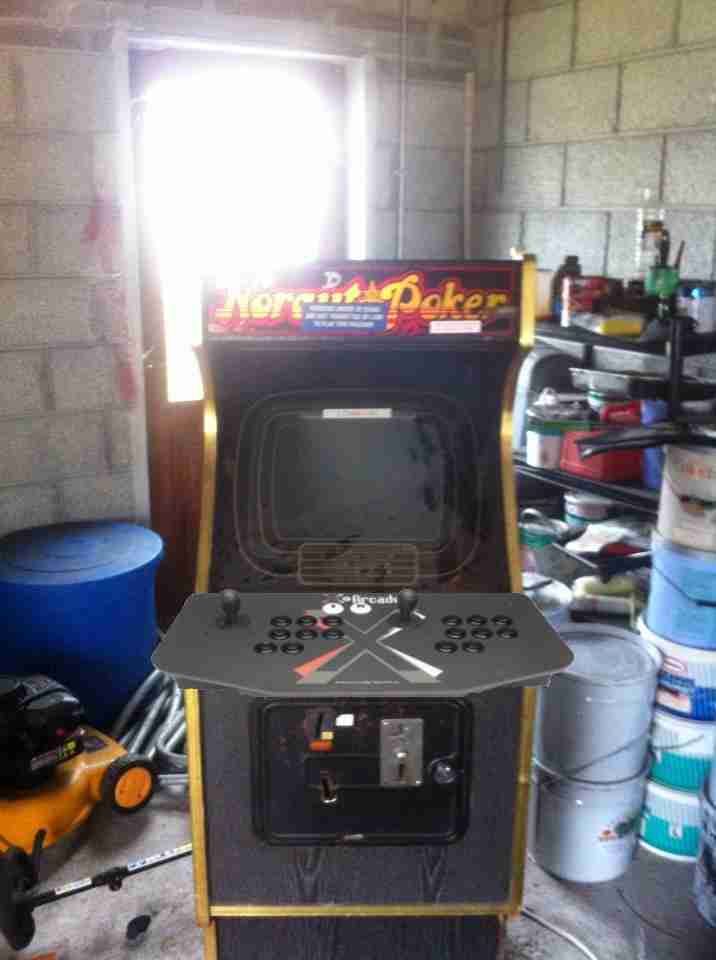
    Something like this I'd say

    2015-05-07%2B20.59.22.jpg

    A bit ugly but whats the point in building a machine that cant be played!
    Hoping to get in into the workshop tomorrow and get all the woodwork done.


  • Registered Users, Registered Users 2 Posts: 5,790 ✭✭✭Jack burton


    Get a load of car filler and flush the cp with cab, proper 90's spec!

    Looking forward to seeing how this turns out!


  • Registered Users, Registered Users 2 Posts: 4,147 ✭✭✭CathalDublin


    Come on, wheres the update?


  • Posts: 7,499 ✭✭✭ [Deleted User]


    Actually just ordered the last bit I needed this morning!
    Well I gotta get paint too but thats no biggy.
    Anybody going between cork and Dublin?
    I need something collected from another member here and dont know when I'll be down next


  • Advertisement
Advertisement