Advertisement
If you have a new account but are having problems posting or verifying your account, please email us on hello@boards.ie for help. Thanks :)
Hello all! Please ensure that you are posting a new thread or question in the appropriate forum. The Feedback forum is overwhelmed with questions that are having to be moved elsewhere. If you need help to verify your account contact hello@boards.ie

Not sure what to do with this muddy area in garden..

1235»

Comments

  • Registered Users, Registered Users 2 Posts: 10,301 ✭✭✭✭gerrybbadd


    Jesus, that's hefty :(


    Well, I'm just after hitting the 4k mark, I believe. However, there's still a few finishing touches (and I haven't even gotten a rabbit yet!). I'd say i'll hit €5k by the time I'm done.

    If you reckon you'll be in for 6k, then I'd hate to see what the actual cost will be :P Cos you'll never judge the budget right.

    I still remember sitting in my car talking to a girl I know about the garden, before I had started doing anything. I distinctly remember stating "with €500 or €600 put into it it'll be done and it'll look a lot better". How naive I was!


    Do you happen to have a progress thread on here, by the way, Gerry? or any pics to share? :) Would love a before/after thread on this forum! :D (maybe there is one and I just haven't found it, though?).

    I don't have a thread, but do have plenty of pics! Maybe I should start one up!


  • Posts: 15,077 ✭✭✭✭ [Deleted User]


    You should start one up. Or someone should at least do a before/after thread. Admittedly I'm generally more of a quiet follower of threads rather than a regular poster but I always enjoy reading along to such threads and see what people are doing in their houses and gardens.

    This is my dad's garden (family house growing up), but I'm hoping to buy the house myself, so this is just part 1 of my efforts to make the place a bit nicer.

    I'll be moving into the inside of the house at some stage to try and revamp things. This garden project is actually going to be getting detoured to inside the house, before I can finish it. Through a friend who works in a furniture place, I inherited about €2,000 worth of sliding wardrobe for free (well, that's the estimated RRP on it, I'd say you'd make if yourself for half that), so that's in my shed at the moment. In order to get that out of the shed, I need to put it in the room it's due to go in. But the room it's supposed to go into is already filled with crap. So in order to continue with my garden shed fixing up, I think I need to first revamp one of the bedrooms. Not gonna be the most fun in the world as it's kinda unexpected and the bedroom needs a new floor (it has a laminate/wooden floor, but it's a bit cracked in places that wouldn't be seen as is, but with the new layout I've scribbled down, would be very obvious).


    So that might slow the big shed's progress down a bit (then again, it may not, either. I'm not sure what's happening. As im typing this im realising i could probably do the small shed first (painting, cleaning, flooring etc.) and use it as a storage space for the wardrobes. Think that might work, too.


    Anyway...

    I threw in a few solar lights. Out of the 20, only 1 isn't working. They make a big difference. The plan was initially to put them around the edging bricks to illuminate the border of the gravel, rather than just the paving, but the pool has gotten in the way of that. I think it looks nice as it is, but it is too squashy inside the paving now having to be careful not to hit the lights with your chair or when you're getting up and such, so I think I'll go back to my original plan as soon as the pool is gone.


    3955F1F9500D4CF6895FB948A41314AF-0000333410-0003775505-01024L-1E60F28814BA4ABFB920E67BD00C06F0.jpg

    A333814C267A46E9801FFC434BECD8AB-0000333410-0003775506-01024L-99E793321AD64109B4B3848629E469F9.jpg


    Big shed starting to get a bit claustrophobic...

    7EC033730B814B0C869DD7830453510A-0000333410-0003775503-00800L-0427B8788846449382DDC574F5E073EB.jpg


    2F142CA3EF2F42BE9A9FF862919ED9A6-0000333410-0003775501-00800L-B5DD376B2DDE46FEA55A7E145C180557.jpg


    I'm looking forward to a before/after photo of the inside of that shed... cos at least then the work will all be done.. :o :P


  • Registered Users, Registered Users 2 Posts: 28,404 ✭✭✭✭vicwatson


    Any updates?


  • Posts: 15,077 ✭✭✭✭ [Deleted User]


    Progress has been fairly slow/minor (hence letting the thread die off a bit, was gonna wait til I'd done a bit more before updating). :o


    I've been a tad busy, and this week coming I'll not get a chance to really get near the place again, but this is pretty much all that's been done since last update...


    The long wall (and front of the big shed) finally got their coats of paint. Admittedly, they're not fully done. The window surrounds/sill on the shed will be painted white, as will the top of the long wall beside the house (hard to see in pics, but it's currently unpainted).


    IMG_3091.jpg

    DSC_0021.jpg

    DSC_0025.jpg


    (Thankfully the horrible looking collapsed swimming pool has also been consigned to the bin).

    The path there is painted for no particular reason. I just wanted to randomly throw some paint on the ground to let it dry up and walk over it.. just to see how it would get on. I just painted over the dust and dirt that was there. Seems to be holding up okay, except where i painted over obvious dirt, and it's started to crack and break. It was just my curiousity though really).


    The small shed got it's collapsing MDF ceiling taken down and replaced with a Plywood one (well.. 90% replaced, still a tiny bit to do, but stopped as cordless battery died. Will only take 10 mins to finish it). Also, 2 of the walls got a good lick of paint. Unfortunately, this shed is now on the long finger and will be a storage space until I finish the bigger shed.


    4679927F012C409184A88A2BDD6911F1-0000333410-0003773088-00640L-E96D2DDC30F948B3B6AA0D918E13C816.jpg


    DSC_0009.jpg

    DSC_0012.jpg

    IMG_3113.jpg

    IMG_3111.jpg


    A definite improvement, but a long way to go with it, yet.


  • Posts: 15,077 ✭✭✭✭ [Deleted User]


    A chap on Adverts was given the duty of making up some flowerbeds for the deck area. They came out well I thought. Fair play to him.


    Threw in some little trees, and then a few little flowers, just for a bit of colour. Looks well, in my opinion (albeit the deck itself is filthy).


    IMG_3109.jpg

    DSC_0037.jpg

    DSC_0036.jpg

    DSC_0031.jpg


    I reckon I might throw some random gravel along the top of the flowerbeds (between the flowers) just to brighten up a bit.

    And that's pretty much everything so far, really. Hope to have the rabbit run made by Wednesday, and the ceiling in the small shed done.


    Something that's got me flip-flopping a bit is whether or not to take down the ceiling of MDF in the big shed and replace with plywood or not. Not sure what to do. The roof itself as it is isn't too bad, but that said, it could be better. It's also got a bit (though not a lot) of sagging going on with it. I reckon the cost of buying the ply alone will be about €200 to do it. Money I'd rather not spend if I don't have to, but money that might be better spent on that than trying to put up a partition wall against a ceiling that's not in the best of shape. Decisions, decisions. Just not sure if a ply ceiling will really benefit me.


  • Advertisement
  • Posts: 15,077 ✭✭✭✭ [Deleted User]


    A bit more buildin' 'n' Paintin' (Rabbit run)


    DSC_0047.jpg


    DSC_0049.jpg


    It's not quite done yet, obviously, but another coat of paint tomorrow, a 'lid' on top, locks on the doors (and a centre support for a little more sturdiness), and mesh all round and it'll be good to go, I'd say.

    Plan is to mesh the centre and left panels on the roof, but not the right one (so in rain, they have something as a shelter), but now I'm considering getting one of those 100ltr water butts and putting it on top of the run and using the gutter from the shed to fill it. Not sure how that'll pan out though. Would like to have a Water butt, but wasn't sure where to put one. Was thinking if I got and painted it white, it wouldn't look too bad up there in the corner?


  • Registered Users, Registered Users 2 Posts: 488 ✭✭The Diddakoi


    You'd need to reinforce the rabbit run to take the weight I would say. 100 litres of water weighs about 100kg, and you don't want squashed bunnies ;)

    Also you would need somewhere for the overflow to go, you would be surprised how quick it will fill up, and will get very messy if there is nowhere for the excess water to go.

    Great job on the garden, by the way :)


  • Posts: 15,077 ✭✭✭✭ [Deleted User]


    alf66 wrote: »
    You'd need to reinforce the rabbit run to take the weight I would say. 100 litres of water weighs about 100kg, and you don't want squashed bunnies ;)

    Also you would need somewhere for the overflow to go, you would be surprised how quick it will fill up, and will get very messy if there is nowhere for the excess water to go.

    Great job on the garden, by the way :)


    That's what's in my head, alright. What I'm trying to figure out is; is there a way of putting it on the hutch without the need of a support post under it (ie; a post inside the run). I'm trying to figure out if I can re-enforce a 'floating shelf' kind of surface on top of the run. I've a few ideas in my head, but all are a bit questionable.

    A support post under it would do the job I'd say, but then that'd interfere with the interior of the run itself and I think I'd rather avoid that (plus I feel confident that the rabbits would eat away at the wooden support post and that wouldn't end well! :P ).


    I hadn't considered overflow.. any practical suggestions?


    One of the reasons a water butt is in my head in the first place is because the guttering on the shed, no matter how many times I adjust it, seems to be anti-gravity, and the water constantly drips out over the doors of the shed (where the two pieces of gutter join).

    There's about a 2-3" overlap on the gutter, and a good bit of silicone, but still somehow the water is sitting there and dripping out.

    So I figured if I put a water butt in, the more extreme angle downwards (I'd re-do the guttering, to a slight V shape) would encourage the water to fall in the centre, but instead of falling onto the deck it'd be piped into the water butt instead.

    Not sure if I've explained that correctly or not, though. :o


  • Posts: 15,077 ✭✭✭✭ [Deleted User]


    Say hello.. to my little friends! :D


    4CBFABFF2BA0446EB99D3DD611D2FD08-0000333410-0003785135-00800L-D9C15D6822D44C72B48869CC05A70E3B.jpg


    I never intended on having 3 rabbits, but there were only three in the shop when I went in. I bought two. The third one looked quite sad when they were taken out and was on his hind legs looking up for them (they were lifted out of their box in the shop, via the roof of it) for about the 5 solid minutes it took me to pay and leave. As a 27 year old man, I don't mind saying I was nearly tearing up thinking of him on his own in there and his only two mates gone (or brother and sister, as it is, I suppose). So halfway home I had to turn the car and go back and get him (the one on the left, in the picture).

    It was souring the whole experience otherwise. So now I have three :D Female and two male (so neutering will be needed).


    At the moment they're living in a big plastic box in my bedroom until Monday, I'd say, when they'll be homed in the run in the garden. I want them to get used to being outdoors but dont want them out in torrential rain on day one, and the run isn't fully finished yet, so still a small bit of work to be done, there, too.

    They're only 8 weeks old, so they're tiny. In the picture above, left to right, they've been named Dig, Dug and Daisy. :P They're great fun to watch so far (although they're quite nervous so giving them a bit of space to settle in). :)


    EDIT: Oh, and they're three Lops (hangy down ears, instead of pointy up ones. They will all eventually hang down, but at the moment I've got a full lop (both down), a half lop (one down, one up) and a no-lop (both up)) :D Lots of variety.


  • Closed Accounts Posts: 18,066 ✭✭✭✭Happyman42


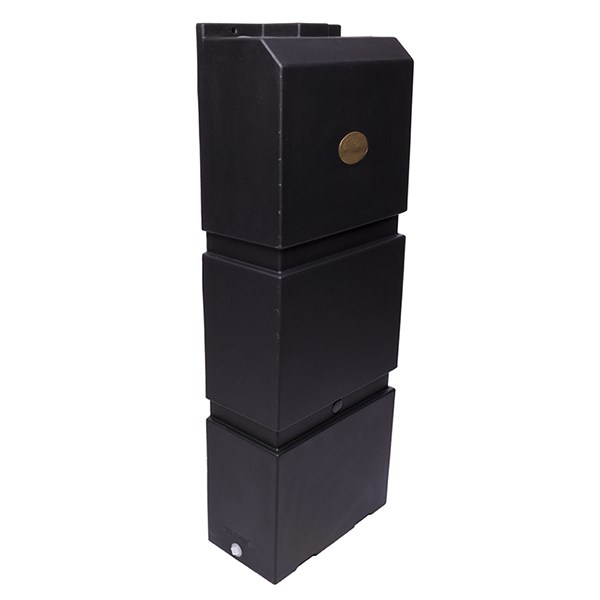
    Maybe you know that you can get 100lt water butts that bolt directly to a wall. Just thought I would say.
    PR2000006090_card2.jpg


  • Advertisement
  • Posts: 15,077 ✭✭✭✭ [Deleted User]


    Happyman42 wrote: »
    Maybe you know that you can get 100lt water butts that bolt directly to a wall. Just thought I would say.
    PR2000006090_card2.jpg


    Never seen that before, actually. Looks clever. Where would you get something like that? Has it got a name? I noticed Woodies are doing 100ltr (normal) butts for €30, and 210ltr for €40. From looking online, they seem exceptionally reasonably priced.


  • Posts: 15,077 ✭✭✭✭ [Deleted User]


    Happyman42 wrote: »


    Hmm.. I think I'll settle for the €30 roundy one. Even if it does look like it was made by Fisher Price :o


  • Registered Users, Registered Users 2 Posts: 699 ✭✭✭Zebrano


    Hows the rabbits


  • Posts: 15,077 ✭✭✭✭ [Deleted User]


    Zebrano wrote: »
    Hows the rabbits


    Woops.. Apologies for the lack of updating! :o


    A bit of a family fall out occurred, meaning the garden was put on hold in general.

    We're all friends again now, though, so a bit of upkeep has resumed.


    I changed the small shed into a little home gym.

    Before:

    DSC_0017.jpg

    After:

    IMG_4311_1.jpg


    Obviously still some work needs doing there (ceiling not finished or fully painted, etc) but for the most part I won't really be fixing anything else til the summer rolls around again.

    I got a skip to clear off the rest of the crap that was stuck down the side of the house from the summer refurb of the Garden. Still a bit of cleaning needs doing along there (paint cans, etc that didn't fit into the skip) but I'll get rid of those over the coming days/weeks in the wheelie bins.

    Before:

    DSC_0065.jpg

    After:

    IMG_4307.jpg


    One of the bedrooms in the house (that got tangled up in the garden because I got some free sliderobes from a shop that was closing, and they took up too much space in the sheds) has been getting a bit of a doing up, to try and get the sliderobes out of the sheds and into use. Unfortunately the sliderobes are still in the shed, taking up space, but should be in the room by the end of this week, I'd say (the bedroom's most recent photos were literally taken today).


    Before > After photos:


    Cluttered mess that it was, with every bit of old tat under the sun thrown into it (like most spare rooms, I'd imagine)

    image.jpg


    Cleared it out, pulled the shelving down, tore up desk, etc.

    image.jpg


    Lifted floor and Painted walls, ceiling, skirting, etc.

    image.jpg


    Put down a new carpet (well, got one fitted, I didn't actually DIY it as I'd only make a mess of it and carpet wouldn't be my strong point), got a new bed/mattress, bedside locker, etc.

    image.jpg

    I work out the cost of revamping the room like that breaks down as:

    Carpet, underlay, fitting: €350
    4'6" Divan bed, mattress, headboard: €275
    Paint costs: €50
    Painter: €60
    Duvet, pillows, bed sheet, covers for duvet/pillows, curtain pole: €50
    Bedside locker and canvas print for wall: €55

    Which totals out at €840, which I don't think is too bad, really, all things considered. I was surprised I could get a bed at that price (I'll put my hands up and say it's not the best mattress you'll ever own, but as someone who has worked in furniture/bedding before, it's a decent enough one for the price. Wouldn't buy it for my own bed but as a spare.. dead right!).


    The rabbits themselves are happy and seem to have settled in a bit. 2 of them are happy enough to be petted, rubbed, touched, etc. but one of them (the girl) does a bit of 'thumping' and runs away if you go near her, so I tend to go easy on her. I find it mad that rabbits can have such different personalities! I've the three of them there, and they're all so different in many ways.

    I haven't any real up to date photos of them, but here they are from a month or so ago, sleeping in a basket together (was zoomed in on the camera, as otherwise i'd have interrupted them)

    IMG_3225_2.jpg


    The big shed is still a disaster inside:


    IMG_4342.jpg


    But once the sliderobes come out to go into the bedroom, I'll be able to clear that all out into a smaller skip I'd say, and paint it up, etc. to a (hopefully) decent standard. The pressing issue there is that the floor is still getting very wet inside (not sure how, but i think it's from where the doors are) and the ground is very uneven in it.


    That's pretty much all I have done since I last updated, to be honest. The small shed got the most progress (the original plan was to put a partition wall in the big shed and make a small home gym in it, but I think it was probably a better decision to do it in the small shed). I just don't really know what do to with the big shed, now, though. Was going to try and turn it into a bit of a dedicated car wash space/garage area, but I'm not sure (and even if i do that, I'd rather it was somewhat dual purpose, as I won't always need to have the car inside it, even if i am cleaning it). Any suggestions are always welcome!


    In the mean time, here's a video of the rabbits first day in their outdoor run, back in August:


    (it has since been re-organised, had new houses etc. put in, covers over it and such to make it a bit more winter-proof).


  • Site Banned Posts: 6,498 ✭✭✭XR3i


    you made a grand job of it kkv


  • Posts: 15,077 ✭✭✭✭ [Deleted User]


    Cheers XR3i. Still a fair bit to do in it, but I'm glad I got it all started during the summer this year. It's an enormous improvement over what it was before, and although it's seemingly going to be the never-ending project, it's keeping me occupied in my downtime, too, so it's not too bad.

    The thoughts of having to dismantle the slide robes, bring them to the room in the house, and re-assemble them (standing up, as they're too tall to assemble on the floor and then lift into place!) is giving me nightmares. Dreading doing it, and know it'll be an enormous pain in the ass (but at least when that's done, then that's the bedroom practically finished with for the time being, too!).


  • Registered Users, Registered Users 2 Posts: 1,434 ✭✭✭Rancid


    Great work!
    Enjoyed the pics and details of your progress right from the start of the whole extended project.

    Keep up the updates!


  • Registered Users, Registered Users 2 Posts: 699 ✭✭✭Zebrano


    Fair play.
    The estuary recycling centre in swords is good for getting rid of stuff lots of things like paint cans and oil and electronics are taken free. And there is a small charge for the likes of wood and rubble and bulky waste. Ive filled a small van numerous times and gone out and the most ive been charged was 32 euro.


Advertisement