Advertisement
If you have a new account but are having problems posting or verifying your account, please email us on hello@boards.ie for help. Thanks :)
Hello all! Please ensure that you are posting a new thread or question in the appropriate forum. The Feedback forum is overwhelmed with questions that are having to be moved elsewhere. If you need help to verify your account contact hello@boards.ie

The Wii Mini Maxi...

  • 04-01-2025 06:55AM
    #1
    Registered Users, Registered Users 2 Posts: 7,983 ✭✭✭


    The final iteration hardware of the Nintendo Wii, was a stripped down, feature reduced, 'unhackable' attempt to squeeze the last few dollars out of the Wii before it was retired. The Wii Mini lacked a power loading dvd drive, WiFi, an SD-card slot, Component Video, and GameCube controller ports. It's very barebones, and very much purely for playing Wii games on (in composite only.) By all accounts, there's really no need to ever own one. That was until some community made mods were developed and released for the Wii Mini, that aim to restore most of what Nintendo left out of it. The funny thing is, the circuitry is actually there on the board for the WiFi and SD-card functionality, so it's 'only' a matter of fitting in the missing bits, and away you go…so let's start there!

    1720621790410.jpg

    ^^ Honestly, I really like the look of the Mini. There's something 'vintage Nintendo' about it, and obviously, the red ties back to the days of the Famicom. I'm not a big fan of the aesthetics of the original Wii, it's fine & all, but very, very, bland looking. This on the other hand, looks more like a console.

    1720621790404.jpg

    ^^ A flip lid to access the dvd drive. Kinda like the PS2 Slim, this way obviously knocks a chunk of manufacturing cost off.

    1720621790395.jpg

    ^^ A single USB port at the back, unlike the twin USB ports on the original Wii. This is a little limiting, in that it can't reliably power a USB/SSD on a single port, but if all goes to plan, I won't be needing any USB powered storage anyway.

    1720621790385.jpg

    ^^ Signs of obvious use here, the fan and intake are pretty well coated in dust.

    1720621790376.jpg

    ^^ Ugh, composite only output available on the Mini….it's really bad, so later on, we'll see if anything can be done about that…

    1720621790357.jpg 1720621790347.jpg

    ^^ Nintendo very generously did fit two power indicator LED's to the Mini, so there's that! Ok this powers on, and seems to work. I grabbed it on Adverts for cheap as I'd never even seen one in the flesh before this, so you never know really what you're getting from Adverts, but this one thankfully checks out.

    1720621790314.jpg

    ^^ Powers up, and displays fine. The composite image is beyond bad in the flesh though, very soft, aliased, and noisy. You'll also notice that there's no SD Card menu available where it normally is (beside the Wii button, again, because the console doesn't have one, and the software is stripped down to work around that.

    1720621790298.jpg

    ^^ It's on firmware 4.3E, which is the latest firmware for Wii….they probably all shipped on this firmware anyway really, given the manufacturing date of the Mini's. No picture here, but there's no settings for Wifi etc here as the Mini runs a cut down version of the OS. A normal Wii won't boot if the WiFi card isn't detected, and seeing as this doesn't have one, the OS has to accommodate that.

    Ok, so if this were a normal Wii, the obvious entry point to soft-mod it is the SD card slot. The Wii Mini doesn't have a card slot, and as such, we don't have that 'attack vector.' Instead, we're going to use a Bluetooth exploit, pushed from a Linux VM running under Windows. Well, that's the idea anyway!

    1720621790291.jpg

    ^^ A good, branded, decent, Bluetooth adapter is needed here. This one is reported to work well.

    1720621790284.jpg

    ^^ A Linux VM up and running. From here, we need to download and run the exploit files using the Linux terminal.

    1720621790275.jpg

    ^^ Command pushed, and files downloaded.

    1720621790267.jpg

    ^^ Ok, upon running the main executable, we've some inputs to feed the script. This is obviously a Wii Mini, so we hit Option #2.

    1720621790256.jpg

    ^^ We feed in the region of the Mini, and are given the final prompt…

    1720621790252.jpg

    ^^ The exploit then runs, waiting on a handshake from the Wii Mini. To do this, we need to keep hitting the Sync button on the Wii Mini until the above text shows, and you can see at the end there, the connection is made and the payload is being sent to the Wii Mini. To compliment this, I have the required files sitting on a USB drive plugged into the Wii Mini, and once the exploit is uploaded, it'll run, the the USB drive will then be used to access files needed for soft-modding the Mini.

    1720621790242.jpg

    ^^ Exploit pushed and ran successfully, so now, the files on the USB drive take over, and we can proceed installing the Homebrew Channel on the Mini (and Priiloader too.)

    1720621790226.jpg 1720621790217.jpg 1720621790210.jpg 1720621790205.jpg

    ^^ Would you look at that, the Homebrew Channel successfully installed on the Wii Mini. Nice.

    1720621790195.jpg 1720621790191.jpg 1720621790186.jpg

    ^^ To compliment the Homebrew Channel, and indeed, to allow the use of game loaders from usb/sd, we need to install D2XL (a modified version of D2X for the Mini). We use the default settings of Beta 1, installed to Base 57 in Slot 249. This goes smoothly, and we're all set now for the next, more interesting parts…


Comments

  • Registered Users, Registered Users 2 Posts: 11,537 ✭✭✭✭LambshankRedemption


    That looks very nice.

    Off topic I know, but I still mourn what the Wii could have been.

    Like many such consoles it was kept alive by the homebrew community, the same community it fought so hard against.

    Sorry, mini rant.


  • Registered Users, Registered Users 2 Posts: 7,983 ✭✭✭Inviere


    So from here, we're going to make some hardware changes to the Mini. There's a couple of kits released, which aim to aim an SD card and Reset button, and also a Wifi Connectivity kit. Let's have a look at those so…

    1720621790178.jpg

    ^^ Ok, onto the table, the patient is sedated, and prepped for surgery.

    1720621790172.jpg

    ^^ Under the top shell, there's really not much to this Wii. There's a DVD drive, a plastic midframe, a metal shield, and the motherboard.

    1720621790164.jpg

    ^^ Down to the mainboard. The thermal pad application is, suboptimal, to the say the least.

    1720621790157.jpg

    ^^ It's also quite dusty and dirty in here. Dust, hair, and grubby contaminants everywhere. It'll get a nice clean….

    1720621790151.jpg

    ^^ So this is the area we'll focus on first. Points 1-20 on the bottom of the board here, are actually for the WiFi card socket believe it or not. Nintendo went ahead and designed this thing with WiFi capability in mind, and at some point, cut it out. The board to the left of it is the Bluetooth board.

    1720621790143.jpg

    ^^ The x20 points have been hit with factory solder, and as such, any connector installed here won't sit flat. This solder needs to be wicked away to make the points flat to the board.

    1720621790137.jpg

    ^^ Done, wicked, cleaned, and flat to the board now ready for a connector.

    1720621790129.jpg 1720621790124.jpg 1720621790109.jpg

    ^^ Behold, the brilliant Wii Mini WiFi Kit by the brilliant webhdx.

    1720621790102.jpg

    ^^ The WiFi board connector has x20 legs to solder onto the existing pads. These are quite small, and I couldn't do them without magnification…

    1720621790088.jpg

    ^^ So from here, we'll switch over to the Tomlov scope…

    20240710_110236.JPG

    ^^ The connector is pushed/placed into position using a tweezers. The scope makes this very easy to see if it's visually aligned correctly.

    20240710_113948.JPG

    ^^ All done. This needs a fine tipped soldering iron head, some liquid no clean flux, and a steady hand (the latter of which I don't have!). I got a few solder bridges doing this between pins, but with flux, and some patience, I was able to clear them.

    20240710_121714.JPG

    ^^ The next part of the mod is to solder a resistor array in place, and two small resistors. The RA20 position is for the Resistor Array, and R212/213 are for Resistors, naturally!

    20240710_123329.JPG

    ^^ The resistor array soldered in place (*** MORE ON THIS LATER, THERE'S A BIG ISSUE HERE ***)

    20240710_124807.JPG

    ^^ The other two resistors now also soldered into place.

    20240710_131241.JPG

    ^^ C138 & C139 now soldered into place, these are capacitors. C138 looks a bit bogey here, so I reflowed it (not pictured.)

    20240710_131339.JPG

    ^^ The FIL50 position needs a ferrite core soldered here….

    20240710_131925.JPG

    ^^ All done…

    20240710_133808.JPG

    ^^ And we're back, full circle, to the Wifi Connector, there's a capacitor needed for position C136 which is done here.

    1720621790061.jpg

    ^^ Just for emphasis of how small some of these SMD components are, here's two resistors beside a screw from the shell of the Mini itself. I managed to lose one or two of these just by placing it down somewhere, and never being able to find it again. They're by far and away, the smallest components I've ever worked with.

    So that's the WiFi hardware side of things done. While we're in here though, let's keep going. Next up, is the SDRST Kit, which adds an SD card slot, and a Reset button.

    1720621790051.jpg 1720621790043.jpg

    ^^ This is a gorgeous, beautifully put together kit by webhdx. The 3D printed parts are genius, and make the finish for the cutting almost factory perfect.

    1720621790036.jpg

    ^^ So the quick solder board goes to these test points on the mainboard of the Mini. There's connectivity for an SD card, and even some GameCube ports I believe (though I'll be leaving those ones alone here.)

    1720621790026.jpg

    ^^ All done, fairly handy to do. Again a small tipped iron, plenty of flux, high heat, and be sure to poke the iron down through the pcb holes to ensure the solder is flowing to the test pads underneath.

    1720621790019.jpg

    ^^ So, we now need to cut the shell to accommodate an SD slot and Reset button. Ideally, I stick to no-cut mods where possible, but since it's not possible in this case (without it looking jank), and because the results of this kit promise to look so good, I give it a go…

    1720621789990.jpg

    ^^ We need 2mm and 4mm drill bits, as per the kit instructions.

    1720621789998.jpg

    ^^ Step one, fit one of the 3d printed blocks around the support post, and drill the three holes…

    1720621789971.jpg

    ^^ Done…

    1720621789955.jpg

    ^^ Ok, not looking like much yet…

    1720621789943.jpg

    ^^ Now fit the other block, with four more holes that are offset to the previous three…

    1720621789924.jpg 1720621789905.jpg

    ^^ So that's now drilled through too (and the hole for the Reset button also.)

    1720621789886.jpg

    ^^ All you do then is use a scalper to cut through all the holes, ensuring they're continuous. Then you use a mini file to clean up what is now a slot…

    1720621789862.jpg

    ^^ 90% done here, all I needed to do was deburr some of the plastic away, and it's done.

    1720621789829.jpg

    ^^ Now, we connect the ribbon cable to the SDRST quick solder board on one end…

    1720621789805.jpg

    ^^ Connect the WiFi aerials to the Wifi Board…

    1720621789786.jpg

    ^^ And stick the aerials then to the side of the inner shell. The other end of the ribbon connector then connects to the SD-card/Reset button pcb (which I conveniently forgot to photo.)

    And that's that!

    Before reassembling though, there's one more modification I'd like to make…


  • Registered Users, Registered Users 2 Posts: 11,537 ✭✭✭✭LambshankRedemption


    Shall I close Doctor?

    That is terrific work! Well done.


  • Registered Users, Registered Users 2 Posts: 7,983 ✭✭✭Inviere


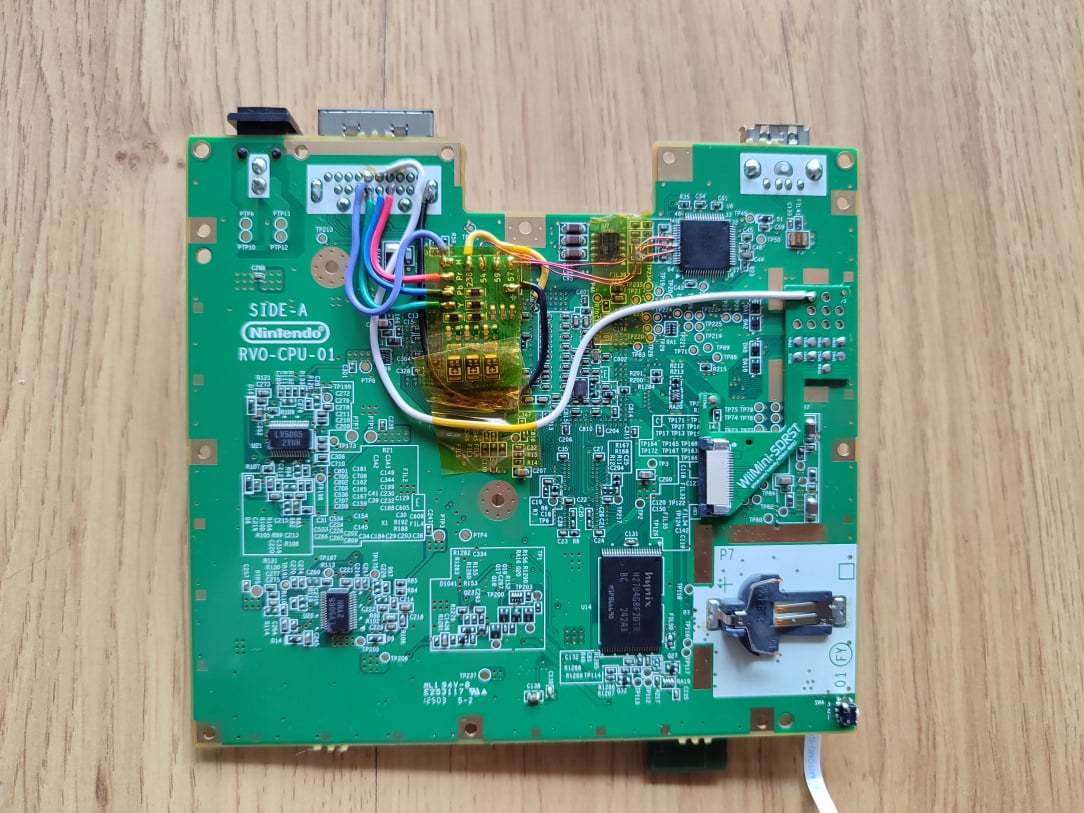
    As is, the Wii Mini has no functionality to output video any better than composite….and the quality of its composite is pretty bad. Another clever fellow, Devnol, has made an RGB Component board for the Wii Mini, which will enable Component Video and 480p functionality, so let's dive in and have a look at that…

    1721114225484.jpg 1721114225504.jpg

    ^^ This little board taps signals directly from the video chip, and outputs them to the multi-out connector on the back of the console.

    20240715_085557.JPG

    ^^ The AVE chip, which we need to tap three tiny wires to.

    20240715_090635.JPG

    ^^ Done, again with the help of the scope. I used 30awg enamel wire here, and which its size makes it perfect, its rigidity makes this tricky. I eventually replaced this with 30awg single core insulated wire instead, and it was much easier.

    20240715_090836.JPG

    ^^ Flux cleaned off and ready for wiring to the video mod board.

    1721114225467.jpg

    ^^ This is it all wired up. As I said above, I eventually redid this mod because the ribbon cabling I used here was overly thick and hard to route cleanly. I eventually redid it with 30awg solid core wire instead, and it was a much nicer finish.

    So that's all of the hardware modification. From here, we need to reassemble!

    1721114225391.jpg

    ^^ First up, we remove any crud from the CPU & GPU, clean them with IPA, and prepare some new thermal pads…

    1721114225381.jpg

    ^^ I measure the size of pad I need…

    1721114225371.jpg

    ^^ Grab some fresh 1.5mm thermal padding…

    1735618367149.jpg

    ^^ And allowing for a small overlap, we position the new pads on the two chips. This should keep them running nice and happy & cool.

    1721114225431.jpg 1721114225418.jpg

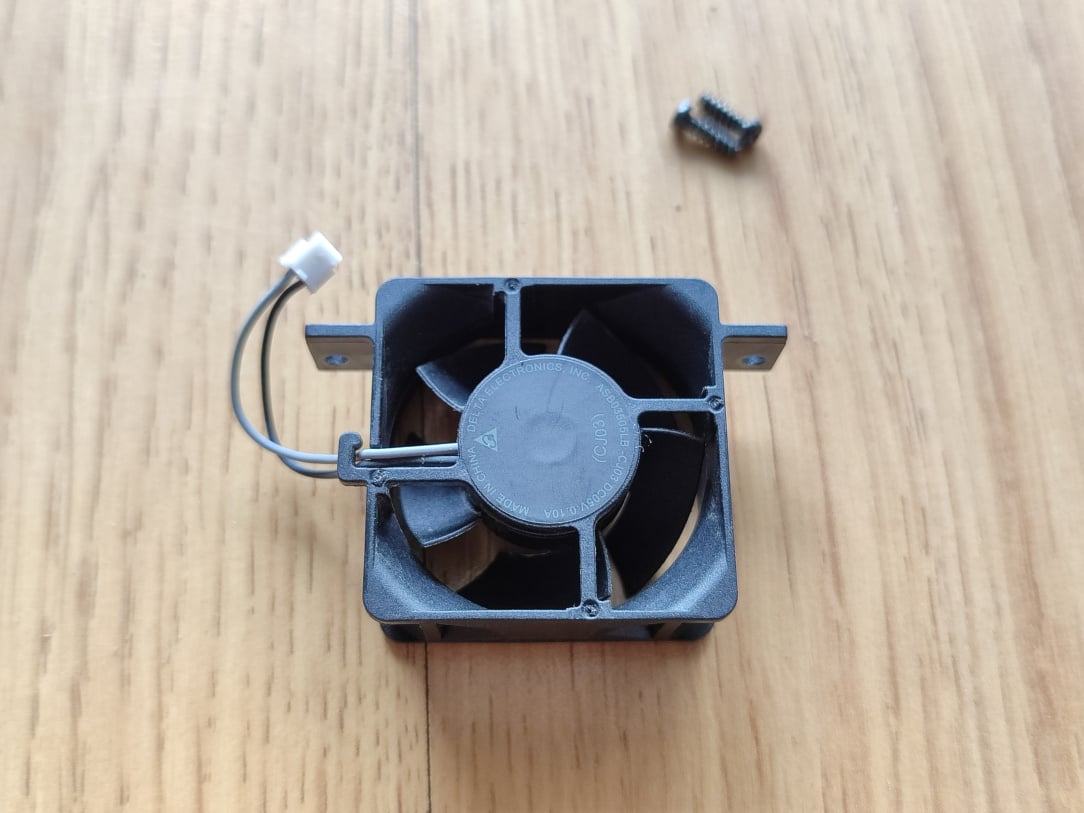
    ^^ I cleaned out the fan of any dust and gunk.

    1721114225453.jpg

    ^^ The original cmos battery was on its way out at 2.9v

    1721114225442.jpg

    ^^ A nice new battery solves that issue!

    1721114225352.jpg

    ^^ So now, we route the SDRST ribbon like so, underneath the WiFi connector…

    1721114225344.jpg

    ^^ And join it into the card/reset pcb which attaches to the the shell post and stays nicely in place. You can see the little black reset button in place too.

    1735903599849.jpg

    ^^ One thing I did read was that interreference from the fan can cause noise in the video output of the component mod board…

    1735903599840.jpg

    ^^ A pack of ferrite rings to the rescue!

    1735903599837.jpg

    ^^ Supposedly this works, and if not, it's doing no harm there really.

    1721114225333.jpg

    ^^ Cmos battery in place…

    1721114225318.jpg

    ^^ Shell lid on….time for testing…

    1721114225296.jpg

    ^^ It boots! Not only that, if I boot with the Rest button pressed, it loads into Priiloader!

    Next up, is the crucial, potentially fatal step of moving away from the Wii Mini software, and installing full Wii software….


  • Registered Users, Registered Users 2 Posts: 7,983 ✭✭✭Inviere


    Ok, so we need to tell this Wii Mini that it's no longer a Wii Mini, and is just a Wii. This gives us back Wifi Connectivity, SD menu, etc. However, if there's any problems on the WiFi end of the mod, if the soldering is right, or if there's any reason the Wii doesn't detect the WiFi board after doing this, it'll be bricked. A Wii won't boot with talking to its WiFi board!

    1.png

    ^^ Ok, to grab all the regular Wii files we need, we'll grab them directly from Nintendo using NUS Downloader.

    2.png

    ^^ We feed it this script, which tells it what WAD files to download…

    3.png

    ^^ It downloads them, and we copy paste them onto the USB drive in a newly created "wad" folder.

    1721114225055.jpg

    We use YAWM (Yet Another Wad Manager) to install the Wad files from USB…

    1721114225038.jpg

    ^^ The point of no return. I've no way to test if my WiFi board installation is correct….it better be, because if it's not, I'm goosed. I'll get a Wii Mini that boots to a black screen, and no way to interact with it.

    1721114225026.jpg

    ^^ Yolo, here goes…

    1721114225013.jpg

    ^^ Ok, it finished going through all 49 WAD files, and during the cleanup phase, it locks on this screen. Oh no….I have no choice but to do a hard reset…..balls, with any luck, it'll be ok….

    AAANNNDDD….

    Nothing. Black screen. Omg, fook, I've killed it. At this point, I've no idea what went wrong, was it my soldering? Was it YAWM locking up? Is the WiFi module maybe dead? No clue at all, and I'm properly pissed off. I hate the idea of turning a working console into a non working one. Balls!

    So, I do what any other rational person would do, and grab another Wii Mini from eBay. I buy two more kits (WiFi and SDRST), and I go again. Surely the same thing can't happen twice can it? CAN IT???

    Well, yes, yes it can. The second Wii, suffered the exact same fate. This time though YAWM didn't freeze, it completed and cleaned up perfectly, but upon reboot, black screen. This really dented my confidence, as I had no clue what the hell I'd done wrong. I tried different WiFi board from working Wii's, I got in touch with Webhdx for tech help (and how helpful and gracious with his time he was), countless hours troubleshooting and fault finding, and in the end, I could do nothing more than box them both back up and put them away. Tail firmly between legs, thoroughly beaten, no idea how, and two broken Wii Mini's.

    A few months pass by, and I happen upon a chance comment on Discord, of someone with the same issue, and an instruction of where to check for continuity on the mainboard to see if the soldering is ok. I thought, "hmm, it's probably not the issue for me, but I'll dust off these Mini's and break out the multimeter and see if there's continuity where there is supposed to be." There wasn't. Could this be it? Is this all down to bad soldering on my part?

    20240710_124032.JPG

    ^^ This was it, this was the culprit. It LOOKED like it was soldered, but in reality, the solder I had put on it wasn't making contact with the pad on the board (again, these points are TINY, and it's difficult to even get a multimeter probe to touch the exact point you want it to touch!)

    1735618367046.jpg

    ^^ BOOM!!! You absolute beauty, it's working….it's working.

    1735618367057.jpg

    ^^ Not only that, but you can see now we've a nice shiny SD Card Menu to browse too….so this is no longer a Wii Mini, it's a Wii!

    1735618367242.jpg 1735618367221.jpg 1735618367213.jpg

    ^^ I've got WiFi! It connects to me WiFi perfectly!

    1735618366944.jpg

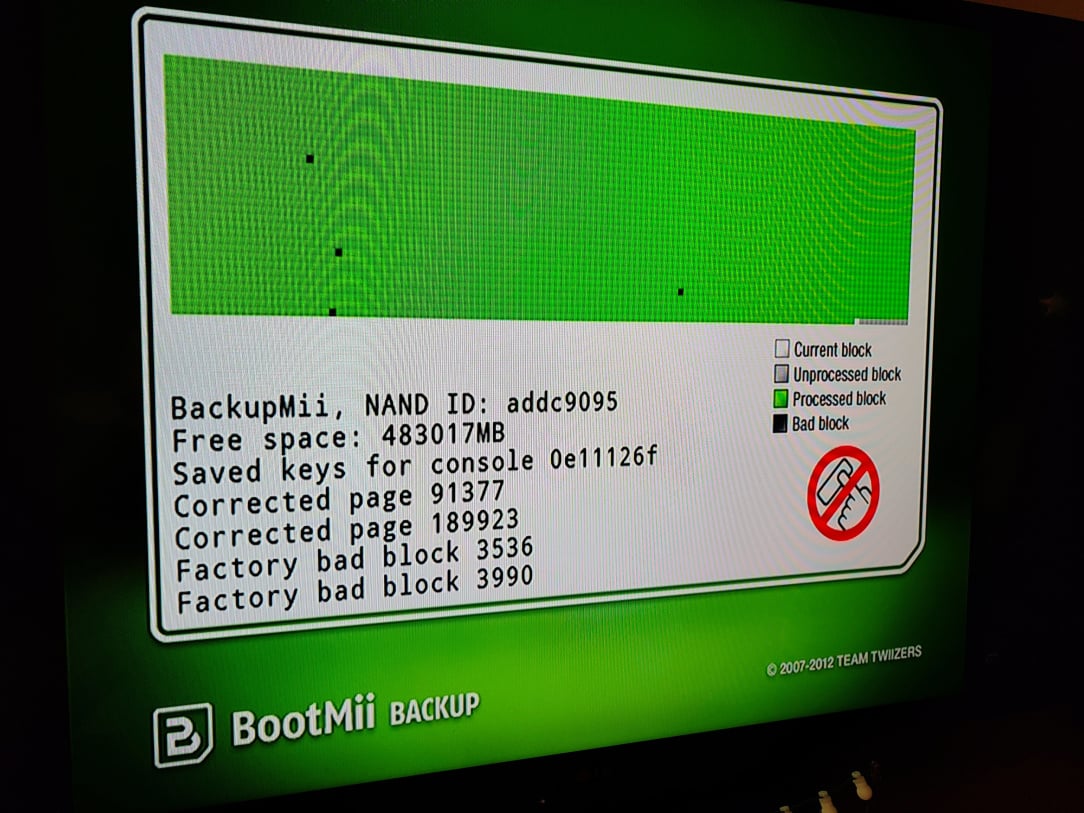
    ^^ Ok, before we do anything more, let's grab a NAND backup….just incase. At least this way, I'll have some form of disaster recovery.

    1735618366955.jpg

    ^^ You navigate BootMii through the Power & Reset buttons….

    1735618366996.jpg

    ^^ We had two bad blocks, and two Factor Bad blocks (which are uncorrectable.)

    1735618366980.jpg

    ^^ When verified, the two bad blocks are corrected, and the factory bad blocks are fine and accounted for.

    1735618366967.jpg

    ^^ Nice, all done. This spits the nand backup and keys file out onto the SD card.

    Next up, some proper testing…


  • Advertisement
  • Registered Users, Registered Users 2 Posts: 7,983 ✭✭✭Inviere


    1735618367189.jpg

    ^^ A nice big 512GB SD Card, just need to format into FAT32 for use on the Wii…

    1.png

    ^^ Done.

    1735618367135.jpg

    ^^ Moment of truth…

    1735618367124.jpg

    ^^ Lovely finish, it's really, really, unobtrusive.

    1735676479987.jpg

    ^^ WiiFlow Lite picks up the game, and scrapes the artwork for it!

    HOWEVER, the game won't boot. Balls. It just locks up the Wii Mini, requiring a hard reset.

    In my troubleshooting, I notice that WiiFlow isn't seeing any CIOS version to choose from to launch games, so it seems, my D2XL installation from previous steps has been undone somehow. It's most likely my fault, because when I connected it to my WiFi, it asked about a system update. I chose YES because I knew it was already on the latest firmware, and no harm could come….or so I thought. It began downloading something, and panic set in. It eventually errored out, but I assume it connected to Nintendo, and the softmod files got zapped.

    Best bet was to reinstall D2XL….

    1735618366893.jpg

    ^^ Aw seriously….the D2XL files will no longer install, something's borked.

    1735676480023.jpg

    ^^ After some tech help from some people far smarter than me, I install ModMii on my PC. What you do here is run Syschecker on the Wii Min, and it scans and looks at the current setup of softmod etc. It then spits a report out as a csv file on the sd card. You then feed ModMii that report, and it figures out what's wrong, what's missing, downloads the files for you, throws them into a folder for you, and sorts the whole thing out. All I needed to do was install the files ModMii downloaded…

    1735676480011.jpg

    ^^ We use YAWM again to install these missing files….

    AANNDD….it worked!!! Wii games now launch from SD Card! Thank you ModMii!

    2.png

    ^^ Next up, time to transfer over my Wii library to the SD Card. All of my Wii games are in RVZ format though, so I need to use Dolphin to convert them to ISO for me…

    3.png

    ^^ Grand, they're all converted now. ISO is only half way there though, now I need to use Wii Backup Manager to convert these ISO files into WBFS file so that a real Wii can run them…

    4.png 5.png 6.png

    ^^ All done. All automatically named, foldered, and converted to WBFS (also split into WBF1 files to allow for FAT32 limitations where necessary.)


  • Registered Users, Registered Users 2 Posts: 7,983 ✭✭✭Inviere


    Enough of this Composite rubbish, let's test this Component mod…

    1735618367074.jpg

    ^^ Component cable plugged into TV….

    1735618367067.jpg

    ^^ We select 480p…

    1735676480000.jpg

    ^^ Hard to tell in this image, but the difference is night and day…

    1735676479972.jpg

    ^^ It's SO much sharper and easier to look at. What a great little mod!


  • Registered Users, Registered Users 2 Posts: 7,983 ✭✭✭Inviere


    Towards the finish line now, time to set up WiiFlow Lite properly…

    storage emulated 0 Android data com.miui.gallery cache SecurityShare 1735676479991.jpg

    ^^ Currently, it's sitting in the Homebrew Channel, but I'll improve this soon…

    1735760070384.jpg

    ^^ The game from testing earlier, and all of the other new games behind it with no artwork etc…

    1735760070370.jpg 1735760070363.jpg

    ^^ Time to scrape all the images etc…

    1735760070352.jpg

    ^^ Muuuch better now….

    1735760070343.jpg

    ^^ Works perfectly.

    The only issues are when you quit out of a game, you go all the way back to the main Wii menu. Then you've to launch the Homebrew Channel, and then you've to launch WiiFlow Lite again to choose a different game. It's quite cumbersome, so let's sort that…

    1735760070336.jpg

    ^^ We install a Channel for Wiiflow lite, so no more needing to enter the HBC first…this channel will be launchable from the main Wii menu.

    1735760070331.jpg

    ^^ Easy as that.

    1735760070325.jpg

    ^^ A wild WiiFlow Lite Channel appears…

    1735760070313.jpg

    ^^ We set the "Return to Channel" as Wiiflow, so now, when exiting a game, we're brought directly back into WiiFlow Lite….so much nicer this way.


  • Registered Users, Registered Users 2 Posts: 7,983 ✭✭✭Inviere


    Modders do what Nintendon't it seems…

    One of the last hurdles to get over, is the lack of GameCube compatibility. Well, Nintendon't has us covered here…

    1735760070303.jpg

    ^^ I transfer over my GameCube ISO files to the SD card, and run Nintendon't….it picks them up…

    1735760070293.jpg

    ^^ And I enable virtual memory cards, as I don't have hardware ports for physical cards. This creates a virtual memory card for every GC game launched if required.

    1735760070265.jpg

    ^^ One of the wonders of Nintendont, is that it's compatible with all sorts of USB controllers, including, the Wii U GameCube Controller Adapter!

    1735760070246.jpg

    ^^ It couldn't be that simple could it?

    1735760070208.jpg

    ^^ Could it???

    1735760070165.jpg 1735760070154.jpg

    ^^ Good lord it is….it just….works!

    1735760070140.jpg 1735760070117.jpg 1735760070100.jpg

    ^^ WiiFlow Lite can just pass things onto Nintendont, so you have everything from the one launcher too…

    1735760070026.jpg 1735760070011.jpg

    ^^ What a punch this little Wii Mini packs now…

    1735760069983.jpg 1735760069969.jpg 1735760069955.jpg 1735760069948.jpg

    ^^ I install USBLoader GX also, just incase I need to use that as a launcher for any reason, grab the artwork, and install a channel for it too.

    1735903599864.jpg

    ^^ I throw on some WiiWare titles…

    1735903599855.jpg

    ^^ Not forgetting some Virtual Console titles too. Here though, these won't launch using Component 480p as they output in 240p, so you need to switch back to composite for these sadly.

    1735903599833.jpg

    ^^ That's it, job done, the Wii Mini Maxi in the flesh.

    I've ended up with x2 of these, all because of a dodgy solder joint, but I have an idea of what to do with the second one…just need to chat with the powers that be here about it…


  • Registered Users, Registered Users 2 Posts: 7,983 ✭✭✭Inviere


    Incase I forget, here's a Macho Nacho video of the install, and features like Wiimifi for onlline play etc

    Webhdx's store where the mods can be bought:

    https://store.webhdx.dev/

    And Devnol's Wii Mini RGB Component Board:

    https://www.tindie.com/products/devnol/minirgbii-wii-mini-component480p-video-add-on/


  • Advertisement
  • Registered Users, Registered Users 2 Posts: 36,366 ✭✭✭✭o1s1n
    Master of the Universe


    This is such a cool mod, really nicely done. Always thought this unit was a million times nicer looking than the original Wii.


  • Registered Users, Registered Users 2 Posts: 7,983 ✭✭✭Inviere


    Cheers man. Yeah I agree re the looks, the cour scheme, and the more square footprint work really well. I think this will be my go-to Wii now.


  • Registered Users, Registered Users 2 Posts: 36,366 ✭✭✭✭o1s1n
    Master of the Universe


    It's actually funny you stuck this up as I was looking at Wii Minis last week on ebay as it's also one of the few Nintendo consoles I've never seen in person.

    Was just reading over this again this morning. Really struck me how much work the modding community puts into developing hardware for hacks.

    I mean if you think about it, this is a fairly unloved, unused console - yet here we have wifi boards, SD card kits, RGB mod boards for it. And they're far from being hobbled together as you pointed out. Really is amazing.


  • Registered Users, Registered Users 2 Posts: 7,983 ✭✭✭Inviere


    I'd definitely say pick one up, they're very cheap...but in their original configuration they are bit....limited.

    I had an idea about raffling this one off to raise funds for an animal charity, and I'll keep the other one for myself. Need to get the nod for that though.


  • Registered Users, Registered Users 2 Posts: 2,924 ✭✭✭TechnoFreek


    Outstanding work as always. The level of detail here you go to here is pitched perfectly to give a good sense of the efforts and steps involved.

    Very jealous of your skills here! Compared to my very amateur attempts in the past!

    I have a gba sp in parts that I never got around to doing an IPS screen on due to COVID hitting back in march 2020. Just in case you need ideas for your next project 😉


  • Registered Users, Registered Users 2 Posts: 7,983 ✭✭✭Inviere


    Kind words man, much appreciated. It was a fun set of mods (apart from the confidence-knocking issue of killing two working consoles…..but the feeling of fixing them balances that out!)

    My 'skills' are just years of learning from mistakes really, there's nothing I'm doing that anyone else couldn't do. The real skills come from the people who make these mods possible.

    Re your GBA SP, aw man I've no shortage of projects in my head here. I say give it a go, follow along some youtube tutorials etc, and post away here with your progress and questions etc. You'll have fun!


  • Registered Users, Registered Users 2 Posts: 2,055 ✭✭✭Colonel Panic


    This is my favourite mod post in a while for a few reasons.

    First off, the Wii Mini is such a cute machine and it's great seeing it get mods to make it into something as capable as the original Wii.

    The other thing though is just how much modding you can do to the Wii in terms of software now.

    I've got my launch US Wii beside me here ready to play through some Metroid Prime 3 for months now and all I ever did was the original Twilight Princess save exploit to get the Home Brew channel on there to let me launch PAL games and such so going to head down a massive rabbit hole based on stuff done above!


  • Registered Users, Registered Users 2 Posts: 3,834 ✭✭✭Doodah7


    Absolutely fantastic thread. You documented and detailed the process so well, it is so clear that you almost make it look straightforward!! Of course, having the skillset, tools and equipment already is half the battle but it takes absolutely nothing away from how brilliant the project turned out!

    Do you mind me asking: how much did it cost for the parts etc. to complete this mod?


  • Registered Users, Registered Users 2 Posts: 7,983 ✭✭✭Inviere


    Thanks very much for the kind words 👍️

    Cost wise, before I add it up there's no doubt it costs more than to just buy a regular Wii…but again, restoring the removed features to the Wii Mini has its own reward, and honestly, it just looks way better than any regular Wii.

    So, you'll need a Wii Mini - I got mine untested on Adverts for €20, but to buy one on eBay complete, you're still only looking at around €50 or so.

    You'll need WebHDX's two mod kits if you want the full fat result (it CAN be done without adding WiFi however.) The two kits come in at around €50 also (https://store.webhdx.dev/)

    You'll need Devnol's Component 480p restoration mod board, which comes in at €20 - (https://www.tindie.com/products/devnol/minirgbii-wii-mini-component480p-video-add-on/)

    You'll want a Component Cable, the cheap Ali ones are absolutely fine, less than a tenner I'd say.

    You'll want a decent sized MicroSD card. My 512GB one from Amazon ran about €40 or so

    Then whatever tools are needed are obviously separate. I don't really see how it's doable without a microscope, there's just too much micro-soldering.

    So without tools, you're looking at around €150 plus or minus, depending on variations in pricing. The mod kits are plus delivery too, so there's that.


  • Registered Users, Registered Users 2 Posts: 982 ✭✭✭psicic


    Great work on the mods. Always wanted to do something similar on a Wii Mini

    Post edited by psicic on


  • Advertisement
  • Registered Users, Registered Users 2 Posts: 1 Devnol


    Hey there, nice work on those mods!

    The reason why cIOS didn't work after you installed everything was because d2xl (the wii mini cios) is based off of the Wii mini IOS 57 which you replaced when you got the regular one from NUSD. You can use the d2x cios installer used on regular Wiis from then on and it would work again. Modmii does more or less the same for you. For all intents and purposes, having the wifi module installed and working you can then on follow the regular Wii guide on wii.hacks.guide (sorry, can't post links yet)

    As for the rest of the hardware mods for the Wii mini, there's a detailed list of them on wii-mini-hacking.github.io/Pimp-My-mini/ (again, no links for me) but I haven't gotten around to finishing it all due to my high school finals.

    I'll also be moving away from Tindie for my miniRGBii sales because PayPal is the largest cancer of the financial industry.

    There's also a more integrated gamecube controller port mod in the works 👀 once I get around to that.

    I hope you enjoy your newly modded console and I'd love to see yall around in the Wii mini Hacking Discord server.

    Cheers,

    Devnol


  • Registered Users, Registered Users 2 Posts: 7,983 ✭✭✭Inviere


    Wow, Devnol in the flesh, welcome and thanks for the kind words 👌Looking forward to the GC controller port mod, very interesting!


Advertisement