Advertisement
If you have a new account but are having problems posting or verifying your account, please email us on hello@boards.ie for help. Thanks :)
Hello all! Please ensure that you are posting a new thread or question in the appropriate forum. The Feedback forum is overwhelmed with questions that are having to be moved elsewhere. If you need help to verify your account contact hello@boards.ie

Nintendo Wii U, Me, and Everybody Else - An eBay Gamble...

Options
  • 10-10-2022 5:26pm
    #1
    Registered Users Posts: 7,482 ✭✭✭


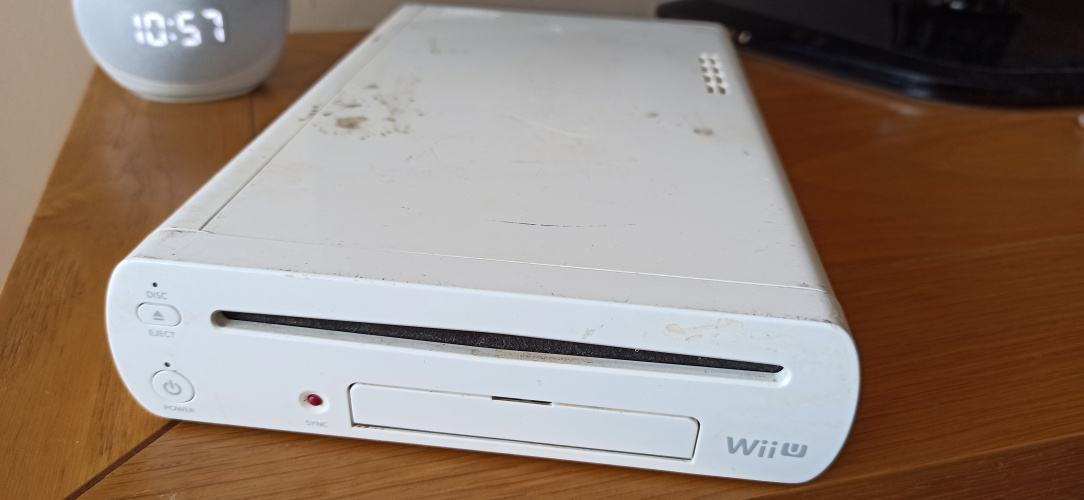
    I've a launch Premium model Wii U that has sit largely unplayed for it's entire existence, much the same as most other Wii U consoles in that sense! It's survived this long untouched, so I never felt like hacking/messing about with it, and always said I'd pick up another model at some stage to play about with. Browsing eBay recently, I spotted an Irish listing for an untested and unloved white model Wii U, for the grand total of about €25 delivered. It was the bare console, no cables or pad with it, but I thought it was cheap enough to warrant a gamble. I'd need to buy a matching Wii U pad, power supply, and other bits, but €25 for the console seemed tempting.

    ^^ Absolutely filthy, obviously hard a hard life, no sign it had ever been cleaned, grills all blocked up with honk...I'll be surprised if this thing even powers on. Especially so, given there was evidence it had been opened previously for some reason, you can see some of the white pads that cover the screws are missing, and the console shell isn't particularly well aligned. Not looking good at all, and the good old "untested" umbrella term looks like it could well and truly bite me here.

    ^^ I bought these from a seller then on Adverts, a matching Wii U Gamepad, and it's accompanying original charger. An original Wii U power supply was needed then, thich thankfully the same seller was able to provide me with. The Gamepad is in ok condition, needs a clean, but overall I'm happy enough with it. There's x2 very slight scratches on the screen, but once there's any image on the screen these become invisible.

    ^^ Ok, we've standby power anyway...at least we're getting something here.

    ^^ Ok, nice, it's actually powering up! Very surprised at this stage to be honest, given how brutalised on the exterior this console is.

    ^^ Wii U and Gamepad are now attached at the virtual hip. Looking pretty good so far, the console is powering up, displaying the correct image, and it's bluetooth module is obviously working too.

    ^^ Ro, whoever you are, take better care of your consoles lad!

    ^^ It's already on the latest firmware for this region, 5.5.5 E

    ^^ A factory reset is in order, wipe the thing clean.

    ^^ Oh Nintendo, I can't even do a factory reset without having to phone home for permission....Time to test the Wi-Fi module so....

    ^^ Connected to the internet, and factory restore in progress. Wi-Fi working, nice!

    ^^ Newly reset and set to English. Making progress...

    ^^ Sound advice....

    ^^ Obviously from a different era...

    ^^ Wow, everything appears to work, I'm genuinely surprised. I tend to see "untested" as "definitely broken", but I suppose this isn't always the case! Actually, there is one more thing to check....the disc drive...

    ^^ I pressed eject, and this popped out...nice! I'll test if it's reading discs later, I just HAVE to clean this thing first, it's beyond filthy.


Comments

  • Registered Users Posts: 4,221 ✭✭✭KeRbDoG


    Soft modding the WiiU is fairly easy, from memory it might be slightly harder than the Wii though


  • Registered Users Posts: 7,482 ✭✭✭Inviere


    Part 2 - Cleaning & Final Testing

    Time to take the Wii U apart for deep cleaning...

    ^^ Look at this, a sad sight. The side panel is screwed in, but isn't lined up with the original holes because you can see here it's sitting a few mm's off from where it should be.

    ^^ Someone couldn't fit the panel on properly, and just decided to screw it in anyway & make new holes....interesting approach.

    ^^ We're in, but there's a ways to go before bath time...

    ^^ The term minging comes to mind...

    ^^ The motherboard revealed. Surprisingly, everything looks very clean from here on. Whoever opened it previously, never made it this far.

    ^^ Signs of possible spillage. Maybe it was partially opened to dry it out?

    ^^ Bath time over, time to dry & reassemble.

    ^^ So, so, so much better.

    ^^ Minty

    ^^ The disc drive works! It's fully working so, and I'm chuffed with the gamble paying off.

    Time to take it a bit further though....


  • Registered Users Posts: 7,482 ✭✭✭Inviere


    Part 3 - Exploiting the Wii U

    So I'd like to finish this console off by soft-modding it, and adding some goodies...

    ^^ A 128GB SD Card, a 480GB SSD, and a Y-Cable to power the SSD. I know the SSD will be bottlenecked by the USB bus in the Wii U, but I wanted it for two reasons....a), the SSD is more power efficient than a traditional hard drive, this is important because I don't want to use an external power supply for the drive if I don't have to, and b), it'll be way more hardy and less vulnerable to movement/vibrations.

    ^^ Some soft-pads for the SSD to stop it scratching the Wii U surface, and to keep it from sliding around. The SSD is connected and powered then directly from the Wii U by using the y-cable.

    ^^ The SSD is detected and the format passes in seconds. Noice, looking like the drive is happily being powered by the console, and no external power supply needed.

    ^^ Browser exploit, very simple, very easy so far.

    ^^ Nand dumped and transferred to pc for safe keeping. This is for disaster recovery, whereby the nand can be restored if needed.

    ^^ PayloadLoader successfully hijacks the Health and Safety App. Loading the Health and Safety App will now load the Environment Loader...

    ^^ Now lets set the Environment Loader to boot instead of the stock Wii U menu.....and done. The Wii U will now boot to the loader, this is the first step in autoloading the cfw environment.

    ^^ A warning when trying to load Tiramisu....we need to remove the built in Update folder to prevent future updates ruining our CFW install.

    ^^ We use the UDFiine app to do this for us, and we're now ready to enter Tiramisu and then set that as the default boot environment.

    ^^ Tiramisu now set to Autoboot from cold, so we boot directly into CFW. Once booted, we use the Mii Maker to act as our Homebrew Channel launcher

    ^^ Homebrew channel installed, and Homebrew App store working away. From here I can directly download any apps etc I need.

    ^^ It goes without saying, I own anything here I'm installing, piracy is wrong, and I won't assist/guide/detail this side of things for obvious reasons. I'm choosing here to install a game I already own, directly onto the attached SSD drive.

    ^^ Nice, it installs without error.

    ^^ Installs, and launches perfectly.

    ^^ Beauty shots to finish!


  • Registered Users Posts: 211 ✭✭petejmk


    Looks great! Any chance you have the link for the SSD and y cable?


  • Registered Users Posts: 4,131 ✭✭✭Quigs Snr


    Nice job. I picked up a black untested one in a large bundle earlier in the year (because I didn't want to take my boxed one out of its packaging). Like yours it looked like it had been pulled from a skip, but they are pretty tough little units.

    Its the one that's getting the most use at the moment. I missed the whole Wii generation because I had stopped collecting, but between my kids playing Mario 3D World and Just Dance and me playing Wii RE4 and various on rails light gun-esque shooters on it, the thing is running day and night. Badly under-rated machine.

    Speaking of which... I dont have a nice boxed white model. One for the watchlist. Did you use anything special to clean it ?


  • Advertisement
  • Registered Users Posts: 7,482 ✭✭✭Inviere


    I grabbed x2 of these - https://www.ebay.ie/itm/392336255436 as I want to move my original Wii from a spinning external drive, to an SSD also.


  • Registered Users Posts: 7,482 ✭✭✭Inviere


    Nothing special or harsh on this one. The Wii U has a glossy finish, so that needs to be protected. I let the plastic soak in warm/soapy water for a good while, and then used some elbow grease. I'd have loved to use some "pink stuff" paste on it, but it'd have ruined the glossy finish so best to avoid.


  • Registered Users Posts: 8,849 ✭✭✭Steve X2


    I've started using 303 Protectant after the cleaning is done on old plastics and some other bits. It's pretty awesome stuff, but you cant use it on clear plastic and I've not tried it on gloss white.


Advertisement