Advertisement
If you have a new account but are having problems posting or verifying your account, please email us on hello@boards.ie for help. Thanks :)
Hello all! Please ensure that you are posting a new thread or question in the appropriate forum. The Feedback forum is overwhelmed with questions that are having to be moved elsewhere. If you need help to verify your account contact hello@boards.ie
Hi there,
There is an issue with role permissions that is being worked on at the moment.
If you are having trouble with access or permissions on regional forums please post here to get access: https://www.boards.ie/discussion/2058365403/you-do-not-have-permission-for-that#latest

Panelling hallway

  • 28-02-2021 5:29pm
    #1
    Registered Users, Registered Users 2 Posts: 30


    Just looking for some advice on what is the best adhesive to secure MDF 6mm paneling to old block wall.


Comments

  • Registered Users, Registered Users 2 Posts: 7,596 ✭✭✭the_pen_turner


    Just looking for some advice on what is the best adhesive to secure MDF 6mm paneling to old block wall.

    3 options i would use
    silicone like tech 7 , ct1 or sticksall. i would use sticks all because it very good but a lot cheaper.
    grab adhesivs like gripfill, pink fill, multi stick etc. i would use pink grip
    expanding foam. its great stuff for this work but would need propping to keep it flat.

    i would use sticksall if i was doing the job. lay out where the rails are going and screw it aswell behind


  • Posts: 7,499 ✭✭✭ [Deleted User]


    Are you making it yourself?
    I'm doing some myself at the moment and using a backing board.
    Drilling the backer to the block wall and gluing & nail gunning the paneling onto the backer.


  • Registered Users, Registered Users 2 Posts: 2,594 ✭✭✭karlitob


    I’m planning to do it later in the summer. I’ve concrete walls also - I thought I might have to fix them more securely (ie metal fixings) rather than adhesives. That’s probably a silly thing to say, it is?


  • Registered Users, Registered Users 2 Posts: 30 happy hurler


    Thanks the advice guys Yeah going to do the work myself. At the planning stage. Hope to start this week. Going to use 6mm or 9mm backing. Shaker style panelling glued and nailed. Guys is worth buying a nail gun any recommendations?


  • Registered Users, Registered Users 2 Posts: 2,594 ✭✭✭karlitob


    Thanks the advice guys Yeah going to do the work myself. At the planning stage. Hope to start this week. Going to use 6mm or 9mm backing. Shaker style panelling glued and nailed. Guys is worth buying a nail gun any recommendations?

    Am I right in saying the nailing is to ‘clamp’ the style while the glue is setting?


  • Advertisement
  • Posts: 7,499 ✭✭✭ [Deleted User]


    Yea the nails are rally only to hold it while the glue sets.
    I'm nearly finished mine ,will post pics tomorrow.
    Im using a ryobi airstrike. I had it already.
    I wanted to do 6mm MDF backer but the supplier only had 12mm in stock so 12 on 12 ,shaker style.
    Room is big so didn't miss the space.
    Without the pin gun you'll need to countersink your screws.much more filling but doable .


  • Registered Users, Registered Users 2 Posts: 2,594 ✭✭✭karlitob


    Yea the nails are rally only to hold it while the glue sets.
    I'm nearly finished mine ,will post pics tomorrow.
    Im using a ryobi airstrike. I had it already.
    I wanted to do 6mm MDF backer but the supplier only had 12mm in stock so 12 on 12 ,shaker style.
    Room is big so didn't miss the space.
    Without the pin gun you'll need to countersink your screws.much more filling but doable .

    Thanks for that. Could you put pics of the corners and where the panelling meets the door jamb or other sections/Joins. Thank you.

    Presume you don’t nail the backer board into concrete walls?


  • Posts: 7,499 ✭✭✭ [Deleted User]


    No I predrilled them with a countersink bit then used red plugs & wood screws.
    It's easy enough with some planning & some making it up as you go .
    You'll probably find your walls are not square or plumb , especially in the corners!


  • Posts: 7,499 ✭✭✭ [Deleted User]


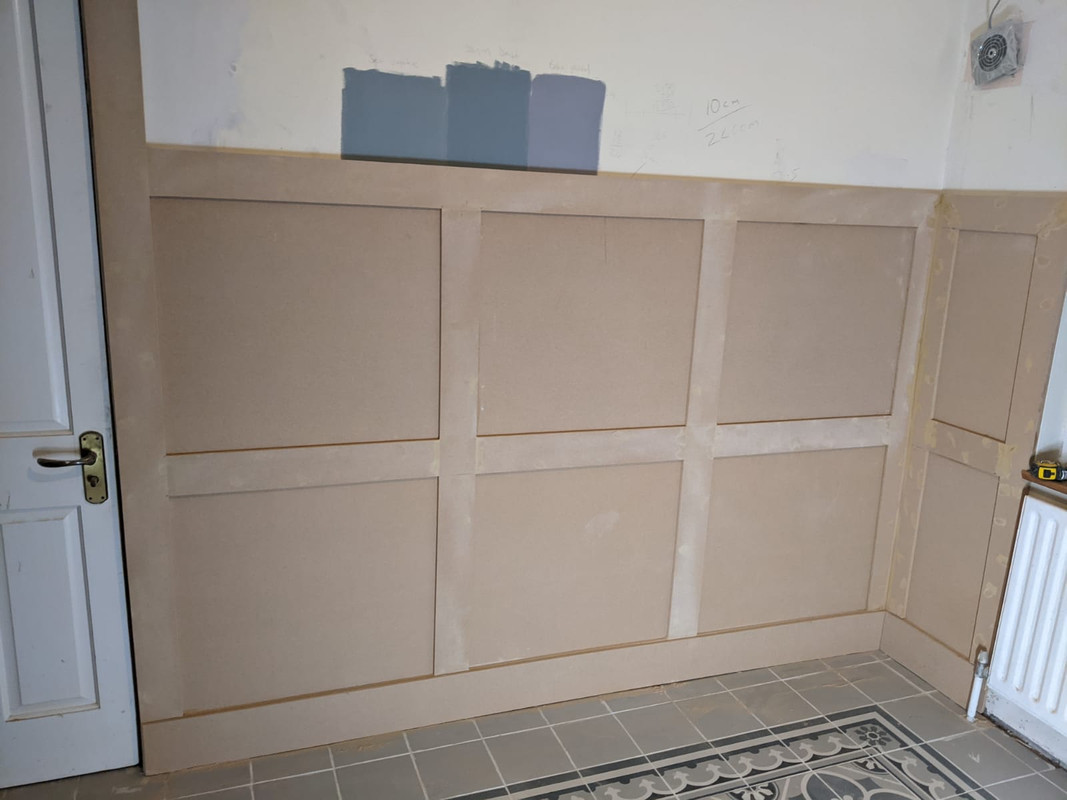
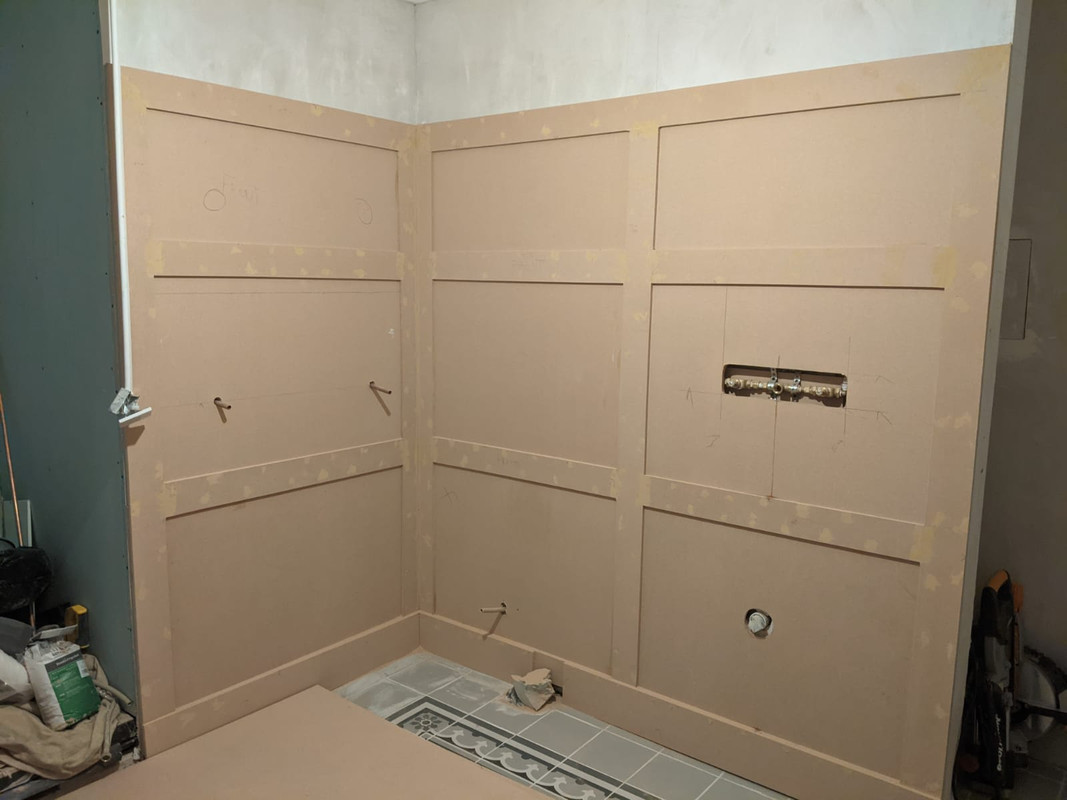
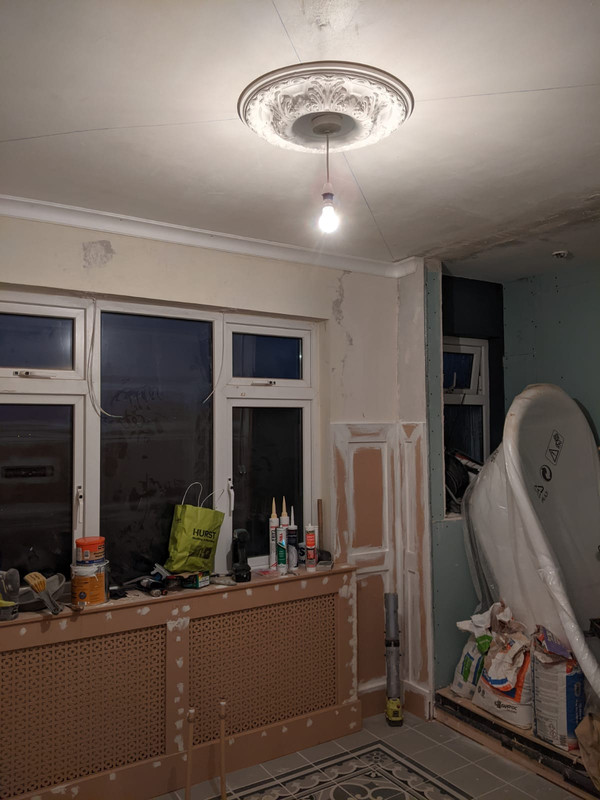
    A few pics of the work in progress
    I just made a new architrave, its double thick so it sits flush with the face of the panels.
    The panels & skirts are based on 100mm .
    I bought a tracksaw for ripping them and it worked well.
    A panel saw could have saved hours of setup but you cant have it all.

    Remember that in your corners that one piece needs to be thinner to account for the thickness of the material in the corner.


    IMG-20210219-WA0021.jpg

    IMG-20210220-WA0009.jpg

    IMG-20210221-WA0011.jpg

    And panted

    IMG-20210227-WA0011.jpg

    IMG-20210228-WA0002.jpg

    IMG-20210228-WA0004.jpg


  • Registered Users, Registered Users 2 Posts: 30 happy hurler


    A few pics of the work in progress
    I just made a new architrave, its double thick so it sits flush with the face of the panels.
    The panels & skirts are based on 100mm .
    I bought a tracksaw for ripping them and it worked well.
    A panel saw could have saved hours of setup but you cant have it all.

    Remember that in your corners that one piece needs to be thinner to account for the thickness of the material in the corner.


    IMG-20210219-WA0021.jpg

    IMG-20210220-WA0009.jpg

    IMG-20210221-WA0011.jpg

    And panted

    IMG-20210227-WA0011.jpg

    IMG-20210228-WA0002.jpg

    IMG-20210228-WA0004.jpg

    Thanks for the pictures, the end result a superb job, think I also invest in a track saw rather than circular saw with a jig.
    My the corners are not to plum. But I'll figure it out as I go I guess.

    Did you make the radiator covers yourself.?


  • Advertisement
  • Registered Users, Registered Users 2 Posts: 34,216 ✭✭✭✭listermint


    Lovely job! Only thing I'd add is skim the bottom of that door it looks too tight to floor. If it's skimming floor means there's no ventilation for your extractor to work. You want 15mm minimum clearance off the floor.


    Massive room all the same nice space


  • Posts: 7,499 ✭✭✭ [Deleted User]


    Yes, made it myself.
    got the mdf grills from woodworkers.ie
    Would have loved metal ones but they are mental money.

    Really happy with the end result ,especially for a first try.
    I wish I had made the skirts out of moisture resistant but I couldn't get any on the day but time will tell.

    A few tubes of plastic wood covers a lot :D


  • Posts: 7,499 ✭✭✭ [Deleted User]


    listermint wrote: »
    Massive room all the same nice space

    Thanks ,
    You cant tell but it was originally 2 rooms, A single toilet (where the shower is now) and a bed room.
    So I had to chase the floor for the pipes, knock two walls and put that door into the bedroom.
    All solid walls so was a good bit of graft but thankfully nearing the end.
    I think i'm going to buy a high cistern toilet to complete the look.


  • Registered Users, Registered Users 2 Posts: 2,594 ✭✭✭karlitob


    Congratulations. Absolutely fantastic job. You must be delighted with yourself. If I could get half as good a job as that I’ll be delighted.


  • Registered Users, Registered Users 2 Posts: 2,594 ✭✭✭karlitob


    No I predrilled them with a countersink bit then used red plugs & wood screws.
    It's easy enough with some planning & some making it up as you go .
    You'll probably find your walls are not square or plumb , especially in the corners!

    Understood.

    Did you use packers where the walls weren’t plumb?

    What track saw did you end up buying?

    Can you explain or show pic of the corners where you say the material has to be thinner?

    Thanks again.


  • Posts: 7,499 ✭✭✭ [Deleted User]


    karlitob wrote: »
    Understood.

    Did you use packers where the walls weren’t plumb?

    What track saw did you end up buying?

    Bought an Evolution one with extra track. For the money I wouldn't complain.
    Very repeatable cuts if you spend time on setup.

    My walls were not too bad as I battened ,boarded & skimmed them out to hide pipes.
    I just did what ever needed to be done to make them look straight :o
    Even that window is fitted wonkey, that was tricky to make it look right as it ran off quite a bit.

    I mean like this in the corners ,
    corner.jpg


  • Administrators Posts: 54,417 Admin ✭✭✭✭✭awec


    I guess another advantage of a backing board is that the raised bits should all sit completely flush and you don't need to be messing around with too much filler?

    Been considering this myself for ages, weighing up backing board or not (plasterboard walls here).


  • Registered Users, Registered Users 2 Posts: 30 happy hurler


    How do you deal the external corners do need to miter them?


  • Posts: 7,499 ✭✭✭ [Deleted User]


    No need to miter them.Just butt one up to the other.
    I wasted time doing some miters but once they were filled/sanded/painted they became invisible.


  • Registered Users, Registered Users 2 Posts: 2,594 ✭✭✭karlitob


    No need to miter them.Just butt one up to the other.
    I wasted time doing some miters but once they were filled/sanded/painted they became invisible.

    I also see you didn’t return the panelling around the window reveals. Was that because it would hit the window frame or prefer the look?


  • Advertisement
  • Registered Users, Registered Users 2 Posts: 30 happy hurler


    Thanks a million save me messing with a miter cut.


  • Posts: 7,499 ✭✭✭ [Deleted User]


    karlitob wrote: »
    I also see you didn’t return the panelling around the window reveals. Was that because it would hit the window frame or prefer the look?

    No reason,
    I still might but I dont think it will make a difference.
    the missus has curtains up now so they cant be seen.

    Also I ended up ordering a high level cistern toilet (I had previously said it wasnt worth it:confused:)


  • Administrators Posts: 54,417 Admin ✭✭✭✭✭awec


    karlitob wrote: »
    I also see you didn’t return the panelling around the window reveals. Was that because it would hit the window frame or prefer the look?

    I think the reveal is too small


  • Registered Users, Registered Users 2 Posts: 30 happy hurler


    Made good progress over the last 2 days. Thanks everybody for giving me such good advice .Brown finger thanks for the photos they give me encouragement needed. Just need to sort out the paint for it.


  • Registered Users, Registered Users 2 Posts: 2,594 ✭✭✭karlitob


    Made good progress over the last 2 days. Thanks everybody for giving me such good advice .Brown finger thanks for the photos they give me encouragement needed. Just need to sort out the paint for it.

    Fair play to you. Very impressive. They look great. And thanks for the pics.

    Would you mind taking a few of the external corners and where the it butts - the front door and the door jamb please.

    Did you take off skirting?

    What size materials did you use?

    Ballpark cost?

    Thanks


  • Registered Users, Registered Users 2 Posts: 30 happy hurler


    Ball park bout 300 euro , 6mm moisture resistant mdf
    Hallway 14m x 1m panels ,adhesive. With Dado rail and 28mm L shaped pine for corners . Pine L to finish off the corners just to made the corners looked better at the end.
    For the dado rail I sanded the corners to round them off. Same is the door jam just sanded in. Still need finish them off a bit

    Also i grabed a nail gun from screwfix made the job so much easier with 15mm brad nails


  • Registered Users, Registered Users 2 Posts: 2,594 ✭✭✭karlitob


    Ball park bout 300 euro , 6mm moisture resistant mdf
    Hallway 14m x 1m panels ,adhesive. With Dado rail and 28mm L shaped pine for corners . Pine L to finish off the corners just to made the corners looked better at the end.
    For the dado rail I sanded the corners to round them off. Same is the door jam just sanded in. Still need finish them off a bit

    Also i grabed a nail gun from screwfix made the job so much easier with 15mm brad nails

    Thanks for going to the effort to do that. Well done again. Looks great.

    Anything you’d do differently? Or wish you then but you know now?


  • Posts: 7,499 ✭✭✭ [Deleted User]


    Good stuff .
    The paint will transform it.
    Yea the brad nailer is a class job.


  • Registered Users, Registered Users 2 Posts: 30 happy hurler


    karlitob wrote: »
    Thanks for going to the effort to do that. Well done again. Looks great.

    Anything you’d do differently? Or wish you then but you know now?

    There nothing major I would do differently, maybe on the prep size make another few more saw horses for the long cuts but happy how it went. Now it done I say it straight forward project really.


  • Advertisement
  • Registered Users, Registered Users 2 Posts: 250 ✭✭Johnthemanager


    karlitob wrote: »
    Thanks for going to the effort to do that. Well done again. Looks great.

    Anything you’d do differently? Or wish you then but you know now?

    I'd suggest priming the wood before fixing.


  • Posts: 7,499 ✭✭✭ [Deleted User]


    Did you get a track saw in the end or make a jig ?
    I badly need some saw horses . Have nearly pulled the trigger on the toughbuild ones a few times but keep buying other tools!
    I was just working on the floor using a sacrificial sheet of mdf.


  • Registered Users, Registered Users 2 Posts: 34,216 ✭✭✭✭listermint


    Did you get a track saw in the end or make a jig ?
    I badly need some saw horses . Have nearly pulled the trigger on the toughbuild ones a few times but keep buying other tools!
    I was just working on the floor using a sacrificial sheet of mdf.

    Make your own horses out of 4x2 and a few screws. Take you ten minutes to do it. Very common youtube quick sawhorse.


  • Registered Users, Registered Users 2 Posts: 471 ✭✭247music


    A few pics of the work in progress I just made a new architrave, its double thick so it sits flush with the face of the panels. The panels & skirts are based on 100mm . I bought a tracksaw for ripping them and it worked well. A panel saw could have saved hours of setup but you cant have it all.


    Lovely job.. Well done.


  • Posts: 7,499 ✭✭✭ [Deleted User]


    Make your own horses out of 4x2
    I know but I want fold away ones,I need to keep room in the garge as much as possible.

    247music wrote: »
    Lovely job.. Well done.

    Thanks,
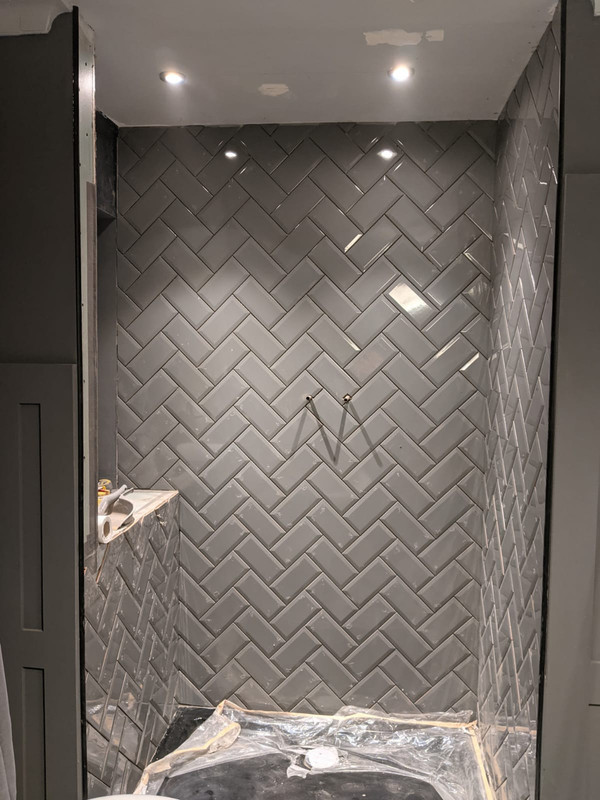
    Spent saturday&sunday tiling the shower.
    Still a bit to do but I ran out of adhisive.

    Whats-App-Image-2021-03-07-at-19-26-43.jpg


  • Registered Users, Registered Users 2 Posts: 30 happy hurler


    listermint wrote: »
    Make your own horses out of 4x2 and a few screws. Take you ten minutes to do it. Very common youtube quick sawhorse.

    Yeah there simple to put together, I had three but should had made a couple more.Clamps and supports are a most if your it single handed.


  • Advertisement
  • Registered Users, Registered Users 2 Posts: 34,216 ✭✭✭✭listermint


    I know but I want fold away ones,I need to keep room in the garge as much as possible.


    Thanks,
    Spent saturday&sunday tiling the shower.
    Still a bit to do but I ran out of adhisive.

    Whats-App-Image-2021-03-07-at-19-26-43.jpg

    Lovely job ! Thinking of doing the ensuite with herring bone myself.

    Did you forget the shower head. :)


  • Posts: 7,499 ✭✭✭ [Deleted User]


    listermint wrote: »
    Lovely job ! Thinking of doing the ensuite with herring bone myself.

    Did you forget the shower head. :)

    I hope not....its all surface mounted:D
    The herringbone is a nice challenge (45degree even moreso), I think this is my 5th diy tiling job so needed to up my game.
    Definitely not one to start out with or one to rush but it makes the standard stretcher pattern look very basic.


  • Administrators Posts: 54,417 Admin ✭✭✭✭✭awec


    I hope not....its all surface mounted:D
    The herringbone is a nice challenge (45degree even moreso), I think this is my 5th diy tiling job so needed to up my game.
    Definitely not one to start out with or one to rush but it makes the standard stretcher pattern look very basic.

    The 45 degree pattern looks really modern.

    I want to do similar in my kitchen with off-white tiles, but I've never tiled before and don't think I'd be able to do it right.


  • Registered Users, Registered Users 2 Posts: 3,188 ✭✭✭Dr_Colossus


    I hope not....its all surface mounted:D
    The herringbone is a nice challenge (45degree even moreso), I think this is my 5th diy tiling job so needed to up my game.
    Definitely not one to start out with or one to rush but it makes the standard stretcher pattern look very basic.

    Nice job, are you going with a dark coloured grout to emphasise the pattern. Pity the tiles aren't a little longer but quite difficult to get long thin tiles for some reason.
    Herringbone looks great, it and hexagon probably the most difficult in terms of planning and wrapping.
    awec wrote: »
    The 45 degree pattern looks really modern.

    I want to do similar in my kitchen with off-white tiles, but I've never tiled before and don't think I'd be able to do it right.

    Here's a good video on doing herringbone, if only doing a splashback or single wall it should be manageable as it's the wrap arounds that are the most difficult keeping everything square and true.


Advertisement