Advertisement
If you have a new account but are having problems posting or verifying your account, please email us on hello@boards.ie for help. Thanks :)
Hello all! Please ensure that you are posting a new thread or question in the appropriate forum. The Feedback forum is overwhelmed with questions that are having to be moved elsewhere. If you need help to verify your account contact hello@boards.ie
Hi there,
There is an issue with role permissions that is being worked on at the moment.
If you are having trouble with access or permissions on regional forums please post here to get access: https://www.boards.ie/discussion/2058365403/you-do-not-have-permission-for-that#latest

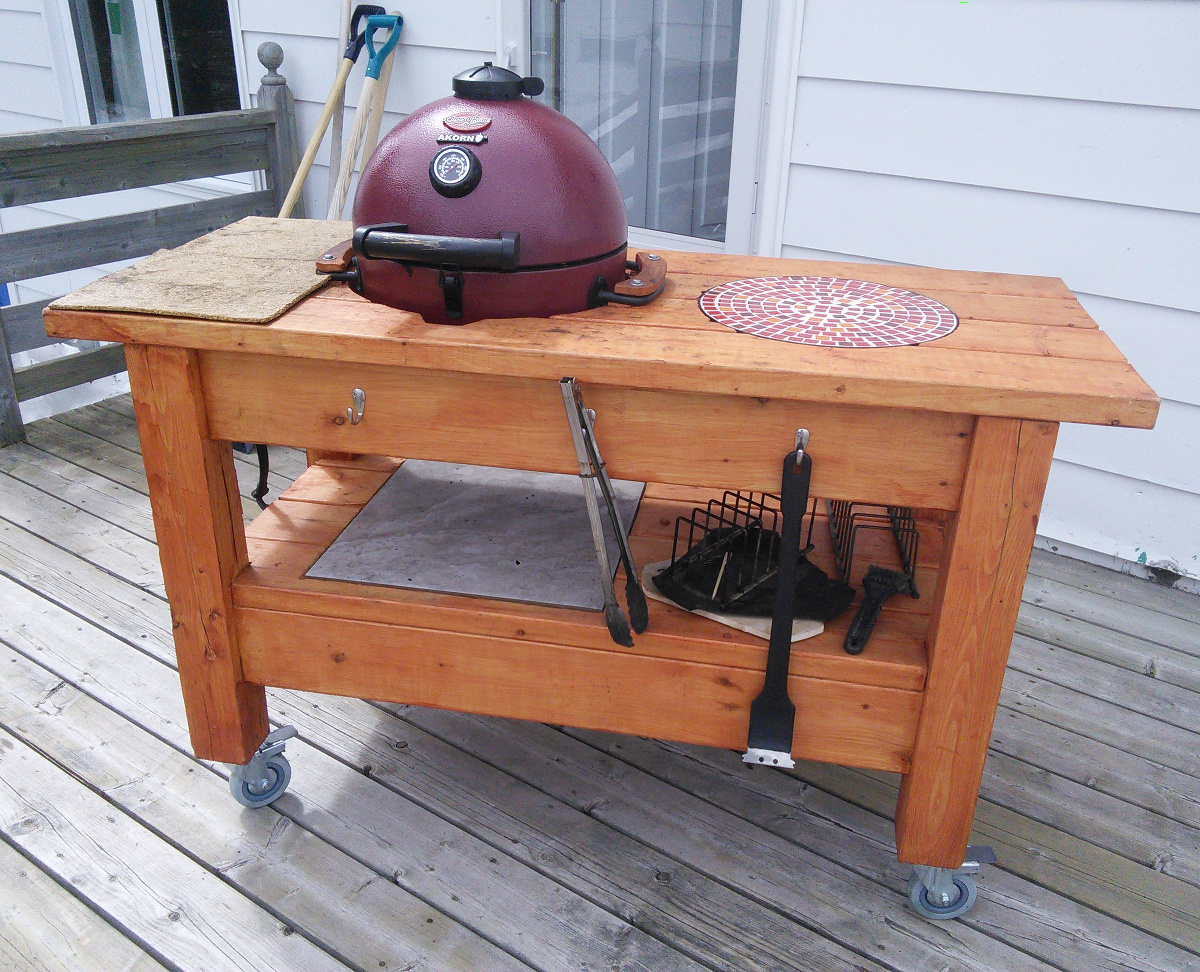
My Kamado BBQ table build

  • 03-08-2020 12:03pm
    #1
    Posts: 7,499 ✭✭✭


    Had a few pics of this over on the BBQ forum but I thought I'd share here too.
    Its done now (thank god!).
    The only scews are the ones holding the casters on.

    8 lenghts of 100 x100mm timber 92e
    2 lenghts of 75 x75mm timer 26e
    8 castors 35e
    2 sheets of ply for the formwork 60e
    sand, cement and dye 70e

    Total 283e
    Call it 300e + a good weeks work :eek:

    The start,didnt know what I was letting myself in for to be honest.
    1.jpg

    All mortice and tennon joints,pinned and glued.First (and last) time ever doing them.
    2.jpg

    Each side took a day to make with the skill saw doing most of the work.
    3.jpg

    Took another day to join the two sides.
    4.jpg

    Strapped up and glued and fairly square.
    5.jpg

    Formwork done.
    6.jpg

    Luckliy I have a mixer so didnt take long to pour the counters.
    There is a decent amount of rebar in there.
    7.jpg

    Bagged and let set for 6 days .Im not very patient!
    8.jpg

    Almost there !
    Work tops were ground down and sanded.
    Edges were chamfered.The whole thing,wood and all was watersealed .
    9.jpg

    And now the moment of truth !
    Fits like a glove!*

    11.jpg
    13.jpg
    12.jpg


    *it didnt quite fit like a glove!
    I didnt account for some bracketry/fastners on the hinge so needed to do some grinding towards the back of the cut out.

    Overall extremly plesaed with it.
    Its not quite as dark as I wanted it to and I regret not doing the two lower worktops out of concrete .I do plan on shelving them out.


Comments

  • Registered Users, Registered Users 2 Posts: 2,511 ✭✭✭Purgative


    Very tidy unit. That'd cost a fair bit to buy similar.


  • Posts: 7,499 ✭✭✭ [Deleted User]


    Purgative wrote: »
    Very tidy unit. That'd cost a fair bit to buy similar.

    Thanks,yes they are insane money.
    In fairness the labour is massive.
    I forgot to add 30e for the water seal and 20e for a cupped grinding disk .

    So 350e or so if you have the tools allredy.
    A workshop with a bench/table saw would make life so much easier!


  • Registered Users, Registered Users 2 Posts: 14,012 ✭✭✭✭Cuddlesworth


    A workshop with a bench/table saw would make life so much easier!

    Says any person who has ever had to do a decent amount of woodwork.

    Looks good, how did you stop the concrete sticking to the formwork?


  • Posts: 7,499 ✭✭✭ [Deleted User]


    Says any person who has ever had to do a decent amount of woodwork.

    Looks good, how did you stop the concrete sticking to the formwork?

    I was supposed to use WD40 as a release agent but I forgot to.
    Thankfully it didn't stick at all!


  • Registered Users, Registered Users 2 Posts: 2,725 ✭✭✭oleras


    Fantastic job, well done sir !

    Hoping to do similar, albeit without the concrete top.


  • Advertisement
  • Registered Users, Registered Users 2 Posts: 13,365 ✭✭✭✭McMurphy


    Fairplay to you BrownFinger, that is what you could call top quality craftsmanship and no doubt about it.

    10/10.


  • Registered Users, Registered Users 2 Posts: 31,223 ✭✭✭✭Lumen


    Outstanding!


  • Posts: 7,499 ✭✭✭ [Deleted User]


    Thanks just about to cook up some ribs now.
    A design improvement would be to have a hole in the lower shelf right under the air vent/ash opening.
    would be easier to clean out the ash but that would take more planning.
    Im slightly concerned about water sitting on the tops of the timber on the lower shelf.I might have to flash them with something.
    I think im going to try make a fitted cover that allows the oven to be used while the rest is covered up.


  • Registered Users, Registered Users 2 Posts: 31,223 ✭✭✭✭Lumen


    You could add top-hinged flaps to the three sides of each end and then you'd have a FLIP OUT MEGATABLE, these would act like shutters when stowed.

    Wouldn't have the purity of design though.


  • Registered Users, Registered Users 2 Posts: 10,153 ✭✭✭✭dodzy


    Great work, and love the garden / view


  • Advertisement
  • Registered Users, Registered Users 2 Posts: 815 ✭✭✭mp31


    Superb table and an even better view - dude you live in a cool place!

    Question: How did you make the mortices and tenons? Hand cut or machine cut?


  • Closed Accounts Posts: 544 ✭✭✭SnowyMay


    Wow - very impressive! Do you have training in carpentry and the like or did you pick it up along the way?

    I’d love to take up a hobby like this, but my slight fear of power tools, utter lack of patience, and the fact that I haven’t made anything more than a table when I was a kid makes me fear for the safety of me, and anybody nearby.


  • Posts: 7,499 ✭✭✭ [Deleted User]


    No formal training in woodwork.didnt do it in school but when I was a lad I worked for a cabinet maker for 2/3 years so picked up a few things!
    But saying that this is the first time I've done a mortice and tennon joint!!
    Tennons were done with a skill saw. 9mins 30into this video for example.
    https://youtu.be/O7bL02E0KLU

    Mortice with a auger bit and chisel.


  • Registered Users, Registered Users 2 Posts: 165 ✭✭stickman1019


    Congrats very impressive PM sent aswell.


  • Posts: 7,499 ✭✭✭ [Deleted User]


    Congrats very impressive PM sent aswell.

    Cheers,
    I have noticed a few hairline cracks !


  • Registered Users, Registered Users 2 Posts: 1,178 ✭✭✭Mango Joe


    Wow! I really like this project of a thing that I didn't even know was a thing!!!

    Very well done - Would you make them professionally?!

    I actually have some 100mm X 100mm posts but can't imagine taking this on due to the joints looking like a nightmare.

    I wonder if it could be simplified?

    PS is frost an issue with the concrete?


  • Posts: 7,499 ✭✭✭ [Deleted User]


    You could use pocket holes or brackets or just really really long screws.
    I only did the joints to expand my woodworking skills.

    You can make them with half the counter space like this.

    Kamado_01.jpg
    But as you can see I have a massive patio so things get lost on it!

    Time will tell on the worktop.
    If they crack they crack,its no big deal.
    Everything is fixable :o


  • Registered Users, Registered Users 2 Posts: 165 ✭✭stickman1019


    Well had a crack at this finally (On a much smaller scale) attached are the results fairly happy with it in the end. Was a fairly big learning curve not my usual cup oftea so to speak and kept me busy during lockdown.


    https://postimg.cc/gallery/BF9TYnW


  • Posts: 7,499 ✭✭✭ [Deleted User]


    Well had a crack at this finally (On a much smaller scale) attached are the results fairly happy with it in the end. Was a fairly big learning curve not my usual cup oftea so to speak and kept me busy during lockdown.


    https://postimg.cc/gallery/BF9TYnW

    Oh yes! you gotta be happy with that :D
    I still havent finished the bottom shelves on mine :o

    my worktop has a few hairline cracks that havent gotten worse over winter.
    I am builing a raised deck over the patio (hopefully this year) so I'm going to have to move mine up 400mm (Egyptian style).
    Going to be hard not to crack it more during that process.


Advertisement