Advertisement
If you have a new account but are having problems posting or verifying your account, please email us on hello@boards.ie for help. Thanks :)
Hello all! Please ensure that you are posting a new thread or question in the appropriate forum. The Feedback forum is overwhelmed with questions that are having to be moved elsewhere. If you need help to verify your account contact hello@boards.ie
Hi there,
There is an issue with role permissions that is being worked on at the moment.
If you are having trouble with access or permissions on regional forums please post here to get access: https://www.boards.ie/discussion/2058365403/you-do-not-have-permission-for-that#latest

Sous-vide partial mash

  • 18-02-2014 5:36pm
    #1
    Registered Users, Registered Users 2 Posts: 20,299 ✭✭✭✭


    So I have a keg system already. US based and have a dual tap kegorator and I own two 5G Sankey kegs. So will be doing my own kegging.

    I also own a sousvide supreme with a 3G capacity.

    I also possess some knowledge recently acquired about the brewing process.

    I have questions. (No surprise says the HB forum)

    1. Is there any reason why I could not do highly accurate multi-rest mashes temperature controlled easily by the sous vide at about 2.5G liquid quantity total (5 gallon batch)? Seems ideal for this and I figure I already have the guts of an electric brewery in the kitchen.

    2. As the sousvide has no spigot, is rectangular (no whirlpooling) what would be the cheapest way to extract wort, I'm guessing a boil in the bag approach which lets me transfer the grain over to the boil kettle and sparge there. Are there any downsides to sparging cooled grain if I let it fully drain before transfer?

    3. With this approach should I sparge with the full other 2.5G to make a full 5 gallon brew or adapt recipes to make smaller batches? Big boil kettle or smaller one?

    4. If I opt for smaller batches is there any downside to fermenting say 3G in a 5G container?

    5. The kegs are plastic kegs, any downside to lagering in them? http://plastickegs.com/product_item/16-bbl/

    5. I'd love to get a Bock, a Helles or a Pilsner going with this, I know that is ambitious for a first brew, any thoughts?

    Cheers for supporting my mad schemes.


Comments

  • Registered Users, Registered Users 2 Posts: 20,299 ✭✭✭✭MadsL


    No comments? :(


  • Registered Users, Registered Users 2 Posts: 2,943 ✭✭✭Bogwoppit


    MadsL wrote: »
    No comments? :(

    A bit over my head, sorry.

    Bw


  • Registered Users, Registered Users 2 Posts: 8,779 ✭✭✭Carawaystick


    MadsL wrote: »
    So I have a keg system already. US based and have a dual tap kegorator and I own two 5G Sankey kegs. So will be doing my own kegging.

    I also own a sousvide supreme with a 3G capacity.

    I also possess some knowledge recently acquired about the brewing process.

    I have questions. (No surprise says the HB forum)

    1. Is there any reason why I could not do highly accurate multi-rest mashes temperature controlled easily by the sous vide at about 2.5G liquid quantity total (5 gallon batch)? Seems ideal for this and I figure I already have the guts of an electric brewery in the kitchen.
    How much power has your sous vide?

    How long will it take to heat up the steps? 9l water&grain
    If it's 30 mins, then it's not great...
    MadsL wrote: »
    2. As the sousvide has no spigot, is rectangular (no whirlpooling) what would be the cheapest way to extract wort, I'm guessing a boil in the bag approach which lets me transfer the grain over to the boil kettle and sparge there. Are there any downsides to sparging cooled grain if I let it fully drain before transfer?
    The sugars go gummy as they cool down and you need hotter water to heat the malt back up to sparge, so you will get a bit more tannins if you use hotter water.
    I'd use a grain bag and sparge in water in your wort kettle at 72 or so degrees
    MadsL wrote: »
    3. With this approach should I sparge with the full other 2.5G to make a full 5 gallon brew or adapt recipes to make smaller batches? Big boil kettle or smaller one?

    4. If I opt for smaller batches is there any downside to fermenting say 3G in a 5G container?
    There'll be a larger %age loss from the trub and dregs in the fermenter from a smaller fermentation, but nothing else worth minding
    MadsL wrote: »
    5. The kegs are plastic kegs, any downside to lagering in them? http://plastickegs.com/product_item/16-bbl/
    I've lagered in plastic fermenters before,
    No issues. Others reckoned the beer was good
    MadsL wrote: »
    5. I'd love to get a Bock, a Helles or a Pilsner going with this, I know that is ambitious for a first brew, any thoughts?

    Cheers for supporting my mad schemes.
    I suppose a bock would work best with temp stepping in the mash

    A lager will take much longer from breed at to tasting, and you'll tie up a vessel for lagering, unless you've spares


  • Registered Users, Registered Users 2 Posts: 20,299 ✭✭✭✭MadsL


    How much power has your sous vide?

    How long will it take to heat up the steps? 9l water&grain
    If it's 30 mins, then it's not great...

    Thank you for your response...really appreciate it.

    I think a few pounds of cheap rice, a stopwatch and a four step all grain recipe would answer that. :D
    The sugars go gummy as they cool down and you need hotter water to heat the malt back up to sparge, so you will get a bit more tannins if you use hotter water.
    I'd use a grain bag and sparge in water in your wort kettle at 72 or so degrees
    So teabag it in the sparge water then add the wort as I can keep the wort at temp in the sousvide - makes sense.
    There'll be a larger %age loss from the trub and dregs in the fermenter from a smaller fermentation, but nothing else worth minding

    Great...
    I've lagered in plastic fermenters before,
    No issues. Others reckoned the beer was good
    Good stuff...they were a bargain at $35 each used. Might get two more. The brewary had a narrow escape with one exploding so are dumping them cheap.
    I suppose a bock would work best with temp stepping in the mash

    I love bocks - any tips on decoction?

    Thanks again.

    A lager will take much longer from breed at to tasting, and you'll tie up a vessel for lagering, unless you've spares[/QUOTE]


  • Registered Users, Registered Users 2 Posts: 32,386 ✭✭✭✭rubadub


    How much power has your sous vide?

    How long will it take to heat up the steps? 9l water&grain
    If it's 30 mins, then it's not great...
    Amazon quotes one as being 550W.

    http://www.amazon.co.uk/SousVide-Supreme-Demi-Water-Oven/dp/B004CNT3M2/ref=sr_1_2?ie=UTF8&qid=1393256415&sr=8-2&keywords=sous+vide+supreme

    so it will take a while to heat, also I am not sure of how the device would operate, it may have 2 elements or more and heat up quickly to one point and back off to a low power element as it gets closer to setpoint, so take even longer.

    You could possibly use a separate travel cup element to speed up heating, this one is fairly low power.

    http://www.amazon.co.uk/Relags-travel-immersion-heater-Watt/dp/B000KBEWQW/ref=sr_1_1?ie=UTF8&qid=1393256697&sr=8-1&keywords=travel+element


  • Advertisement
  • Registered Users, Registered Users 2 Posts: 20,299 ✭✭✭✭MadsL


    rubadub wrote: »
    Amazon quotes one as being 550W.

    http://www.amazon.co.uk/SousVide-Supreme-Demi-Water-Oven/dp/B004CNT3M2/ref=sr_1_2?ie=UTF8&qid=1393256415&sr=8-2&keywords=sous+vide+supreme

    so it will take a while to heat, also I am not sure of how the device would operate, it may have 2 elements or more and heat up quickly to one point and back off to a low power element as it gets closer to setpoint, so take even longer.

    You could possibly use a separate travel cup element to speed up heating, this one is fairly low power.

    http://www.amazon.co.uk/Relags-travel-immersion-heater-Watt/dp/B000KBEWQW/ref=sr_1_1?ie=UTF8&qid=1393256697&sr=8-1&keywords=travel+element

    Sous-vides are designed to slowly operate at exact temps for hours on end.

    Let me ask a naive question about malt chemistry, when extracting enzymes I had assumed that the timings were minimum timings to hold at that temp, not precise stops. Is there are downside to mashing longer at a particular temperature, and longer overall (say 2 hours) will this ruin my mash?

    Also perhaps decotion is the answer to increasing the temp in the sousvide faster than the heating element. As I am looking at a traditional Bock perhaps this solves the slowness of the sousvide?

    Sorry to be technical as a novice but I enjoy modernist cooking and understanding the science behind cooking processes.

    Thanks again for the help.


  • Registered Users, Registered Users 2 Posts: 20,299 ✭✭✭✭MadsL


    I might have just answered my own question...
    In a perfect world, a mash, when brought to a rest temperature, can be held at that temperature for the duration of the rest.

    http://www.promash.com/tipsntricks/mash/KnowTemp.html


  • Registered Users, Registered Users 2 Posts: 20,299 ✭✭✭✭MadsL


    So forgive me if I use this thread as something of a blog of jumping straight into a complex process, but please if anyone has experience jump in. I realise now that I'm probably going towards all grain, not partial here.

    So I found this description and tested the sousvide to see if I could get a reasonable understanding of the steps.
    Step Mash[edit]
    If you are planning to use undermodified malts, or just simply want a better quality product, the Step Mash (or Program mash or Temperature-Controlled Step Infusion Mash), is only slightly more complicated than iso-thermal mashing. There can be two or three steps, or rests, in your mash.

    Proteolytic stand Mashing takes place to achieve a strike temperature of about 50°C (122°F) and held there for roughly a half hour for the protein rest.

    Saccharification stand The mash is brought to 63°- 65°C (150°-158°F),(20 to 60 minutes depending on the required fermentability of the wort) for the beta-amylase to produce the fermentable maltose sugars for another half hour.

    Conversion stand The mash is raised to 71 - 72°C (about 20 minutes) for the alpha amylase to break down any large starch particles and to achieve starch conversion. The end of this stand is confirmed with the starch test

    Mash out stand the mash is finally raised to 76°C for 5 minutes to denature all mashing enzymes.

    Now I tested raising 3G of water to the mid point of each stand and got 18 mins, 9 minutes and 5 min 30 sec. So about 1 min 20 secs for every degree centigrade with plain water.

    Now I know adding grain will have an impact...
    In practice, for every pound of grist in the mash, you will use 1 liter (1 qt) of water at 54°C (130°F) to get the mash to the initial protein rest.

    If I buy some grain then I should be able to figure out what timings I need to have for each step to have the mash rise through the temperature profile;
    Then, for each pound of grist, you will use .5 liter (½ qt) of 93°C (200°F) water to raise the temperature 10°C (18°F).

    Hmm...this or a decotion technique.

    So. I need a brew kettle. :D

    Wish me luck.


  • Registered Users, Registered Users 2 Posts: 216 ✭✭Whisko


    If you're doing a partial mash why not just use a stock pot BIAB style and keep all the base malt LME/DME?

    I'm not sure what a Sous-vide is but it looks like a mini mash tun that regulates the temps?

    How will you sparge the grain in that? just a regular batch sparge?


    If you want to brew a lager go for it, just make sure you can regulate your fermentation temps properly.

    A long mash time at a lower mash temp will create a more fermentable wort. This guy explains it better than I could. - http://byo.com/mashing/item/1604-what-mash-temperatures-create-a-sweet-or-dry-beer


  • Registered Users, Registered Users 2 Posts: 20,299 ✭✭✭✭MadsL


    Whisko wrote: »
    If you're doing a partial mash why not just use a stock pot BIAB style and keep all the base malt LME/DME?

    I should edit the thread title. I think this will be AG.
    I'm not sure what a Sous-vide is but it looks like a mini mash tun that regulates the temps?

    Exactly. To within 0.5 degrees/
    How will you sparge the grain in that? just a regular batch sparge?

    I think either by syphoning (building a slotted pipe or braided steel strainer at the bottom) or BIAB and then rinsing over another pot.
    If you want to brew a lager go for it, just make sure you can regulate your fermentation temps properly.
    I have a fridge set aside for it, will the internal controls be enough or will I need a temperature controlller?
    You deffinetly need a brew kettle since you're going to have to boil the wort after the mash.

    Yeah, the choices are killing me at the moment. I saw a really nice 10 gallon one for $169 SS with temp guage and ball valve. Not sure if I can justify that money yet as I also need to finish my second kegorator build,


  • Advertisement
  • Registered Users, Registered Users 2 Posts: 216 ✭✭Whisko


    MadsL wrote: »
    I should edit the thread title. I think this will be AG.


    Exactly. To within 0.5 degrees/


    I think either by syphoning (building a slotted pipe or braided steel strainer at the bottom) or BIAB and then rinsing over another pot.


    I have a fridge set aside for it, will the internal controls be enough or will I need a temperature controlller?


    Yeah, the choices are killing me at the moment. I saw a really nice 10 gallon one for $169 SS with temp guage and ball valve. Not sure if I can justify that money yet as I also need to finish my second kegorator build,

    Temperature controllers are easy to put together and cheap as chips. I don't think a regular fridge will be able to be set to lager fermentation temps.

    Get yourself a stc-1000 off Ebay and a cheap tube heater. That'll both cool and heat the fridge in Summer/Winter and give you control year round.

    Lagers take a long time to come good/ lager. It'll be occupying your brew fridge for atleast 2 months while it ferment out and lagers. Then you need to condition on top of that. I still haven't touched a pilsner I brewed back in early November. - I'd brew yourself a hoppy pale ale first to drink while the lager is getting ready. (The wheat, blonde and stout I brewed in November have all gone! - I have a Sierra Nevada clone that has been 3 weeks in the bottle and I will try this weekend)

    Get yourself a big stock pot, or a plastic FV and two cheap kettles. You don't need to watch the temp of boiling wort!


  • Registered Users, Registered Users 2 Posts: 20,299 ✭✭✭✭MadsL


    Whisko wrote: »
    Temperature controllers are easy to put together and cheap as chips. I don't think a regular fridge will be able to be set to lager fermentation temps.

    Get yourself a stc-1000 off Ebay and a cheap tube heater. That'll both cool and heat the fridge in Summer/Winter and give you control year round.

    Lagers take a long time to come good/ lager. It'll be occupying your brew fridge for atleast 2 months while it ferment out and lagers. Then you need to condition on top of that. I still haven't touched a pilsner I brewed back in early November. - I'd brew yourself a hoppy pale ale first to drink while the lager is getting ready. (The wheat, blonde and stout I brewed in between have are all gone! - I have a Sierra Nevada clone that has been 3 weeks in the bottle and I will try this weekend)

    Get yourself a big stock pot, or a plastic FV and two cheap kettles. You don't need to watch the temp of boiling wort!

    Great advice. I do need to watch the headroom of the kettles though, right..which is why a 10G pot appeals...


  • Registered Users, Registered Users 2 Posts: 32,386 ✭✭✭✭rubadub


    MadsL wrote: »
    Now I tested raising 3G of water to the mid point of each stand and got 18 mins, 9 minutes and 5 min 30 sec. So about 1 min 20 secs for every degree centigrade with plain water.

    Your sous vide device does not circulate water, some do this to make sure its all the same temp. It has a max power of 550W, this does not mean this is going all the time at this power. I said before it might have 2 elements say 500W and 50W and turnoff the 500W as it gets near your set point temp. Or else it may have 1 element and turn it off as it approaches temp. This allows time for the residual heat in the element to transfer to the water, it also allows the thermostat (or whatever the control method is) to respond. Since your unit is not circulating water it is probably doing this to prevent overheating, and have a gentle rise. Otherwise it would be prone to going over the desired setpoint temp, which is extremely critical with sous vide cooking (as you know, others reading might not).

    If this is the case and you want to heat faster, then a trick is to set a much higher setpoint temp than you really want. As you approach it give the liquid a good stir to get the temp uniform. Then as you get close to it you can turn it off, then reset to your true desired temp and let its cautious control operate and give a gentle final heat.

    To test if it does have varying power control you simply need to pour in way 5 litres of water at known temp and set to say 70C, now time how long it takes in normal operation to get there, you can give it a good stir a few times. Next do it again with the same 5L (accurate water measurement is needed) at the same temp. Now set it to 90C or so and see how long it takes to get to 70C this time. If it goes faster then you know it is backing off power.


  • Registered Users, Registered Users 2 Posts: 20,299 ✭✭✭✭MadsL


    rubadub wrote: »
    To test if it does have varying power control you simply need to pour in way 5 litres of water at known temp and set to say 70C, now time how long it takes in normal operation to get there, you can give it a good stir a few times. Next do it again with the same 5L (accurate water measurement is needed) at the same temp. Now set it to 90C or so and see how long it takes to get to 70C this time. If it goes faster then you know it is backing off power.

    Test results pending :D Great idea to test..


  • Registered Users, Registered Users 2 Posts: 20,299 ✭✭✭✭MadsL


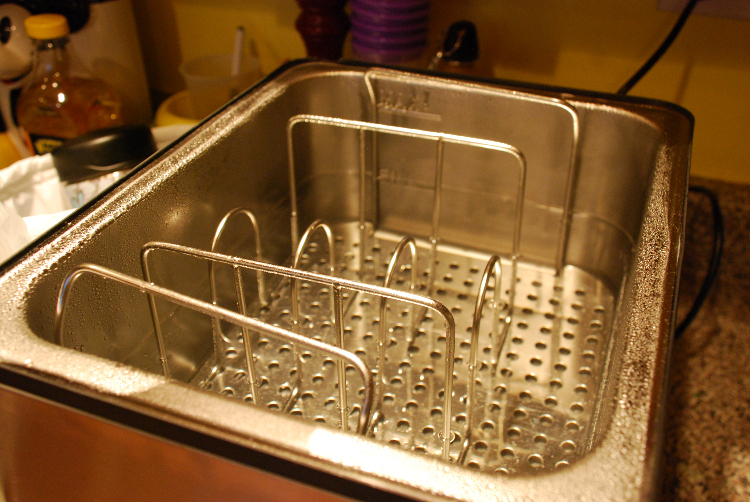
    Ok, sousvide is warming up. But in the meantime....false bottom can be set at any height, is this too 'holey' - should I add a finer screen or...

    Empty+Sous+Vide+Supreme.jpg

    I plan to build a very fine gauge copper manifold...but I will need to suction or syphon the wort out of the sous-vide. Perhaps BIAB is way less hassle...

    http://www.howtobrew.com/appendices/appendixD-1.html


  • Registered Users, Registered Users 2 Posts: 20,299 ✭✭✭✭MadsL


    Test results are in- no stir

    1. 60C water to 70C. set temp point 70C = 9m 30secs
    2. 60C water to 70C. set temp point 80C = 8m 40secs
    3. 60C water to 70C. set temp point 90C = 9m 47secs

    Looks like it makes no difference.


  • Registered Users, Registered Users 2 Posts: 32,386 ✭✭✭✭rubadub


    Interesting, I was pretty sure it would have varied power.

    From your figures I am estimating you had 7/7.5 litres in there? 7-7.5 litres should have had a heat up time around what you got at 550W. The heaters are typically a little under power and some power is for the electronics so maybe a little under 7 litres.


  • Registered Users, Registered Users 2 Posts: 20,299 ✭✭✭✭MadsL


    rubadub wrote: »
    Interesting, I was pretty sure it would have varied power.

    From your figures I am estimating you had 7/7.5 litres in there? 7-7.5 litres should have had a heat up time around what you got at 550W. The heaters are typically a little under power and some power is for the electronics so maybe a little under 7 litres.

    I filled to the min line - let me go check that volume...


  • Registered Users, Registered Users 2 Posts: 20,299 ✭✭✭✭MadsL


    You would *think* the FILL line volume would be in the manual :rolleyes:

    Between FILL and MAX takes 5 litres. Total capacity is 11.2 litres. So 6.2 litres was the test volume.


  • Registered Users, Registered Users 2 Posts: 8,779 ✭✭✭Carawaystick


    Palmer has a bit about decoction mashing
    http://www.howtobrew.com/section3/chapter16-4.html


    To be honest, seeing as you've a small mash tun, but with accurate temp control,
    I'd make several small batches of beer, with all things being equal bar the mashing ( same malt/hopping/yeast)

    See how mashing affects the brew.

    Even single rest mashes of 4l brews would show significant differences between 63/68deg

    You'ld have a great handle on mashing temps if you made 4 or 5 brews this way, and you'ld end up with the same amount of beer as a normal brew, but with variety.

    If you aim for 4l of wort, your sous vide should heat quicker than you've timed, and you can use 5l water bottles as fermentation vessels. Cover the neck with tinfoil, put em all in the same press and you've got good unifirm fermentation conditions.

    Keep detailed notes and labelling - multicoloured bottle tops are your friend.


  • Advertisement
  • Registered Users, Registered Users 2 Posts: 20,299 ✭✭✭✭MadsL


    It has taken me a while to update, but I have successfully produced some decent beer with the sous vide. Initially I used a brew bag to hold the grain so that I could just tip out the wort as the Sous Vide Supreme (SVS) has no drain. The BIAB seem to produce some astringency so I sought a better solution.

    An upgrade was buying a SS screen, http://www.amazon.com/gp/product/B000H9TKIW
    and cutting and bending this with a sheet metal bender to produce a better false bottom for the sous vide mash tun. I added silicon tubing so that I could drain using gravity.

    http://imgur.com/a/72mFx

    One of the other drawbacks of the SVS was that it did not provide the efficiency that I wanted so I was missing OG targets and having to add DME to the wort.

    I figured that recirculating the mash may yield better results, so today I just got this pump set up.

    A "leftovers" beer.
    I want to test this with some old grain I never used. Almost 10lbs of (I think, probably sure) is Maris Otter. I'm going to do two half mashes today to compare efficiency from regular mash and a reirculated mash. I'll post results here. The grain is a bit dry but still tastes sweet and bready so I'm not expecting stellar results, I have some Northern brewer hops left, as well as US Fugggle and Centennial. I'll bitter with NB and some Centennial, and finsih with the Fuggle and remaining Centennial. Basically an English style pale ale with American character. I made a starter last night with WP001, so an American yeast for the brew.

    I also have some Aro, Special Roast and UK Crystal aromatics left which were vacuum sealed so should still be in reasonable shape.

    Grain Bill is therefore is:

    9.9625 lbs Maris Otter (4.335 kg)
    1.9oz Special Roast 54g
    4.2 oz Aro 120g
    3.5oz UK Crystal 100g
    Batch details here
    http://www.brewersfriend.com/homebrew/recipe/view/294024/leftovers

    I'm planning to mash at 155F 68.3C - I'm aiming at a thick mash to reflect the fact that the mash tun is limited in size and this reflects a typical capacity for the tun for a full mash.

    Strike temp is 83.7C with 7l of water (I'm at 5000 feet altitude btw)


    Here goes, updates later...


  • Registered Users, Registered Users 2 Posts: 20,299 ✭✭✭✭MadsL


    results...

    Mash 1.

    Normal infusion mash with batch sparging.
    Doughed in at 83.3C and mashed for 60 mins at (sometimes) 68C.
    I noticed that I was having to switch the SVS on and off and a couple of times overshot my temp, in one case up to 82C!! I started mistrusting the thermometer dunked in the mash as the SVS was reading 10 degrees lower. Quck trip to the HBS and another thermometer bought, then I realised I could not trust the SVS temperatures. Clearly the SVS was not designed for pounds of grain sitting in it.
    Drained SVS completely and took first runnings OG reading: 1.086
    Refilled the SVS with 75C sparge water and let it sit for 10 mins. Drained again.
    Repeated the batch sparge. Drained again.
    Repeated the batch sparge. Drained again.
    On the fourth refill I noticed boiling at that back of the SVS, my fault as I had left it heating and wandered off to take OG readings, tidy up and find other equipment. Gah! Not wanting to risk heavy tannin extraction I dumped this batch sparge and ended up with 3 gallons of wort in the bucket rather than the 4 gallons I was shooting for. Lesson learned.

    I took a pH reading (new pH toy arrived this week) and I was happy to see a reading of 5.44. No messing with salts, hard water is a blessing sometimes.

    Collected wort OG was 1.044.

    I stuck the 3 gallons in a carboy, purged with CO2 and stuck it in the shamefully empty kegorator as is was time for work. It's not exactly crystal clear wort...more mocha coffee.


    7D4cdUB.jpg

    Brew day 2 - pretty wrecked, home at 4am after a hectic bar shift. On the other hand, a stunning day to brew! Here's what I get to look at while water boils.

    6uhjZMO.jpg

    and as we are at it, a quick look at my brew rig.

    IAkCy5w.jpg

    I was thinking today I'm very lucky to be able to brew on a deck and not have to really worry about spills and water draining or leaking. Just goes straight through :) I'm also lucky in that there is a hose tap just to the left of the (improvised) brewstand. The Fastferment sits in a stand I welded up so that it would fit a keg under it.

    Mash 2
    Same strike temp and dough in procedure as above. For safety I switched off the heater on the SVS. After doughin I was at 74.6C I set the recirculation rig in place and started it up after 5 min mash time. Dropped almost immediately to 69.5C.

    As you can see by the sticker I was was ready if it all burst into flames :D

    OJQoydk.jpg

    Here's how I set up the top of the grain bed. I'd been thinking about how to avoid channeling, if only I had something to protect the top of the grain. Lightbulb moment! I used the original false bottom from the SVS and it 'floated' nicely on top of the grain. The holes are also useful to get a lab thermometer into the grain bed.

    5upUV4V.jpg

    After 5 mins recirculating my temp dropped to 67.5C so I switched on the SVS and set a temp target of 68.5C. The recirculating wort clearly pleased the SVS as it did a great job of holding temp without the overshoots I'd seen yesterday. Which really makes sense as the natural circulation of a water bath is what it is designed for.

    20 mins 68.3
    40 mins 67.1
    60 mins 67.5

    So throughout my mash I was within 1 degree of my target temp. I took a OG before sparging of 1.084.

    I sparged as before but recirculated throughout the sparge batches. for the last batch sparge I simply ran water from my cooler HLT as I drained to the kettle to have a shot at continous sparging.

    The wort was such a contrast to yesterday, wonderfully clear.

    UPx1Pw7.jpg

    At this point, I completely forgot to take an OG reading - duh. Really wanted to compare the two methods. I basically dumped the previous days 3 gallons into the kettle and then slapped my forehead. I took a reading of 1.042 at this point so figured that the OG for each day was pretty identical, no real difference between the efficiency on each technique. Hypothesis not proven!!

    So, I'm loving the little pump, such a useful thing to have, not only has the recirculation fixed a problem with the SVS overshooting temps, but also it produced really clear wort. I was also able to use it to transfer sparge water from kettle to HLT and wort straight to fermenter from the kettle without using gravity which just saved a lot of hassle. For $20 and change I'm really thinking about getting another.

    Wort is now pitched and sitting in the (still) empty kegorator, I set the temp on the kegorator for 16C and give the WLP001 an nice cool start for the next four days and slowly bring the temp up.

    Looking forward to leftovers...:)

    Oh. One more lesson learned, my brewday started late as my ball valve on the cooler HLT sprang a leak. I disassembled it and figured out the problem, I'd used the HLT on a camping trip for some grey water storage and disposal (Burning Man - you are not allowed to dump grey water on the ground) so it was pretty rank when I got it home - I'd disassembled the ball valve and boiled it for 20 mins. Turns out the white seals that fit against the ball had warped, they are not high temp safe (Grrrr) - trip to the HBS and I was $40 lighter, annoying as the same valve can be had for half the price online.

    So. Don't boil your seals kids!


  • Registered Users, Registered Users 2 Posts: 20,299 ✭✭✭✭MadsL


    Bubbling nicely with a great krausen (might need to add blowoff tube soon) at 16C, I just adjusted the kegorator to 17C.


  • Registered Users, Registered Users 2 Posts: 20,299 ✭✭✭✭MadsL


    So I just got a full batch of Citra Pale Ale into the fermenter with the goal of pushing the extraction efficiency as high as I can using the Sous Vide and performing some true multi-step mashing. I also wanted to see if I could push mash thickness to 1:1.1, but brimmed the SVS out at 1:2 so I still have some headroom to try a mash at thicker ratios next time.

    Since the recirculation of mash makes it easy to take readings I took an OG reading at each mash step.

    Grain Bill
    8lb Rahr 2 row
    0.5lb UK Crystal 15C
    Total mash water: 9.7 litres/10.22 Qts.

    Mash schedule was;
    Dough-in at 140F (60C) - much lower than traditional single step strike temps, since I can control temps easily there is no point in having higher temp water hitting the grain. I'd read some advantatages to a long rest at 140F for thick mashes. I hit some issues with getting the pump working so this rest was extended to 35mins.
    Beta-amylase rest 140F - 20 mins - OG:1.055
    Aiming to get some dryness out of the beer at this range
    Beta Rest#2 150F (65C) - 20 mins - OG:1.071
    Upper limit of the beta rest, allowing alphas to begin working.
    Alpha-amylase rest - 155F (68C) - 20 min - OG:1.077
    Alpha rest to extract some body into the beer.
    Mashout 168F (75.5C) OG:1.087
    - sparge for 1 hour - total wort collected 6 Gallons (22.7L)
    Final OG of wort in kettle = 1.045
    Post boil OG = 1.050

    Very happy with the extraction efficiency, my recipe calculator indicated a boil gravity of 1.039 and I exceeded this by 6 points. I got conversion efficiency of 93%.


  • Registered Users, Registered Users 2 Posts: 20,299 ✭✭✭✭MadsL


    Quick update:

    I have been fretting about the Citra since I have seen little activity and no krausen. Fretted to the point of buying another vial with the intent to pitch it today. I dropped the collection ball (FastFermeter) just now expecting mostly trub so that I could take a reading. I was pretty pleasantly surprised to find a massive amount of yeast slurry in there. (This is a 1 gallon jug)

    jbwlygO.jpg

    Took a reading at 1.013 so I'm at 74% attenuation, low end of expected 73-80% from WPL001, but I can live with 4.86% ABV as a session ale. Hope to see a quarter a percent cleanup in the next 7 days, although I'm dubious if there is any yeast left active. Next step is dry hop with 1oz of whole Citra hops and wait it out.

    Lesson learned (as always) is patience and ignore the airlock, this beer probably could have done with 2-3 more days on the yeast cake. It is a shame that the Fastfermenter doesn't have a sample port so that you can test OG without opening the lid or dropping the collection ball. I've basically rushed this one.

    I'll harvest off the remaining yeast in the ball, although that jug was sanitised, it wasn't boiled so it will get dumped. I have the Leftovers brew doing nicely (about to cold crash it) with a decent cake in there, so that yeast will also replenish the yeast library.


Advertisement