Advertisement
If you have a new account but are having problems posting or verifying your account, please email us on hello@boards.ie for help. Thanks :)
Hello all! Please ensure that you are posting a new thread or question in the appropriate forum. The Feedback forum is overwhelmed with questions that are having to be moved elsewhere. If you need help to verify your account contact hello@boards.ie

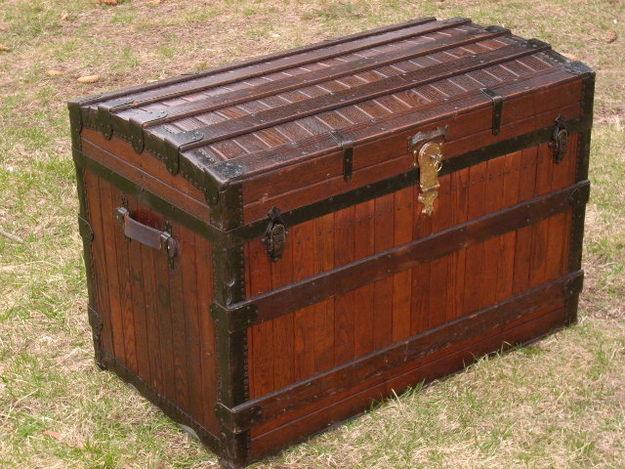
Steamer Truck/Chest Repair

Options
  • 15-08-2013 3:43pm
    #1
    Registered Users Posts: 828 ✭✭✭


    Hello all,
    I was not getting much joy over in the Antiques forum with my thread below, so i thought i would try here (Mods permitting);

    http://www.boards.ie/vbulletin/showthread.php?t=2057009451

    The Wood in the body the trunk is pretty much shot, it appears to be 1/2" ply that was used before, therefore i was going to replace any bad timber with birch ply.

    However the covering, which is canvas to my eye is the hardest to source. Would there be any furniture canvas suppliers that some here might know in the Meath/Cavan area?

    I cannot attach a pic as i am in work but the picture of the trunk is in the link above.

    Thanks inadvance.


«1

Comments

  • Registered Users Posts: 828 ✭✭✭dingdong1234567


    Hi again,


    So i have started work in this project and i am looking to replace the removed 'Split Rivets' with like. However i am struggling to find split rivet suppliers either here or in the UK. Perhaps anyone out there may know of suppliers that i have missed from interweb searches etc?

    Thanks in advance.


  • Registered Users Posts: 828 ✭✭✭dingdong1234567


    Just one more point, for those whom may take on something similar to this. The original covering used back in the 1900's to 1920's was know as Vulcanised Fibre. This was pretty much the norm for Steamer Trunk/chests at this time. However sourcing this today is proving virtually impossible. Therefore i am looking at salvaging as much of the original covering as possible. Which in itself will be mighty craic altogether.....not.


  • Registered Users Posts: 2,804 ✭✭✭recipio


    Just one more point, for those whom may take on something similar to this. The original covering used back in the 1900's to 1920's was know as Vulcanised Fibre. This was pretty much the norm for Steamer Trunk/chests at this time. However sourcing this today is proving virtually impossible. Therefore i am looking at salvaging as much of the original covering as possible. Which in itself will be mighty craic altogether.....not.

    Full marks for persisting with the project. The trick with all restoration is to know your limits and not try and reproduce a 'shiny' new trunk.
    I see lots of split rivets on ebay. Would you consider having the metal fittings recoated -say nickel or chrome, whatever the original finish was.?
    The fabric is intrinsic to the look of the trunk - it would be better to restore it rather than replace.
    I saw a Louis Vitton old trunk valued on the 'Antiques Roadshow' last Sunday for £3000 - its all in the name !


  • Moderators, Motoring & Transport Moderators, Sports Moderators Posts: 6,323 Mod ✭✭✭✭fergal.b


    You should be able to get split rivets here http://www.macb.ie/mechanical-fasteners/rivets or here might also have them http://www.allmetalfasteners.com/ as for the vulcanised fibre you could try a cobbler "if there are any left"
    I agree with recipio don't try and clean it up too much.


    .


  • Registered Users Posts: 828 ✭✭✭dingdong1234567


    fergal.b wrote: »
    You should be able to get split rivets here http://www.macb.ie/mechanical-fasteners/rivets or here might also have them http://www.allmetalfasteners.com/ as for the vulcanised fibre you could try a cobbler "if there are any left"
    I agree with recipio don't try and clean it up too much.


    .

    I agree guys. I am certainly not looking for something all new and shinny. I have 30% of the iron ware derusted and it looks surprisingly good in its rustic state as is. I will consider getting these recoated but it would take away from the original fibre covering I fear. Thanks for the links chaps.

    I have a new carcass made from birch plywood. ...so there ain't no going back now! !

    I must try to keep this thread updated.


  • Advertisement
  • Registered Users Posts: 3,851 ✭✭✭tabby aspreme


    You could try Restoration Materials in Bury Lancashire, I know they do leather skivers and may be able to help you with the canvas


  • Registered Users Posts: 828 ✭✭✭dingdong1234567


    You could try Restoration Materials in Bury Lancashire, I know they do leather skivers and may be able to help you with the canvas

    I have emailed restoration materials above but they cannot help me in any way apparently. Anywho the search continues.


    i will try and get some photo up soon of what is going on and perhaps some advise could be thrown this way in terms of what i may/may not be doing correctly etc. Anyways more to follow.


  • Registered Users Posts: 828 ✭✭✭dingdong1234567


    A quick update

    Some pics of the Lid ironware removed and de-rusted with a wire wheel on a power drill:


  • Registered Users Posts: 828 ✭✭✭dingdong1234567


    Pic of the Original Lid covering that has obviously seen better days. However it still has some of the original 'Cunard' Shipping label still on it. I have cleaned this up using Olive Oil and some elbow grease.


  • Registered Users Posts: 828 ✭✭✭dingdong1234567


    My next stage is to go over the lid ironware with grade 000 steel wire wool and then polish and seal with wax.


    I am not sure what kind of wax could be used here though....would anyone have any pointers?


  • Advertisement
  • Moderators, Motoring & Transport Moderators, Sports Moderators Posts: 6,323 Mod ✭✭✭✭fergal.b


    If you don't find the fabric you want you might get away with a brown leather or crocodile effect leatherette you could also make a new box out of wood and stain it to give it some age.


    x_119T3135.jpg


    steamer-trunk.jpg


  • Registered Users Posts: 828 ✭✭✭dingdong1234567


    fergal.b wrote: »
    If you don't find the fabric you want you might get away with a brown leather or crocodile effect leatherette you could also make a new box out of wood and stain it to give it some age.


    x_119T3135.jpg


    steamer-trunk.jpg

    I am trying, and I use that word 'trying' very loosely to restore the original covering and ironware. I think I can do this If I take my time and do not rush anything.


  • Registered Users Posts: 828 ✭✭✭dingdong1234567


    fergal.b wrote: »
    You should be able to get split rivets here http://www.macb.ie/mechanical-fasteners/rivets or here might also have them http://www.allmetalfasteners.com/ as for the vulcanised fibre you could try a cobbler "if there are any left"
    I agree with recipio don't try and clean it up too much.


    .


    OK so have tried the above with no joy on the Split Rivets that i am trying to source. I have salvaged one or two rivets from the trunk and have taken measurements of what they roughly are, shank dia. head dia, and length etc.

    So its of to ebay or amazon i go by the looks of things.


  • Registered Users Posts: 828 ✭✭✭dingdong1234567


    Just to follow on from a post HERE

    What would be suitable wax to use to 'seal' the ironware once i have polished and cleaned it up?


  • Moderators, Motoring & Transport Moderators, Sports Moderators Posts: 6,323 Mod ✭✭✭✭fergal.b


    Just to follow on from a post HERE

    What would be suitable wax to use to 'seal' the ironware once i have polished and cleaned it up?

    I'd say you would get away with a non silicone floor wax I have used it on a cast iron saw table and it seems to work.


  • Registered Users Posts: 2,362 ✭✭✭jack of all


    Just to follow on from a post HERE

    What would be suitable wax to use to 'seal' the ironware once i have polished and cleaned it up?


    As fergalb suggests a silicone-free wax would be best, I've seen mention of a "renaissance wax" on other forums dedicated to restoration projects, it's a microcrystalline wax and is supposed to be better than traditional carnuba/ beeswax polishes, but I don't know where you'd get it here.


  • Registered Users Posts: 828 ✭✭✭dingdong1234567


    Just a few pictures of some of the lid ironware that i polished up last night. I think i will get some of the 'Renaissance wax' recommended above.


  • Registered Users Posts: 828 ✭✭✭dingdong1234567


    Wll I haven't been on here in a while. As work has continued on this project it turns out that the original vulcanised fibre covering is not salvageable. Therefor I has opted for leatherette as a covering with the restored ironwork re fitted. I have the leatherette ordered with rivets and nails also. Had to get these in from the states as there was was nowhere here or in th uk that would stock the size I needed.

    Anywho I plan to get covering and refitting the restored ironwork in the next few weeks and post some pictures.


  • Registered Users Posts: 828 ✭✭✭dingdong1234567


    Ok chaps, so i have gather up all my bits from www.trunk.com and they arrived this week. Details of which i will be posting as soon as i get time. But mainly consisted of nails and rivets.

    I began covering the Trunk shell last week with leatherette and it is beginning to take shape etc. The only thing now is not to rush in here as it will be done and no pictures have been taken really which would be a total shame. So i will get pictures taken and get some up here for the criac sure!

    Anywho, i have found that Copydex is great stuff for gluing leatherette to ply, in my case birch ply. It works a treat. I also used some spray on carpet adhesive which was also very good indeed, just allow it to go off for a few minutes and place on your covering/leatherette and it takes straight away.

    For the corner/edge pieces i have cut 5'' strips of leatherette and folded these to form 2-1/2'' strips. The glue mentioned above here was proving very messy indeed so i wipped out some double sided tape a had for years and used this...again this was great for forming these edge pieces without any mess.


    The above is only a snippet of what is ahead so will try and the to date cataloged in some shape or form guys. You never know when someone will need to refer to it etc.

    Stay tuned.


  • Registered Users Posts: 1,464 ✭✭✭Double Barrel


  • Advertisement
  • Registered Users Posts: 828 ✭✭✭dingdong1234567


    I have got some Renaissance Wax alright. I will soon be using some of that.


  • Registered Users Posts: 828 ✭✭✭dingdong1234567


    Just some random photo's from this past few nights works. Have some taken tonight but will see if i can get them up after baba's bath time!


  • Moderators, Motoring & Transport Moderators, Sports Moderators Posts: 6,323 Mod ✭✭✭✭fergal.b


    Looking good, but I wouldn't bath a baby in it :eek: :D


    .


  • Registered Users Posts: 828 ✭✭✭dingdong1234567


    Some more from today's work.


  • Registered Users Posts: 828 ✭✭✭dingdong1234567


    Cliching the nails is not that hard really. Got myself a big lump hammer to use as a dead weight behind the nail and then drive the nail home. When the nail tip hits the dead weight (lump hammer) it curls back into the plywood. What i intend to do with the nail tips on the inside of the trunk is dab a little Hammerite on the area to prevent any further rusting that may occur down the years.


  • Registered Users Posts: 828 ✭✭✭dingdong1234567


    fergal.b wrote: »
    Looking good, but I wouldn't bath a baby in it :eek: :D


    .


    Agreed, but i would put the mother in law into it!


  • Registered Users Posts: 828 ✭✭✭dingdong1234567


    Trunk lid with corner pieces fitted.


  • Registered Users Posts: 828 ✭✭✭dingdong1234567


    Lid finished. Overall about 75% finished. Not looking to shabby by all accounts.

    Just finished tonights work by putting some Hammerite on the nail heads on the inside of the trunk.


  • Registered Users Posts: 2,362 ✭✭✭jack of all


    Well done, it looks great!


  • Advertisement
  • Registered Users Posts: 828 ✭✭✭dingdong1234567


    Trunk Lid/top fitted with hinges in place by using split rivets.


Advertisement