Advertisement
If you have a new account but are having problems posting or verifying your account, please email us on hello@boards.ie for help. Thanks :)
Hello all! Please ensure that you are posting a new thread or question in the appropriate forum. The Feedback forum is overwhelmed with questions that are having to be moved elsewhere. If you need help to verify your account contact hello@boards.ie

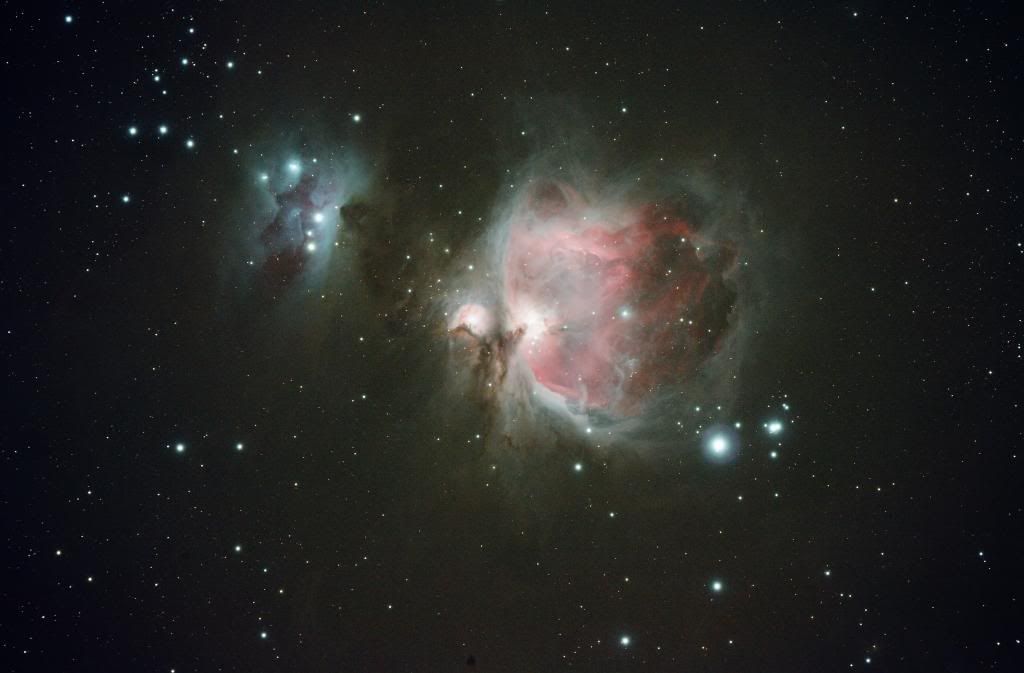
M42 finished and processed

Options
  • 15-03-2013 5:13pm
    #1
    Registered Users Posts: 4,407 ✭✭✭


    Well I eventually got it finished after my problems with DSS, ended up using nebulosity instead and find it more hands on and the final stack seems to have more detail. Its a blend of three stacks: 15sec for the core, 1 min and 3 min for the fainter stuff. Good deal of noise in the final image, definitely didnt do enough lights or darks but happy with it. No flats or bias frames, def need flats, some vignetting and dust specks but never done any yet and find everything so time consuming that I don't bother! My processing is still novice at this stage but all starting to come together slowly. Comments and advice appreciated.

    M42Fullprocess_zps53d2098e.jpg


Comments

  • Registered Users Posts: 959 ✭✭✭ZeRoY


    Its a very good attempt Wailin, very colorful and plenty of details!


  • Registered Users Posts: 1,143 ✭✭✭Tzetze


    Looking great! The modded camera is really picking up loads of faint gas in the outer areas. Looks like the data stretched out nicely for you.

    The only calibration files that you need to take during a session are flats. A set of 25 will take less than 10 minutes to capture. A library of darks and a set of bias (work for cloudy nights) will last you for a couple of years before needing to be refreshed.


  • Registered Users Posts: 325 ✭✭ThatDrGuy


    Great job, the colour looks amazing.


  • Registered Users Posts: 4,407 ✭✭✭Wailin


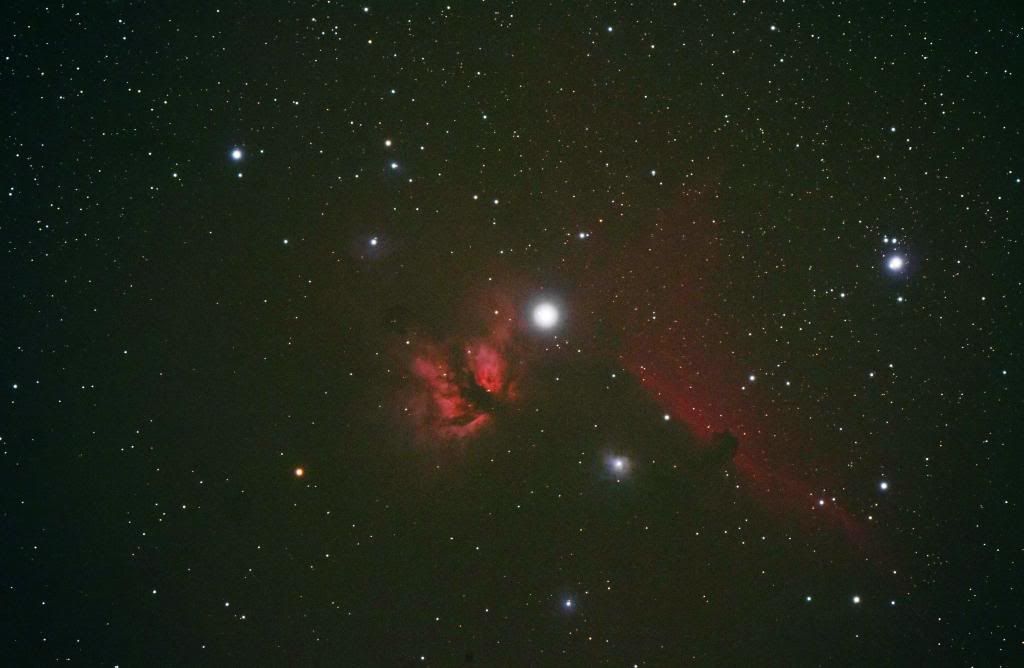
    Thanks guys. Always wanted to do the horsehead and before I packed up the other night I did one 5min exposure on it just to see it in the camera. Its something that i want to spend a few hours on to get some good data but anyway this is just one 5 min exposure, no darks or anything. Guiding seems rock solid.

    Horseheadnebula_zps0184d397.jpg


  • Registered Users Posts: 325 ✭✭ThatDrGuy


    Do you have a H alpha or Beta filter by any chance ? Great for the horse head


  • Advertisement
  • Registered Users Posts: 4,407 ✭✭✭Wailin


    ThatDrGuy wrote: »
    Do you have a H alpha or Beta filter by any chance ? Great for the horse head

    Nah just recently modified the camera so that helped bring out the red emission.


  • Registered Users Posts: 959 ✭✭✭ZeRoY


    Wailin wrote: »
    Thanks guys. Always wanted to do the horsehead and before I packed up the other night I did one 5min exposure on it just to see it in the camera. Its something that i want to spend a few hours on to get some good data but anyway this is just one 5 min exposure, no darks or anything. Guiding seems rock solid.

    Really good, i'd like to see this one with more data :D


  • Registered Users Posts: 1,143 ✭✭✭Tzetze


    Look at all the response from that sensor. So tempted to mod my camera now...


  • Registered Users Posts: 2,891 ✭✭✭Kersh


    Thats awesome. The colour in it is brilliant.

    Superb.


  • Registered Users Posts: 4,407 ✭✭✭Wailin


    Tzetze wrote: »
    Look at all the response from that sensor. So tempted to mod my camera now...
    Go for it! If the camera is used only for imaging then its a no brainer I think. But if its for everyday use you'll need to replace the filter rather than just removing it to make sure you have autofocus. Or pick up one from adverts.


  • Advertisement
  • Registered Users Posts: 4,407 ✭✭✭Wailin


    Tzetze wrote: »
    Looking great! The modded camera is really picking up loads of faint gas in the outer areas. Looks like the data stretched out nicely for you.

    The only calibration files that you need to take during a session are flats. A set of 25 will take less than 10 minutes to capture. A library of darks and a set of bias (work for cloudy nights) will last you for a couple of years before needing to be refreshed.


    I thought you had to take your darks as soon as the lights are finished to make sure they are both at the same temperature? Isn't that the whole point of it?


  • Registered Users Posts: 1,143 ✭✭✭Tzetze


    Yep, the darks have to be same temp, ISO and exp. as the lights.
    There are conflicting opinions on how many darks are needed but the most convincing arguments that I've read (and since forgotten!) show that you get diminishing returns when you go past 50 and a minimum of 35 is recommended.

    It's unreasonable to try to take 35x 600s darks in a session when you really want to be gathering photons. This is where the Dark Library comes in to play.

    Which image acquisition software do you use? APT (AstroPhotography Tool) is excellent - maybe you use Backyard EOS or similar? Anyway, APT shows the sensor temp as each sub rolls off and you can get a feel for what temp you stabilise out at. My subs are typically 2 - 4 degrees, although a bit higher in late spring early autumn - haven't done any night AP in the summer months.

    You'll want to decide on 2 or 3 exposure/ISO combinations for different targets (star clusters need shorter exposures than galaxies) and build a library of 35-50 darks for say 600s-ISO800 and 240s-ISO800.

    That Dark Library software works in conjunction with DSS to automatically match your lights with a set of darks from your library. You can set it to match exact temp or a range, but I wouldn't recommended going more than +/- 1 degree of your subs.

    I took all of my darks in the fridge and ice box to get a range of temps and have a good 45 - 50x for most stacks. Just but the camera in a zip lock bag and squeeze the air out. Mains power supply to camera, APT exposure plan set and it worked away for many many hours. Keep the camera in the zip lock bag when you take it out of the cold so it doesn't generate condensation inside it.


  • Registered Users Posts: 1,143 ✭✭✭Tzetze


    I should add that you can also see the temperature of your lights in dark library if you don't have another way to check currently.

    When you have lights loaded into DSS, save the file list and then open that list in DL. You can then scan the lights, match darks and add them to filelist.


  • Registered Users Posts: 4,407 ✭✭✭Wailin


    Tzetze wrote: »

    My subs are typically 2 - 4 degrees, although a bit higher in late spring early autumn - haven't done any night AP in the summer months.

    2-4 degrees?! Are you cooling your camera? I use backyard eos and it also displays the sensor temp, I have seen mine read 20 deg + on occasion, normally between 8-14 deg. But I doubt you can possibly keep it at 2-4 deg without cooling....


  • Registered Users Posts: 1,143 ✭✭✭Tzetze


    Well doubt no longer. Camera is uncooled. :)

    dlscreen.jpg

    Edit: Those subs were taken in sub-zero temps. I have some other subs in the 1 - 3 degree range. It's just the winter nights that get my subs down to that temp. They say the senor temp rises to 10 degrees above the ambient temp. Just looking at subs from late sept and they are showing 8-10 degrees.

    I suppose my temp sensor could be inaccurate but I'd expect an inaccuracy to be only in the region of 1 or 2 degrees. Are you taking your camera straight out of a warm environment and setting it to work on subs with little cooldown time? Make sure to switch off the LCD screen as that will generate some heat too.


  • Registered Users Posts: 8,435 ✭✭✭wandatowell


    That looks fantastic


  • Registered Users Posts: 959 ✭✭✭ZeRoY


    Wailin wrote: »
    I have seen mine read 20 deg + on occasion, normally between 8-14 deg.

    Same here on my 1100D - 10 is the minimum i've seen it and this was on a very cold night. I think some DSLR cool down faster than others and TzeTze I think you do leave the DSLR outside quite some time before starting AP session?


  • Registered Users Posts: 1,143 ✭✭✭Tzetze


    If at all possible, I like to set up while it's still bright so I can get finderscope aligned with scope and generally see what I'm doing more easily. Then mount the cameras and get the scope properly imbalanced. Once that is done, the DSLR is left mounted and and let cool until dark enough for drift aligning, target acquisition, PHD calibration and ready for imaging. That's usually a couple hours.

    On top of that, it's important to set a reasonably long pause between exposures in your APT/BYEOS. Too short a pause and the temp will keep ramping up. I find 30s works well.

    As I mentioned before, turning off the LCD screen will lower the temperature. Your battery also generates heat as it drains. Astronomiser sells power supplies that keep all the 'hot parts' outside of the battery case. My own had to be sent back for repair recently - no dark site visits til it comes back. :(


Advertisement