Advertisement
If you have a new account but are having problems posting or verifying your account, please email us on hello@boards.ie for help. Thanks :)
Hello all! Please ensure that you are posting a new thread or question in the appropriate forum. The Feedback forum is overwhelmed with questions that are having to be moved elsewhere. If you need help to verify your account contact hello@boards.ie
Hi there,
There is an issue with role permissions that is being worked on at the moment.
If you are having trouble with access or permissions on regional forums please post here to get access: https://www.boards.ie/discussion/2058365403/you-do-not-have-permission-for-that#latest

Photoshopping in a blue sky

  • 02-07-2012 7:46pm
    #1
    Registered Users, Registered Users 2 Posts: 3,130 ✭✭✭


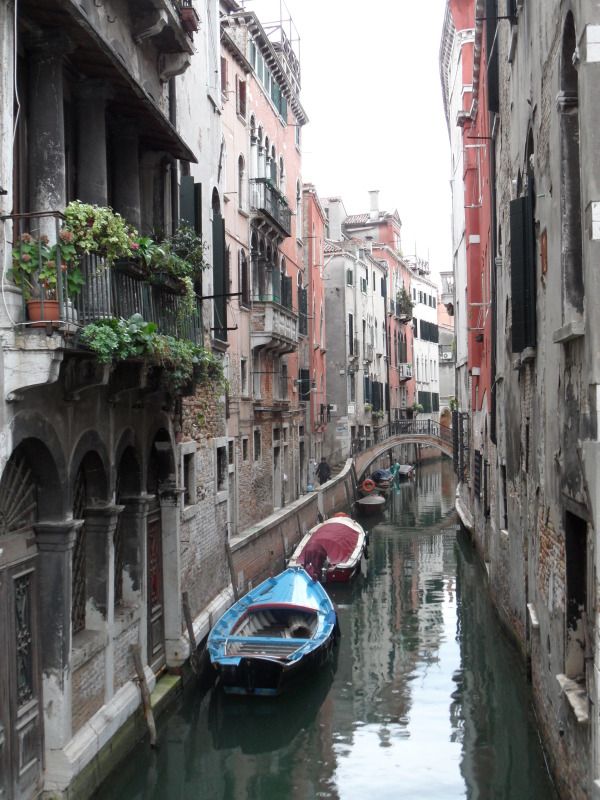
    Can anyone give me some links for an effective but easy way to photoshop in a blue sky. I am getting a 20 x 30 canvas print done of this photo

    SAM_1469.jpg

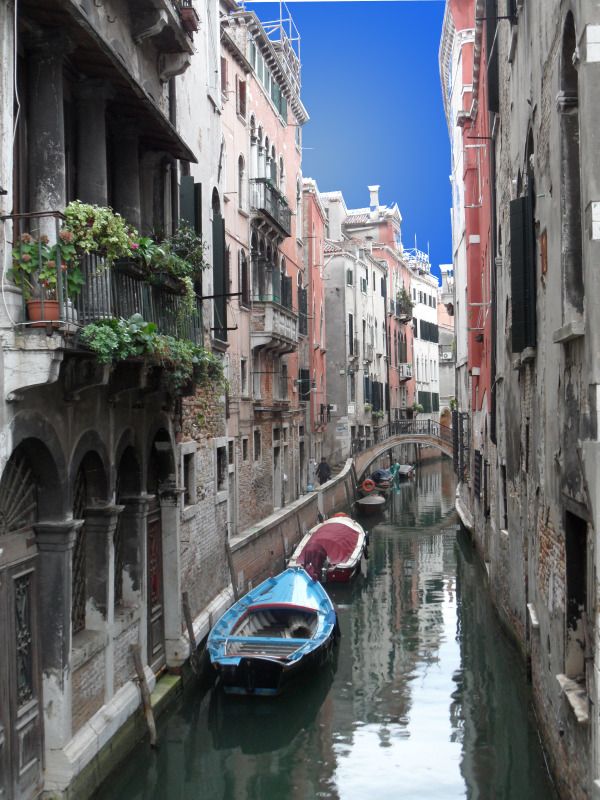
    This is my first attempt and took me less than 10min using this tutorial
    http://nyfalls.com/article-photoshop-fixing-sky.html

    venice1.jpg

    Obviously it's a pretty crappy first effort and please ignore the bright blue sky...it was just for practice:o

    So pointers to good tutorials would be great. I have CS5.


Comments

  • Registered Users, Registered Users 2 Posts: 20,226 ✭✭✭✭cnocbui


    You will need to attend to the skies reflection in the canal as well.


  • Registered Users, Registered Users 2 Posts: 3,130 ✭✭✭mel.b


    so it's not going to be as simple as i thought? Looking at the canal that looks like it will be tricky and fiddly.


  • Registered Users, Registered Users 2 Posts: 20,226 ✭✭✭✭cnocbui


    Not really. Looking at the canal, I see blue - as in the sky was when the shot was taken. It might be possible to recover the original sky colour from the original photo if it isn't too blown (over exposed) - same for the canal - which could then massaged into looking a lot more natural than just tipping a paint bucket in - which won't look natural as the blue of the sky is graduated in saturation from looking darker overhead and fading down to the horizon.

    The pic you posted - has that been adjusted in Photoshop or similar? If so, do you have the original file as it was taken?


  • Registered Users, Registered Users 2 Posts: 3,130 ✭✭✭mel.b


    Hi cnocbui,

    The first pic posted is the original file. How to do though what you said I have no idea!


  • Registered Users, Registered Users 2 Posts: 20,226 ✭✭✭✭cnocbui


    SAM_1469b.jpg

    The original better be a much larger file with a lot more resolution if you want to print it to those dimensions.

    This was very quick and dirty.


  • Advertisement
  • Registered Users, Registered Users 2 Posts: 7,903 ✭✭✭frozenfrozen


    If you have a raw of it upload it somewhere and I'll give it a try for you


  • Registered Users, Registered Users 2 Posts: 20,226 ✭✭✭✭cnocbui


    Looks like it was taken with a Samsung WB600 - jpeg only going by the specs.


  • Registered Users, Registered Users 2 Posts: 3,130 ✭✭✭mel.b


    That looks great cnocbui :)
    your comment about the file size made me go and double check - the original is 2.6mb...I thought is bigger to tell you the truth. Will it still print ok at that size?

    I don't have a RAW file as it was taken with a Samsung WB600 which doesn't do RAW:(


  • Registered Users, Registered Users 2 Posts: 20,226 ✭✭✭✭cnocbui


    Thanks, but I missed the sky in the scaffolding top left. here is a slightly better effort, but i think maybe the sky is overdone and needs to be paler and more subtle:

    SAM_1469c.jpg

    2.6 mb might be OK. The real metric that determines how big you can print is the dimension in pixels. The specs for your camera state 4000X3000 pixels if you shoot a maximum resolution. to print a photo that looks smooth, the usual guide is you need to print at 300 dpi (dots per inch) or pixels in other words. so you could go 40x30 inches, theoretically.

    Obviously, I am no Photoshop expert, but I can give you a rundown on what I did if you like so you can play with the full size image.


  • Registered Users, Registered Users 2 Posts: 3,130 ✭✭✭mel.b


    cnocbui wrote: »

    Obviously, I am no Photoshop expert, but I can give you a rundown on what I did if you like so you can play with the full size image.

    I would really appreciate that :)


  • Advertisement
  • Registered Users, Registered Users 2 Posts: 2,699 ✭✭✭samhail


    mel.b wrote: »
    cnocbui wrote: »

    Obviously, I am no Photoshop expert, but I can give you a rundown on what I did if you like so you can play with the full size image.

    I would really appreciate that :)

    If you get the mask for the sky section, you can delete it and put another later in with some sky clipart, pick it up from google images.. Or take it yourself


  • Registered Users, Registered Users 2 Posts: 20,226 ✭✭✭✭cnocbui


    mel.b wrote: »
    I would really appreciate that :)

    I use an old version of Photoshop on a Mac, so things might work slightly differently on a PC.

    I used the magic wand tool set to 'contiguous', tolerance 8, to select the sky reflection in the canal. you click on an area, but because the tolerance is relatively low, it wont be the whole thing. Holding the shift key down, click on each part of the sky's reflection not selected and it will be added to the selection, until the whole area is selected.

    Keeping the shift key held, add the real sky areas to the selection, but drop the threshold to 1 or 2 for around the awning frame top left.

    Throughout this process you will probably want to be zooming in and out a bit to better see what you are doing.

    you should now have all the sky and canal reflection of it as a selection. Do... Layer > New > Layer via copy. And... Window > Layers. The first takes your selection and creates a new layer which just has sky stuff in it. - think tracing paper. The second brings up the layers window to let you more easily switch between the two.

    The sky layer should be selected in the layers window through the action of creating it, now... Image > Adjustments > Levels. Of the three sliders, Shadows, mid-tones and highlights, drag the shadow slider to the right to the point in the graph where the first speck of it starts. The sky in the canal should become a bit darker and the colours more saturated. I also moved the Mid-tones slider a tad to the right so the number in the input levels box for it was 0.95. It's up to you. Click OK when you are happy.

    Using the colour eyedropper tool, click on the blue in the canal that is in line with the seat of the boat. Or elsewhere if you fancy. This is for tinting the real sky. using the magic wand again, unchecking 'contiguous', Tolerance 4, click on the real sky. The whole lot should be selected, including the fiddly bits around the frame. A bit in the canal might be snagged, You can unselect it using the selection box tool and select the selected canal area while holding down the alt key on a Mac. Ctrl key on a PC? so you get a minus sign instead of the + sign holding shift gives.

    Now just the sky should be selected. From the tools window select the gradient tool. Might have to right click the paintbucket tool to find it?

    Click in the top left of the selected sky and drag the line the tool draws down to the right and outside the bottom of the selected are to about the vertical midpoint of the image on it's right boder and let go. The selected sky should now be filled with a gradation of the blue you nicked from the canal. Deselect the sky now (ctrl D?)

    Because all of the sky and it's reflection is in it's own layer, you can fiddle with it as a whole while not effecting the base layer with the rest of the image on it, and vise versa, without having to select again. You could now pop into the levels function again and lighten things up, darken them to your taste.

    To my taste, the rest of the image is a tad washed so I would click on the base layer so it is selected in the Layers window, then using levels, just bump the shadows up a bit to where they start on the displayed histogram. I use this tool to adjust the colour balance of an image if the levels histogram or my eyes indicate it needs it, by choosing each of the R, G, B channels in the levels tool and seeing if the shadows and highlight sliders are pointing to where the graph for that channel starts, but that's for other images as this one seems pretty good from the small version I have been working on.

    When you are happy with the sky and background combo, I would save the image as a photoshop document in case you ever want to fiddle with it again. The seperate layers will be preserved and usable should you want to fiddle with them again. You can now Layer > Flatten Image to combine the layers together and then save the file with a different name to the original, maybe as a Tiff so there is no further compression and loss of info or as JPG with maximum quality level if whoever is printing requires that.

    Have fun


Advertisement