Advertisement
If you have a new account but are having problems posting or verifying your account, please email us on hello@boards.ie for help. Thanks :)
Hello all! Please ensure that you are posting a new thread or question in the appropriate forum. The Feedback forum is overwhelmed with questions that are having to be moved elsewhere. If you need help to verify your account contact hello@boards.ie
Please note that it is not permitted to have referral links posted in your signature. Keep these links contained in the appropriate forum. Thank you.

https://www.boards.ie/discussion/2055940817/signature-rules
Hi there,
There is an issue with role permissions that is being worked on at the moment.
If you are having trouble with access or permissions on regional forums please post here to get access: https://www.boards.ie/discussion/2058365403/you-do-not-have-permission-for-that#latest

Cleaning engine to head mating surface ?

  • 06-06-2012 9:58pm
    #1
    Registered Users, Registered Users 2 Posts: 129 ✭✭


    Howdo all, I'm in the process of replacing the headgasket on punto.

    The head has been sent for skimming and I'm now cleaning up the block surface for the fresh cylinder head, I was wondering about cleaning the surface as there seems to be stains on the metal even after a rub of some alcohol. Don't get me wrong it's smooth to the touch but want things done right.

    Any suggestions ?


Comments

  • Closed Accounts Posts: 8,223 ✭✭✭Nissan doctor


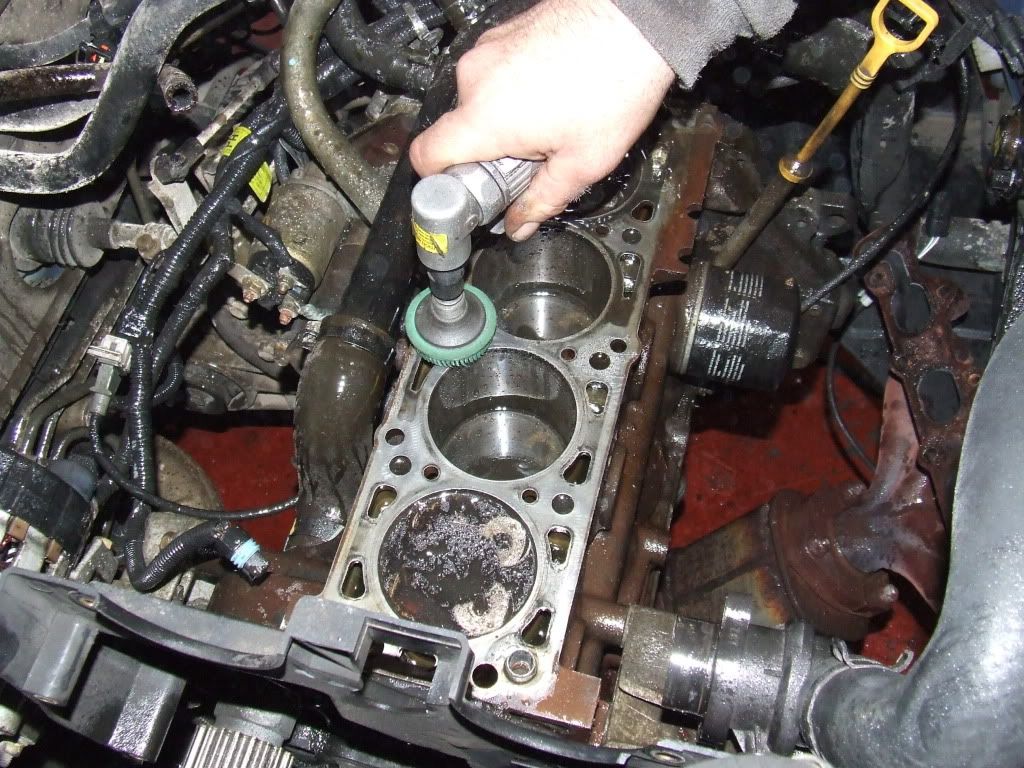
    On a cast Iron block, the ideal way, aside from skimming of course, is a nylon cleaning head on a air tool or drill. You need to use a lubricant too.

    DSCF3370.jpg

    Assuming most people won't have this at home then a very fine grit sand paper with lubricant too. The biggest problem you need to avoid with sanding is any swarf getting in around the cylinders etc.


  • Registered Users, Registered Users 2 Posts: 129 ✭✭timefora_J


    Thanks for the reply Doc, no power tools for me unfortunately just some elbow grease :)

    Just so we are talking the same very fine, is 220 to 240 fine enough ? Also should all stains be gone from the block or is that staining of the metal non removable ?

    Come to think of it could I get a head like that for a cordless drill ?


  • Closed Accounts Posts: 8,223 ✭✭✭Nissan doctor


    timefora_J wrote: »
    Thanks for the reply Doc, no power tools for me unfortunately just some elbow grease :)

    Just so we are talking the same very fine, is 220 to 240 fine enough ? Also should all stains be gone from the block or is that staining of the metal non removable ?

    Come to think of it could I get a head like that for a cordless drill ?


    220-240 should be ok used wet, you want to just remove the staining, not any actual metal nor do you want to rough up the surface.

    You could use a drill but finding the those heads can be awkward. I got that one a few years ago but the last time I enquired about another one no-one had them.


  • Registered Users, Registered Users 2 Posts: 129 ✭✭timefora_J


    Spot on, I'll go on the look tomorrow for the nylon head. Worst case I'll get some sandpaper, I suppose the higher the git the better to begin with. I ave a sanding block there to throw it on


  • Registered Users, Registered Users 2 Posts: 129 ✭✭timefora_J


    Right is seems not a lot of people know of these nylon heads, got some funny looks after asking for em :rolleyes:

    Picked up some Scotchbrite pads in one place and got some 280 and 400 grit sandpaper. The Scotchbrite pads where breaking up a bit so went for the sand paper.

    Here's the result, it ain't perfect but better. A lot of the marks which are there are pitting around the waterways. Is this gonna be good enough or will it need to be machined to be perfect


  • Advertisement
  • Closed Accounts Posts: 8,223 ✭✭✭Nissan doctor


    That looks pretty good. The pitting is a sign that water has been used in the past instead of coolant and caused corrosion. It looks very minor on yours though.

    If you have a steel straight edge or ruler and a feeler gauge then you can check the block deck to make sure its perfect. Just place the straight edge/ruler, on its edge, across several points on the deck and use the feeler gauge, on no more then 0.05mm and make sure it doesn't fit under the straight edge anywhere.


  • Registered Users, Registered Users 2 Posts: 129 ✭✭timefora_J


    Sound as mate, I've got feeler gauges there so I'll get on that tomorrow.

    I have to pick the head up tomorrow also from the machine shop, now I did ask the chap to change out the valve stem seals as I don't have the tools he said an extra tenner so why not, is it usual to reseat valves when this gets done or does it come as an extra do you think ?

    The thought of inspecting the bottom end has also crossed my mind i.e. taking off sump and removing big end bolts and pulling pistons for a look see while bottom end is still in the car, its for peace of mind more than anything after going to this far it kinda makes sense. I don't have piston ring compressor so will need one but I have to get instant gasket anyway to put water pump back on.

    Moneys tight but this could save a chunk of change if I catch something early. Theres just 64000 on the clock
    what ya reckon ?


  • Closed Accounts Posts: 8,223 ✭✭✭Nissan doctor


    The bottom ends of the Punto engines are pretty bullet proof. Unless its been very poorly serviced or run without oil then The bottom end will be fine.

    For the stem seals, they can be changed by removing the springs/retainers etc but keeping the valves themselves in place, meaning that the valves don't have to be ground/lapped, but I wouldn't do it personally, while the head is off and your changing stem seals anyway, it makes sense to redo the valves while your there so that everything is going back together in the best condition possible.


  • Registered Users, Registered Users 2 Posts: 129 ✭✭timefora_J


    I think then I can cross the bottom end off the list so, that's one thing off the list.

    I've really taken care of it since I've had it and I'm putting the blown HG down to a blocked water channel on the left of the intake manifold which is on the same side the HG went between cylinders 1 & 2

    It was blocked completely with some really thick black sludge. Posted pic after clearing it

    https://us.v-cdn.net/6034073/uploads/attachments/302070/208458.jpg

    I'll have a word with the engine guy tomorrow to see how much it would be to get the valves seated if they need it. I hope this would be too expensive ?


  • Closed Accounts Posts: 8,223 ✭✭✭Nissan doctor


    timefora_J wrote: »
    I think then I can cross the bottom end off the list so, that's one thing off the list.

    I've really taken care of it since I've had it and I'm putting the blown HG down to a blocked water channel on the left of the intake manifold which is on the same side the HG went between cylinders 1 & 2

    It was blocked completely with some really thick black sludge. Posted pic after clearing it


    Sounds feasible alright, after re-assembly, I'd run a cooling system flush through it as if it was blocked there then there could well be other area's of build up in the cooling system. I'd also change the thermostat while your at it, they are only a couple of Euro so worth doing IMO.


  • Advertisement
  • Registered Users, Registered Users 2 Posts: 129 ✭✭timefora_J


    I have a spare Holts 2 part rad flush there, no harm like you said giving it a run through one it's all back in one piece.

    Got the head back today still waiting on gasket kit tho, come on an post.. Itching to get going on it.

    Thanks for all the advice Nissan doctor your help has been invaluable to a learner like me self.


  • Closed Accounts Posts: 8,223 ✭✭✭Nissan doctor


    timefora_J wrote: »
    I have a spare Holts 2 part rad flush there, no harm like you said giving it a run through one it's all back in one piece.

    Got the head back today still waiting on gasket kit tho, come on an post.. Itching to get going on it.

    Thanks for all the advice Nissan doctor your help has been invaluable to a learner like me self.

    No bother, let us know how you get on when its back together.


  • Registered Users, Registered Users 2 Posts: 129 ✭✭timefora_J


    Right small update but major pain in the head.

    Picked up the head this afternoon, brought it home and after dinner went to go get the tappets and cam shaft and found the box I have put them into most have been knocked over by the wife or kids, tappets are all out of order grrrrrrrrrr

    I put em back in the cylinder head best I could and torqued the cam bearings to spec. 6 out of 8 are out of tolerance some by a good bit.

    Any advice on reshimming a cylinder head ? I've got the haynes there alright, the process seems easy enough if you've got the tools and spare shims to hand.

    I'll have to get me hands on a micrometer tomorrow and double check each shim is the same size as it printed on it, one has no numbers at all :( and go from there.

    Note to self get shed with child and wife resistant lock :D


  • Closed Accounts Posts: 8,223 ✭✭✭Nissan doctor


    The shims could have the size stamped on either side. If there was no valve clearance issues before then a bit of trial and error might be needed to match them back up to their original positions.:(


Advertisement