Advertisement
If you have a new account but are having problems posting or verifying your account, please email us on hello@boards.ie for help. Thanks :)
Hello all! Please ensure that you are posting a new thread or question in the appropriate forum. The Feedback forum is overwhelmed with questions that are having to be moved elsewhere. If you need help to verify your account contact hello@boards.ie
Please note that it is not permitted to have referral links posted in your signature. Keep these links contained in the appropriate forum. Thank you.

https://www.boards.ie/discussion/2055940817/signature-rules
Hi there,
There is an issue with role permissions that is being worked on at the moment.
If you are having trouble with access or permissions on regional forums please post here to get access: https://www.boards.ie/discussion/2058365403/you-do-not-have-permission-for-that#latest

Wiring an Apexi Neo to an ITR (DC2)

  • 08-03-2010 10:49pm
    #1
    Registered Users, Registered Users 2 Posts: 4,396 ✭✭✭


    Wired an Apexi Neo to my car over the christmas. Posted this up for the lads on midnightclub.ie its an easy enough job if your handy with wires. I said id post up here the step by step with pictures. I have to say if your no good with wires, dont know what splicing means or cant read diagrams forget it, this is your ecu your playing around with.

    Firstly get your tools together.
    You will need:

    1 no. Wire stripper
    1 no. Snips/pliers
    1 no. Roll of insulating tape
    1 no. Torch
    1 no. Lighter ( a must for splicing a wire in quick time)
    1 no. Apexi Neo
    1 no. Wiring diagram book (http://www.apexi-usa.com/content/pdf6458.pdf)
    1 no. Instruction Manual (http://www.apexi-usa.com/content/pdf6457.pdf)
    1 no. 10mm socket and ratchet.
    IMG_0015.jpg

    Firstly, go under the bonnet and remove the neg (-) (BLACK) terminal from your battery, go around to driver size, turn the key in the ignition, make sure nothing turns on. You are now ready to proceed.
    my98teg052.jpg

    You need to find your ECU, this is down to the left by the passenger footwell.
    IMG_0018.jpg

    Behind the flare is the flare holder, this has a bolt that you need to loosen to remove the panel.
    IMG_0019.jpg
    Take a 10mm socket and losen the bolt off
    IMG_0021.jpg

    Next pull off the panel, it may take a little jiggling to move and the carpet can get in the way at the bottom. When the panel is off you should see something like this:
    IMG_0024.jpg
    This is your ecu
    IMG_0023.jpg

    Next, remove the cover with the RH embossed in it, this protects your ECU
    IMG_0025.jpg

    When this is off it should look like this:
    IMG_0026.jpg
    There are 2 more bolts to remove at the top of the ECU, they are a little obscured so you need to get the torch out. they are also 10mm size. Your ECU can now be taken down and placed upon the floor
    IMG_0027.jpg

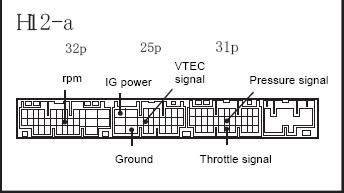
    Next Turn to Page 38 of the Wiring manual and go to item H12-A (Double check the back of your ECU matches the pin layout at all times)
    IMG_0028.jpg
    DC2ECU.jpg
    IMG_0029.jpg

    Your next job is where the concentration begins. I can only stress this. Fully find and complete only one wire at a time. When you have located the wire, check the diagram again to make sure, then go back and check this again to make sure your cutting or splicing the right wire.
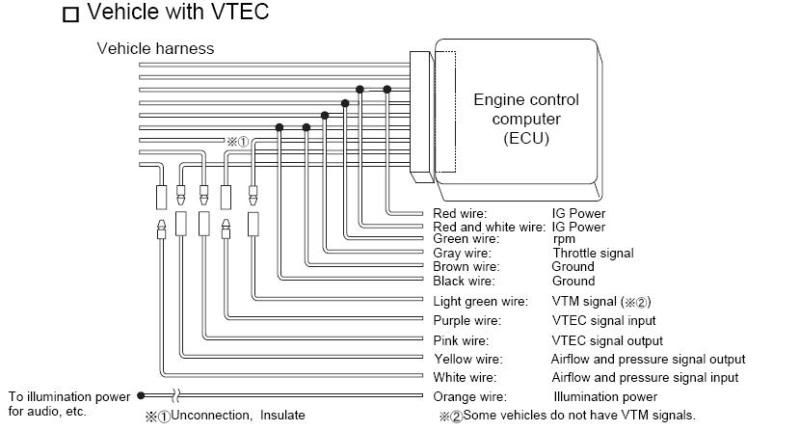
    VTECECU.jpg

    To splice a wire, isolate the wire from the others and heat the wire with the lighter till the PVC coating goes black, then while hot move the PVC coating with your fingers until the wire is exposed. Then take the wire from the NEO harness, split the ends in a V shape and then wrap each side TIGHTLY around the exposed wire.
    Then use the clips provided and then press them in to ensure a tight connection, then take a small bit of shrink wrap or insulating tape and ensure a good tight insulation of the wires. Then using the lighter heat the shrink wrap/insulating tape a little and it will close up.

    The following are the wire colours (again double check yours)
    POWER (+): Red wire & Red with White tracer from the NEO splice to the Yellow wire with Black trace on the ECU.
    RPM: Green wire on NEO Splice to Yellow wire with Green tracer on ECU.
    Throttle: Grey wire on NEO Splice to Red wire with Black tracer on ECU.
    GROUND(-): Black wire and Brown wire on NEO splice to Brown wire with Black trace on ECU.

    VTEC: Cut the VTEC signal wire in two (Green wire with Yellow tace on ECU)
    -Taking the Purple wire on the NEO harness and connect it to the wire still in the back of the ECU (VTEC input)
    -Taking the Pink wire on the NEO harness and connect it to the other side of the wire (running to engine bay). Again insulate all connections and ensure tight connection.

    AIRFLOW/PRESSURE Signal: Cut the wire in two ( Red wire with a greeny-brown tracer)
    -Taking the Yellow wire on the NEO harness, connect it to the wire still in the back of the ECU (Airflow OUTPUT) *Note this is opposite to the VTEC signal*
    -Taking the white wire on the NEO harness, connect it to the other side of the wire ( running to engine bay). Again as before fully insulate and ensure tight connection.

    You should now be left with something that looks like this:
    IMG_0030.jpg

    Double check the back of your ECU and ensure nothing is left loose.
    Put back your ECU doing the first few steps in reverse.
    Congratulations your APEXI NEO is now installed.

    Connect back your battery terminal and then turn the IGNITION until your NEO illuminates.
    NOTE: DO NOT START YOUR CAR
    Ensure you cant hear any electrical fizzing noises or any burning smell. If you do turn off the ignition completely and have a look to see if any wires are loose or contacing at the back of your ECU.


    You need to setup the NEO:
    - Select ETC from the MENU
    - Turn VTEC control off (V/T Control off with the down key)
    - Go to Car Select (THR setting)
    - Set the number of Cylinders to 4
    - Then Set the throttle setting. First do it in the closed position (pedal untouched)
    - Then set the throttle in the open position (foot fully to the floor)
    - A message saying " Throttle setting successful" and an OK symbol will flash. Press ok (the down button)
    - Next set the type of Sensor: Integras are "Pressure" sensors. Select this option.

    You may now proceed to start your car.

    After this you need to get the NEO setup by a professional with a rolling road, at which point they will set the MAP settings and the proper VTEC control.

    Have Fun!


Advertisement