Advertisement
If you have a new account but are having problems posting or verifying your account, please email us on hello@boards.ie for help. Thanks :)
Hello all! Please ensure that you are posting a new thread or question in the appropriate forum. The Feedback forum is overwhelmed with questions that are having to be moved elsewhere. If you need help to verify your account contact hello@boards.ie
Hi there,
There is an issue with role permissions that is being worked on at the moment.
If you are having trouble with access or permissions on regional forums please post here to get access: https://www.boards.ie/discussion/2058365403/you-do-not-have-permission-for-that#latest

Howto: Recovering Deleted Photos

  • 08-02-2010 10:53am
    #1
    Registered Users, Registered Users 2 Posts: 140 ✭✭


    (spotted that this was missing/requested in the FAQs thread so I'll give a go)

    Its not just 'computer forensics' experts who can recover deleted photos, anyone can do it and the software is free. Your level of success will depend upon how soon you start the recovery process; or rather, how much activity has gone on, on the device that youre recovering from.

    Background Info
    You dont need to know this bit but it might help you understand the process. We're going to think of a data storage as being represented by 'slots'. When we tell a camera or pc to save a file that it has in its memory, it picks a slot and puts it in there, and then writes to a 'table of contents' (journal) about where the file is now saved. When picking a slot, it looks for a free one by using slots not mentioned on the table of contents.

    When deleting a file, the device will remove the entry for the file in the table of contents. This way, the file system no longer knows where the file is, and thus it might as well not exist. However, the data that was saved is still intact in the slot, until the next time the device is looking for a free slot - if it picks this slot again, your data will be destroyed and replaced with the new file. We need to use a program that will recognise these remaining image files before they get replaced.

    Ingredients
    1 medium with deleted image. Can be a camera, memory card or a computer.
    1 decently sized USB key (as big as your memory card, at least).
    1 virgin PC with nothing deleted on it.
    1 internet

    Steps

    To pre-emptively summarise:
    1. Stop what you are doing
    2. Use a different computer
    3. Download testdisk (which includes photorec)
    4. Run testdisk (from a different disk than you are recovering from)
    5. Follow the steps of the program
    6. Have Patience

    1. Stop what you are doing.
    This is important.
    - If you are using a camera, do not take any further pictures until you have removed the memory card that you have deleted something from. This is why I always carry two cards: very rarely will I fill an entire card but having the second means that if something does manage to delete itself (I hardly ever delete on-camera except maybe on a return journey), I don't have to stop shooting entirely, just on that card.
    - If you are using a computer, stop dead. Drop the mouse. Wait, you googled this? Checked the boards forum? You may have already erased the photos. It's not very likely, as PCs these days have fairly large amounts of data storage so its like winning a horrible lottery. But we want to be safe! Ideally you are reading this before you deleted the images, to know what to do in case it happens. Realistically, you are probably not. I want you to stop using the PC on which you deleted the image.

    2. Use a different computer
    - If you were using a camera when you deleted the image, this bit isnt that exotic. Your digital camera is a computer, albeit with a very defined purpose. When you use a card reader or connect it to the PC, the PC becomes your second computer. Just dont read or write (save or delete or update) anything on the camera/card. This means you may have to cancel any automatic processes that happen when you connect your camera/card. Apart from that, you will be able to use your usual PC. It is a different computer.
    - If you were using a PC when you deleted the image, you should now be on a different computer. At the very least, you should be attempting to use a different hard drive on the same computer. You're still going to lose data to the operating system though. Forget I said anything. This might be awkward and might take some time to borrow a friend's laptop or go to work or something. Oh well; you -really- want these photos, right?

    3. Download testdisk
    Testdisk is free, open source software. There is no need to purchase software for this. It is 100% legal and the intent of the developers that you download this for free. (I say this because I've had at least one person tell me that they thought downloading anything for free was illegal...)

    On the virgin computer, visit: http://www.cgsecurity.org/wiki/TestDisk_Download
    Download the relevant file. If you are not going to be running the recovery process on this computer (i.e., you deleted the file on another PC), you can save time by saving it directly to a USB key. The links at the time of writing are:
    Windows
    OSX/Mac
    Linux

    Having downloaded the zip file, you will need to extract it. Most people are familiar with this these days and it is almost always built into the operating system to do so, so I'm going to assume you can do this. If not, google it!

    4. Run testdisk
    - If you deleted an image from a memory card, ensure the memory card is inserted (or if it's in the camera, connected by USB cable), and then start photorec from where you downloaded it. You will not have to install it, it runs where ever it is put.
    - If you deleted an image from a PC, you will now need to take testdisk to this computer. Put testdisk on a USB flash memory drive/ memory key. On the PC, open the drive and start photorec. Do not copy testdisk to your PC. It should only be run from the flash memory.

    How you start PhotoRec will depend on your operating system:
    • Under Windows, start PhotoRec (ie testdisk-6.9/win/photorec_win.exe) from an account in the Administrator group. Under Vista, right click photorec_win.exe and then click Run as administrator to launch PhotoRec.
    • Unix/Linux/BSD, you need to be root to run PhotoRec (ie. sudo testdisk-6.9/linux/photorec_static)
    • MacOSX, start PhotoRec (ie testdisk-6.9/darwin/photorec). If you are not root, PhotoRec will restart itself using sudo after a confirmation on your part. Sudo will ask for a password - enter your Mac OS X user password.

    5. Follow the testdisk photorec process.

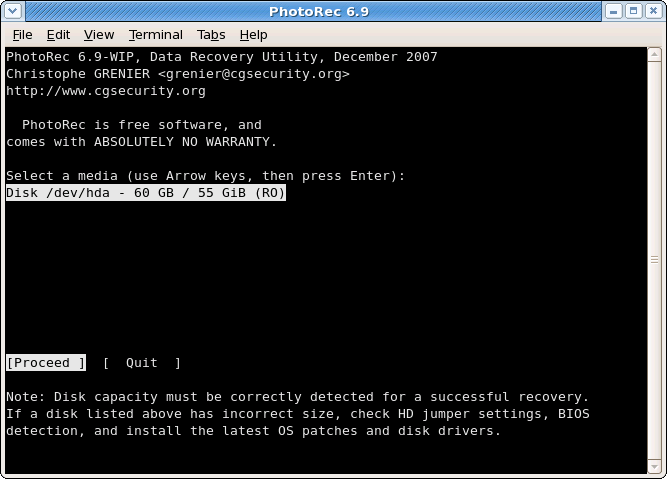
    5.1 You should be greeted with the disk selection screen. Select the disk that the image was deleted from. This image shows one disk, but you should see two if you've been following my steps. You can identify which disk is which by the label or by the size. Hard drives are generally big (20GB+), memory cards are generally small (< 16GB unless you seriously splurged on storage!). Hit enter to select the one you want.
    PhotoRec_startup.png

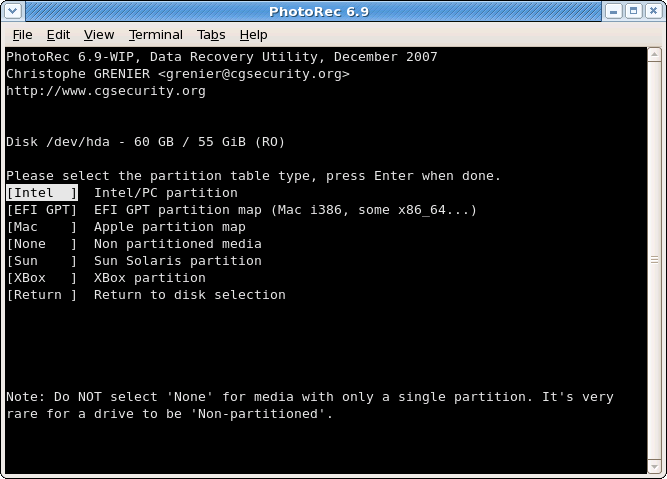
    5.2 You must now select the partition type. What? I know. This is easy though. 99% of you will be just hitting enter to select Intel. For you Mac users, press the down arrow key twice, hit enter and thank anyone except Steve Jobs for open source software.
    PhotoRec_part_type.png

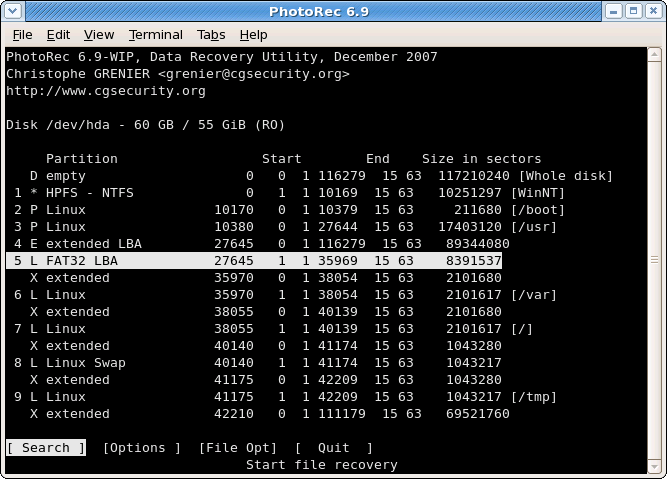
    5.3 Now the filesystem type. Aaaah! What an ugly, scary screen. No matter; photorec will auto-detect the one you want. Hit enter to select it.
    PhotoRec_src.png

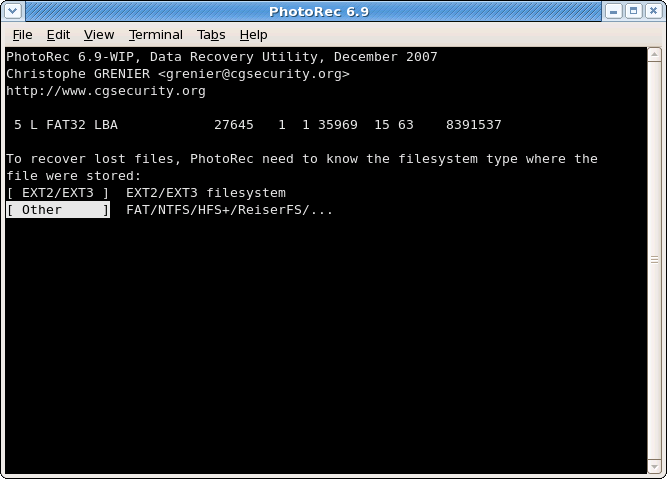
    5.4 Another screen that will mean nothing to most, so you can just go ahead and hit enter with Photorec selecting whatever it thinks will work.
    PhotoRec_filesystem.png

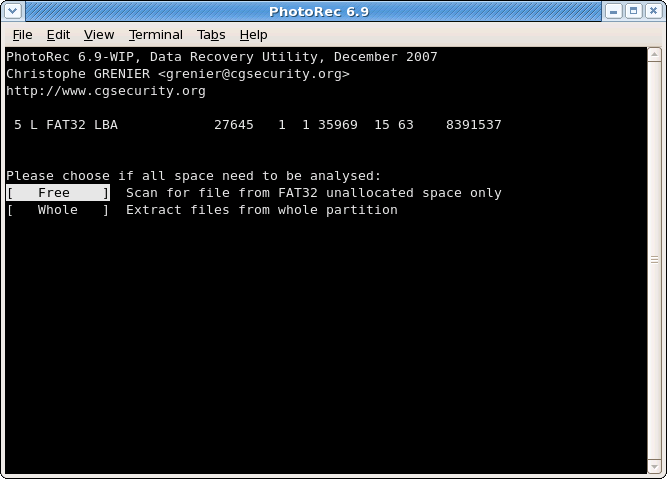
    5.5 We must now choose whether to search for files in the empty part of the file system (where we expect to find the deleted files) or the whole system. Selecting whole partition is generally a bad idea, we just want deleted files. With Free selected, hit enter.
    PhotoRec_free.png

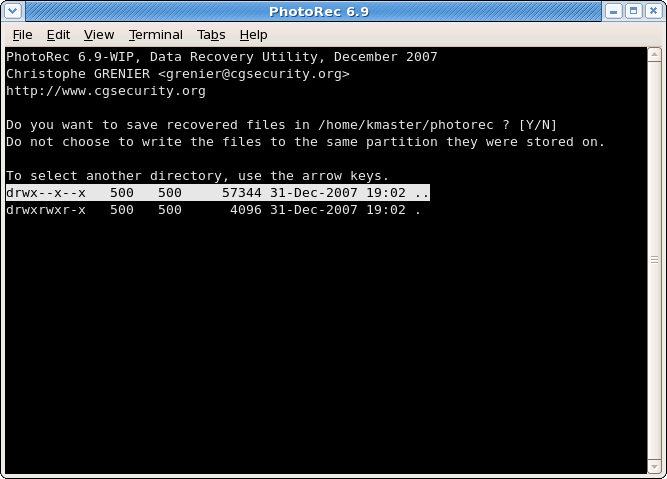
    5.6 We need to choose a place to save all the images we are going to recover. This is a little confusing for non technical users. Hopefully photorec will just select its own directory. This would be good - we want to save them on a different disk than it was deleted from, and you put testdisk on a different disk. If for some reason it does not, then use the arrow keys to navigate around the file system. At the top of the list "." means select this folder. ".." means move 'up' in the folder hierarchy, to the folder that contains this folder.
    When you have selected the folder you want (hopefully photorec did this automatically) hit the letter "y" to start! Or "n" if you want to cancel. No turning back now though, right?
    PhotoRec_dst.png


    6. Have Patience
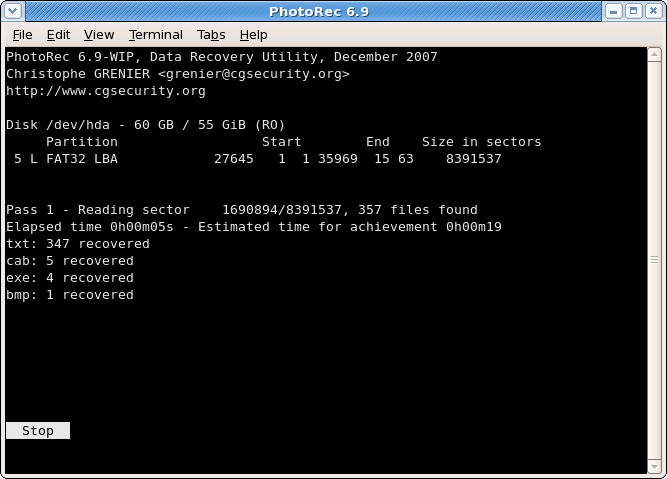
    6.1 Photorec will now start scanning for deleted files. How long this takes will depend on the size of the disk: dont be surprised if this takes as much as three hours on a very large hard drive. On a memory card it might be as little as ten minutes or less. It will give you feed back as it goes on what it has found and how much longer it should take. Note that the estimated time can jump around quite a bit, and frequently if it says three hours, it might only take one, or two. If this isnt the case and it does take the same or longer, sorry for getting your hopes up...
    PhotoRec_running.png

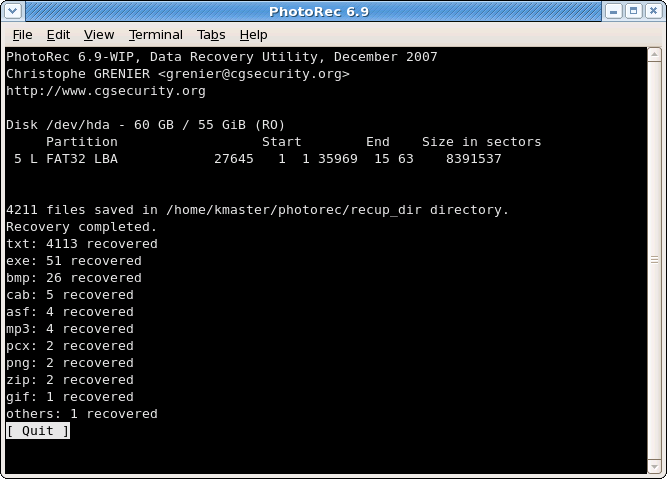
    6.2 Done! Hit enter to quit out of photorec and go see what we've got.
    PhotoRec_end.png

    6.3 Use your file manager (windows explorer, my computer, whatever you call it) to go to the directory you selected the files be output to. Here's what mine looks like:
    screenshotrecup.png

    That folder called "recup_dir.1" with the lock on it (yours probably wont have the lock) is full of your recovered files. If there are more than 500 recovered files, you will additionally end up with "recup_dir.2", "recup_dir.3", etc.

    6.4 Have a look inside your recup directory(s).
    screenshotinrecup.png
    Hurray! There they are! The file names will not be related to what the image is, except for the extension (if its a jpg, it'll end in .jpg, etc.) as the filename was deleted from the table of contents.

    6.5 A note on patience:
    If you are recovering from a hard drive upon which you do your daily chores or web browsing, you will get back a LOT of rubbish. Practically every image that you see on the internet is downloaded to your hard drive by your browser - if its been deleted as not needed any more, it will still show up as a deleted file. Yes, this means you might get some dodgy stuff back if you've been using the internet for its primary purpose, but you'll get the absolute mundane back too - the boards.ie reply button, for example. You will need to have the patience to sift through this stuff to find what you want. Luckily, when they are found, items you are looking for are generally found together. If your hard drive is badly fragmented, they might not be though. Look through every file to see if you've got what you wanted. Don't be tempted to give up and delete everything (again).

    Conclusion
    While Testdisk Photorec is not exactly user friendly to look at, it is a very simple process 99% of the time. You only have to invest time (waiting) and diligence (being careful not to save anything, including photorec itself, to the disk where the image was deleted). It has been successful for me on several occasions on several people's computers, on several operating systems and on several sized disks. Give it a go.


Comments

  • Registered Users, Registered Users 2 Posts: 520 ✭✭✭corkandproud


    Super stuff, trust good old Boards to have the answers after I deleted birthday pictures!!!

    Super step by step guide. It must be 22 years since I navigated through DOS


  • Registered Users, Registered Users 2 Posts: 2,660 ✭✭✭SDTimeout


    Thank you. I fear that having done this after bringing it to a chemist may have hindered my chances. I am left with a lot of .txt files but a lot of photos that the chemist had " greyed " out on me.

    Thank you!


  • Registered Users, Registered Users 2 Posts: 237 ✭✭M007


    Thanks for this - followed the steps and recovered the deleted images!


  • Registered Users, Registered Users 2 Posts: 3 Efa87


    I am far from technically minded so this might be the stupidest question but I need some help.

    My Nokia C-3 memory card is fecked and cleared all my photos, I went to a photo shop and was advised to take the memory card out and insert it into my laptop. You'd think this would be straight forward but not for me. the only slot I can see for a memory card is an SD/MMC slot and the card from my phone is tiny and wont fit. Is there anyway i can insert this memeory card into my laptop to recover my photos?


  • Registered Users, Registered Users 2 Posts: 255 ✭✭vic20


    What you need is an adapter. Something like this: http://www.pixmania.ie/ie/uk/1244983/art/tikoo/8-gb-micro-sd-memory-card.html
    or this:
    http://www.dabs.ie/products/veho-micro-sd-usb--adapter-card-reader-674H.html
    Efa87 wrote: »
    I am far from technically minded so this might be the stupidest question but I need some help.

    My Nokia C-3 memory card is fecked and cleared all my photos, I went to a photo shop and was advised to take the memory card out and insert it into my laptop. You'd think this would be straight forward but not for me. the only slot I can see for a memory card is an SD/MMC slot and the card from my phone is tiny and wont fit. Is there anyway i can insert this memeory card into my laptop to recover my photos?


  • Advertisement
  • Registered Users, Registered Users 2 Posts: 3 Efa87


    Thanks Vic, didn't even know there was such a thing.


  • Registered Users, Registered Users 2 Posts: 255 ✭✭vic20


    I picked up a card/USB adapter recently in a Vodafone shop. You'll probably find one or the other in any phone/camera/electronics shop.
    Efa87 wrote: »
    Thanks Vic, didn't even know there was such a thing.


Advertisement