Advertisement
If you have a new account but are having problems posting or verifying your account, please email us on hello@boards.ie for help. Thanks :)
Hello all! Please ensure that you are posting a new thread or question in the appropriate forum. The Feedback forum is overwhelmed with questions that are having to be moved elsewhere. If you need help to verify your account contact hello@boards.ie
Hi there,
There is an issue with role permissions that is being worked on at the moment.
If you are having trouble with access or permissions on regional forums please post here to get access: https://www.boards.ie/discussion/2058365403/you-do-not-have-permission-for-that#latest

Woodwork project - Monopoly Board

  • 03-01-2010 1:08am
    #1
    Registered Users, Registered Users 2 Posts: 1,088 ✭✭✭


    Hi All,

    with a bit more time on my hands ue to the current economic climate, i'm looking to keep myself busy.

    i have limited tools but have a bit of a knack for wood working.

    I'm looking to build a personalised Monopoly board such as the Franklin Mint Collector's Edition.

    http://www.franklinmint.com/product1.aspx?SID=2&Product_ID=7290

    would anyone be able to help me with drawing up the plans or any ideas or comments.

    I would also welcome any tips on stensiling or painting the board.

    Thanks
    Tagged:


Comments

  • Registered Users, Registered Users 2 Posts: 6,414 ✭✭✭kdouglas


    A very nice idea and something I would love to try myself at some stage.

    General construction of the board is not like anything I've done before myself, so I wouldn't be much help there, but if you want similar finishes on the edging, a router (if you dont already have one) is one of my favourite tools.

    I've never been very good at drawers, but given there small size they shouldn't cause you too much hassle.

    For the board itself, to get a similar effect to the one you linked, I'd buy a new monopoly game set and cut the centre part out, leaving you with just the outside, then cut a recess (using the aforementioned router) into the top surface and glue into place.

    The only problem with this is the folds in the board, but if you put a small piece of wood under the fold area, you may be able to push the surface up to level again and it wouldn't be noticeable.

    I'd also look on ebay for old monopoly pieces with the metal figures, polished up they would go well with the wooden board.
    I got a set second hand from a market stall in the UK last year and they are quite nice.

    Edit: For the centre piece, i'd imagine it would be fairly difficult/impossible to get something printed on green felt, instead you could get the Monopoly logo and the positions for the cards printed onto some high quality paper/cardboard and put a piece of glass on top.

    Edit again: print the monopoly logo on clear acetate material (probably need to go to a printers to get it done in a3 size or bigger to suit), cut to size and sandwich between two layers of glass, then put this on top of green felt in the centre.

    e.g.
    ---        glass         ---
    ---    printed acetate   ---
    ---        glass         ---
    ---      green felt      ---


  • Registered Users, Registered Users 2 Posts: 4,509 ✭✭✭SpitfireIV


    Hi fanzhiyidan, you say you have limited tools, but a knack for woodworking. Just how much of a knack? :p Because that image you supplied is a fairly fine piece of woodworking that'd require a high degree of skill, tools and knowledge to finish to that standard, I'm not trying to put you off it, but we have to be realistic :). Is it a case of you want to make one similar to that, or, something on the same principle, ie decorative monopoly board with storage drawers etc.

    Give us more info as to how youd like it, what sort of timber, what sort of tools/equipment youve got and we'll be better able to help you! :)


  • Registered Users, Registered Users 2 Posts: 1,088 ✭✭✭fanzhiyidan


    thanks for the replies guys.

    as for my knack, i built a grandfather clock a few years ago and it's still going strong. last project was a poker table but a carpenter friend did most of the work to be honest.

    i would have access to a router, hand saws, electric sander, clamps, chisels.

    would like to do most of this work myself if possible

    fairly technical minded, good with cad etc, so could chance drawing up plans myself but would really need someone who has a knowledge of wood working


  • Closed Accounts Posts: 443 ✭✭cork1


    what wood are you thinking of using?


  • Registered Users, Registered Users 2 Posts: 1,088 ✭✭✭fanzhiyidan


    was thinking of mahogony or cherry


  • Advertisement
  • Registered Users, Registered Users 2 Posts: 4,509 ✭✭✭SpitfireIV


    Hi fan,

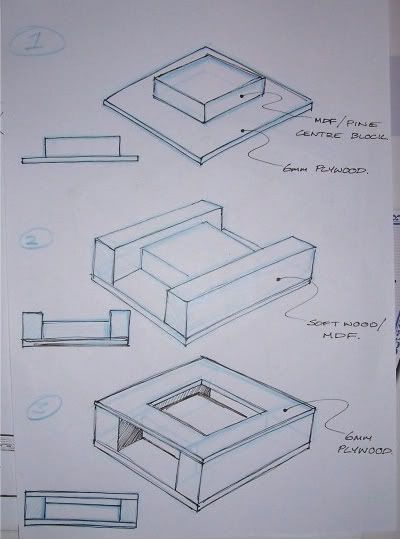
    Did a few quick sketches there to show one way it could be made, and made relatively cheaply and easily I'd imagine (I think this is the way I'd make it anyway! :p)

    101_1958.jpg

    1. Get a piece of 6mm ply for the base, this will be the same size as the monolopy board itself! Cut square! On top of this then, in the centre you can fix a block, the dimension of which will be the square inset you want in the middle of the board, so, whatever size the piece is that you'd be cutting out of the centre of the board! The height of this block is up to you and however high you want it to be (just keep in mind that the height of this centre block will dictate more or less the height of the drawer).

    2. Two pieces of softwood or mdf lenghts down each side. You might be lucky and get some wood off the shelf, planed, ready to use, so have a look around. Just use a lenght down two sides, you'll notice then that this gives you two spaces for drawers, these two pieces will be higher than the centre block fitted in stage one and thus give you the raised gaming area.

    3. Get another piece of 6mm ply, like that used in the base and cut a square out of the centre, the same size as the block fitted in stage one, then, fix this down onto the unit. None of these will be seen, so, you can pump some screws into them, and plenty of glue to hold it all together.


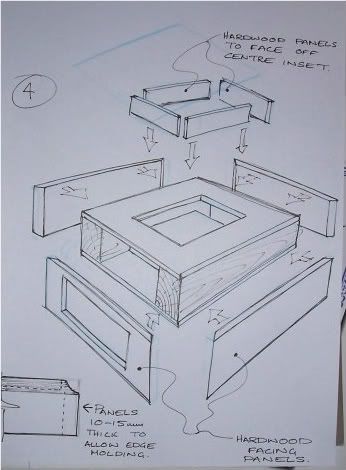
    101_1960.jpg

    What you'll have then is a very simple, cheap, and sturdy carcass around which you have face off with your hardwood, which ever you choose (cherry would be nice, but is a bit more expensive than mahogany). If you know someone that had a bandsaw that could run you off a few lenghts and run them through a planer for you. Cut them on a good mitre saw/box with a good fine tooth saw/blade to get nice clean 45's. For around the outside, cut them the height of the unit, plus the thickness of the board, plus another 5mm or so, so as to give you a 'parapet' like on the image you showed. Get them cut to 12 or 15mm thich, so you can route a molding onto them. Notice the panel where the drawer is to be fitted has a piece cut out of it.

    For the inset centre section again get four lenghts cut, and cut to such a height so as to allow for a parapet again, the same height as the outside wall and set these into place.

    The hardwood panels could be glued into place, or, if you want to do something like the image below, you could screw them into place.

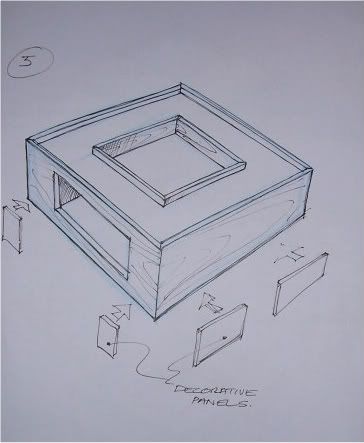
    101_1959-1.jpg

    When you have all the above done you could add some decoration/panels from thinner veneer. Get some thin strips cut and put them around the base etc. What I mentioned earlier about fixing the hardwood panels via screws, if you were to use screws you could place and countersink them where you would be later applying the panels, thus, they would be covered!


    The drawings make the board appear a bit think and chunky, compared to the low and flat board in the image provided, but, you get the idea of what I'm getting at I hope. Its a pretty rough and quick idea and lots of things to be ironed out I imagine. Get a few feet to raise the unit off off a table and some green baize for the recessed section. I'll leave the fine measurements and cad work to yourself! ;)


  • Registered Users, Registered Users 2 Posts: 878 ✭✭✭Bicky


    Really nice post croppy.
    Good luck with this project.


  • Registered Users, Registered Users 2 Posts: 1,088 ✭✭✭fanzhiyidan


    thanks a million croppy!

    you make it look a hell of a lot easier than i had imagined.

    would the drawers move ok as they are or should i get drawer rollers?

    think i might make a trip to the shops tomorrow and get cracking.
    although first i'll get the cad design done;)

    going to make pubopoly or puckopoly, based around my local pubs.
    any ideas for community chest and chance cards???:D


    keep the ideas coming.


Advertisement