Advertisement
If you have a new account but are having problems posting or verifying your account, please email us on hello@boards.ie for help. Thanks :)
Hello all! Please ensure that you are posting a new thread or question in the appropriate forum. The Feedback forum is overwhelmed with questions that are having to be moved elsewhere. If you need help to verify your account contact hello@boards.ie

Capturing Time...

Options
  • 05-01-2009 12:27am
    #1
    Registered Users Posts: 6,392 ✭✭✭


    Looking for a "How To" here really because i've tried a shoot and failed miserably.

    The idea is quite simple - you want to capture the second hand motion of a watch or clock.

    In my case i was looking to capture a 10 second 'impression' of the watch's second hand over time.

    As with many/most watches the face of the timepiece is bright with varying levels of darkness on the individual hands.

    As what was being attempted to capture was time bound motion, my attempt was based around a 10 second exposure in shutter priority mode allowing the camera to figure out the rest of the equation.

    The result (out of camera) was underwhelming ;

    69637.jpg

    If you look really hard, just after the 5 minute mark you'll see a slight impression of the second hand at each second for 10 seconds but they are so faint that it doesn't serve the purpose I was interested in.

    What i find really strange is that the second hand actually vanishes from the final position.

    I've googled and googled and can't find a tutorial that demonstrates the right way to achieve this. I searched boards and can't find that it was discussed before on this forum.

    My best guess is at this stage that the way the sensor works is that bright areas of an image will take priority over dark as time progresses on a long exposure, thus the initial and subsequent positions of the second hand are being overwritten/blended/obscured with the bright watch face as the second hand moves to reveal the underlying surface. But that doesn't quite explain the vanishing second hand in the final position.

    If i'm correct then i'm wondering what is the correct way to achieve the desired result in the camera and without post processing? Only other way I can think of (but it involves post processing) is to shoot for 10 seconds on continuous and pick 10 frames and blend together - but as said I was really hoping to improve on my initial attempts in camera rather than in PP.

    So, has anyone achieved this or something similar and how did you achieve it?


Comments

  • Registered Users Posts: 16,624 ✭✭✭✭Fajitas!


    You can do it with an image similar to what you have there, but you'll need some nice processing to really bring it out. I'd reccommend a very powerful B&W conversion.

    Am writing at the moment, I'll be back in another 1000 words and I'll give you a hand if you want.


  • Closed Accounts Posts: 910 ✭✭✭Jagera


    I think you may be on the right track about the exposure of the second-hand being overridden by the light background as the exposure continues. but as you point out the final second should be clear.....

    It would be interesting to see how the same thing turned out on film considering once the dark parts are burnt there's no going back...

    Maybe try a multiple exposure, rather than a single 10 second one.


  • Registered Users Posts: 492 ✭✭Burnt


    10 minute exposure with flash fired once every 61 seconds?


  • Registered Users Posts: 4,699 ✭✭✭ThOnda


    Mutiexposure (in camera or via processing, or by firing flash each second).
    There is also a way to do it - don't charge the watch and once the arm stop, just shake them carefuly to move the second one only by one stop. Or just copy and paste...


  • Registered Users Posts: 26,558 ✭✭✭✭Creamy Goodness


    dunno if this would make sense, but would using a self winding (automatic) watch make a difference? was thinking it might due to the way the second hand moves continuously instead of clicking each second.

    i can try it tomorrow - as i'm nowhere near my camera at the mo - with my self-winding omega and see if it does what you're trying to achieve if you'd like


  • Advertisement
  • Registered Users Posts: 4,699 ✭✭✭ThOnda


    I just could not be bothered :-) I know what you mean, but very hard to achieve with running watches.

    3168342065_275645584f_m.jpg


  • Registered Users Posts: 6,684 ✭✭✭DaireQuinlan


    bw wrote: »
    I think you may be on the right track about the exposure of the second-hand being overridden by the light background as the exposure continues. but as you point out the final second should be clear.....

    It would be interesting to see how the same thing turned out on film considering once the dark parts are burnt there's no going back...

    Maybe try a multiple exposure, rather than a single 10 second one.

    I don't think there's anything surprising about this, I think the same thing would probably happen on film aswell. That second hand rests briefly at each of the ticks before continuing on, probably less than a second, say 0.5 of a second or something. That means that over the course of the entire 10 second exposure the hand is still at a particular location for less than 5% of the entire exposure. The rest of the time the background is being exposed. This more or less agrees with the picture above, the second hand impressions are faint, but not so faint that you can't make them out.


  • Registered Users Posts: 615 ✭✭✭rahtkennades


    Not sure I'm 100% on this, but here's my take on it.
    If you're taking an image for 10 seconds, then there is a total amount of light being absorbed by the sensor/film. If all elements are static, then each will be seen in equal proportion to the light it is reflecting/emitting.
    However, if one element of the image is moving, then it will be seen in the final image only in proportion to the amount of time it spends in each position.
    In the case of a person running/cars moving at night/sea lapping the shore, this translates to a motion blur, which is essentially an averaging of the light from each position the element is in. But it always appears to be 'ghostly', because the light at each position is a fraction of the total light absorbed by the sensor.
    In this case, the dial, the case, and the background are all reflecting constant light for 10 seconds. However the second hand is only reflecting light in each position for just under 1 second each position (assuming a fraction of a second to move between positions).
    As such the light reflected by the second hand will (proportionally) be only about 9-10% of the light reflected by the other elements of the image (dial, case, etc). So it will always be a very light blur.
    Using a flash every second, or any other way of adding light to the whole image, won't make it any better.
    It seems to me the only way of showing the second hand better is to increase the proportion of the light it is giving. This means either selectively darkening the other elements of the picture, or increasing the brightness of the hand.
    Digitally, you could take 10 separate 1 second exposures as suggested, then brighten the hand by say 10% in each image, then stack the images to give an overall image with the hand then on average 10% brighter.

    Not sure if that's any help?

    Edit: Daing, Daire got there while I was typing!!!


  • Moderators, Category Moderators, Arts Moderators, Entertainment Moderators Posts: 9,047 CMod ✭✭✭✭CabanSail


    I recall using up a few rolls of Kodachrome trying to do something like this in the camera a long time ago. I did not get one vaguely useable shot (but I learned a lot)

    To do it in the camera you may have a better result if the clock face was black. The second hand would then show up a bit more, but it would still be very faint as it would only have 1/10 of the exposure of the rest of the image at each stop.

    Even if you flashed the same exposure 10 times it would not work the clock face would blow out, if you cut the power to 1/10 then the second hand will still be under exposed.

    I think the effect I think you are seeking will be best achieved by blending multiple exposures.


  • Registered Users Posts: 6,684 ✭✭✭DaireQuinlan


    A neat way to do it (not in-camera unfortunately) would be to get the 10 exposures with the second hand in the appropriate position and then blend them sequentially in PS so that the last shot is the last one you blend in. This should result in the second hand becoming progressively less faint as it moves toward the 10 second mark. It'll give an impression of time and movement.


  • Advertisement
  • Registered Users Posts: 26,558 ✭✭✭✭Creamy Goodness


    this was the best i could do, the effect is still a little bit weak but i think it shows up a bit clearer (does an my monitor anyways).

    3170966513_c21aff8c83_o.jpg
    30sec exposure.

    3171796104_805f64c003_o.jpg
    10sec exposure.

    also thank you 100mm macro, i see scratches on my watch that i didn't know existed :(

    also these are part of a my first macro set so, sorry if they ain't up to scratch (hohoho lame pun).


  • Posts: 0 ✭✭✭ [Deleted User]


    I had to figure this out a while back aswell for one of my photos,I was doing it with a clock though which made it much,much easier.

    Firstly I placed the clock in front of a lamp to make sure there was a lot of light hitting it.Then I started the exposure with the second hand in one position.I left it there for 6-7 seconds then moved it to another position using the dial at the back,then left the second hand there for 6-7 seconds and so on.In the final photo I got the second hand at 4 different positions,they were still a bit faint though,so to emphasise them I used some selective burning.Combining 10 exposures would probably give the most impressive results but there's the lazy man's way :p


  • Registered Users Posts: 26,558 ✭✭✭✭Creamy Goodness


    bedlam wrote: »
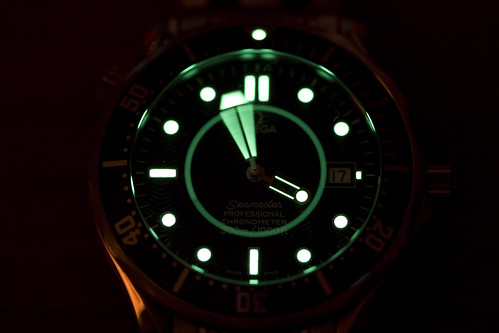
    This would work better if you charged the lume (or used a UV light source) and took the shot in a slightly darker setting, incorporating the glow from the second hand which would help emphasise the passing of time more.

    d'oh my brain has been fried studying for exams. why didn't i think of that.

    so i went off and done more

    20sec exposure.

    3174966699_9c2549567e.jpg

    60sec exposure.

    3175803180_e5ddcd2190.jpg

    120sec exposure.

    3174971393_6af4539edd.jpg

    click for bigger versions, these are all original shots unedited only brought into photoshop to convert from raw to jpg :P

    i think they turned out a little bit better than my previous ones ;)


  • Closed Accounts Posts: 790 ✭✭✭uprising


    agghhhhhhhh, i just spent 20mins explaining and when i hit submit i had to sign in again and lost it:mad:.

    ok quick version now.
    Get a watch/clock with white/bright hands, a black/dark face, makes life much simpler.
    set your camera on bulb or timed exposure 10secs in this case, during these 10 secs fire your flash 10 times(set your flash to 1/10th required output in flash or move your flash further away from subject) , once per second. because film/sensor only records light the second hand will show more vivid than in your first attempt. this may not be the effect you were seeking as the second hand may show some ghosting.

    option 2: multiple exposure,small apature/high f-stop, matt black card, remote release, scissors, uv or similar "clear" screw in filter, and a few hours free time. cut a circle the same diamater as your filter from the card, this will be your mask, then cut a 6degree v from the centre outwards, this represents 1sec, 360degree=60 sec, place your mask inside your filter moving it 6degrees anticlockwise per exposure making sure the second hand corresponds with your mask position, basically your making the image from small segments.
    when you have your 10 exposures remove the mask and make another pizza slice mask, in this case 60degrees and place it in your filter covering the portion of the image youve just taken your 10 exposures from and take the other 300degrees of the image. this is tedious and not really worth the effort required to get it right.

    option 3: 10 images, 1 per second, photoshop, 10 layers from images, keep a straight face as you explain how you achieved this using option 2.


Advertisement