Advertisement
If you have a new account but are having problems posting or verifying your account, please email us on hello@boards.ie for help. Thanks :)
Hello all! Please ensure that you are posting a new thread or question in the appropriate forum. The Feedback forum is overwhelmed with questions that are having to be moved elsewhere. If you need help to verify your account contact hello@boards.ie
Hi there,
There is an issue with role permissions that is being worked on at the moment.
If you are having trouble with access or permissions on regional forums please post here to get access: https://www.boards.ie/discussion/2058365403/you-do-not-have-permission-for-that#latest

Advice needed please

  • 08-08-2008 3:04pm
    #1
    Registered Users, Registered Users 2 Posts: 706 ✭✭✭


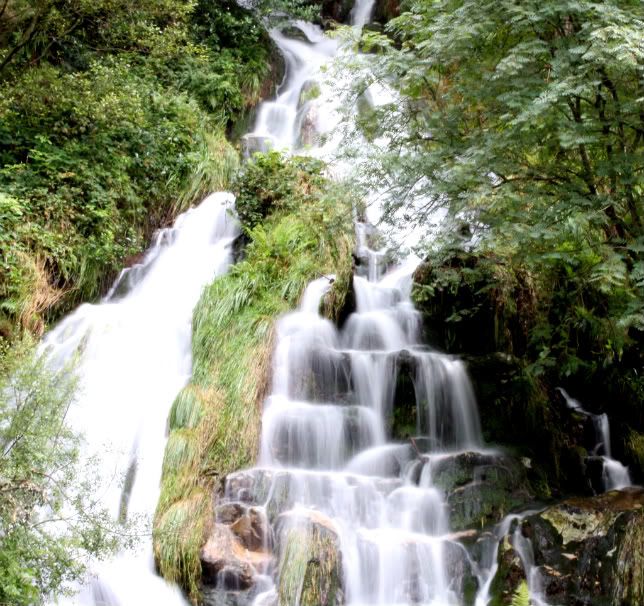
    neewbie question: ive been trying to get some "flowing" type shots of streams and waterfalls etc. however all the shots i take seem to be washed out and over exposed (like below)!:mad:
    any advice as to what settings to use. my equip: canon 40d with kit 18-55 lens with tripod. tried exposure times of about 2seconds. thanks

    IMG_0551.jpg


Comments

  • Registered Users, Registered Users 2 Posts: 2,063 ✭✭✭GristlyEnd


    At 2.26pm the sun is very high in the sky so you will need an ND filter to reduce the light entering the lens or better still go back during the hour before sunset (or after sunrise). You can use longer shutter speeds then.


  • Moderators, Education Moderators, Music Moderators Posts: 10,686 Mod ✭✭✭✭melekalikimaka


    shoot raw and under expose after, or jusy under expose maybe, what iso you on?


  • Registered Users, Registered Users 2 Posts: 8,070 ✭✭✭Placebo


    ISO = less
    fstop = minus
    Aperture = highest..


  • Registered Users, Registered Users 2 Posts: 706 ✭✭✭BoardsRanger


    thanks for the replys. here is what the above was shot at:
    Exposure Time = 2"
    F Number = F32
    Exposure Program = Shutter priority
    ISO Speed Ratings = 100

    i think il try and shoot raw next time and see what i can do with it later on


  • Registered Users, Registered Users 2 Posts: 6,713 ✭✭✭DaireQuinlan


    thanks for the replys. here is what the above was shot at:
    Exposure Time = 2"
    F Number = F32
    Exposure Program = Shutter priority
    ISO Speed Ratings = 100

    i think il try and shoot raw next time and see what i can do with it later on

    Not even shooting that RAW will probably do you any good, by the looks of it you've blocked out the highlights completely. And the midtones. And a fair bit of the shadow detail :-)

    The only solution is to (as suggested above) shoot when its darker, evening time after the sun has gone down or something, or get an ND filter for your lens. This'll cut down the amount of light getting through the lens significantly and allow you to extend the exposure time without over exposing everything.


  • Advertisement
  • Registered Users, Registered Users 2 Posts: 164 ✭✭pippatee


    Hi there,

    your heading in the right direction, but by using shutter priority, your forcing the camera to overexpose i.e. at 2 seconds, the shutter is letting far too much light onto the sensor ... try using aperture priority (av) and giving it the smallest aperture i.e. f32 in this case ... you will need an exposure of perhaps a second or longer to blur the movement of the water,

    if your exposure time is not long long enough to do this, you will need to restrict the light entering the lens using a neutral density filter or a polarising filter ... or else wait til the light drops, either by going behind a cloud or waiting til later in the day,

    as a rule, this type of shot tends to look best either early in the morning or late in the evening,

    try again and let us know how you get on,

    Phil


  • Registered Users, Registered Users 2 Posts: 13,381 ✭✭✭✭Paulw


    Believe it or not, these dull overcast days are great for this type of photo. A bright sunny day makes such images harder to capture.

    At least you're on the right idea.

    There's already plenty of advice above, but another option would be an ND10 filter (slowing the image by 10 stops). Before you go that far though, try a shorter exposure, and see how it goes.


  • Registered Users, Registered Users 2 Posts: 706 ✭✭✭BoardsRanger


    thanks again for all the info. i think i will try again sometime over the weekend but in the evening time! it was cloudy enough today when i took that shot but there was some (and evidently too much) sun.
    i will definately try and shoot in AV mode next time, and hope that it gives me long enough to give the "blur" motion of the water.


  • Registered Users, Registered Users 2 Posts: 706 ✭✭✭BoardsRanger


    Ok, so I had another go at this type of shot. I went to a waterfall where I knew it to be very dark so I could take it during the day. I did however have the worst tripod in Ireland with me and as I was fixing it to the camera, the screw snapped off and half of it remained in the camera! (luckily I could remove it with a pliers later). As a result, I had to place the camera on a rock, which wasn’t ideal to say there was still half a screw sticking out of the bottom of it!
    Anyway, although the image still isn’t quite sharp enough, it’s getting there!

    copy-1.jpg


  • Registered Users, Registered Users 2 Posts: 2,259 ✭✭✭Shiny


    Huge Improvement.
    Good work and it looks great despite the conditions. :)


  • Advertisement
  • Registered Users, Registered Users 2 Posts: 2,538 ✭✭✭sunny2004


    what waterfall is it?


  • Registered Users, Registered Users 2 Posts: 706 ✭✭✭BoardsRanger


    sunny2004 wrote: »
    what waterfall is it?
    one of many in Glenmalure valley in Wicklow


  • Registered Users, Registered Users 2 Posts: 6,196 ✭✭✭PaulieC


    Bryan Petersen (Understanding Exposure) recommends taking a reading off the foliage either side of the waterfall to get a good exposure - means the water doesn't get burned out as much, but you still get a blurred effect


  • Registered Users, Registered Users 2 Posts: 4,503 ✭✭✭smelltheglove


    Well done on the waterfall. When I was studying we were told that running water shots should be taken at around 1/10th of a second, if you go too slow you can get a plasticy effect, having said that there is always an exception. The waterfall shot is beautiful, do you know what speed you used for that one?

    Some beautiful waterfalls in wicklow, I got one recently but dont think I did as good a job as you have here.


  • Registered Users, Registered Users 2 Posts: 706 ✭✭✭BoardsRanger


    Well done on the waterfall. When I was studying we were told that running water shots should be taken at around 1/10th of a second, if you go too slow you can get a plasticy effect, having said that there is always an exception. The waterfall shot is beautiful, do you know what speed you used for that one?

    Some beautiful waterfalls in wicklow, I got one recently but dont think I did as good a job as you have here.
    thanks- i shot it at 1"1 at f36. any greater amount of time and the image started to become over exposed/white. then when i get back, i slightly adjusted the contrast.
    yeah Wicklow really has got some great waterfalls, think i might try powerscourt next. after i get a new tripod that is!


  • Registered Users, Registered Users 2 Posts: 706 ✭✭✭BoardsRanger


    Bryan Petersen (Understanding Exposure) recommends taking a reading off the foliage either side of the waterfall to get a good exposure - means the water doesn't get burned out as much, but you still get a blurred effect
    cheers for the info- i was reading good reviews about that book- may invest.


  • Registered Users, Registered Users 2 Posts: 694 ✭✭✭kgiller


    The second shot is a big improve,ent. The first shot was way too overexposed. I think the second shot is still slightly overexposed IMO, but still looks really nice.

    Try putting the camera into Tv mode and getting your light meter reading off the water, or the foliage to the side of the water (as stated previously by cambo_gueno). This will give you the required aperture. Switch to Manual mode and set it with these settings. Check the shot on screen after, and go up or down in stops to compensate for over/underexposure. (you can also light meter in Av, set to about f/25-32 id say.)

    Example
    ISO 100
    55mm
    f/36
    2 secs

    Hope this helps

    Bryan Petersen - Understanding Exposure is a very good book. You can read it again and again and every time it changes your attitude about how to take shots IMO.


  • Registered Users, Registered Users 2 Posts: 706 ✭✭✭BoardsRanger


    kgiller wrote: »
    The second shot is a big improve,ent. The first shot was way too overexposed. I think the second shot is still slightly overexposed IMO, but still looks really nice.

    Try putting the camera into Tv mode and getting your light meter reading off the water, or the foliage to the side of the water (as stated previously by cambo_gueno). This will give you the required aperture. Switch to Manual mode and set it with these settings. Check the shot on screen after, and go up or down in stops to compensate for over/underexposure. (you can also light meter in Av, set to about f/25-32 id say.)

    Example
    ISO 100
    55mm
    f/36
    2 secs

    Hope this helps

    Bryan Petersen - Understanding Exposure is a very good book. You can read it again and again and every time it changes your attitude about how to take shots IMO.
    thanks alot for the advice. how exactly do i take a light meter reading?- i know, i should really read that book asap!
    the example you gave is really really good- thats the very stlye of image i am trying to achieve.


  • Registered Users, Registered Users 2 Posts: 694 ✭✭✭kgiller


    thanks alot for the advice. how exactly do i take a light meter reading?- i know, i should really read that book asap!
    the example you gave is really really good- thats the very stlye of image i am trying to achieve.

    To light meter something you need to choose either an aperture or a shutter speed that you want to use (for the shot you are trying to achieve you want a long exposure, so i would choose to go with a long shutter speed - eg. 2secs)

    So, in shutter priority mode (Tv) aim the lens at the required focal length at either the water or the green around the water (both should give pretty much the same reading if its bright) and hold the shutter button half way. This will focus on what u are aiming at, and also work out what aperture you will need, which will show up in the viewfinder (eg. - in the viewfinder you will be able to see the f/number and shutter speed in yellow text at the botom).

    So once you have the appropriate aperture (shown in the viewfinder) you can switch to manual mode and adjust to your 2 sec exposure and the correct aperture, and hey presto.

    If when u review the picture on screen it seems over/underexposed, simply increase/decrease the aperture or increase/decrease the shutter speed to suit. Alternatively you can compensate for an over/underexposure by manually selecting to shoot with a +/- exposure (hold the exposure button on the back of the camera "AV +/-" and scroll up or down to increase/decrease the exposure).

    Phew.


  • Registered Users, Registered Users 2 Posts: 706 ✭✭✭BoardsRanger


    Thanks for that - some really good tips! looking forward to trying that out.


  • Advertisement
  • Registered Users, Registered Users 2 Posts: 73 ✭✭Arkana


    Placebo wrote: »
    ISO = less
    fstop = minus
    Aperture = highest..

    Well, the last one is not quite right - it should read Aperture - lowest.
    What often is forgotten is, that aperture is measured in fractions, so 1:2, 1:4 ... up to 1:32. On the lens though, you only read 2,4 ... 32. So, the 'highest' number is the lowest/smallest aperture, and the same game with the shutter speed - the highest number 8000, 16000 or even 32000 with professional cameras is the shortest (!) shutter speed.

    It was not said though, whether you used a digi cam or an analogue (or do I need glasses?). If you want to do special photographs like those you described, some of the already given hints are quite useful. But, whatever you do, every and each change of camera and lens settings has not only an effect but also a counter- or side-effect. Have that in mind! If you want that 'flow effect', 2 seconds is OK, possibly also 1 second - but NOT shorter. If it is a good digi cam, settings down to ISO 25 should be possible - that is two steps lower than you had. If the smallest (!) aperture is 32 and you cannot go down to 64, then you have to use, as already said, a grey filter - available with factors (steps) 2,4,8 and 16 in good professional shops.


Advertisement